Chapter 6
Gaps
A gap is simply space between two prices. On daily, weekly, and monthly charts, traditional gaps are easy to spot. For example, if the market is in a bull trend and today's low is above the high of yesterday, then today gapped up. These traditional gaps are called breakaway or breakout gaps when they form at the start of a trend, measuring gaps when they are in the middle of a trend, and exhaustion gaps when they form at the end of a trend. When a gap forms at other times, like within the spike phase of a trend or within a trading range, it is simply called a gap. Traders usually cannot classify a gap until after they see what the market does next. For example, if the market is breaking out of the top of a trading range on the daily chart and the breakout bar is a large bull trend bar with a low above the high of the prior bar, traders will see the gap as a sign of strength and will think of it as a potential breakaway gap. If the new bull trend continues for dozens of bars, they will look back at the gap and definitively call it a breakaway gap. If instead the market reverses down into a bear trend within a few bars, they will call it an exhaustion gap.
If the bull trend goes for five or 10 bars or so and gaps again, traders will think that this second gap might become the middle of the bull trend. They will see it as a possible measuring gap, and many traders will look to take profits on their longs once the market makes a measured move up. The measured move is based on the height from the bottom of the bull trend to the middle of the gap, and this height is added to the middle of the gap. This type of gap usually is in the spike phase of a trend, and it gives traders confidence to enter at the market or on small pullbacks because they believe that the market will work its way toward a measured move target.
After the bull trend has gone on for dozens of bars, reaches a resistance area, and is beginning to show signs of a possible reversal, traders will pay attention to the next gap up, if there is one. If one forms, they will see it as a potential exhaustion gap. If, before going much higher, the market trades back down to below the high of the bar before the gap, traders will see that as a sign of weakness and will think that the gap might represent exhaustion, which is a type of buy climax. They will often not look to buy again until after the market has corrected for at least 10 bars and two legs. Sometimes an exhaustion gap forms before a trend reversal, and because of that, whenever there is a possible exhaustion gap, traders will look at the overall price action to see if the trader's equation warrants a short position. If there is a reversal, the trend bar that creates it is then a breakout gap (a bar can function like a gap) and a possible start of a trend in the opposite direction.
Because all trend bars are gaps, traders can see intraday equivalents of the traditional gaps that are so common on daily charts. If there is a bull trend that is at a resistance area and is likely to reverse down (reversals are discussed in book 3), but has one final breakout, that bull trend bar might become an exhaustion gap. The bar is sometimes a very large bull trend bar that closes near its high, and occasionally the final breakout will be made of two very large bull trend bars. This is a potential buy climax, and it alerts astute traders to sell. The bulls sell to grab profits, since they believe that the market will likely trade down for a couple of legs and about 10 bars, possibly allowing them to buy again much lower. They also are aware of the possibility of an exhaustive buy climax and trend reversal, and do not want to risk giving back any of their profits. Aggressive bears are aware of this as well, and they will sell to initiate shorts. If a strong bear trend bar forms within the next few bars and the always-in direction flips to down, that final bull trend bar becomes a confirmed exhaustion gap, and the bear trend bar becomes a breakout gap. The bull trend bar followed by the bear trend bar is a climactic reversal, and a two-bar reversal. If there are one or more bars between the two trend bars, those bars form an island top. The bottom of that island top is the top of the bear breakout gap and, like all gaps, might get tested. If it does and the market turns down again, that breakout test forms a lower high. If the initial reversal down was strong, both bulls and bears will sell as the market tests the island top and as the market turns down again, since both are more confident that the market will fall for about 10 or more bars. The bulls will sell to lock in profits or to minimize losses, if they bought higher as the bull trend breakout bars were forming. The bears will sell to initiate shorts. Once the market trades down for many bars, profit takers (bears buying back their shorts) will come in and create a pullback or a trading range. If the market again has a bear trend bar that breaks below the trading range, that bar is then a possible measuring gap, and traders will try to hold onto part of their shorts until the market approaches that target.
As the market turns down, traders will look at the strength of the bear bars. If there are one or two large bear trend bars closing near their lows, traders will assume that the always-in direction might be flipping to short. They will watch the next few bars to see if a high 1 buy signal bar develops. If one forms and it is weak (relative to the selloff), like a small bull doji or a bear bar, more traders will look to short above its high than to buy. Remember, this is a high 1 pullback in what has been a bull trend, but now traders are looking for about 10 bars sideways to down, so more will look to short above the high 1 buy signal bar than to buy. If they are right, the high 1 buy signal will fail and form a lower high. If the reversal down is strong, traders will also short below the lower high and below the high 1 buy signal bar. If the market goes more sideways to down and then forms a high 2 buy setup, the bears will assume that it, too, will fail, and will place limit orders at and above its high to go short. Other bears will place stop orders to go short below the high 2 buy signal bar, because that is where the bulls who bought the high 2 will have their protective stops. Once these bulls get stopped out, they will likely not look to buy again for at least a couple of bars, and the absence of bulls and the presence of bears can lead to a bear breakout. If it is weak, the bulls might be able to create a wedge bull flag (a high 3 buy setup). If the breakout is strong, the move down will likely go for at least a couple of small legs, and reach a measured move, based on the height of the trading range (the bull high to the bottom of the high 2 bull signal bar). The breakout bar then becomes a measuring gap. If the bulls are successful in turning the market up at the high 3 (a wedge bull flag), then the bear measuring gap will close and become an exhaustion gap.
This process happens many times a day on every chart, and traders are always asking themselves whether a breakout will likely succeed (and turn the breakout bar into a measuring gap), or will it more likely fail (and turn the trend bar that formed the breakout into an exhaustion gap). The labels are not important, but the implications are. This is the single most important decision that traders make, and they make it whenever they consider any trade: Will there be more buyers or sellers above and below the prior bar? Whenever they believe that there is an imbalance, they have an edge. In the case of that bull breakout, when there finally is a signal bar for a failed breakout, traders will decide if there will be more buyers or sellers below that bar. If they think that the breakout is strong, they will assume that there will be more buyers, and they will buy below the bar. Others will wait to see if the next bar only falls for a few ticks. If so, they will place stop orders to buy above it, and they will consider it to be a breakout pullback buy setup. The gap will then likely become a measuring gap. The bears will see that signal bar for the failed breakout as a strong sell signal, and they will short below its low. If they are right, the market will sell off, and close the bull gap (turning it into an exhaustion gap), and soon move below the low of the bull breakout bar, and they hope that it will continue much lower.
“All gaps will get filled” is a saying that you sometimes hear, but this saying only rarely helps traders. The market is always coming back to test prior prices, so the saying would be more precise if it were “all prior prices get tested.” However, enough traders pay attention to gaps so that they act as magnets, especially when the pullback gets close to them. The closer the market gets to any magnet, the stronger the magnetic field and the more likely the market will reach the magnet (this is the basis for buy and sell vacuums). For example, if there is a gap up in a bull trend, once there is finally a correction or a reversal, the market might be only slightly more likely to go below the high of the bar before the gap (and therefore fill the gap) than it is to go below the high of any other bar in the rally. However, since gaps are magnets, traders can look for trading opportunities as the market approaches them, just as they should as the market approaches any magnet.
Gaps where the low of a bar is above the high of the prior bar, or where the high of a bar is below the low of the prior bar, are rare on an intraday chart of a highly liquid instrument, except on the first bar of the day, when they are common. However, if one uses a broad definition, gaps of other types occur many times every day on a 5 minute chart, and they can be useful in understanding what the market is doing and in setting up trades. Occasionally, the open of a bar on a 5 minute chart will be above the close of the prior bar, and this is often a subtle indication of strength. For example, if there are two or three of these gaps on consecutive bull trend bars, the bulls are likely strong. All of these gaps have the same significance on daily, weekly, and monthly charts as well.
Because gaps are important elements of price action, intraday traders should use a broad definition of a gap and look at trend bars as an intraday equivalents because they are functionally identical. If the volume was thin enough, there would be actual gaps on every intraday chart whenever there was a series of trend bars. Remember, all trend bars are spikes, breakouts, and climaxes, and a breakout is a variant of a gap. When there is a large gap up on the first bar of the day on the Emini, there will be a large bull trend bar on the Standard & Poor's (S&P) 500 cash index. That is an example of how a gap and a trend bar represent the same behavior. When there is a large trend bar at the start of a trend, it creates a breakout gap. For example, if the market is reversing up from a low or breaking out of a trading range, the high of the bar before the trend bar and the low of the bar after it create the breakout gap. You can simply think of the entire trend bar's body as the gap as well, and there may be other recent swing highs that some traders will consider as the bottom of the gap. There is often not a single choice, but that does not matter. What does matter is that there is a breakout, which means that there is a gap, even though a traditional gap is not visible on the chart. The market will often dip a tick or two below the high of the bar before the trend bar, and traders will still think that the breakout is in effect as long as the pullback does not fall below the low of the trend bar. In general, if the market falls more than a couple of ticks below the high of the bar before it, traders will lose confidence in the breakout and there might not be much follow-through, even if there is no reversal.
Whenever there is a trend bar in a potential bull breakout, always look at the high of the bar before it and the low of the bar after it. If they do not overlap, the space between them might function as a measuring gap. If the trend continues up, look for profit taking at the measured move (based on the low of the bull leg to the middle of the gap). Sometimes the bottom of the gap will be a swing high that formed several bars earlier, or a high within the spike, but a couple of bars before the trend bar. The low of the gap might be a swing low that forms many bars after the breakout bar. The same is true of a bear trend bar that is breaking out in a bear leg. Always look for potential measuring gaps, the most obvious one being the one between the low of the bar before the bear trend bar and the high of the bar after it.
If the bull trend has been going on for 5 to 10 or more bars and then there is another bull trend bar, it might become just an unremarkable gap, a measuring gap, or an exhaustion gap. Traders will not know until they see the next several bars. If there is another strong bull trend bar, the odds of a measuring gap are greater and bulls will continue to buy with the expectation of the rally continuing up for about a measured move, based on the middle of the gap.
Another common gap is between the high or low of a bar and the moving average. In trends, these can set up good swing trades that test the extreme of the trend, and in trading ranges, they often set up scalps to the moving average. For example, if there is a strong bear trend and the market finally rallies above the moving average, the first bar in that rally that has a low above the moving average is a first moving average gap bar. Traders will place a sell stop order at one tick below the low of that bar to go short, looking for a test of the bear market low. If the stop is not triggered, they will keep moving the stop up to one tick below the low of the bar that just closed until their short is filled. Sometimes they will get stopped out by the market moving above the signal bar, and if that happens, they will try one more time to reenter their shorts at one tick below the low of the prior bar. Once filled, the signal bar is a second moving average gap bar short signal.
Moving average gaps happen many times a day every day, and most of the time they occur in the absence of a strong trend. If traders are selective, many of these gap bars can set up fades to the moving average. For example, assume that the day is a trading range day and that the market has been above the moving average for an hour or so. If it then sells off to below the moving average but is followed by a strong bull reversal bar with a high that is below the moving average, traders will often go long above that bar if there enough room between the high of that bar and the moving average for a long scalp.
Breakouts on all time frames, including intraday and daily charts, often form breakout gaps and measuring gaps that are different from the traditional versions. The space between the breakout point and the first pause or pullback after the breakout is a gap, and if it appears early in a possible strong trend, it is a breakaway gap and is a sign of strength. Although it will lead to a measured move from the start of the leg, the target is usually too close for traders to take profits and they should therefore ignore the measured move projection. Instead, they should look at the gap as only a sign of strength and not a tool to use to create a target for taking profits. For example, if the average daily range in the Emini has been about 12 points and after about an hour into the day the range is only three points, the gap formed by a breakout would lead to a target that would result in a range for the day of only six points. If a trend is just beginning, it is more likely that the range will reach about the average of 12 points and not just six points, and therefore traders should not be taking profits at the measured move target.
When the distance from the start of the leg to the breakout gap (breakaway gap) is about a third to a half of an average daily range, its middle often leads to a measured move projection where traders might take profits or even reverse their positions. For example, if the market is in a trading range and then the market forms a large bull trend bar that breaks out above the trading range, the swing high at the top of the range is the breakout point. If the market moves sideways or up on the next bar, the low of that bar is the first price to consider as the breakout test; the midpoint between its low and the breakout point often becomes the middle of the bull leg, and the gap is a measuring gap. If the range is about a third to a half of the recent average daily range, use the bottom of the leg as the starting point for the measured move; measure the number of ticks between that low and the middle of the measuring gap, and project that same number of ticks up above that midpoint. Then look to see how the market behaves if it moves up to a tick or so of the measured move. If within a few bars of the breakout the market pulls back into the gap but then rallies, use that pullback low as the breakout test, and then the measuring gap is between that low and the breakout point. This is a sign of strength. Once the market rallies to the measured move projection, many traders will take partial or total profits on their longs. If the move up was weak, some traders might even place limit orders to short at the measured move target, although only very experienced traders should consider this.
Elliott Wave traders see most of these gaps as being formed by a small wave 4 pullback that is staying above the high of wave 1, and expect a wave 5 to follow. Not enough volume is being traded based on Elliott Wave Theory to make this a significant component of the price action, but whenever a pullback does not fall below the breakout point, all traders see this as a sign of strength and expect a test of the trend high. The pullback is a breakout test.
If the pullback falls a little below the breakout point, this is a sign of a lack of strength. You can still use the middle between that low and the breakout point even though the pullback is below the breakout. When that happens, I refer to this type of gap as a negative gap, since the mathematical difference is a negative number. For example, in a bull breakout, if you subtract the high of the breakout point from the low of the breakout test bar, the result is a negative number. Negative measuring gaps lead to projections that are less reliable, but still can be very accurate and therefore are worth watching. Incidentally, stairs patterns have negative gaps after each new breakout.
Small measuring gaps can also form around any trend bar. These micro measuring gaps occur if the bar before and the bar after the trend bar do not overlap and, like any gap, can lead to a measured move. The measured move will usually be more accurate if the trend bar was acting as a breakout. For example, look at any strong bull trend bar in any bull leg where the trend bar is breaking into a strong bull leg. If the low of the bar after it is at or above the high of the bar before it, the space between is a gap and it can be a measuring gap. Measure from the start of the leg to the middle of the gap, and project up to see how high the market would have to go if the gap was in the middle of the leg. This is an area where longs might take profits. If there are other reasons to short up there, bears will short there as well. When these micro gaps occur in the first several bars of a trend, the market will usually extend much further than a measured move based on the gap. Don't use the gap to find an area in which to take profits, because the market will likely go much further and you don't want to exit early in a great swing. However, these gaps are still important in the early stages of a trend because they give trend traders more confidence in the strength of the trend.
Breakouts occur many times every day, but most of them fail and the market reverses. However, when they succeed, they offer a potential reward that can be several times as large as the risk with an acceptable probability of success. Once a trader learns how to determine if a breakout is likely to be successful, these trades should be considered. There are other examples of measuring gaps in Chapter 8 on measured moves.
Using this broad definition of a gap allows traders to discover many trading opportunities. A very common type of gap occurs in any three consecutive trending bars on any chart. For example, if these three bars are trending up and the low of bar 3 is at or above the high of bar 1, there is a gap and it can act as a measuring gap or a breakaway gap. The high of bar 1 is the breakout point and it is tested by the low of bar 3, which becomes the breakout test. On a smaller time frame chart, you can see the swing high at the top of bar 1 and the swing low at the bottom of bar 3. It is easy to overlook this setup, but if you study charts you will see that these gaps often get tested within the next many bars but not filled, and therefore become evidence that the buyers are strong.
A related gap occurs after the market has been trending for many bars but now has an unusually large trend bar. For example, if the market has been going up for the past couple of hours but now suddenly forms a very large bull trend bar with a close near its high, especially if the high of this bar or that of one of the next couple of bars extends above a trend channel line, one or more important gaps with one or more breakout points and breakout tests are created. Rarely, this bar is the start of a new, even steeper bull trend, but much more commonly it represents a buy climax in an overdone, exhausted bull trend and will be followed within a few bars by a sideways to down correction that could last about 10 bars or so, and may even become a trend reversal. Experienced traders wait for these bars, and their waiting removes sellers from the market and creates a buy vacuum that sucks the market up quickly. Once they see it, the bulls take profits and the bears short on the close of the bar, above the bar, on the close of the next bar or two if they are weak, or on a stop below those bars. Look at the bars before and after the buy climax bar. The first gap to consider is that between the low of the bar after it and the high of the bar before it. If the market continues to go up for a few bars and then pulls back and rallies again, the breakout test is now the low of that pullback. If the market trades down below the high of the bar before the buy climax bar, the gap is then closed (filled). If the market continues down into a large leg down, the gap becomes an exhaustion gap.
Also, look at the bars before the bull breakout for other possible breakout points. These usually are swing highs and there might be several to consider. For example, there might have been a small swing high a few bars earlier but another couple of higher swing highs that formed even a couple of hours earlier. If the breakout bar broke strongly above all of them, they are all possible breakout points that could lead to a measured move up and you might have to consider the projections up from the midpoint of each of these gaps. If there is a confluence of resistance at one of the projections, like a trend channel line, a higher time frame bear trend line, or a couple of other measured move targets based on other calculations, like the height of the trading range, profit takers will come in at that level and there will also be some shorts. Some of the shorts will be scalping, but others will be establishing swings and will add on higher.
There is a widely held belief that most gaps get filled or at least the breakout point gets tested, and this is true. Whenever something is likely to happen, there is a trading opportunity. When there is a bear spike and channel, the market often corrects back up to the top of the channel, which is the bottom of the gap, and tries to form a double top for a test down. When there is a buy climax bar that breaks out above a significant swing high, there will usually be a pullback that tests that swing high, so traders should look for short setups that could lead to the test. However, do not be too eager, and make sure that the setup makes sense and that there is other evidence that the pullback is likely to be imminent. This might be a sideways bull flag that breaks out and runs for a couple bars and then has a strong reversal bar, turning that bull flag into a possible final flag. Final flags usually are followed by at least a two-legged correction that tests the bottom of the flag; they often drop for a measured move down from the top to the bottom of the flag, and sometimes lead to a trend reversal. All of the preceding is true for bear breakouts as well.
Besides the breakout gaps that form at the start of trends and the measuring gaps that form in the middle, exhaustion gaps form when a trend is trying to reverse. When there is a gap late in a trend and then the market reverses and closes the gap, the gap becomes an exhaustion gap and, like all signs of exhaustion (discussed in book 3 on reversals), it is usually followed by a trading range, but it sometimes leads to a reversal. These are more important to traders who are trading off of daily charts, but day traders see them all the time on gap openings that lead to opening reversals. Day traders think of them as just failed gap openings, but they are a type of exhaustion gap. On the daily chart, if there is an exhaustion gap followed by a breakout gap in the opposite direction and that gap remains open after the bar closes, this creates an island reversal pattern. For example, if there is a bull trend and then there is a gap up that is followed by a gap down on the next bar or even a dozen bars later, the bars between the two gaps are considered to be the island top. Figure 18.4 (in Chapter 18) shows an example of an island bottom on a daily chart.
Whenever there is a channel and then a trend bar that closes beyond the extreme of the prior bar, traders should watch to see if a gap forms. For example, if there is a bull channel or a bear flag and the next bar closes several ticks above the high of the prior bar, this breakout bar might become a measuring gap. Watch the low of the next bar to see if it stays above the high of the prior bar. If so, the breakout bar might be a measuring gap. If the gap closes, the trend bar might be an exhaustion gap and the bull spike could lead to a reversal down.
Breakout gaps are discussed further in the first book in Chapter 23 on trends from the open and in the third book in the chapter on gap openings.
Figure 6.1 Many Types of Gaps on a Daily Chart
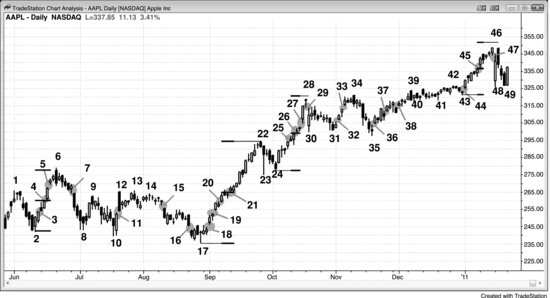
Traditional gaps on a daily chart are classified as breakout gaps (breakaway gaps), measuring gaps, exhaustion gaps, and just ordinary gaps. For the most part, the classification is not important, and a gap that appears as one type initially can be seen as a different type later on. For example, gap 5 on the daily chart of AAPL shown in Figure 6.1 might have been a measuring gap but ended up as an exhaustion gap. Also, when a market is in a strong trend, it often has a series of gaps and any can become a measuring gap. Traders need to be aware of each possibility. For example, gaps 4, 21, 25, 26, 27, and 45 were potential measuring gaps. Gap 4 was a measuring gap, and the bar 6 high was almost a perfect measured move. The bar 2 bottom of the leg to the middle of the gap had about as many ticks as the middle of the gap to the top of bar 6, where profit takers came in, as did new strong bears. Profit taking came in just below the targets based on gaps 26 and 45.
Breakout gaps often flip the always-in direction and therefore are an important sign of strength. Most traders would classify the following as breakout gaps: gaps 3, 7, 11, 15, 18, 29, 32, 36, 44, and 47. When there is a breakout and a gap, look at the gap as a sign of strength and not as a tool to create a measured move target. When a trend is just beginning, it is a mistake to take profits too early. Do not use a reasonable candidate for a breakout gap as a measuring gap.
The rally to bar 22 broke out above the bar 6 high, and the pullbacks to bars 23 and 24 were breakout tests. The space between the bar 24 low, where the market turned up again, and the bar 6 high is the breakout gap. Here, because the bar 24 low was below the bar 6 high, the breakout gap was negative. Since it was a breakout from a large trading range, it had a good chance of also being a measuring gap.
Some experienced traders would have faded the breakout and shorted below bar 22, looking for a test of the breakout point and a quick scalp down. The bulls were looking for the same thing and were ready to eagerly buy at the market or on limit orders when the pullback tested into the gap. The bulls originally bought the breakout in the move up to bar 22, and their eagerness to buy again at the same price enabled the new bull trend to resume and go for at least some kind of measured move up (for example, it might have been based on the height of the pullback from the bar 22 high to the bar 23 low).
After a trend has gone on for a while, traders will begin to look for a deeper pullback. A gap often appears before the correction, and that gap is an exhaustion gap, like gaps 5, 16, 27, 33, and 45.
When a gap occurs as part of a series in a spike or within a trading range, it is usually not classified and most traders refer to it simply as a gap, like gaps 19, 20, 37, and 38.
Figure 6.2 Trend Bars Are the Same as Gaps
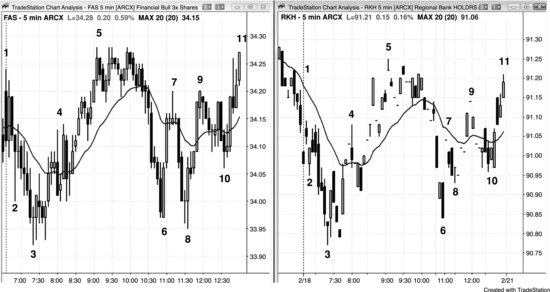
Traditional gaps on intraday charts can usually be seen on 5 minute charts only if the volume is extremely light. Figure 6.2 shows two related exchange-traded funds (ETFs). The FAS on the left traded 16 million shares today, and the RKH on the right traded only 98,000 shares. All of the gaps on the RKH chart were trend bars on the FAS chart, and many of the large trend bars on the FAS chart were gaps on the RKH chart, demonstrating that a trend bar is a variant of a gap.
Figure 6.3 Trend Bars Are Gaps
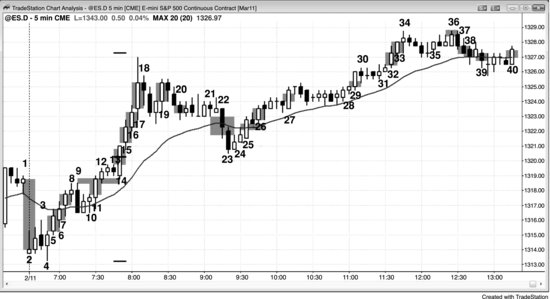
Intraday charts have their own versions of gaps. Every trend bar is a spike, a breakout, and a climax, and since every breakout is a variant of a gap, every trend bar is a type of gap. Gaps on the open are common on most 5 minute charts. In Figure 6.3, bar 2 gapped beneath the low of the final bar of yesterday, creating an opening gap.
The market reversed up on bar 5, and at the time of the reversal, the odds of it being the start of a bull trend were good, given the strong bottom. Because it was the start of a bull trend, it was a breakout gap. Some traders saw its body as the gap, and others thought that the gap was the space between the high of bar 4 and the low of bar 6.
Bar 6 and bar 7 were also trend bars and therefore also gaps. It is common for trends to have gaps along the way and are a sign of strength.
Bar 11 was a breakout of the bull flag from bar 9 to bar 10 and a breakout above the opening range. Since the opening range was about half of the size of an average daily range, traders were looking for a doubling of the range, and that made bar 11 a likely measuring gap as well as a breakout gap.
The market hesitated for three bars between bar 12 and bar 13, in the area of yesterday's high, going into the close. Some traders saw this as the top of today's opening range. Bar 13 was a bear reversal bar, and since the market might have traded below it, the bears saw it as a signal bar for a failed breakout (of both the bar 9 high and the high of yesterday's close). Since the breakout was so strong, far more traders assumed that the failed breakout sell signal would not succeed, and therefore placed limit orders to buy at and below its low. Those aggressive bulls were able to turn the market up quickly on bar 14. The low of 14 then formed the top of the measuring gap, and the high of bar 9 was the bottom. Since bar 14 was an outside up bar, it was a breakout pullback buy entry that triggered the buy as the market went above the high of the prior bar (bar 13). The bull trend went far beyond the measured move target. Had the bears succeeded in reversing the market down, bar 11 would have become an exhaustion gap instead of a measuring gap. As long as the pullback did not fall more than a tick or so below the bar 9 high, traders would have still looked at the gap as a measuring gap, and they would have considered taking partial profits at the measured move target (the market raced up so sharply that many would not have exited at the target). If the market fell further, traders would not have trusted any measured move up based on the bar 11 gap, and instead would have looked for other ways to calculate measured move targets. At that point, referring to bar 11 as either a measuring or exhaustion gap would have been meaningless, and traders would no longer have thought of it in those terms. As long as the selloff did not fall below the bar 10 high, the bulls would have considered the breakout to be successful. If it fell below the high of bar 10, or the low of bar 10, traders would have then saw the market as in a trading range, or possibly even a bear trend, if the selloff was strong. Bar 14 was a breakout test of the bar 11 gap. It missed the bar 9 breakout point by a tick and turned back up. By not letting the market fall below the bar 9 high or the bar 12 low, the bulls were showing their strength.
The market broke out again on bar 15, which meant that bar 15 was a breakout gap and a potential measuring gap. Some traders would have used the height of the opening range for the measured move (the bar 4 low to the bar 13 high), and others would have used the middle of the gap between the bar 13 breakout point and the bar 15 pullback.
Bars 15 and 16 were also gaps in a bull trend, and therefore signs of strength.
Bar 17 was an especially large bull trend bar in a trend that had gone on for 10 or 20 bars, and therefore it was likely to function as an exhaustion type of trend bar and a possible exhaustion gap. Buy climaxes sometimes lead to reversals but more often just lead to corrections that last about 10 bars and often have two legs.
Bar 19 was another potential breakout gap, since it was the breakout above a small bull flag, but after a buy climax, more of a correction was likely.
Bar 20 was an attempt at a bear breakout gap, but the body was too small; the bar did not break below the bottom of the developing trading range (the low of the bar before bar 19).
Bar 22 was a breakout gap, and the bears hoped that it would lead to a measured move down (and therefore become a measuring gap). It had a large bear body and it broke below a five-bar ledge and the bottom of the trading range. However, in a strong bull trend, it could simply have been part of a test of the moving average, and it might simply have been due to a sell vacuum, with strong bulls and bears just waiting for slightly lower prices. The bulls were waiting to buy to initiate new longs, and the bears were waiting to take profits on their shorts.
Bar 23 extended the breakout, but there was no follow-through, and like most reversal attempts and most bear breakout attempts in bull trends, it failed. Most traders wanted to see one more bear trend bar before they would have considered the market as having flipped to always-in short. This is a common situation, which is why aggressive bulls buy the closes of bars like 23, expecting that the bears would be unable to flip the market to short. This allows those bulls to get long near the very bottom of the correction.
Bar 24 was a bull moving average gap bar and a signal bar for the end of two legs down from the bar 17 buy climax. Although bar 22 could be considered to be an exhaustion gap, since it was the end of a small bear trend, most traders still saw the market as always-in long and the trend as still up, so there was no significant bear trend to exhaust. This was a pullback in a bull trend and not a new bear trend. Bar 22 was therefore just a failed breakout.
Bar 25 was another breakout, since the market was reversing up from a pullback in a bull trend and therefore breaking above a bull flag (the bull inside bar after bar 23 was the signal bar for the bull flag entry). Bar 25 was a potential bear flag after the bear spike down to bar 23. Once bar 25 closed well above the bar 24 high, the bears probably gave up on their premise that a second leg down would follow. That close created the possibility that bar 25 was a measuring gap, which it was once bar 26 turned the market up again after a one-bar pause. The rally went well above the measured move target and 25 became a breakaway gap.
Some traders still wondered whether a bear channel might be underway, but when bar 26 went above the bear trend bar before it and above the top of bar 22 (the bear breakout gap), the bear theory was untenable for most traders.
Bars 27, 29, 32, and 40 were also bull breakout gaps.
Bar 36 was a breakout gap but the next bar reversed down. Some traders then saw bar 36 as an exhaustion gap and a possible end of the rally and the start of either a trading range or a larger correction.
Bars 37, 38, and 39 were bear gaps and signs of strength on the part of the bears (selling pressure).
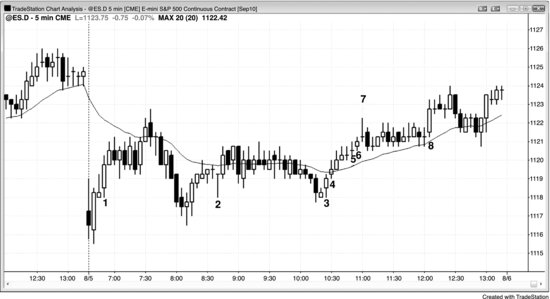
Figure 6.4 Intraday Gaps
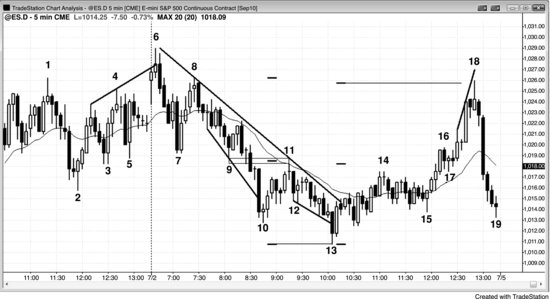
This 5 minute Emini chart in Figure 6.4 illustrates a number of gaps. The only traditional gap occurred on the open when the low of the first bar of the day gapped above the high of the final bar of yesterday. However, since the first bar did not gap above the high of yesterday, there was no gap on the daily chart.
The market trended down to bar 13 and then rallied above the moving average, breaking the bear trend line. Notice how the low of bar 14 is above the moving average and it is the first such bar in over a couple of hours. This is a moving average gap, and these gaps often lead to a test of the bear low and then a two-legged move up, especially if the move up to the gap bar breaks above the bear trend line as it did here. Here, it led to a higher low trend reversal at bar 15 and then a second leg up to bar 18.
Bar 6 broke out above the highs of bars 1 and 4, which became breakout points. The space between those highs and the low of bar 6 was a gap, and it was filled on the bar after bar 6. Day traders think of this as simply a gap up and an opening reversal down, but it is a form of an exhaustion gap.
The bear trend bar before bar 10 opened near its high, closed near its low, and had a relatively large range. Since it formed after the market had trended down for many bars, it was a sell climax where there was a last gasp of selling with no one left who would be willing to sell until after a pullback, which often has two legs. That breakout bar broke below many swing lows (bars 2, 3, 5, 7, and 9), and bar 11 became the breakout test. There was also a large gap between the bar 10 high and the moving average, and that gap was filled by a two-legged move that formed a low 2 short setup.
The middle of the gap between the bar 9 breakout point and the bar 11 breakout test led to a measured move down from the bar 8 top of the channel down to bar 9. The hash mark below and one bar to the right of the bar 10 low is the projection down from the two higher hash marks. This gap became a measuring gap. Instead of reversing up, as is common after a reversal up from a trend channel line overshoot, the market broke to the downside and the bottom was at the measured move to the tick. Since you never know in advance which, if any, of the possible measured move targets will work, it is good to draw all that you can see and look for a reversal at any of them. These are reasonable areas to take profits on shorts. If there are other reasons to initiate a long, the chance of a profitable reversal trade increases if it occurs at a measured move. Here, for example, the market broke below a trend channel line and the prior low of the day and reversed up at an exact measured move.
Although the rally to bar 11 was close to the bars 7 and 9 breakout points, the gap was not filled. That is a sign that the bears were strong, and it was followed by a new bear low.
Bar 13 was another big bear bar after a protracted bear trend and therefore a second sell climax. The next bar filled the gap below the bar 10 low.
Bar 14 was a second breakout test of the bars 7 and 9 double bottom, which was the breakout point. However, instead of the market falling, it went sideways to bar 15 and formed a wedge bull flag. This led to a rally and a closure of the gap, and the breakout below bars 7 and 9 failed. The day tried to become a reversal day, as trending trading range days sometimes do, but the bull trend could not maintain control late in the day.
Bar 17 was a breakout pullback that tested the high of the bar 14 breakout point and led to a strong rally that stopped two ticks above the measured move from the bottom of bar 13 to the top of bar 11. The measured move hash marks are just to the right of the bar 13, and the distance from the bottom one to the middle one led to the projection up to the top one.
Bar 18 is another example of a large moving average gap, and the gap was filled within a couple of bars.
There are many other minor gaps as well, like between the low of bar 6 and the high bar 8. Even though that high is at the same price as the low of bar 6, it is a gap and it is the breakout test of the breakout below bar 6. Similarly, the bar 15 reversal bar high was the breakout point for the breakout test bar that occurred two bars later.
Note that the three bars with the largest bodies, bar 7, the bar before bar 10, and two bars before bar 18, all led to reversals. Remember, most breakouts fail to go very far and usually reverse, at least into a pullback. When a large trend bar occurs after a trend has been going for a while, it usually represents capitulation or exhaustion. For example, that large bull trend bar that formed two bars before bar 18 was in a very strong bull leg. Shorts were desperate to get out and were worried that the market might go much higher before a pullback would come and let them out at a lower price. Other traders who were flat were panicking, afraid that they were missing a huge trend into the close, so they were buying at the market, also afraid that a pullback would not come. This intense buying was caused by traders with tremendous urgency, and after they bought, the only traders left who were willing to buy were traders who would only buy a pullback. With no one left to buy at these high prices, the market could only go sideways or down.
There were several micro measuring gaps. For example, the bear trend bar after bar 6 set up one, as did the bull trend bar after bar 10 and the bull trend bar after bar 15. All of the moves went beyond the measured move targets.
The low of the bar after bar 6 and the high of the bar before bar 7 formed a micro measuring gap, and the bar 7 low was an exact measured move down. The trend bar in the middle was a breakout to a new low of the day and a strong bear trend bar, closing on its low.
The bar after bar 15 broke out of a small wedge bull flag. The low of the bar after it tested the high of bar 15, which was the breakout point. The test was exact, and as long as the low of the breakout test does not fall more than a tick or so below the breakout point, the test is a sign of strength. If the breakout test fell more, it would be a sign that the breakout was not strong and was more likely to fail. The space between the breakout point and the breakout test is a micro gap. Since it is a breakout gap, it should be used only as an indication of the strength of the breakout and not as a basis for a measured move. Initial breakouts generally lead to big moves, and traders should not be looking to take profits prematurely. Micro gaps are often negative gaps, meaning that the low of the breakout test bar is a tick or two below the low of the breakout point bar. Once the breakout bar closes, an aggressive trader can place a limit order to buy one tick above the high of the prior bar and risk just three ticks or so. The chance of success might be only about 40 percent, but the reward is many times the risk, so the trader's equation is very favorable.
Figure 6.5 Gap between the Open of a Bar and the Close of the Prior Bar
If the open of the bar is above or below the close of the prior bar, there is a gap. Sometimes it can be entirely due to low volume (for example, when there are many dojis), but other times it can signify strength. Seven of the eight gaps in Figure 6.5 were bullish; only on bar 2 was the gap to the downside. When there are two or more successive gaps in the same direction and the bars have trending bodies, it is a sign of strength. In those seven bull gaps, a large number of traders placed market orders on the close of the bar and the orders got filled at the offer, indicating that the market had to go up to find enough sellers to fill those orders. If sellers are only willing to sell higher and bulls are willing to buy the offer, the market will likely continue up, at least for a while.
Bar 1 set up a micro measuring gap with the high of the bar before it and the low of the bar after it. The move up to the 7:35 a.m. PST swing high was an exact measured move from the open of the second bar of the day. Measured moves often begin with the open of the first trend bar of a spike. If the market goes above that target, then use the bottom of the spike to see if the market begins to correct at that target.
The downside gap reversed up on the second bar and it was therefore an exhaustion gap. Day traders would instead just think of it as a failed gap down opening and an opening reversal up.