Chapter 28
Entering on Limits
Experienced traders will enter with stop or limit orders, depending on the situation. When the market is in a strong trend, entering on stops is a reasonable approach. When it is in more of a channel, they will be more inclined to look to enter on limit orders. For example, if there is a strong bull spike, traders will enter on stops above bars and at the market around the tops of bars. Once the market converts into its channel phase, it is still in a bull trend, but now the trend is weaker, and it can end at any time and test down to the bottom of the channel. Early on, traders will still look to enter on stops on high 1 and high 2 buy signals. After the channel has gone on for a while (maybe 10 or more bars), many experienced traders will switch to entering on limit orders at and below the low of the prior bar instead of on stop orders above the high of the prior bar. Once the channel goes on for a long time (maybe 20 bars) and approaches resistance areas, traders will stop looking to buy and will instead begin to sell at and above the high of the prior bar on limit orders. They will sell to take profits on longs, and some will scale into shorts. Once there is a bear breakout, the process begins in reverse. If the bear trend is strong, they will sell on stops below bars, but if the bear leg is weak, experienced traders will not short on stops near the low. Instead, they will prefer to short on stops on pullbacks, like below low 1 or low 2 setups near the moving average, and on limit orders at and above the high of the prior bar.
Until traders are consistently profitable, they should enter only on stops because then the market is going in their direction as they enter, and this increases the chances that they will have a profitable trade. Limit order entries can have just as good a probability of success, but it is more difficult to determine if the setup is strong, and this takes experience. It is also emotionally easier to see the trade immediately go your way than it is to see it go further against you, as often happens with a limit order entry. A limit order means that you are betting that the market is about to reverse direction. You might be right, but early. Therefore, many traders who enter on limit orders trade smaller sizes. They look to add on if the market continues against them and they still believe that it will soon reverse.
Here are some of the situations in which a limit order entry can be useful (examples of all of them are in the appropriate chapters of the three books):
- If you missed placing your stop entry order for the original entry by a few seconds and are trying to get in at the original price, place a limit order at the original price or a tick worse.
- Buy with a limit order located at the close of the prior bar if it was a strong bull trend bar in a strong bull spike.
- Sell with a limit order located at the close of the prior bar if it was a strong bear trend bar in a strong bear spike.
- Buy a small pullback in a strong bull spike before the bar closes, like placing a limit order to buy two ticks below the current high of the bar.
- Sell a small pullback in a strong bear spike before the bar closes, like placing a limit order to sell two ticks above the current low of the bar.
- When there is a bull breakout bar that could create a micro gap, buy just above the high of the bar before the breakout bar, which is the breakout point.
- When there is a bear breakout bar that could create a micro gap, sell just below the low of the bar before the breakout bar, which is the breakout point.
- Buy on a limit order at or below the low of the prior bar in a strong bull spike.
- Sell on a limit order at or above the high of the prior bar in a strong bear spike.
- Buy on a limit order at one tick above the bottom of an ii pattern in a strong bull trend, risking two ticks to make four or more ticks, since this has about a 60 percent probability.
- Sell on a limit order at one tick below the top of an ii pattern in a strong bear trend, risking two ticks to make four or more ticks, since this has about a 60 percent probability.
- When a bull trend bar that is not particularly large flips the market to always-in long, buy on a limit order at one tick above the high of the bar before it, anticipating a measuring gap (it is a sign of strength if the bar does not fall below the high of the bar before the bull breakout bar).
- When a bear trend bar that is not particularly large flips the market to always-in short, sell on a limit order at one tick below the low of the bar before it, anticipating a measuring gap (it is a sign of strength if the bar does not go above the low of the bar before the bear breakout bar).
- While the opening range is forming, if there are two consecutive bull trend bars with strong bodies, buy at the low of the previous bar, expecting the low of the bull spike to hold for at least a scalp up.
- While the opening range is forming, if there are two consecutive bear trend bars with strong bodies, sell at the high of the previous bar, expecting the high of the bear spike to hold for at least a scalp down.
- Buy a bear spike at the market or on a limit order at the bottom of a trading range.
- Sell a bull spike at the market or on a limit order at the top of a trading range.
- When there is a bear spike in a bull market and the bears need the next bar to be a bear bar to confirm a flip of the always-in trade to down, buy the close of the last bear trend bar in the spike before the follow-through bar forms, at and below the low of the bear trend bar, and at the close of the next bar if it does not have a bear body (and buy on a stop above its high). A pullback is more likely than a bear spike and channel.
- When there is a bull spike in a bear market and the bulls need the next bar to be a bull bar to confirm a flip of the always-in trade to up, sell the close of the last bull trend bar in the spike before the follow-through bar forms, at and above the high of the bull trend bar, and at the close of the next bar if it does not have a bull body (and sell on a stop below its low). A pullback is more likely than a bull spike and channel.
- When there is a large bear trend bar that is a likely sell climax at the end of a bear trend or pullback in a bull trend, buy at the close of the bar, below its low, and at the close of the next bar (and on a stop above its high).
- When there is a large bull trend bar that is a likely buy climax at the end of a bull trend or pullback in a bear trend, sell at the close of the bar, above its high, and at the close of the next bar (and on a stop below its low).
- When there is a pullback in a bull trend after a one-bar bull spike, buy on a limit order at a tick or two above the bottom of the bull spike, expecting a breakout pullback instead of a failed breakout.
- When there is a pullback in a bear trend after a one-bar bear spike, sell on a limit order at a tick or two below the top of the bear spike, expecting a breakout pullback instead of a failed breakout.
- When a second leg up is likely after a bull spike, buy on a limit order at a tick or two above the original signal bar high, even if the test comes dozens of bars later.
- When a second leg down is likely after a bear spike, sell on a limit order at a tick or two below the original signal bar low, even if the test comes dozens of bars later.
- Buy below the low of the prior bar in a bull channel, especially when the channel is in its early stages.
- Sell above the high of the prior bar in a bear channel, especially when the channel is in its early stages.
- Buy below the low of the prior bar and below the most recent swing low in a bear channel in its late stages after selling pressure has been building.
- Sell above the high of the prior bar and above the most recent swing high in a bull channel in its late stages after buying pressure has been building.
- Buy below the low of the prior bar in a bull micro channel, expecting the first breakout below the channel to fail.
- Sell above the high of the prior bar in a bear micro channel, expecting the first breakout above the channel to fail.
- When there is a spike and channel bull trend and a low-momentum pullback to the bottom of the channel, buy the test of the bottom of the channel.
- When there is a spike and channel bear trend and a low-momentum pullback to the top of the channel, sell the test of the top of the channel.
- Buy a bear close after at least a couple of strong bull trend bars at the start of a strong bull swing.
- Sell a bull close after at least a couple of strong bear trend bars at the start of a strong bear swing.
- Buy at or below the low of a prior swing low at the bottom of the range.
- Sell at or above the high of a prior swing high at the top of the range.
- Buy with a limit order a tick or two above the bottom of a bull ledge (a small trading range with a bottom created by two or more bars with identical lows).
- Sell with a limit order at a tick or two below the top of a bear ledge (a small trading range with a top created by two or more bars with identical highs).
- Buy at or below a low 1 or 2 weak signal bar on a limit order at the bottom of a trading range or in a new bull trend after a strong reversal up (a possible higher low).
- Short at or above a high 1 or 2 weak signal bar on a limit order at the top of a trading range or in a new bear trend after a strong reversal down (a possible lower high).
- In a strong bull trend, fade short scalps, since most will fail. When there is a strong bull trend and then a short scalp setup, buy on a limit order at two or three ticks above where the short scalpers are looking to take profits. For example, if there is a short setup in the Emini in a strong bull trend, look to buy on a limit order at about four ticks below the bear signal bar and risk about three ticks, expecting the sell-off to not reach the six ticks needed for the bears to make a one-point scalp.
- In a strong bear trend, fade long scalps, since most will fail. When there is a strong bear trend and then a buy scalp setup, short on a limit order at two or three ticks below where the bull scalpers are looking to take profits.
- In a very strong bull trend where the market has not yet dropped below the moving average by more than a couple of ticks, buy the close of the first small bear trend bar with a close that is a tick or two below the moving average.
- In a very strong bear trend where the market has not yet poked above the moving average by more than a couple of ticks, sell the close of the first small bull trend bar with a close that is a tick or two above the moving average.
- Buy at or below the prior bar on a limit order in a quiet bull flag at the moving average.
- Short at or above the prior bar on a limit order in a quiet bear flag at the moving average.
- Buy a bear close in a quiet bull flag at the moving average.
- Sell a bull close in a quiet bear flag at the moving average.
- Buy a moving average pullback in a strong bull trend, like a 20 gap bar buy setup.
- Sell a moving average pullback in a strong bear trend, like a 20 gap bar sell setup.
- Buy on a pullback to a steeply rising moving average and scale in at intervals below the moving average.
- Sell on a pullback to a steeply falling moving average and scale in at intervals above the moving average.
- Buy below a bull bar that breaks above a bull flag, anticipating a breakout pullback.
- Sell above a bear bar that breaks below a bear flag, anticipating a breakout pullback.
- When trying for a swing in a bull trend, buy or buy more on a breakout test, which is an attempt to run breakeven stops from an earlier long entry.
- When trying for a swing in a bear trend, sell or sell more on a breakout test, which is an attempt to hit breakeven stops from an earlier short entry.
- When there is a pullback to a possible double bottom bull flag, buy on a limit order around the prior swing low.
- When there is a pullback to a possible double top bear flag, sell on a limit order around the prior swing high.
- Scale into any trade where you believe that your premise is strong.
- If the market is in a stairs pattern, enter on a limit order for the pullback to the prior stair. For example, if the average daily range in the Emini is about 12 points and today is in a bear stairs pattern, consider placing a buy limit order at four points below the prior swing low for a rally up to test that swing low.
- In a trending trading range day, place a limit order at the extreme in anticipation of a test of the other side of the most recent trading range. For example, in a bull trending trading range day when selling pressure is building, consider shorting on a limit order located a tick or so below the measured move target (based on the height of the lower trading range) for a test of the bottom of the upper range or a test into the lower range.
- In a trading range day during a bull spike near the top of the range, sell a bear close, especially if it is in the top half of the range of the prior bar and if it is a second attempt to reverse down.
- In a trading range day during a bear spike near the bottom of the range, buy a bull close, especially if it is in the bottom half of the range of the prior bar and if it is a second attempt to reverse up.
- In a bull trending trading range day, sell the close of, and above the high of, a large bull trend bar near the measured move target, especially if the bar is relatively large and, therefore, a possible buy climax, and if the last five to 10 bars had some selling pressure.
- In a bear trending trading range day, buy the close of, and below the low of, a large bear trend bar near the measured move target, especially if the bar is relatively large and, therefore, a possible sell climax, and if the last five to 10 bars had some buying pressure.
- In a bull trending trading range day where the range will be about 10 points, short on a limit order four to six points above the high of the lower range for a test of the breakout.
- In a bear trending trading range day where the range will be about 10 points, buy on a limit order four to six points below the low of the upper range for a test of the breakout.
- In a strong bear channel when the market is setting up a two-bar reversal up, short as the second bar rallies to the high of the first bar, risking a few ticks, expecting the market to not trade above the second bar and trigger the long.
- In a strong bull channel when the market is setting up a two-bar reversal down, buy as the second bar falls to the low of the first bar, risking a few ticks, expecting the market to not trade below the second bar and trigger the short.
- In a bull trend, buy a test of the bull trend line with a limit order (although it is usually better to buy above a bull reversal bar that tests the line).
- In a bear trend, sell a test of the bear trend line with a limit order (although it is usually better to sell below a bear reversal bar that tests the line).
- In a bull trend or a trading range, buy a falling wedge (a wedge bull flag) as the market tests the downwardly sloping trend channel line (although it is usually better to buy above a bull reversal bar that tests the line).
- In a bear trend or a trading range, short a rising wedge (a wedge bear flag) as the market tests the upwardly sloping trend channel line (although it is usually better to sell below a bear reversal bar that tests the line).
- In a bull trend where there is a pullback, which is a small bear trend, buy below a swing low, expecting the breakout to a new low to fail and become a high 2 or wedge bull flag buy signal.
- In a bear trend where there is a pullback, which is a small bull trend, sell above a swing high, expecting the breakout to a new high to fail and become a low 2 or wedge bear flag sell signal.
- In a bull trend, buy a 60 to 70 percent pullback from the current high, risking to a lower low, and taking profit at or above a new high (the reward is about twice the risk, the probability is about 60 percent).
- In a bear trend, sell a 60 to 70 percent pullback from the current low, risking to a higher high, and taking profit at or below a new low (the reward is about twice the risk, the probability is about 60 percent).
In general, when the market is in a bull trend, the bulls will expect every attempt by the bears to fail, and therefore look to buy each one. They will buy around the close of every bear trend bar, even if the bar is large and closes on its low. They will buy as the market falls below the low of the prior bar, any prior swing low, and any support level, like a trend line. They also will buy every attempt by the market to go higher, like around the high of a bull trend bar or as the market moves above the high of the prior bar or above a resistance level. This is the exact opposite of what traders do in strong bear markets, when they sell above and below bars, and above and below both resistance and support. They sell above bars (and around every type of resistance), including strong bull trend bars, because they see each move up as an attempt to reverse the trend, and most trend reversal attempts fail. They sell below bars (and around every type of support), because they see each move down as an attempt to resume the bear trend, and expect that most will succeed.
A market order is just a type of limit order where a trader is eager to get in or out of a trade and does not worry about saving a tick or two. Many traders who want to trade at the market just place a limit order on their price ladder, so many limit order trades are actually with the intent of entering or exiting at the market. For example, if the QQQ is at $51.10 and in a bull spike, traders who want to get long at the market will often hit a buy limit price on their price ladder that is above the offer, like at $51.14, and get filled at the market. Because of this, most of what I write about limit orders is applicable to market orders for traders who prefer to use market orders.
Something very important happens every time the market moves above the high or below the low of the prior bar. The market is breaking out of the range of the prior bar, but it is very important to realize that most attempts to break out fail. Unfortunately, beginning traders get caught up in the emotion of all breakouts and assume that the market is at the start of a big move. They don't understand that the breakout is a test. The market is searching for value, and the breakout is simply a contest between the bulls and the bears, and usually not the start of a big trend. The market runs this test every bar or two on every chart and in every time frame. A trader who used stop orders to buy above the high of every bar and short below the low of every bar would be taking every breakout and would lose money. Why? Because a stop entry is a breakout trade, and most breakouts fail. The market usually gets pulled back into the trading range, such as the body of the prior bar, and then decides where it will go next. Although stop entries and exits are the best choice for traders starting out, they have to be selective.
Let's say that the current bar just rallied to one tick above the high of the prior bar. Most individual traders would either do nothing, buy on a stop at one tick above the high of the prior bar, or sell on a limit order at the high of the prior bar. If the breakout is successful and the market runs far enough up for bulls to make their profits, then they made the right decision. However, if the move above the prior bar was just a buy vacuum, the market will soon turn down, and the bears will make a profit. If the trend is down, then many bears will wait for rallies to sell, and a favorite setup is a rally above anything, like a bear trend line, a prior swing high, or even simply the high of the prior bar. If there are enough strong bears waiting to short until the market moves above something, then this buy vacuum could easily lead to a one- or two-tick breakout above the high of the prior bar. Instead of the market finding a lot of strong bulls up there, it will find lots of strong bears who were waiting for the market to get just a little higher, like above the prior bar, before shorting.
The opposite is true for the bulls in an uptrend. They want to buy pullbacks, and if enough strong bulls believe that the bears will be able to push the market below the low of the current bar, why should they buy before that happens when they can soon buy lower? They simply step aside, place a limit order to buy at the low of the prior bar, and wait for the bears to push the market below the low of the current bar. That sell vacuum sucks the price down into their buy zone, and they buy aggressively, trapping the bears who will soon have to buy back their shorts (adding fuel to the rally), and the market quickly reverses up.
Most of the time, the probability for either buying on the stop above the prior bar or shorting on a limit order at the high of the prior bar is about 50 percent, but it is often 60 percent or more in favor of the stop or the limit order. With experience, traders can spot these 60 percent situations and place their orders in the direction that has the edge. Since most breakout attempts fail, successful limit order entries tend to be more reliable, but they are much harder to take because you are betting that a move will fail and reverse in your direction before hitting your protective stop. Until traders have a lot of experience, it is very stressful to wait for the market to reverse and go their way. Just as blindly entering on every stop signal is a losing strategy, blindly fading every one of those signals with a limit order in the opposite direction is also a losing strategy. On any given day, there might be about 10 reasonable stop entry setups and 20 or more limit order setups, although many are not obvious to inexperienced traders. Because there are so many reliable limit order setups, it is important for traders to be able to evaluate them.
When you are trying to enter on a limit order, you are trying to get in at a better price than the current price. For example, if you are looking to buy on a limit order, your order is below the current price and you need the price to fall for your order to get filled. Entering on stops is a safer approach in general because the market is moving in your direction as you enter, and the odds of follow-through are greater. For beginners, this is the best approach. However, there are many situations in which you can enter on a limit order instead of a stop. In fact, as mentioned, there are usually about twice as many limit order setups as there are stop entry setups, but they are riskier and usually harder to take because they are counter to at least the short-term trend. For example, if you just bought a second-entry setup in a pullback following a breakout above a bear trend line and a strong bull reversal bar, and the market tests the exact low of the entry bar a couple of times over the next one or two bars, consider placing a limit buy order to double your position at one tick above the low of the entry bar and risk just two ticks (to the original stop, just below the entry bar). You would likely not get filled if you tried to buy the low of the entry bar on a limit order, since the market usually has to trade through the limit price for the order to get filled. Everyone knows that there are many protective stops just one tick below that entry bar low—why isn't the smart money gunning for it? It is because if those stops are hit, the character of the market will have changed. Instead of being a strong second entry, the chart now has a failed second entry, and that is a with-trend setup and will likely result in two further legs down. If the smart money traders had loaded up on the bottom, they would not want to see the market drop for another two legs, so they will do exactly as you did: they will continue to accumulate longs to defend the bottom. Eventually, sellers will give up and start to cover, and as they do, the market will rise well beyond the scalper's target.
Entering on a limit order is trading countertrend to at least the short-term trend and, in general, can create needless anxiety that can interfere with your ability to trade later in the day. A strong spike alone is not a reason to begin to look to enter on a pullback using a limit order. For example, if there is a strong bull spike in the Emini to the top of a trading range or a possible buy climax at the end of a bull trend, traders might see it as a sign of strength and place limit orders to scale into longs at maybe one to four points lower. However, they need to consider the possibility that the bull spike was an exhaustive buy climax. When there is any doubt, a trader should not be buying on limit orders as the market is falling, because the sell-off might last for at least 10 bars and two legs, and it could be the start of a reversal down. A strong bull spike alone is not enough of a reason to buy a pullback on a limit order; traders need to consider the context of the bull spike. The opposite is true of bear spikes.
Furthermore, if the market rallied for a couple of hours but has now sold off for an hour with no sign of a bottom and you place a limit order to buy a Fibonacci 62 percent pullback or at a Bollinger, Keltner, or any other type of band, the market will be falling when you enter your long and you will therefore be trading against the current trend, hoping that the earlier trend will return. The market often bounces in the area of a 62 percent pullback, but not often enough or far enough to make it worthwhile compared to entering on a stop. If the market reverses up around that 62 percent retracement, just wait for the bar to close and look to see if it has a bullish close. If so, place an order to buy at one tick above its high. Then the market will be moving in your direction when you enter and the bulls will have demonstrated strength both by the bullish close and by their ability to push the market above the high of the prior bar. And you still have the 62 percent pullback in your favor. If the trade is good, it is now much more likely to be successful. Yes, you might miss a couple of ticks by waiting for the entry on a stop, but you will be avoiding far more losers and a lot of needless stress.
There are a few instances when entering on a limit order results in a winning percentage comparable to a good stop order entry. If for some reason you missed entering what appeared to be a great trade on a stop and within seconds you are able to place a limit order at the stop price or a tick or two worse, this can be effective. However, use it only for very strong trades because, in general, you do not want to be in a trade that let you in at a great price once you have already missed the original entry. Great trades rarely come back to bail out less astute traders.
In a strong bull trend, you cannot be looking to short a low 1 or a low 2, especially when the signal bar is weak. When there is a pause bar or a weak bear bar, many traders will step aside and wait until the market trades below that bar to buy. This creates a mini sell vacuum. Buying at or below the low of that bar is often a good trade with the expectation of a high 1 or high 2 trigger several ticks higher. Other traders will buy at fixed intervals below the high of the spike, like one or two points down, and this often coincides with the low of those low 1 and low 2 signal bars. Remember, in a strong bull trend, low 1 and low 2 signals do not exist and are only traps. Tops in strong bull trends become bull flags in about 80 percent of the cases. The opposite is true in strong bear trends, where shorting at or above the highs of high 1 and high 2 signal bars is often a good strategy.
If you are taking a reversal entry, especially in a trading range, there are frequently pullbacks along the way, often within a bar or two of entering. If you are confident in your reading of the price action, you can fade those pullbacks. These are usually low or high 1 or 2 setups that you believe will fail. For example, if there is a wedge bottom on a trading range day and you buy the reversal up, you can expect the low of the wedge to hold. You believe that the trend is now up, so you want to buy pullbacks. A pullback can be as small as a single bar. Since there will probably be two legs up, the first leg down should not go far. That low 1 short should fail and become a pullback in the new bull leg because the trend for the next 10 or more bars has reversed to up. The only time that a low 1 short is reliable is in the spike phase of a strong bear trend, and never after a reversal pattern. That low 1 short entry will likely fail to fall below the low of the wedge and will instead form a small higher low in the two-legged correction up. Because of that, you can place a limit order to buy at the low or one to three ticks below the low of that short signal bar, expecting a small higher low to form instead of a profitable low 1 short. You usually can risk as few as four ticks in the Emini.
As the reversal up continues, you might think that a low 2 short setup could form. However, since you believe that the trend has reversed into a bull trend, you expect that low 2 to fail as well and be followed by higher prices. You are still in the buy pullbacks mode, and that can include a small pullback, like a low 2. Here again you can place a limit order to buy at or below the low of the low 2 signal bar and risk about four ticks in the Emini. You are expecting this bear flag to fail to break out more than a few ticks, and instead to continue to work up into a bull channel. This is a type of final flag because it is the final flag of the bear trend. The bears thought of it as a bear flag, but when they are not able to break it below the bear signal bar by more than a tick or two, the flag will continue to grow up and to the right until traders realize that it has become a bull channel. At some point, when enough traders realize what is happening, the bears will cover and there will usually be an upside breakout and then a measured move up. Once the bears believe that either the market has reached the top of a trading range or the bull trend is in the process of reversing down, they will look for high 1 and high 2 signal bars and place limit orders to short at or just above the highs of those bars. They are looking to sell rallies, even very small ones like a high 1 or a high 2. Bulls will look to buy low 1 and low 2 entries at the bottom of a trading range, and at the bottom of a bear trend when they feel that the market is in the process of reversing into a bull swing.
As discussed in the chapter on trend reversals in the third book, most tops are some form of double top and involve a failed high 1, high 2, or triangle breakout, and that high 1, high 2, or triangle then becomes the final bull flag in the rally. When the leg up and top are small, the double top is a micro double top. When traders are anticipating a reversal, they will place sell limit orders at and above the signal bar for the bull flag, expecting it to fail. A bottom usually comes from a failed low 1, low 2, or triangle breakout, creating the final flag in the bear leg. When the double bottom forms over only a few bars, it is a micro double bottom. Traders expecting the flag to fail and lead to a reversal up will place limit orders to buy at and below the low of the sell signal bar.
Going back to that wedge bottom, if it ends with a large bull reversal bar and then there is a second strong bull trend bar with small tails, the odds of a two-legged rally are good. If the next bar is a small bull bar or a doji bar, then this is a weak setup for a low 1 short in any circumstance, and after a possible wedge bottom, it is especially likely to not lead to a profitable short. At a minimum, bears should wait for at least a low 2, but if the trend has reversed, that will also likely fail. Smart bulls will see the weak low 1 setup and expect it to fail to yield a scalper's profit for the shorts; they will place a limit order to buy at the low of the bar or maybe a few ticks lower, and risk maybe six ticks in the Emini. Traders do this in all markets all the time, and the locations of the limit order and protective stop depend on the market. For example, suppose the average daily range in Google (GOOG) has been $10 lately; if there is a reversal up from a bear wedge on the 5 minute chart and those first few bars extend $3 off the low, a trader might place a limit order to buy about 50 percent down at maybe $1.50 below the top of the first leg and maybe 50 cents or even a dollar below the low 1 signal bar, and then risk another $1.50 or $2.00, or to below the low of the wedge.
Entering on limit orders can also be effective in some barbwire patterns and in small trading ranges, where the bars are large and mostly overlapping and the pattern is largely horizontal. This is risky and requires quick decision making, and only the best and most experienced traders should attempt it.
Traders routinely fade all types of channels with limit and market orders, shorting at the top and reversing to long at the bottom. The safest channel is a trading range with clearly defined support and resistance that has been tested several times. Since false breakouts are common, traders who fade a test of the extremes by shorting at the resistance line above or buying at the support line below put their protective stops far enough beyond the line to allow for a failed breakout before the market reverses in their direction and tests the opposite side of the range. Traders do this in trend channels as well. For example, if there is a bull trend channel, they will short at the market or with a limit order when the market touches or gets close to the trend channel line, and they will short above the most recent swing high in the channel and scale in as the market goes higher. This is not a good strategy for the final couple of hours of the day because you will too often run out of time and have to cover a large short position for a loss.
Bulls will buy at the market or with a limit order on a test of the trend line at the bottom of the channel, and they will place a protective stop far enough below the line to allow for a small overshoot of the line. They will also buy with a limit order at or below the low of the prior bar. Since they are trading with the trend, they are more likely to swing their positions up and add on at subsequent setups. In a bull channel, you should not be looking for low 1, 2, 3, or 4 setups, because those are setups only in bear trends and trading ranges. If you see one in a bull trend, since the odds are that it will fail and hit the protective buy stop above, it makes more sense to take the opposite trade. Instead of looking to short below the low of the prior bar, place a limit order to buy at or below that bar. You will be buying where those bears will be shorting, and since they will likely lose, you will likely win.
If there are broader swings within the channel, like in a trending channel or stairs pattern, there is even stronger two-sided trading, so fading the top and bottom of the channel are even more reliable trades. All channel fading is especially reliable if a trader trades a small enough size to be able to scale in if the market goes further against the initial entry. For example, if the market is in a bear channel, you can buy on a limit order below each prior swing low and look to add on a little lower, using a wide stop. If the market reaches your profit target after the first entry, you take your profit. If instead the trend continues and your second limit order is also filled, you can exit both positions at the entry price of your first entry. You will then get out of your first entry at around breakeven and out of your second entry with a profit. There is one important caveat for traders who scale into countertrend trades, and that is that you should exit or reverse to the with-trend direction on the second move against you. This means that if you are scaling into shorts in a bull trend, exit or even reverse to long on a high 2, especially if it is near the moving average. Similarly, when scaling into longs in a bear trend and it sets up a low 2, especially if it is near the moving average, exit or even reverse to short if the low 2 triggers.
A scalper in the Eminis usually needs a six-tick move beyond the signal bar to scalp four ticks of profit. This is because the entry stop is one tick beyond the bar, and then you need four more ticks for your profit, and your profit target limit order usually won't get filled unless the market moves one tick beyond your order. Sometimes your order will get filled without the market moving through it, but when that happens, the market is usually strong and will likely move beyond that price within a few minutes of your fill. Similarly, to scalp 10 ticks in the QQQ, you usually need a 12-tick move.
When a setup looks weak, it is best to not take it and to wait for another opportunity. If it is weak, it will likely fail, and you should not take needless risk. Often a weak setup will have a second entry, in which case it becomes a strong setup.
Traders can also enter on limit orders on pullbacks to breakout areas if they believe that the breakout was strong and they expect that test to be successful. Breakout tests exist to see if traders will enter again where they entered earlier. For example, if the 5 minute Emini reversed up with a strong bull reversal bar after a final flag in a bear swing and the rally lasted for a couple of hours, it is common for the market to test down to within a tick or two of the high of that bull signal bar. Traders bought aggressively above that bar, and now the market is testing back down to that price level. If the bull trend is strong, buyers will return at that same price area and the bull swing will resume. Many institutions routinely have limit and market orders at that level, and it provides an excellent risk/reward ratio for traders. They might have to risk only four to six ticks and they might have better than a 50 percent chance of making four or more points. For examples, see Chapter 5 on failed breakouts, breakout pullbacks, and breakout tests.
Although most trades should be entered on stops, when there is a strong trend it is safe to enter anytime, and entering at the moving average on a limit order is particularly good in stocks, which tend to be well behaved. This allows for a smaller risk and greater potential reward and essentially no change in the winning percentage. In a bull trend, traders often risk to below the most recent higher low, so buying a pullback means that their protective stop is smaller. Similarly, in a bear trend, traders often put their protective stops above the most recent lower high and short on pullbacks.
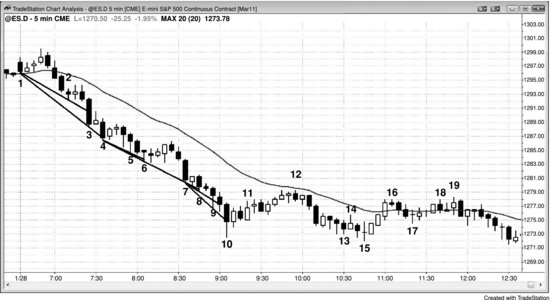
Figure 28.1 Limit Order Entries
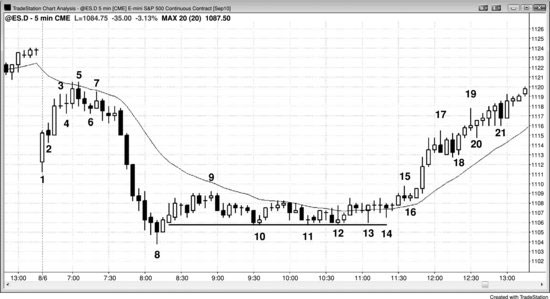
The chart in Figure 28.1 shows several examples of good trades with limit order entries. The move up to bar 3 was strong and the market was pausing just below the moving average, which is a magnet. The market was close enough to be within the magnetic pull of the moving average. Since bar 3 was a doji and therefore a bad signal bar for a short after a strong up move, the market would likely not go down far before it pushed up again to test the moving average. Aggressive bulls could have bought at or just below bar 3 with a limit order for a test of the moving average, maybe risking six ticks.
After the bar 5 test of the moving average, the market was likely to correct sideways to down. Astute traders saw that the bulls were unable to create consecutive strong bull trend bars. This increased their willingness to go short. Bar 5 was a bear bar test of the bottom of the moving average. Since it was after a second buy climax (formed by the first and third bars of the day, which were large bull trend bars), two legs sideways to down were likely to follow. Therefore, shorting on a limit order at the bar 6 high or one tick above was a good risk/reward trade. Some bulls thought that a high 2 buy signal was likely so they placed limit orders to buy at and below the low of bar 5. However, given the two-sided nature of the recent bars, this was a risky strategy. Other traders saw the bear close on bar 5 and anticipated a low 2 short signal at the moving average. Just after bar 5 closed, they shorted at the market or on a limit order at the close of bar 5.
As the market collapsed down from the moving average, traders shorted the closes of the three large trend bars, and they shorted on small pullbacks as the bear bars were forming. For example, many had limit orders to short one, two, or three ticks above the most recent low.
The opening range from bar 1 to bar 5 was about half the size of an average day's range, so once the market broke below bar 1, some traders would have looked at measured move targets for a possible low of the day. The bar 8 low was an exact measured move down from the open of bar 1 to the high of bar 5. Traders knew that the open of the day at this point was in the exact middle of the day's range, and that the market might try to test back up to the open before the close. This would create a doji bar on the daily chart with both the open and the close in the middle of the day. If the market could rally back up to the high, the day would become a bull reversal day. Some bulls were willing to go long on a limit order at one tick above the measured move target and then hold for a test of the open. The chance of a successful test of the open of the day was probably 30 percent to 40 percent. They could have used a protective stop of maybe a couple of points, and then they could have waited to see what happened. Since the sell-off was losing momentum, the odds were good that there would be enough profit takers for the market to bounce before their protective stops were hit. If the market fell below their entry price but did not hit their stops, they could have exited at breakeven if they felt that their premise was no longer valid. Once the market had the two-bar reversal up, they could have moved their protective stops to breakeven and then they could have waited patiently to see if the rally developed, which it did.
The bear spike down to bar 8 had seven consecutive bear trend bars. Traders who saw this as a sign of strength might have placed limit orders to scale into shorts at maybe one to four points higher. However, they needed to consider the possibility that the bear spike was an exhaustive sell climax. When there is any doubt, a trader should not be selling on limit orders as the market is rallying, because the rally might last for at least 10 bars and two legs, and it could be the start of a reversal up, especially under the current circumstances. A strong bear spike alone is not enough of a reason to sell a rally on a limit order. Traders have to look at the context of the bear spike.
The tight trading range at the low was a good example of how understanding the mathematics of trading can lead to a great trade. The range was too tight to be scalping with stop entries. You cannot buy above a bar or short below a bar and expect to consistently make profitable scalps when the range is this tight. However, there is a great opportunity for swing traders. The day was a trending trading range day and if it broke above the tight trading range, it would have had about a 70 percent chance of testing the bottom of the upper range at the bar 1 low. Once the double bottom bull flag was established by the move above bar 11, the bulls would defend its low. Therefore, buying one tick above it on a limit order and risking one or two ticks below it was a good risk/reward trade. Your limit order would have been filled on bar 12, which retested the bars 10 and 11 double bottom to the tick. You were risking about three ticks to make at least four points to the bar 1 low, or even about 12 points if the market reversed up and tested the high of the upper range, which it did. Since you were buying at the bottom of a tight trading range, you had a 60 percent chance of a test of the top of the range. However, you needed a successful upside breakout, and the chance of a breakout in either direction of a tight trading range is 50–50. So at the time of your purchase, you had a 50 percent chance of making four or more points while risking less than one point. This was a great risk/reward trade, but only traders who understood the math would have been able to see it that way.
Once the market started forming higher lows at bars 13 and 14, you could have trailed your protective stop to one tick below the most recent higher low. After the tests at bars 13 and 14 and then the breakout pullback at bar 16, the odds of at least a four-point move went up from maybe 50 percent to 70 percent. At that point, you had locked in a couple of ticks of profit and had a 70 percent chance of making at least four points, and maybe a 50 percent chance of the market going up to the top of the upper trading range. After the five bull trend bars started a breakout at bar 16, the market had at least a 60 percent chance of reaching a measured move up because that is typical when there is a strong spike breakout. The measured move would be based on the open of the bar after bar 16 to the close of the third bar of the spike and adding that to the close of that third bar. The strongest bodies of a spike often lead to a measured move. This meant that you had a 60 percent chance of making about another five points. You would have put your protective stop at the bottom of the spike, which would have protected about two points of your open profit.
Bar 17 was a bear reversal bar in a strong bull spike. Bulls expected that the market would form a successful high 1 buy setup after a one- or two-bar pullback. However, the high of that buy signal bar was likely to be higher than the low of the bar 17 sell signal bar, so aggressive bulls bought at the low of bar 17. The bar after bar 17 was a bull bar and the trend up was strong. If the bar after it was a bear trend bar, and it was, it would set up a two-bar reversal short. Since the bull trend was strong, aggressive bulls would have placed buy limit orders at the low of the bull bar. They would have expected that if the bear bar traded below the low of the bull bar, the two-bar reversal short would not fall below both bars of the two-bar reversal top and trigger on bar 18.
Since the market was clearly always-in long on the rally to bar 17 and the bear bar just before bar 18 was the second attempt to reverse down, many bulls thought that the market would soon resume up. They doubted that there would be follow-through, and as soon as bar 18 opened, they placed limit orders to buy at the close of the prior bar (the bear trend bar).
Figure 28.2 Limit Order Entries on Quiet Days
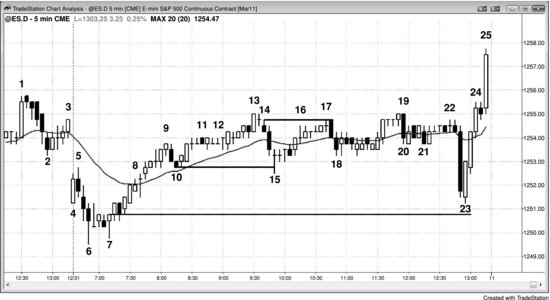
During quiet trading in late December, entering on limit orders is often the best approach. In Figure 28.2, the sell-off down to bar 6 had signs of buying pressure, like the bar 4 bull bar and the increasing size of the tails at the bottoms of the bars. This was therefore not a strong bear spike and consequently the low 1 breakout to bar 7 was likely to fail. Since bar 6 was also at the bottom of a two-day expanding triangle and a poke below a two-week-long bull trend line, traders were looking for a dueling lines buy setup. Aggressive bulls bought during bar 7 as it broke below the iii pattern, and more conservative traders bought above its high.
Most traders saw the market as always-in long by the close of the bull breakout bar before bar 8 and were therefore looking to buy pullbacks. Since the move up to bar 8 was in a bull micro channel, they believed that the first breakout below the low of the prior bar would fail and become a bear trap, even though some traders saw it as a low 2 short near the moving average. These bulls would have placed buy limit orders to buy at and below the low of the prior bar, and they would have been filled on the bar after bar 8.
Since the bar before bar 8 flipped the market to always-in long, bulls wanted the market to hold above the high of the bar before bar 8. Some placed buy limit orders at one tick above the high of that bar, and they were filled on the doji bar after bar 8. Some would have risked just two ticks. Others would have used a wider protective stop, and some would have added on lower. Even though the probability of success using a two-tick stop might have been only 30 to 40 percent, the potential reward was for a measured move up from this measuring gap, or at least a six-tick profit. The realistic worst case was a six-tick profit and a 30 percent chance of success, which is a breakeven strategy, and the best case was maybe a 60 percent chance of success and a 10- or 12-tick profit. This is an excellent result. Since the actual outcome was probably going to be somewhere in between and the math was therefore still good, this was a reasonable buy setup. The average daily range during this holiday trading was only about five to six points. Since the market has only a few days a year with a range less than five points, today's range should have become at least that large.
The move from bar 7 to bar 8 was a bull micro channel. Since the first breakout below a bull micro channel usually fails, bulls kept placing limit orders to buy at the low of the previous bar. They were filled on the bar after bar 8.
The micro channel continued up to bar 9, and the bulls were filled again on the next bar as it fell below bar 9. Some would have risked four to eight ticks on their longs, but others would have scaled in and bought more around four to six ticks below their first entry.
Although bar 11 was a possible final flag short and a higher high, most traders assumed that the momentum up was strong enough so that a bear leg was unlikely. Either the market would continue up or it would go down just a little, form a trading range, and then go on to a new high. Because the odds favored higher prices, they were willing to buy on limit orders at and below the low of the prior bar and were filled below bars 11 and 12.
The two-bar bear spike down from bar 14 might have flipped the market to always-in short for some traders, but most would have wanted to see strong follow-through selling on the next bar to confirm the breakout to the downside. Once they saw the doji close on the next bar instead of a strong bear close, they bought with limit orders around that close.
The market was likely to test the bar 10 bottom of the bull channel that followed the bar 7 to bar 9 bull spike. After that, a small trading range was likely as the market decided on its next move. Bears were shorting on the move up from bar 15 with a stop at one tick above the top of the bar 14 bear spike. Astute bears placed limit orders to short at one tick below the bar 14 high, with protective stops two ticks higher. They were filled on bar 17. Since their risk was only two ticks and they were shorting in a trading range, the chance of success for an equidistant move was at least 50 percent, and the chance of a four-tick move down before their two-tick stop was hit was probably also more than 50 percent. Since this was a trading range on a small day, these bears were in scalp mode and were happy to go for a one-point, four-tick profit. Their potential reward was twice the size of their risk and the probability was at least 50 percent, so the trader's equation was strong.
By bar 21, traders saw this as a trading range day and they expected breakout attempts to fail. Even though the strong bear spike after bar 22 was impressive, without follow-through selling and a bear close on the next bar it was likely to be a bear trap instead of a spike leading to a channel. Aggressive traders bought its close and also went long on a limit order at its low. They also saw that bar 23 was a test of the open of the day and of the original long above bar 7. They might have risked about four ticks for a swing trade up. Even if the probability was only 30 to 40 percent, the potential reward might have been four or five times the risk and therefore worth considering. More conservative traders bought above the bar 23 bull reversal bar that confirmed the failed bear breakout. They were buying higher above the bottom, and therefore their potential reward was less and their risk was more, but the greatly increased probability of success more than offset those problems.
When traders saw the strong close of the entry bar after bar 23, they bought on the close of the bar. Others waited until the next bar opened and then immediately placed limit orders to buy the close of the prior bar. When this next bar also became a strong bull trend bar, they repeated the process on bar 24.
The market was always-in long by the close of bar 24, so some bulls would have tried to buy the first bear close, which was on the next bar. However, the market never traded below the close of that bear bar, so most of their limit orders would probably not have been filled. This was a sign of urgency going into the close, and alert bulls would have also placed stop orders to go long above that bear bar because it was a breakout pullback buy setup. Many would not have been fast enough and would have chased the market up during the next bar, buying one- or two-tick pullbacks with limit orders as the bar was forming.
As the market was rallying up to bar 13, the trend was clearly up. Some traders placed limit orders to buy a Fibonacci 62 percent pullback, or any pullback of around 60 to 70 percent, with a stop below the bar 6 bull low. They were looking to buy where the reward would be about two or more times greater than the risk. Buying about two-thirds down for a test of the bull high was risking about one-third, making their target twice as large as their risk, which is always good. At the time they placed their orders, the trend was up, so buying a pullback had at least a 60 percent probability of an equidistant move (a move up equal to the size of their stop), and possibly a 60 percent chance of a new bull high (a reward twice as large as their risk). Entering on pullbacks to reduce risk is an approach used by many traders and has a strong trader's equation.
Figure 28.3 Limit Order Setups
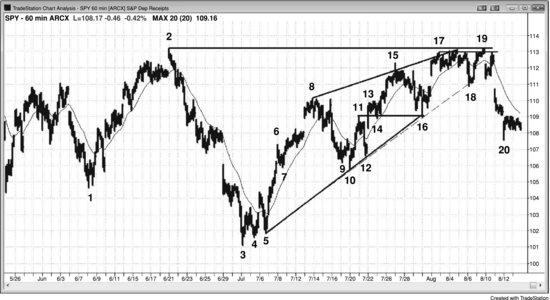
This 60 minute chart of the SPY presented in Figure 28.3 shows many examples where institutions and traders almost certainly entered on limit or market orders. Bar 3 was a climactic bottom of a bear channel, which was a bull flag, and a possible expanding triangle bottom. Bar 1 was the second push down, and the swing low that preceded it was the first. After the bar 3 low, traders were so confident that the market was going higher on the leg down to bar 5 that they bought at the market and limit orders above the bar 4 low. Whenever a double bottom bull flag looks like this, it is because the bulls are so afraid of missing the new trend that they put their orders many ticks above the bar 4 low rather than at it or one tick above it. This led to a spike up to bar 6 and then a channel to bar 8. A trader could also have entered with a limit order in that area, risking about a point to below the bar 4 low and holding for a test of the tops of trading ranges in the channel at 105, 108, and maybe even 110. Each of these was the start of a channel down after a bear spike, and they were magnets. Traders were risking one point to make three to seven points and the probability was at least 40 percent, which made this a logical trade. Alternatively, they could have entered on a stop above the high of bar 5. This increased the probability of success to about 60 percent because they were then buying a confirmed bottom of a trading range (a double bottom). Their risk was to below the signal bar, which was about one point, and their first profit target was two points higher, again making for a sound strategy.
Bar 6 was the top of a strong bull spike and therefore the chance of any pullback being followed by a higher high was about 70 percent. Many traders therefore bought below its low. Other traders bought one tick above the bar 7 high 1 on a stop. When the market tested that price area again, they bought some at bar 9 but were not able to lift the market much. However, when bar 10 dipped below the bar 7 low, the bulls bought aggressively on limit and market orders (and stop orders).
Bar 14 was a small breakout test of the breakout above bar 11, and many traders bought there on limit orders, lifting the market.
The spike up to 13 was followed by the channel to 15 and then the test of the bottom of the channel at 16, where the market created a double bottom bull flag as it often does in a spike and channel bull trend. Buyers again bought at the market using limit orders at the same price as they did at bar 14, and this created a double bottom bull flag. Bar 16 dipped below the trend line from bar 5 to bar 10, and many traders bought this test at the market and with limit orders. They then redrew the trend line and bought again with limit and market orders when bar 18 tested it and tested below it. The buyers aggressively returned at the same price where they had bought on the breakout above bar 11 and the pullback to bar 14.
Bar 17 was a dueling lines short setup because the trend channel line across the top of the wedge was in the area of the bar 2 high, and a major swing high is always a resistance area. Traders repeatedly shorted below the resistance line over the next several days, and the market finally broke below the small double top formed by bars 17 and 19; this sell-off was also the start of the reversal down from the wedge top and large double top (bars 2 and 19). The market formed a trading range between bars 17 and 19, and traders repeatedly shorted tests of the top of the range, many doing so with limit orders.
The bull spike and channel up to bar 8 was so strong that higher prices were likely to follow. Although some traders buy at the market and on tiny pullbacks all of the way up, many traders only buy on pullbacks, like in the area of the bar 9 and bar 10 test of the bar 7 bottom of the bull channel. They buy on limit orders as the market is falling, as well as on stops above the high of the prior bar in areas of support. Since the trend was up, unless the market fell below the most recent higher low at bar 5, or below the bar 3 bottom of the swing, buying well below the bar 8 high would allow traders to use a smaller stop, reducing their risk. The trend is less certain after the sell-off to bars 9 or 10, reducing the probability of a profitable long swing, but the rally to bar 8 was stronger than the sell-off to bar 9, so the odds still favored the rally. Once the market turned up sharply to bar 11, the bulls raised their stops to below the bar 10 low. The sell-off to bar 12 was sharp, but held above the stop.
Figure 28.4 Fading Tests of Lines with Limit Orders
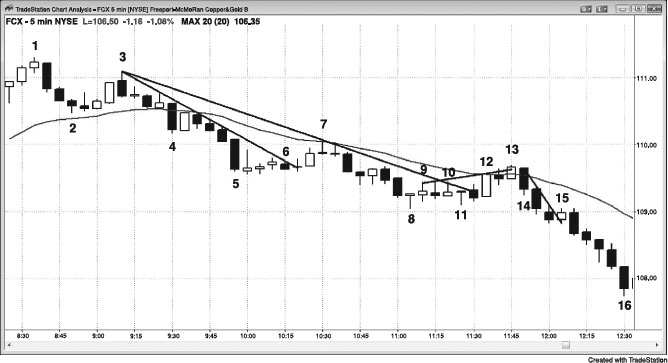
Many traders fade tests of trend lines and trend channel lines, but most traders make more money by entering on stops after the market reverses away from the lines. The trade-off is a little less profit for much more certainty, and this usually makes for a stronger trader's equation.
As shown in Figure 28.4, bar 6 was a test of the bear trend line in Freeport-McMoRan (FCX), and some traders shorted on a limit order as the market tested the line. This was a risky strategy in the three-bar tight trading range after the bar 5 sell climax, which was likely to have a two-legged correction. The market was within the magnetic pull of the moving average and was likely to test closer. A better strategy would have been to short on a stop at one tick below the bar 7 low 2 at the moving average.
Traders also shorted with limit orders on the test of the bear trend line from bar 9 to bar 10. A better strategy would have been to short below a low 2 signal bar, like the bar after bar 11, but that short never triggered. The market then had a wedge bear flag at the moving average at bar 13. Traders shorted with limit orders at the moving average and at the trend channel line, but a better strategy would have been to short below bar 13, or below a bear trend bar like the bar before or the bar after bar 13. When traders saw the bar 11 higher low, they expected any breakout above a swing high to fail. Some placed limit orders to short at one tick above bar 10. They also believed that there would be additional bears shorting at one tick below the moving average and that very few bulls would buy the breakout above the bar 10 swing high. Most attempts to reverse a bear trend fail and become bear flags. These aggressive bears shorted at the top of the bear flag, trusting that these high prices would not last long. Others entered as the market fell below the bar 12 bull trend bar, expecting remaining longs to sell out at that point and provide fuel for lower prices. These longs would have also been hesitant to buy again for at least a couple of bars, giving the bears short-term control over the market.
Bar 14 was the first bar of a three-bar bear spike, which created a bear micro channel. Traders could have shorted during bar 15 as it went above the trend line. Other traders shorted its close once they saw that it was going to be a weak bull breakout bar. Once bar 15 closed, many traders immediately placed limit orders at, just above, and just below its high. Since the next bar did not trade above bar 15, those who tried to short at or above bar 15 did not get filled. They then chased the market down, and many sold on a stop at one tick below the bar 15 low. This was the best entry, because traders saw the bear micro channel and believed more selling would follow, and they also saw that the market never went above bar 15. This told them that the traders who tried to short there were trapped out and would be eager to get short, and the next logical entry was on a stop below bar 15.
Figure 28.5 Trend Channel Lines Trap Early Bulls into Losses in a Strong Bear Trend
Buying at trend channel lines in a bear market, hoping for a wedge bottom, is a losing strategy. Whenever you find yourself repeatedly drawing trend channel lines as the market is falling, you are usually totally missing a strong trend and looking for trades in the wrong direction.
In Figure 28.5, bar 3 collapsed through the trend channel line drawn from bar 1 to bar 2, and traders who bought as the market fell to the line immediately found themselves trapped. Buying when the market is strongly always-in short is a losing strategy. Traders should look only for short trades and try to swing part of the position. A trader who bought as the market tested other trend channel lines at bars 6, 8, and 9 also likely lost money. Although a trader might have made money buying as bar 10 fell to the trend channel line, the risk was great and the probability and potential reward were small, so that was a bad strategy. However, buying above the strong bull inside bar that followed the large bar 10 sell climax was an acceptable long for a scalp up to around the moving average.
This was followed by a wedge bear flag short near the moving average at bar 12. Bar 12 was the second entry, and because it was a bear reversal bar close to the moving average, this was an especially reliable short setup in a strong bear trend.