Chapter 29
Protective and Trailing Stops
Since most trades are only 60 percent certain at best, you always have to have a plan for that other 40 percent of the time when the trade does not do what you expect. You should not ignore that 40 percent any more than you should dismiss someone 30 yards away who is shooting at you but who has only a 40 percent chance of hitting you. Forty percent is very real and dangerous, so always respect the traders who believe the opposite of you. The most important part of your plan is to have a protective stop in the market in case the market goes against you. It is better to have the stop working, because many traders who use mental stops find too many reasons to ignore them when they are needed most, and they invariably allow their small loss to grow and grow. There are several approaches to placing stops, and any of them is fine. The most important consideration is that you have the stop order working in the market instead of just in your head.
The two main types of protective stops are money management stops, where you risk a certain number of ticks or dollars, and price action stops, where you get out if the market moves beyond a certain price bar or price level. Many traders use both or either, depending on the situation. For example, a trader who uses a two-point stop in the Emini for most of his trades might use a three-point stop if the bars are large. A price action trader who just went long might initially place a protective sell stop at one tick below the low of the signal bar. However, if the bar is unusually large, like six points tall, she might instead either trade far fewer contracts or switch to a money management stop of about three points. In general, using one method most or all of the time is best because then it is such a part of your routine that you will always have a protective stop working as soon as you enter any trade. This saves you from the distraction of having to think about what type and size stop you should be using in different situations when your focus needs to be on deciding whether to take the trade.
For most small scalps, traders do not want to see any pullbacks and will often exit as soon as one appears. However, if they believe that the market has entered a trend channel, they will usually allow small pullbacks. For example, if the day is a trading range day and the market just had a spike up off the low of the range and now might be forming a small bull channel that could test the top of the range, the profit goal of a trader who went long would be limited and therefore the trade would be a scalp. Since the market is in a bull channel, it will likely have pullbacks, which means that a bar might trade below the low of the prior bar by a few ticks, but not below the most recent swing low in the channel. Since the trader suspected that the market might enter a channel and he still went long, he has to be willing to hold through those pullbacks and keep his protective stop below the most recent swing low in the channel. Aggressive, experienced traders might even buy more on a limit order at the low of the prior bar, since they know that channels typically have one- or two-bar pullbacks yet continue to work higher.
If traders are buying for a swing, then they are expecting a bull trend. Since a bull trend is a series of higher highs and higher lows, it is reasonable to move the protective stop to below the most recent swing low after the market makes a new swing high. This is called a trailing stop. If the market trades up for five or 10 bars, pulls back to below the entry price, and trades up to a new swing high, traders will not want the market to trade below the low of that pullback and will move their protective stop to one tick below its low. Many traders would not want their stop to be tested a second time and would simply move their stop to breakeven.
Once traders see the market break out into what they believe will be a trending trading range day, they have to be ready to change their trading style as the market begins to form the second trading range. For example, if there is a bull breakout lasting a couple of bars followed by a one-bar pullback and then a weaker rally, the low of that pullback bar will probably become the low of the upper trading range. Since the market usually tests back into the breakout gap and often to the top of the lower trading range, the odds are that it will fall below the low of that pullback bar. Therefore, bulls should not trail their stops below that low, since they will get stopped out. If they were thinking about placing protective stops there, it makes more sense to exit on the close of a bull trend bar within the next several bars, so that they would be taking profits near the top of the developing trading range rather than below the bottom. Once the market evolves into a trading range, traders should no longer trade it as if it was still in a strong trend.
Some traders will allow pullbacks beyond the signal bar as long as they believe that their premise for a swing trade is still valid. For example, if they bought a high 2 pullback in a bull trend and the signal bar is about two points tall, they might be willing to hold on to their position even if the market falls below the low of the signal bar, thinking that it might evolve into a high 3, which is a wedge bull flag buy setup. Other traders would exit if the market fell below the signal bar and then buy again if a strong high 3 buy signal sets up. Some might even buy a position that is twice as large as their first because they see the strong second signal as more reliable. Many of these traders would have bought just a half-size position on the high 2 buy signal if they thought that the signal did not look quite right. They were allowing for the possibility of the high 2 failing and then evolving into a wedge bull flag, which might even look stronger. If this happened, they would then feel comfortable trading their usual full size.
Other traders trade half size when they see questionable signals, exit if their protective stop is hit, and then take the second signal with a full size if the signal is strong. Traders who scale in as a trade goes against them obviously do not use the signal bar extreme for their initial protective stop, and many look to scale in exactly where other traders are taking losses on their protective stops. Some simply use a wide stop. For example, when the average daily range in Eminis is less than about 15 points, a pullback in a trend is rarely more than seven points. Some traders will consider that the trend is still in effect unless the market falls more than between 50 to 75 percent of the average daily range. As long as a pullback is within their tolerance, they will hold their position and assume that their premise is correct. If they bought a pullback in a bull trend and their entry was three points below the high of the day, then they might risk five points. Since they believe that the trend is still in effect, they believe that they have a 60 percent or better chance of an equidistant move. This means that they are at least 60 percent certain that the market will go up at least five points before falling five points to their protective stop, which creates a profitable trader's equation. If their initial buy signal in the bull pullback came at five points below the high, then they might risk just three points, and they would look to exit their long on a test of the high. Since the pullback was relatively large, the trend might be a little weak, and this might make them take profits on a test of the trend high. They would try to get at least as much as they had to risk, but they might be willing to get out just below the old high if they were concerned that the market might be transitioning into a trading range or possibly even reversing into a bear trend.
Once the market finally begins to enter a trading range, traders should look to take at least partial profits around the high of the range, rather than relying on their trailing stops. This is because it is likely that the market will begin to have pullbacks that fall below prior swing lows. As soon as traders believe that their stops will likely get hit, it makes sense to exit before that happens, especially if they have already met most of their profit objectives.
The initial price action stop for most trades is one tick beyond the signal bar until the entry bar closes, when it is tightened to one or two ticks beyond the entry bar if the entry bar is strong. If the entry bar is a doji, then rely on your original stop. Remember that a doji is a single-bar trading range, and if you just bought, you don't want to exit (sell) below a trading range in what you think is a bull trend (or if you just shorted, you don't want to buy above a trading range in a new bear trend).
In fact, experienced traders can consider adding on at a tick or two below a small doji entry bar in a possible new bull trend (or above a doji entry bar in a new bear trend), relying on the initial stop location for the stop on the added contracts. They are buying below the low 1 short signal bar because they think that the market is going up, not down. A low 1 is a short setup at the bottom of a strong bear spike in a bear trend, or near the top of a trading range (in a trading range, it is better to wait to short a low 2), not at the bottom of a trading range or at the bottom of a new bull trend. Since a short down there is likely to fail, the two-point protective buy stop is more likely to be hit than is a six-tick profit-taking limit order placed below the low 1 signal bar. This means that buying below the low 1 signal bar will probably be followed by the market going up at least two points before falling six ticks. Since traders think this is a new bull trend or at least a trading range, they think that the market will go up at least three or four points, so this is a logical long trade.
If it is a bar in the opposite direction, then you have to make a decision. For example, say you just bought a pullback in a strong bull market and the signal bar was a strong bull reversal bar at the end of a two-legged pullback to the moving average. If the entry bar becomes a bear reversal bar, you should usually just keep your protective stop below the signal bar. However, if you were buying a reversal up in a strong bear trend, you should usually exit if the market falls below that bear entry bar. In some cases, you should even reverse to short, if the context makes sense. In general, you should not be buying in a strong bear trend if you believe that a failed long would be a short setup. Very few traders are able to reverse in such a situation, and if the bear trend is still strong enough so that shorting low 1 setups makes sense, then it is probably too strong to be looking for longs. Instead, a bull should wait for a strong rally and then look to buy a higher low pullback. Buying in a bear trend before there has been evidence that the bulls can control the market is a losing strategy. Since most bull reversals become bear flags, it is far better not to buy and instead to look to short, unless the reversal setup is especially strong (this is discussed in the chapter on trend reversals in the third book).
If the bars at the time of entry into any trade are too large, it is wiser to use a money management stop, like eight ticks on the Emini 5 minute chart, or about a 70 percent pullback (a couple of ticks beyond the Fibonacci 62 percent pullback). For example, in a long off a large bull signal bar, you would place the protective stop about 30 percent of the distance up from the bottom of the signal bar to the entry price. The size of the money management stop is in proportion to the size of the bars. After the market reaches the first profit target and partial profits are secured, move the protective stop to about breakeven (the entry price, which is one tick from the signal bar's extreme). The best trades will not hit a breakeven stop and will rarely ever go more than four ticks beyond the entry on the 5 minute Emini (for example, three ticks below the signal bar high after getting long).
If you are very confident in the reversal because of a large, strong reversal bar and a confluence of other factors, you can use a stop beyond that large signal bar and allow a pullback after entry, as long as it does not hit your stop. You might even allow a stop of a couple of points beyond your signal bar, but if you do, calculate your risk and reduce your position size to keep your risk the same as on your other trades. Also, if you are confident that a reversal is strong enough to make two legs likely, and if the market comes back through your original entry by a few ticks after you've scalped out part of your trade, you can hold through the pullback and rely on your original stop, despite being in a drawdown of several ticks. Otherwise (for example, in a new long) you will exit the swing portion at breakeven and then buy again above the high of the bar that ran your stop, giving up a couple of points or more of what you considered to be a very high-probability second leg.
If you are entering a quiet pullback that you believe is about to end and the bars are small, you might consider using your usual money management stop, even if it means that you are risking several ticks beyond your signal bar. For example, if the day is a bear trend day with a low-momentum bull channel up to the moving average that forms a low 4 short setup and the signal bar is a three-tick-tall doji bar, traders who believe that the pullback is about to end might risk their usual eight ticks, even though the stop would then be four ticks above the signal bar. Low 4 setups often form in tight channels, and the entry is a breakout below the tight channel. Tight channel breakouts usually have pullbacks, and sometimes they go beyond the signal bar. Here, a higher high breakout pullback would not be surprising. As long as the traders believe that their premise is still valid, they can allow the trade some room. Alternatively, they could exit if the market goes above the entry or signal bar and then sell again as the market turns down again; but if they are confident in their analysis, they can rely on their original eight-tick stop and allow the higher high pullback. In general, if you are in a losing trade, ask yourself if you would put the trade on now if you were flat. If the answer is no, then get out. If your premise is no longer valid, then exit, even with a loss.
When you are concerned that the market might be volatile and have large bars, you should trade only a fraction of your usual position size. Just cut your position size in half or down to a quarter and place the order. If you are buying and are confident that a low will hold, but a long trade would require a much greater money management stop than you typically use, you can use the larger stop and then wait. If the market hits your profit target without much of a pullback, take your profit. However, if it only goes a tick or so beyond your entry, pulls back almost to your stop, and then starts up again above your entry price, raise your profit target. As a general rule, the market will rally enough to equal the size of the stop that it required you to have to stay in the trade. So if the market dipped 11 ticks below your entry before reversing back up, a stop of only 12 ticks would have worked; therefore the market will likely go about 12 ticks or more above your entry price. It would be wise to place a limit order to exit with a profit at a tick or two less than this and, when it approaches the target, to move your stop to breakeven and wait to see if your profit target order gets filled. For example, suppose the pullback was 11 ticks, your stop beyond the signal bar was not hit (maybe it was 12 or even 18 ticks), and now the market is again going in your direction; calculate the total number of ticks that you would have had to risk to avoid being stopped out. At this point, you would have had to risk 12 ticks (one beyond the pullback). Now increase your profit target to one or two ticks less than the risk, or 11 ticks. You also should adjust your protective stop at this point to one tick beyond that pullback, so you are now risking 12 ticks.
When a protective stop is hit before making a scalper's profit, you were trapped into a bad trade, so reversing on the stop is occasionally a good strategy. This depends on the context. For example, a failed low 2 short is a good reversal into a long trade when you think that the market is reversing into a bull trend. However, a stop run in a tight trading range is not a reversal. Take time to make sure that you are reading the chart correctly before considering a trade in the opposite direction. If you don't have time to get right back in, wait for the next setup, which will always come before too long.
After studying a market, you will see what a reasonable stop is. For the Emini 5 minute chart when the average daily range is 10 to 15 points, eight ticks works well on most days. However, pay close attention to the maximum size stop required in the first hour, because this often becomes the best stop to use for the rest of the day. If the stop is more than eight ticks, you will likely be able to increase the size of your profit target as well. However, this provides a modest advantage at best unless the bars are exceptionally big.
There are a couple of common setups that usually require a large stop, which means trading a smaller position. Both involve entering around the close of a strong spike in a trend, but the two trades are in opposite directions. When there is a strong spike at the beginning of a trend and there are several consecutive trend bars, traders will enter in the direction of the trend as the bars are forming and as they close. For example, if there is a strong bull breakout that has two large bull trend bars, bulls will buy the close of the second bar and above its high. If it is followed by a third, fourth, and fifth consecutive bull trend bar, bulls will keep buying as the bull spike grows. The theoretical stop for all of their entries is below the bottom of the spike, which is far away. If traders used that for their stop, they need to trade a very small position size to keep their risk within their comfort zone. Realistically, most traders would consider scalping a larger position and using a smaller stop when they enter late in the spike. This is because a pullback becomes more likely, and it would allow them to then put a swing position on at a lower price and with a smaller stop, like below the signal bar.
The second situation when traders are entering during a large trend bar and need a large stop is when they are entering countertrend. For example, if there is a third consecutive sell climax without a significant pullback, and that third one has the largest bear trend bar of the day and closes near its low, aggressive bulls will buy the close of the bar, expecting it to be at or near the low of the swing; they will also expect a strong rally to follow. Reliable protective stop placement in this situation is never certain, but as a rule, since traders expect the rally to go at least to the high of the large bear trend bar and they are 60 percent certain of the trade, they should risk about as many ticks as there are in the bear trend bar. This is discussed more in the chapter on climaxes in book 3. If they are very experienced traders, this can be a reliable trade. The volume is often huge in these situations, which means that the institutions are buying heavily as well. The bears are taking profits on their shorts, and the bulls are aggressively buying. Both often wait for a large bear trend bar into support as a sign of exhaustion, and then buy heavily. Because they were expecting the bottom to form very soon, they stepped aside and stopped buying just above support, and this creates a sell vacuum in the form of the large bear trend bar.
There are many other special situations when a trader might use an unusually wide protective stop. I have a friend who looks for weak channels and scales in against them, expecting a reversal. For example, if the market is in a bull channel after a bull spike and the channel is not particularly strong, he places a limit order to go short at the prior swing high in the channel, using about a quarter of his normal position size, and adds on above the next two or three swing highs if the channel continues. When the average daily range in the Emini is about 10 to 15 points, his final stop is about eight points from his first entry and his target is a test of his first entry. Once the reversal is underway, if he thinks that it is strong, he will often swing part of his position below his original entry.
Traders can use wide stops when they are fading breakouts in stairs patterns or on trending trading range days. If the average range in the Emini is about 10 to 15 points and there is a breakout that runs about five points, a trader might fade the breakout and risk about five points to make five points, expecting a test of the breakout. In a typical situation, this trade has better than a 60 percent chance of success and therefore has a positive trader's equation.
Traders sometimes fade large trend bar breakouts of one-bar final flags at the ends of big trends, expecting that the trend bar is an exhaustive climax (this is discussed in the chapter on climactic reversals in book 3). For example, if there is a bull trend that has gone on for 30 bars or so with only small pullbacks, and then there is a large bull trend bar followed by a one- or two-bar pullback, bulls and bears will sell the close of the next bar if it is also a large bull trend bar. The bulls will sell to take profits, and aggressive bears will sell to initiate shorts. The bears will risk about the height of the bar (if the bar is 10 ticks tall, they will use about a 10-tick stop), and their initial profit target will be a test of the bottom of the bar. The next target is a measured move down.
I have another friend who routinely uses a five-point stop when entering on pullbacks in the Emini. He feels that he cannot consistently predict the end of a pullback and instead enters when he thinks that the trend is resuming. He just assumes that he sometimes enters early and that the pullback might go a little further before the trend resumes, and the wide stop allows him to stay in the trade. His profit target is a test of the trend's extreme, which might be three to five points away. If the resumption is strong, he will swing the trade, looking for five or more points. Although there are many variations to this approach, the average risk is generally about the size of the average reward, and since it is a with-trend strategy, the probability is at least 60 percent. This means that the strategy has a positive trader's equation.
Whenever traders use a wide stop, as soon as the market begins to turn in their direction they are usually able to tighten the stop and greatly reduce their risk. Once a swing trade reaches about halfway to the profit target, many traders will move their protective stop to break even. If the market moves strongly in their direction, the probability of success increases, the potential reward can remain the same or they might increase it, and the risk becomes smaller. This increases the strength of the trader's equation and is why many traders prefer to wait to enter until the market is able to get to this point. If, however, the reversal is very weak, although traders can tighten their stop and reduce their risk, their probability of success will be less and they might also reduce their reward (tighten their profit-taking limit order). If the trader's equation is weak enough, they might try to scalp out with a small profit and wait for another trade.
The goal is to make money, which requires a positive trader's equation. If the size of the bars requires a large stop, that is what you must use, but you also must adjust your target to keep the trader's equation positive. You should also reduce your position size.
In a big market, there might be a hundred institutions actively trading, each contributing about 1 percent of the total volume. Of the other 99 percent of the volume, only 5 percent is from individual traders. Institutions are going to try to take money from other institutions, which make up 94 percent of the market, not the 5 percent of dollars traded by people at home. Institutions could care less about us and are not out there running our stops, trying to devour the little guy. If your stop gets hit, it has nothing to do with you. For example, if you were long and your protective sell stop got hit, you should assume that it was because there was at least one institution that also wanted to sell at that price. Only rarely will enough small traders do the same thing to offer enough volume to attract an institution, so it is better to assume that the market will only trade at any price if there is both an institution willing to sell there and another willing to buy there.
Figure 29.1 The Initial Stop Is Just beyond the Signal Bar
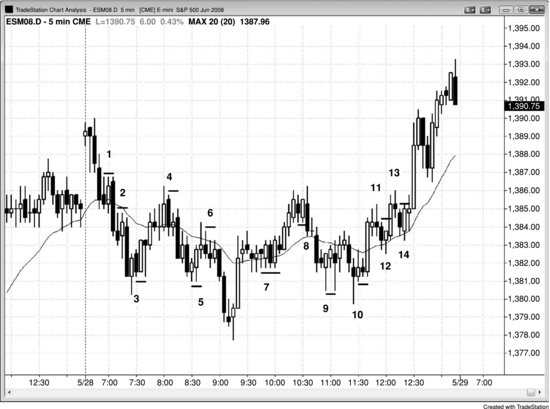
The initial stop is one tick beyond the signal bar in Figure 29.1. Once the entry bar closes, move the stop to one tick beyond the entry bar if the bar is strong. If the risk is too great, use a money management stop or risk about 60 percent of the height of the signal bar.
If you shorted on bar 1 on the breakout below the bear inside bar, the initial stop would have been above the signal bar. The bar 1 entry bar reversed up immediately after entry but did not exceed the top of the signal bar, so this would have eventually ended up as a profitable short scalp. Once the entry bar closed, if it is a bull or bear trend bar and not a doji bar, move the stop up to one tick above its high. In this example, the signal and entry bars had the same high, so the stop would not have to be tightened.
The bar before bar 3 was a bull reversal bar after three pushes down on the open. Although buying the first breakout of a tight bear channel is not usually a good trade, reversals in the first hour are usually reliable, especially when the prior day had a strong close (look at the steep slope of the moving average going into yesterday's close). The bar 3 entry bar immediately sold off but did not fall below the low of the signal bar, or below about 70 percent of its height (if you used a money management stop, thinking that this signal bar was too big to use a price action stop below its low). Once an entry bar closed, the protective stop should have been moved up to one tick below its low. If the market fell below its low, many traders would have gone short because this was a breakout pullback short setup. However, since this was not a strong bear spike, it was not a reliable low 1 short. Alternatively, a trader could have kept the stop below the signal bar, but when bottom picking in a strong bear trend, it is risky to hold a long if the market falls below a strong bear trend bar that is a low 1 short signal bar.
Two bars later, there was a pullback bar, but it did not hit the stop. It tested the entry bar low to the tick, creating a double bottom. Since this wedge bottom was likely to have two legs up, it was reasonable for an experienced trader to hold through the pullback that occurred two bars after entry and to rely on the stop below the entry bar. Otherwise, you would have been stopped out for seven ticks and then you would have bought above the high of the pullback bar to catch the second leg; your entry price would have been three ticks worse, so overall you would have been 10 ticks worse off.
The pullback to the moving average at bar 4 formed a double top with the bar 1 area, and it was a small wedge bear flag. Other traders would have seen it as a simple low 2 at the moving average. The initial protective stop for the short at the bar 4 low 2 was not hit, despite a pullback bar two bars after entry. The stop was above the signal bar, and you should not tighten to above the high of the most recent bar until after the market had moved about four ticks in your direction or until the market had a reasonably strong bear body. Give the trade time to work. Also, when the entry bar is a doji, it is usually safe to allow a one- or two-tick pullback. A doji bar is a one-bar trading range and it is risky to buy above a trading range, so don't buy back your short there. Rely on your original stop until the market has moved at least several ticks in your direction.
The bar 5 long immediately sold off to test the signal bar low (this was evident on the 1 minute chart, not shown) forming a micro double bottom and then a successful long scalp. Rely on your stop and ignore the 1 minute chart. When taking a 5 minute entry, rely on a 5 minute stop, else you will lose too often and be stopped out of a great many trades in your attempt to risk less per trade.
Bar 7 was a high 2 long after a strong bull spike. The market tested the stop below the signal bar but missed by one tick, and then tested the tightened stop below the entry bar, but neither stop was hit. The dojis prior to entry increased the risk of the trade, but with six closes above the moving average after the surge from a new low of the day, this was an acceptable long setup since you had to be expecting a second leg up.
The bar 8 ii pattern was a high 1 buy setup. However, it was not at the top of a strong bull spike in a strong bull trend and therefore it was not a good trade. In fact, it was at the top of a bull channel after the spike up from the low of the day; it was around a measured move up, and it might have been forming a double top with bar 4. Since most trading range breakout attempts fail, there was a 60 percent chance that the market would trade down and only a 40 percent chance that the breakout would be successful. It is impossible to know the probabilities with certainty, but 60–40 is a good rule of thumb when it comes to trading range breakout attempts. Aggressive traders would have shorted with a limit order at the high of the ii pattern, expecting it to be a bull trap. If a trader instead bought above the bar 8 ii pattern, the protective stop was hit on the entry bar; this would have been a good reversal, as are most failed ii patterns.
If you shorted the bar 11 swing high near the top of this trading range day, you could have reversed either on the bar 12 reversal bar that tested the moving average or on a buy stop at one tick above the entry bar that followed the bar 11 short.
The short from the bar 13 swing high, low 2 became a five-tick failure and a failed low 2. You should have reversed to long on bar 14 at one tick above the entry bar (the bar after the bar 13 signal bar) since there were trapped shorts, and you should have expected at least two more legs up. If you did not buy there, you should have bought on the bar after bar 14 because bar 14 was a two-bar reversal up and a high 2 buy signal above the moving average in a possible bull trend. Whenever traders are top picking and then see a high 2 buy signal at the moving average with a bull signal bar, they should always exit the short and reverse to long. If they were not short, they should go long. This was not a good short setup since this could have been setting up a pullback from the breakout of a large wedge bull flag. The strong bull trend bar two bars earlier was the breakout, and the three pushes down began with the bars around bar 7 (three bars before is a good choice), and then bar 9 and the bar before bar 10. The move up to bar 8 broke above the bear channel of the first couple of hours, and bar 10 was a second entry into the higher low after the break above the bear trend line. Some traders bought on bar 10 because they saw this as a head and shoulders bottom. Other traders bought with a limit order below the bar 13 low 2 since they saw this as a bull trend and not as a trading range, and a low 2 in a bull trend is a buy setup. A low 2 is a short setup only in a trading range or in a bear trend. When the market is in a bull phase, traders see a low 2 as a bear trap and will buy below it for the reversal up. Some traders would instead buy on a stop at one tick above the low 2 entry bar, waiting for confirmation that it would fail.
A trader who was swinging a long up from bar 12 would trail the stop to one tick below the most recent swing low after the market moved to a new high. So once the market rallied above the bar 13 swing high, the trader could move the protective stop up to just below the bar 14 higher low.
Figure 29.2 Trailing Stops in a Strong Bull Trend

In a strong bull trend, traders often trail their protective stops to below the most recent swing low just after the market makes a new swing high. Once the market looks like it will enter a trading range, traders should take some profits, and consider scalping for smaller profits.
Today, as shown in Figure 29.2, had a large gap up and a strong bull trend bar for the first bar of the day, and therefore had a good chance of becoming a bull trend from the open day. If traders bought above bar 2 or bar 4, they could have started to trail their protective stops as soon as bar 5 moved above the most recent swing high at bar 3. The three-bar bull spike up to bar 5 convinced most traders that the always-in direction was long and strong, so many traders wanted to let their profits run. Once bar 7 moved above bar 5, they could have tightened their protective stops to one tick below bar 6, and when the market moved above bar 9, they could have raised them to one tick below bar 10.
Traders know that trends usually have a larger pullback at some point, and many traders will take partial or full profits when they believe that a more complex pullback is imminent. A measured move target can often give an idea of where institutions might take profits, which means it is where a pullback could begin. Since the initial strong bull spike began at bar 4 and ended around bar 8, a measured move up from there would have been a level where profit taking was likely. The move up from bar 10 to bar 19 also had three legs, and a three-legged move is a variant of a wedge (even when it is in a steep channel like this) and can be followed by a larger pullback. The initial target was the moving average. Bar 18 was a large bull trend bar and was followed by another large bull trend bar, and this two-bar buy climax followed a protracted trend. When this happens, the market often corrects for at least 10 bars and two legs, especially when it is far from the moving average, as it was here. When bar 19 became a bear reversal bar, many traders took profits. Other traders assumed that the first pullback would be followed by at least one more new high, and they held through the pullback. However, there was aggressive profit taking on bar 30 when the market moved above bar 19 near the close of the day, so many traders took profits at the new high and as the market turned down.
Today was a very strong bull trend day and was likely to have a test of the high after a pullback to the moving average. The bear channel down to bar 24 had low momentum and small bars. A trader who bought above bar 24 might have considered relying on the usual eight-tick stop, in case the breakout above the bear channel (all bear channels are bull flags) was followed by a lower low breakout pullback. The market broke strongly to the upside but immediately formed a big two-bar bear reversal. This was not a reliable short setup in a strong bull trend that was pulling back to the moving average. Experienced traders would have relied on their stops, even though the stops were several ticks below the signal bar. The stops would not have been hit and the traders could have then exited their longs near the high of the day. Alternatively, a trader could have exited below the bar 25 two-bar reversal and then bought again above the bar 26 micro channel breakout pullback.
A swing trader who bought during the strong bull trend at any point up to the bar 19 buy climax ideally would have used a protective stop below the most recent swing low, which means risking more than two points and using a wide stop. Once the bar 19 buy climax formed, the market was likely to enter a trading range and the trader would have switched to a trading range style of trading, which means scalping instead of swinging. Since the market was entering a trading range, it was likely to fall below prior swing lows and therefore it no longer made sense to keep protective stops there. Once a stop is likely to get hit because a trading range is forming, traders should exit their longs well before that happens. Astute traders would have exited on strength at the top of the likely developing range, like below bar 19. Aggressive traders would have begun to short at that point, looking for a scalp to the moving average.
Most swing traders would have trailed their protective stops below the most recent swing low. Instead of letting a swing trade run until the trend ends, some traders prefer to use profit targets. Those who do often move their protective stops to no worse than breakeven once the market has reached halfway to their profit targets.
Figure 29.3 Reward Often Equals Risk
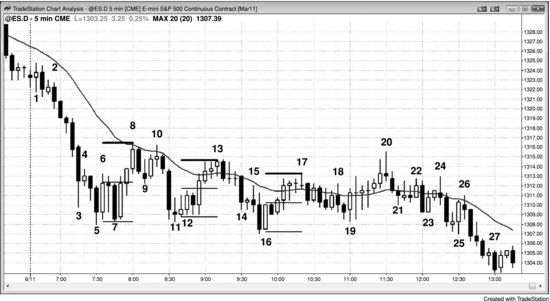
The market often rewards traders with as many ticks of profit as it forces them to risk. In general, it is risky to buy above large signal bars in a bear trend day, and the trades described here based on the chart shown in Figure 29.3 are questionable at best, but they illustrate a point.
If traders bought above bar 5, thinking that it was the second consecutive sell climax and the bottom of a parabolic move and therefore likely to be followed by a two-legged rally, their initial stops would have been below the bar 5 low. Bar 7 tested the low but did not hit the stops. However, once the market went above bar 7, the traders would have moved their stops to one tick below the bar 7 low, which was 16 ticks below the entry price. The market then rallied to exactly the bar 8 high, which was 16 ticks above the entry price (and a test of the moving average, where shorts came in). Traders who understood this tendency would have placed a profit-taking limit order at 15 ticks above their entry. Since they were buying at what they thought would become the bottom of a small trading range, they believed that they had at least a 60 percent chance of the market having an equidistant move up. This was a barely acceptable trade.
The same thing happened again on a long above the bar 12 and bar 16 strong bull trend bars. Once there was a pullback and then a move back up, traders saw how much the market forced them to risk, and they could put a profit-taking limit order at one tick less than that risk.
A trader who shorted at any point during the bear spike from bar 2 to bar 3, and who planned to swing the trade, would have used a wide protective stop, possibly above the top of the spike. Most traders would have risked less than that, but they would also have risked two or three times as much as they would have on a scalp.
At bar 16, assume that a bull bought the reversal up from the third push down, looking for a final flag trend reversal. Since the channel down from 13 was tight, the probability of a successful long would have been higher if a trader waited to see if the breakout was strong, and then bought the strong spike or the pullback that followed. However, for the sake of illustration, assume that the trader simply bought above bar 16. He might have assumed that he had a 50 percent chance of the market breaking above the bar 13 high and reaching a measured move up, making his reward much greater than his risk, which was to below the bar 16 buy signal bar. However, he might have been concerned by the lack of urgency by the bulls on the move up to the bar 17 doji, and decided that his premise had changed. He might have become convinced that the market was simply making another lower low in a bear channel instead of a trend reversal, and then simply scalped out of his long. If he thought that the market was topping out, it would make no sense for him to continue to hold his long. If he thought that it might have a second leg up but not hit a breakeven stop, he might have moved his protective stop to breakeven. If he thought that the market might fall below his entry price but stay above the signal bar low and form a higher low, he could have kept his original stop, or he cold have exited and bought the breakout pullback to the higher low. Traders make these decisions constantly, and the better they get at making them, the better able they are to make money. If they always hold on to their original premise, even when the market is not doing what they expected, they will have a difficult time making money trading. Their job is to follow the market, and if it is not going where they believe it should, they should exit and look for another trade.
Swing traders allow pullbacks and patiently wait to tighten their stops until the trend is well underway. A swing trader who shorted below bar 20, expecting it to be a test of the top of the trading range that would lead to a resumption of the bear trend from the open, might have been looking for a reward that was at least twice as large as his risk. Once he saw the strong bear entry bar, he might have tightened his stop to above its high, or he might have left it above the bar 20 signal bar high until after it turned down from the bar 24 double top. The signal bar was three points (12 ticks) tall so his initial risk was 14 ticks. If his profit target was twice as large as his risk, he was looking to take profits at 28 ticks below his entry, or at 1,305.25, and his profit-taking limit order would have been filled two bars before bar 27. Bar 24 went one tick above the strong bear trend bar before bar 23, trapping out impatient weak shorts, but it did not get above the entry bar or the signal bar.
Figure 29.4 The Stop Size Is Often Set by the First Trade of the Day
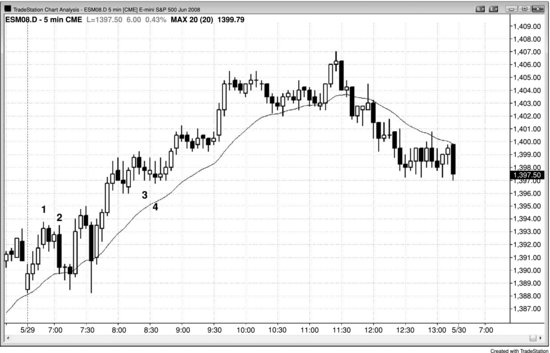
The market rallied to above yesterday's high and then turned down, as shown in Figure 29.4. Traders who shorted below bar 1 would have placed an initial protective stop above bar 1. After the market turned down on bar 2, they could have calculated that the market went eight ticks against them before it went their way. That meant that the minimum initial protective stop that they would have had to use to stay in the trade was nine ticks, and they would have remembered that for the rest of the day.
If you bought the failed low 2 at bar 3 and placed the initial stop at one tick below the signal bar's low, you would have risked eight ticks. One-tick stop runs are common and you would have known that a nine-tick stop was needed earlier in the day, so it would have been wise to risk the extra tick. This was not a great buy because it followed a tiny breakout and the last seven bars were largely sideways. A second entry would have been better. Bar 4 was a high 2 buy setup, and the bull inside bar two bars later was a breakout pullback buy setup (the inside bar was the pullback from the high 2 long breakout); both of those were stronger setups.
Once the bars become smaller, you can adjust the size of your stop to one that is appropriate for the current market conditions. However, the market often later in the day will have a trade that would require a larger stop. Don't worry if your stop gets hit and you take a loss. It is usually easier than constantly adjusting your stops, targets, and position sizes all day, and end up missing trades or making mistakes.
Figure 29.5 Don't Tighten Stops Too Soon
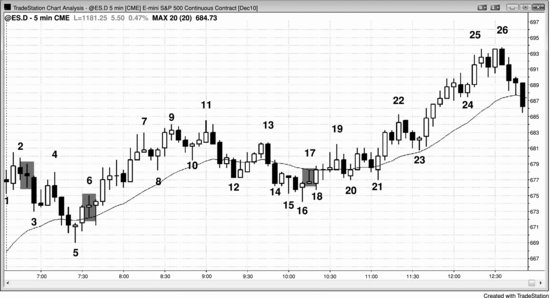
Don't tighten your protective stop after small doji bars that form within a few bars of entry. They are one-bar trading ranges, and it is common for the market to reverse beyond them for a tick or two. You do not want to get stopped out of a trade when your premise is still intact.
If traders shorted below bar 2 and saw the doji close of their entry bar, they should keep their protective stop above the signal bar high until the market makes a strong move in their direction. They could have scalped out part on the bar 3 plunge, and if they thought that the moving average was steep and there was a risk of a rally, they could then tighten it to breakeven or to one bar above bar 3. If they did, they would have been stopped out on bar 4, but it was still a sensible decision. However, on a large gap up day when there is a pullback that is close to the moving average, there is often a second leg down that tests closer; this often sets up the low of the day, as it did here at bar 5.
If traders bought above the bar 5 moving average gap bar and high 2 and wedge bull flag test, they could have moved their protective stop to breakeven on the swing portion of their trade once the entry bar closed and was clearly a strong bull trend bar. They would not have exited below the low of the bar 6 doji.
If they bought above the bar 16 bull reversal bar, thinking of it as a high 2 long or as a wedge bull flag (where either bar 8 or bar 10 formed the first push down), they would not tighten their stop after the entry bar became a doji. However, once bar 18 became a strong bull trend bar, they should move their stop to below its low.