You and your camera
Camera types
While the following pages are mainly concerned with DSLR cameras, there are many other cameras in use. Although digital technology has galloped ahead of traditional film technology, film is still very much alive and well.
Large-format cameras
Early photographers are associated with peering into giant cameras with black cloths over their heads. However, these cameras are not just of the past – large-format cameras, producing 10 × 8 inch and 5 × 4 inch negatives, were until recently always used for the highest-quality landscape, architectural, food and still life pictures that it was possible to take.
In the commercial world digital cameras have mostly taken over this area, but the large format is increasingly used by art photographers. It’s human nature that whenever there is a strong movement forward technologically there will always be a small but determined movement defiantly working with the older technology because it’s believed to be more elegant and to give a more aesthetically pleasing result. There are many young art photography students going right back to shooting 10 × 8 inch black and white film in search of the quality of images produced by the old masters of photography such as Edward Weston, Ansel Adams and Minor White and very many more.

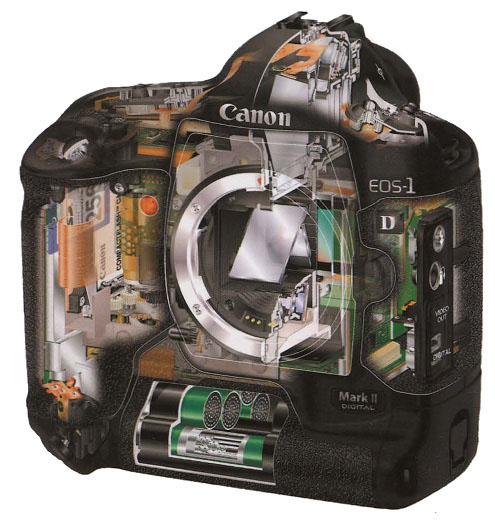
A 1930s 35mm Leica rangefinder camera which incorporated the latest technology of its day and a cut-away of a 21st-century Canon DSLR, showing all its technical complexities.
Large-format cameras have many camera movements that allow the correction of perspective and the holding of focus from foreground to background on wide apertures. They are the ultimate recorders of tonal values, sharpness and fine detail.
Medium-format cameras
This category of camera includes those producing negatives measuring 6 × 9 cm, 6 × 7 cm, 6 × 6 cm, 6 × 4.5 cm. All use 120 and 220 roll film and the number of frames per film depends upon the format size.
Medium-format cameras have been the professional’s workhorses for years and with the digital age they still are, producing the highest-quality digital images possible. Most of the manufacturers make a film camera and a digital equivalent; some, such as Hasselblad, now embrace both film and digital technology in the same cameras, allowing you to attach either a film magazine or a magazine that contains a digital sensor.
Medium-format cameras are more expensive and more difficult to handle than 35mm cameras, but they are very versatile in their use. Most fashion and advertising photography is shot on medium format.
Seeing the big picture
The double-page photograph on pp.12-13 is of pressed campanula flowers, from a series of images I made of flowers and leaves. I placed a sheet of Japanese paper on top of a lightbox and put the flowers on the paper. The light coming from beneath has passed through them, giving the appearance of an X-ray (see p.121). The textured background behind the flowers comes from the paper. GH
35mm cameras
DSLRs are of course digital versions of the time-honoured 35mm ‘miniature’ film camera – so-called because when it was developed in the 1920s it was so much smaller, both physically and in the negative size it produced, than the large cameras used at the time. These cameras gave birth to photojournalism and many people still choose to use them rather than DSLRs.
Compact cameras
The film compacts usually called ‘point and shoots’ have bred the digital compacts. These vary considerably in price according to the quality of the lens and resolution and the sophistication of the controls. The compact camera comes into its own for trekkers, mountaineers and extreme sports fans who are often in spectacularly beautiful places and are keen photographers but can’t carry an SLR around with them.
Underwater cameras
These cameras are increasingly in demand as scuba diving becomes more popular. As well as the traditional 35mm film cameras such as the Nikonos (now only available on the secondhand market), there is a large choice of digital underwater cameras available in a range of prices.
Cellphone cameras
The rapid advance of cellphone camera technology has added to the ubiquity of the digital image. The cellphone camera is already beginning to take over from the compact camera as a visual notebook, and it won’t be long before they all have zoom lenses and can produce higher-quality prints.
What seems to be the weakness of cellphone cameras is that they are totally automatic and we cannot alter anything. However, this can liberate us from all technical decision-making responsibilities and leave us with just the subject, composition and light to play with.
Remember, most of the great pictures from the past were shot on much less sophisticated cameras than compacts and cellphone cameras. It is still the photographer who takes a great picture, not the camera.
Cellphone camera tips
• Keep the lens clean.
• Shield the lens from the sun when shooting.
• Use the highest-quality setting.
• Fill the frame – don’t use digital zoom, since it’s poor quality.
• There may be up to half a second shutter delay, so make sure the subject doesn’t move.
• Hold the camera very, very still for a sharp picture.
Getting to grips with your DSLR camera
The modern camera is really a computer with a lens attached. Navigating the menu will be familiar to anybody who is used to modern electronic equipment.
It’s easy to be daunted by all the clever things your camera can do and just how much information there is in the instruction book about all the various functions. The easiest way to deal with this is to learn on a need-to-know basis. After you’ve worked out the essentials, tackle the more complex things as you need them.
There are still many photographers, both professional and amateur, who are devoted to film and there will continue to be for a long time. While the emphasis of this chapter is on DSLR cameras, much of the information on aperture, shutter, focus, lenses and so on equally applies to SLR film cameras.
Read the manual
• It cannot be overemphasized how important it is to use your camera manual in conjunction with this book. Every camera model has different controls and methods of accessing its functions, and manufacturers are increasingly using different terms for the same features.

POWER SWITCH The first time you turn your camera on you need to set the language, time and date. Always turn the power off when you are changing lenses, batteries and the memory card.

BATTERY The battery will need charging before you use your camera. Keep it charged so you don’t run out of power at a critical moment. It’s a good idea to keep a spare battery to hand.

SHUTTER BUTTON This releases the shutter and also turns on the lens focusing when pushed down halfway. Gently squeeze (don’t jab) the button all the way down to take a picture.

VIEWFINDER FOCUS To adjust the viewfinder to your vision, look through it at a blank wall and adjust the diopter control until the markings on the viewfinder screen come into focus.

COMMAND DIALS OR MAIN CONTROL Depending on your camera model, this control (or controls) sets most of the functions of the camera such as ISO, white balance, aperture and shutter.

MULTI SELECTOR OR SELECTION BUTTON Use for navigating the menu to set functions and to browse photographs in playback. This also varies according to your camera model.
The menu
Many of the functions of your camera are accessed through the menu. The navigational method is much the same as any other computer. Here Nikon screens have been used as illustrations, and although your camera will have the same functions it may display the menus in a slightly different way.
The number of menus that are available on a DSLR are too numerous to explore in detail here. These illustrations will explain briefly what their functions are and for fine detail you will need to turn to your camera manual.


SETUP MENU This contains all the basic functions of your camera. It is the first menu that you need to familiarize yourself with when you are starting out.

SHOOTING MENU All the settings for taking pictures are found inside this menu. Frequent-use functions such as quality, white balance, ISO and exposure compensation can often be accessed by buttons on the camera to simplify matters and save you time.

CUSTOM SETTING MENU You will use these menu banks when you get to the stage of wanting to fine-tune your camera settings to suit you personally and to exploit the full potential of your camera.

PLAYBACK MENU These are all the tools that are concerned with the viewing and management of pictures already shot and recorded on your memory card.
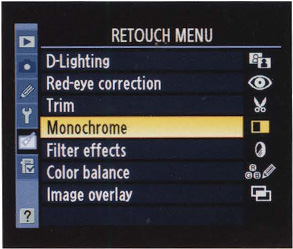
RETOUCH MENU With this menu, which is only available on some cameras, you can work on the image and make a copy while keeping the original untouched. This means you can print straight from your camera or card without needing a computer.
Factory presets
• Don’t let all the features worry you – the factory has preset your DSLR to basic settings that will get you started. You will be able to begin shooting as soon as you have charged the battery. Having got the feel of the camera, you can then get down to setting up preferences in the menus as you work your way through the book.
Exposure modes
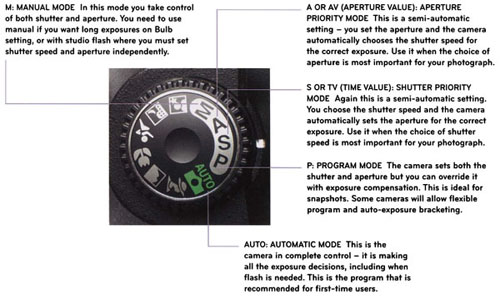
Although the majority of cameras have a dial with which you set the exposure mode, some of them incorporate this function in the menu instead. Nevertheless, they all offer you the same choices regarding the type of exposure. These are aperture priority, shutter priority, program mode and manual mode.
Holding the camera
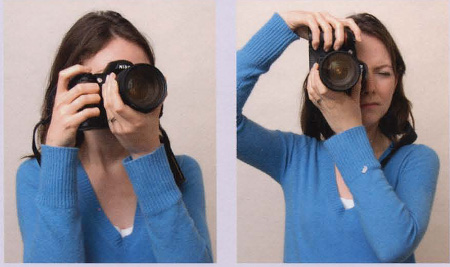
• Place one foot half a step in front of the other to maintain good balance. Hold the camera in your right hand with your fingers wrapped around the handgrip. Support the camera with your left hand under the lens. Keep your elbows pressed lightly to your body.
Preset modes
Your DSLR camera is a sophisticated computer and the preset programs are the result of an enormous amount of information that has been programmed into it. These preset modes set up the camera functions to match the subject you have selected, choosing combinations of shutter speed, aperture, flash, colour balance and focus that the camera decides is ideal for each subject.
Preset modes are very useful when you are starting but you can’t override the automatics. As your knowledge increases you will probably find this very limiting in creative terms and will want to move on to taking your own decisions.

Quick tip
• It’s all too easy to get carried away and forget to change your preset modes. Always check that you are on the right one for the subject you are shooting or the settings will be unsuitable.
Playback
The ability to see a picture as soon as you have taken it rather than waiting for negatives and prints to come back from a processing lab is one of the most attractive features of digital photography – particularly when you are shooting one-off events such as weddings or competitive sports.
The playback button
This button gives you access to the pictures that are recorded on your card. When you push it, the last picture taken will appear on the monitor.

Playback button
Image information
By using the multi selector, you can gain a lot of information from playback. All the technical data about the images is recorded and will stay attached to the pictures when they are transferred to the computer – exposure mode, aperture, shutter speed, ISO, exposure compensation, date and time of the exposure, focal length of the lens, flash mode used, white balance setting and histogram.

Image information

Viewing multi images

This is the digital equivalent of contact sheets or thumbnails. You can bring four or nine pictures up on the monitor for review, depending on your camera model.
Close up
You can zoom into close up on a portion of the picture in stages using the +magnifier button, and likewise zoom out with the – magnifier button. Using the multi selector, you can also manoeuvre the magnified section of the image around the monitor to check details of your picture for sharpness and colour.
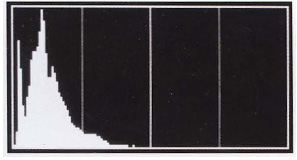
The histogram display
This is a graphic representation of the image exposure; the left side of the graph represents the shadow areas of the image and the right side the highlights. If the peak of the graph is over to the left the image will be underexposed and if it is on the right it will be overexposed. When the peak is in the centre it represents a normal exposure. This graph can be a bit confusing, but it’s not something to worry about until you become more experienced.
A problem with digital photography is that it’s hard to retain detail in extreme highlights. The histogram is useful to check this. If the graph runs into the right edge of the box (below centre) you’ll be losing highlight detail, so you’ll need to reduce the exposure.
Protecting images from deletion
Use this button to mark individual images so that they are safely protected from accidental deletion.

Protecting images from deletion button
Deleting individual images
To delete an unwanted photograph from your memory card, press the delete button. You’ll need to confirm this with a second press of the button, or with a different one, depending on your camera.
Don’t be too hasty in deleting images at the time of shooting – you may make decisions you’ll regret later. Wait until you have the chance to go through them at leisure. Also, time can add significance to a picture; a shot taken on the first day of a holiday can have much more meaning in the context of the holiday as a whole than seemed likely at the time, for example.

Deleting individual images button
Playback tips
• Playback is really useful when you are shooting portraits – you can show your subject a picture to give them more confidence in your work.
• Each photograph you shoot has a number, shown on the monitor when you view it. You can record the frame number to link the picture to any notes you are taking at the time.
Underexposed

Overexposed

Correctly exposed
Image quality
There’s more to a successful photograph than an interesting subject and pleasing composition – the quality of the image must be good.
Understanding ISO
Before you make an exposure, you must choose the ISO setting on your camera. The ISO (International Standards Organization) index is a system for calibrating the sensitivity to light of film emulsions and digital sensors. The ISO settings on most cameras go from 100 to approximately 3200, depending on the make of camera, and the higher the ISO number the more sensitive the film or sensor is to light. The ISO rating of digital sensors is based directly on the film ISO, so the 200 ISO setting on a digital camera is the same sensitivity as 200 ISO film.

ISO button
The practical difference between the ISO setting on a digital camera and the ISO speed of a film is that when using digital the photographer is able to change ISO settings on every frame. In contrast, once you have set the camera’s ISO for a film you must leave it on that setting for the whole film as it will be developed for a specific ISO. However, you can raise the ISO rating of a film from the manufacturer’s given speed (known as ‘pushing’) and have it ‘push processed’ successfully as long as you are consistent with the ISO of that film.
ISO sensitivity
Being able to change the ISO on every frame if you need to has great benefits. If you go from shooting in bright sunlight to low interior light you can increase the ISO from, say, 200 to 1600, thus increasing the light sensitivity of the sensor; the manufacturers call that amplifying the light. With an analogue camera, you would need to change films, which can seem painfully wasteful if you have shot only a few frames of expensive transparency film.

For this comparison of a fine-grained and grainy image, the film grain effect in Photoshop was used. Note that fine detail is lost and the colour is less saturated. The same is true in the case of noise, the digital equivalent of grain.
So why not always use high ISO ratings? The answer is that as a general rule of thumb in both digital and film, the lower the ISO (thus the slower the film) the higher quality the image will be in terms of tonal range, sharpness and colour; the higher the ISO the grainier (in film) or noisier (in digital) the image will be. A digital picture shot on 200 ISO will be sharper and smoother (with no noise) and have more colour saturation. In the case of film, a 50 ISO black and white film will be almost grainless, very sharp and of higher contrast than a 1000 ISO film.
A question of taste
However, we now arrive at an old chestnut – what is good quality? Depending on the subject, a grainy picture may well convey more to the the viewer about the subject than a smoothly fine-grained one. Indeed, you will see that there are a number of deliberately grainy pictures in this book. To some, the smoothness of digital images looks plastic and unreal, and they choose to add film grain effect in Photoshop.
In both film emulsions and digital sensors, the manufacturers have succeeded in pushing the speed of ISO with improved picture quality further and further; some 400 ISO films now have little more grain than the older 100 ISO films, while top of the range digital cameras can go beyond an astonishing 25600 ISO.
Guide for your ISO settings
• 50-200 ISO For very bright sunny days or when you want the ultimate in smooth, sharp images.
• 400 ISO A good all-round setting, suitable for overcast skies or when you need a fast shutter speed.
• 800 ISO For interiors, low-light outdoor subjects or action photography when you don’t want to use flash.
• 1600 ISO For night shooting or indoor low available light, or with very long lenses. Grain/noise may be a problem. Try using your noise reduction setting.
• 3200 ISO Much the same as 1600 but with more grain/noise. The grainy effect of fast film can look great with black and white subjects.

The picture of the horse (below left) is a small section of a 16 × 12 inch print. Shot on Ilford FP4 125 ISO film, it has little evidence of grain. The ballet photograph (below) is a similar section of a 16 × 12 inch print, in this case shot on Kodak TMAX 3200 ISO film. Here the grain is very obvious.
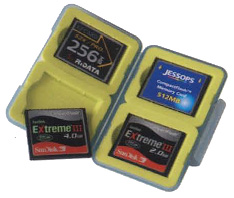
Memory cards are very delicate and shouldn’t be dropped or subjected to extreme temperatures. Protect them in a padded carry case.
Digital quality
Digital cameras use three different file formats to store the images on the memory card: JPEG, TIFF and RAW.
The file format that you choose has a big influence on the final quality of your pictures and also on the amount of pictures you can store on the memory card.
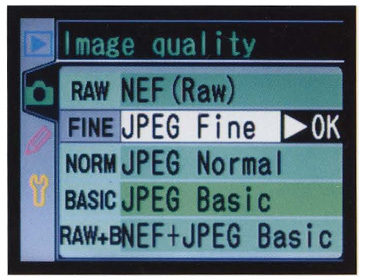
JPEG format
This type of file is processed by the camera’s computer, which applies all the settings that you have selected, such as colour balance, contrast and sharpening, to form the digital image. It then compresses the image to the file size and quality (fine, normal or basic) you have chosen.
Although the large size and fine setting takes up more space on the memory card, it’s best to select it because you may want to do a bigger print in the future. Even if you think you are only aiming for postcard-size prints, there may be some shots you are so pleased with that you want to print them poster-size, and if you have used a smaller file size you have ruled out that option.
Fine (less compressed) JPEG files produce high-quality images and are used by many professional photographers.
RAW format
If you save your file in RAW format, you are storing all the image information that is received by the camera. It’s the digital equivalent of the analogue camera’s negative. Every detail is in the file for the photographer to download onto the computer and make adjustments to later; just like the film photographer will take his or her negative into the darkroom and use the information on it to make a print, so the digital photographer will open up a RAW file in Photoshop and process the image to make a final interpretation. This is then saved as a separate file, and the RAW file is kept untouched ready for future use.
The disadvantages of RAW files are that because they are not compressed by the camera they take up more space on the memory card, and the camera also has to pause more frequently to write them to the card. While professional cameras can do this fast enough not to cause a problem, keeping up with the action at a sports event, for example, isn’t practicable with many consumer-level cameras.
The CD provided with your camera should include software to enable you to process the RAW files. If not, you may have to buy a program or download a free one.
Some cameras have the facility to shoot RAW and JPEG at the same time. Many professionals use the JPEGs as a digital equivalent of a darkroom contact sheet from which to choose the best pictures then get to work on the RAW images.
TIFF format
In terms of quality, TIFF files lie between JPEG and RAW files. They are compressed, but not as much as JPEGs; they lose no detail, but take up much more space than a JPEG, though less than a RAW file.
You have a choice of file formats. Shooting high image quality and large file size will allow you to do large prints if you ever need them. Use RAW if you plan to do extensive retouching on your pictures in Photoshop.
So, your choice of file type depends on how many pictures you want to get on the card and on the quality you are after. However, not all cameras offer TIFF as an option for storage.
Memory cards
In the digital camera, the memory card replaces the function of film in terms of recording the images. The cards are available in different memory capacities; which you decide to buy will depend on the number of images you want them to hold, and their size. They also have different transfer speeds – the faster they record, the faster you can shoot.
Make sure you turn your camera off before you insert or remove a card. Before you use a card for the first time, you must format it in the camera. Reformatting a card which contains images will permanently erase them, so make sure you have copied them first.
It’s a good idea to have several smaller capacity cards instead of one large one, especially when you go on holidays. That eliminates the possibility of losing all your pictures if you damage or lose a card.
Downloading
There are different ways of downloading the pictures from your memory card. You can download directly from your camera to your computer using the USB cable supplied, but it’s quicker to download via a separate card reader. As a precaution, many photographers download their images onto a portable storage device or laptop computer while on location. Some printers have card readers built in and you can print directly from your card without needing a computer.
Sharpening
• This function gives your pictures an appearance of greater sharpness by emphasizing the borders between light and dark areas. Whether and how much you sharpen in the camera is a matter of personal taste and also the subject matter. Sharpening is more suited to architecture than baby pictures, for example, though you can choose different degrees of sharpness. If you plan to work on the images in Photoshop later, it’s best not to sharpen in the camera but to leave it as the last step after you have retouched and resized the image.

Using a card reader is a quick way of transferring your pictures from the memory card to your computer.

Downloading the images from your card into a portable storage device such as this makes a secure back-up copy and is a way of managing your pictures on location.
Film effects
• If you want a digital image to look as if it has been shot on a particular film you can use software that will mimic the appearance of any film available now and even some obsolescent ones. Films such as Fuji Velvia, Kodak TriX, Ilford Delta and many more can be reproduced in Photoshop using software programs.
Film quality
It’s a mistake to write off film as a dying technology – in fact there is probably a greater variety of films available than ever before. While digital technology has been motoring on, film emulsions have been improving too. New films have been launched and some old discontinued films have been revived; at the same time the current favourites are still being improved.
The processing chemistry that goes with black and white film has been improved also and there are several small manufacturers making traditional formulae that have not been seen for years. This revival is directed toward the art photography movement.
Some photographers working in both colour and black and white prefer to shoot film and then go digital by scanning the negative into the computer and fine-tuning the image there, combining traditional and modern technology.
Black and white film
The actual speed of black and white films is dependent on the amount of development they receive – for example, a film that has a manufacturer’s rating of 400 ISO can have a working speed of 1600 ISO if the development time is increased sufficiently. Longer development times increase grain size and contrast. There are films available designed specifically for uprating, known as push films.
Black and white films are available in the following categories:
Slow-speed films: 20 to 50 ISO This group of slow films produces the ultimate in photographic technical excellence, giving very fine grain and high resolution (sharpness) and contrast. Use them for any subject that would be especially enhanced by those qualities, such as architecture and still life. Ilford, Adox and Rollei make films in this category which are superb when matched with the manufacturers’ recommended developers.
Medium-speed films: 100 to 200 ISO Films in this versatile group offer most of the qualities of the slow films in terms of fine grain and high resolution but are not as contrasty. This enables them to produce more shadow detail, which is useful for subjects such as landscapes and portraits. Ilford, Kodak, Fuji, Lucky, Adox, Foma and Rollei all have films in this range.
High-speed films: 400 ISO This group is the most versatile of all, and the manufacturers have been improving their films continually over the years. Ilford’s 400 ISO film started its life as HP3 in the 1950s, became HP4 then HP5, and has now graduated to HP5+, its latest manifestation in a long and distinguished career.
Today, all the 400 ISO films can be pushed up to 1600 ISO and beyond. At 400 ISO they reproduce a huge tonal range and can be used for almost any subject, which has made them the universal choice for photojournalists for many years and has also made them popular for landscapes on medium- and large-format cameras. As well as Ilford, Kodak, Fuji, Foma and Rollei all have films in this range.
Ultra high-speed films: 1600 to 3200 ISO These are all push films which can be rated at anything from 200 to 50,000 ISO, according to development time. The more you push them the grainier they become, with increased contrast. Use them for available light pictures and for when you want grain for graphic effect. Ilford, Kodak and Fuji produce them.
Chromogenic films Designed to be processed in C41 colour chemicals, these films have the advantage that they can be quickly processed with colour negative film in a mini lab. Although the negative looks different, they produce a normal black and white print. They are made by Ilford, Kodak and Fuji.
Infra-red films These films are like normal black and white films except that they have an extended red sensitivity. Foliage and faces become pure white when infra-red film is used with a deep red filter – to get the greatest effect, use an 87 or 88 Wratten filter to cut off all visible light relative to the infra-red. Exposure readings are difficult, and you will need to do a wide bracket (see p.32). Ilford, Rollei and Adox make infra-red films.
Digital transfer film This is a transparent film with a surface to accept inkjet printing, allowing you to make larger negatives. Makers include Permajet and Pictorico.
Colour film
Transparency films Colour transparency or slide film has been the traditional colour film for both the professional as well as the family slideshow evening. It has been preferred for the highest quality commercial printing. Most of the big transparency processing labs have now changed over to digital work, but transparency film still has many devotees.
Kodak films start from Kodachrome 64 ISO, the sharpest 35mm fine-grain colour film available. Their Ektachrome range starts from 64 ISO and goes to 400 ISO in steps of 100, 200 and 400 ISO. Kodak also make 64T film, a 64 ISO film which is balanced for use with tungsten light.
Fuji’s slowest colour transparency film is Velvia 50 ISO, which is highly saturated and has fine grain. Velvia is also available at 100 ISO, along with Astia and Provia 100; the latter also comes at 400 ISO. The Velvia films have a warm colour balance, while Asti and Provia are more neutral. Fuji also provide a tungsten-balanced 64 ISO film.

Kodak 200 ISO transparency film (left) and Fuji 400 ISO colour negative film.
Colour negative films There have been great improvements in colour negative films over the last ten years; the colour is more accurate, and the grain is smaller and sharper. Most photographers still shooting colour film are using colour negative, which has the advantage that a print can be made in the darkroom or it can be scanned and used digitally.
Kodak make a range of Portra professional colour negative films at 160, 400 and 800 ISO. These are available with a neutral colour balance (NC) or with more vibrant colour (VC). They also have a large range of amateur films from 200 to 400 ISO.
The Fuji Superia range covers 100, 200, 400, 800 and 1600 ISO. These films are warmer in colour and sharper than the rest of their range. The Pro range, from 160 to 400 and 800 ISO, is good for a general range of subjects, while Reala 100 ISO has finer grain and lower contrast.
Lenses
The primary function of a lens is to focus the image onto the film or sensor. It also controls the angle of view and houses the aperture diaphragm.
Lenses come with fixed focal lengths (known as prime lenses) or as zoom lenses. The latter are designed to provide many focal lengths in one lens, which reduces the amount of equipment that a photographer has to carry on location.
The advantage of prime lenses is that they have the largest apertures, allowing you to work in lower light levels without a tripod and to choose a shallower depth of field, which is useful in selective focus imagery. They are also still the best in terms of sharpness and minimum distortion.
Within these two categories there is a further choice between digital (D) and analogue lenses. The former are dedicated to digital cameras and will not work with film cameras; however, the latter can be used with both film and digital cameras, which means that if you are changing from film to digital you won’t have to go to the expense of buying new lenses.


Perspective correction lenses are used for eliminating the distortion that occurs when you photograph a tall building from a low viewpoint. The front of the lens can be moved up, down and sideways while the camera remains on the same plane. These lenses are mainly used by photographers specializing in architecture.
Focal lengths
While the sensors of DSLR cameras vary, they are approximately two-thirds the size of a 35mm film frame. This means that lenses are effectively increased in focal length by 1.5x, so that, for example, a 50mm lens will become a 75mm lens on a digital camera and a 200mm lens has the effect that a 300mm lens would have on film.
This means that there is an advantage at the telephoto end of focal lengths but a disadvantage in wide-angle lenses because a 24mm lens on a film camera is only about 36mm on a digital camera. To get a really wide-angle effect you need a 12mm or 14mm lens for digital, of which there are now plenty available.
Lenses range from an 8mm fisheye right up to 2000mm. There are also some very specialized lenses such as the perspective control lens and macro lens. Today, zoom lenses are used almost universally by most photographers, although some still prefer to work with fixed focal lengths.
You’ll find that just two lenses, a wide-angle zoom and a medium to telephoto zoom, will cover most situations. Indeed, the majority of people never use anything other than a zoom because cameras are usually sold with a zoom lens included, and they are also the easiest, lightest way to go. However, if you are interested in close-up photography you may want to consider using a fixed focal length macro lens as the quality is superior to that of the macro setting on the zoom lens.

Macro lenses are the sharpest you can buy. Most are about 55-60mm focal length, used with film; their focal length is effectively increased by 50 per cent on a digital camera. They are relatively inexpensive and you will probably be able to find a secondhand one at a good price on eBay.
Photographers keep to their favourite lenses over many years. It is often not so much that there is anything particularly special about that lens, but that it suits the way they see the world and the type of work they like to do.
Good-quality lenses, especially those with large apertures, can be very expensive. However, independent lens manufacturers such Sigma and Tamron make high-quality lenses for most DSLRs at about half the price of the camera manufacturers’ lenses.
Focusing modes
Your lens is focused via three modes that are selected from a switch on the camera body: S, C and M.
• S Single auto will automatically focus on the object that you point the camera at when you push the shutter button halfway down. It will fix that focus until you release the button or take a picture.
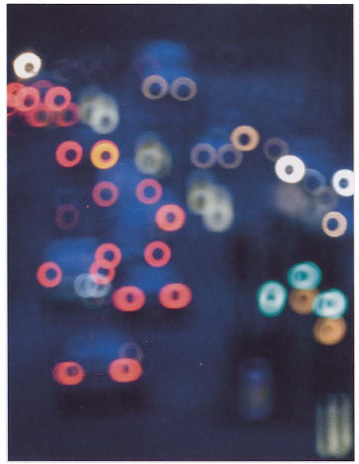
Reflex telephoto lenses have an internal mirror system and fixed aperture. Their creative characteristic is that they turn out-of-focus highlights into doughnut-like shapes.
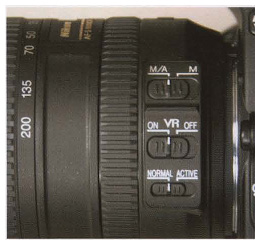
A recent addition to some lenses is vibration reduction (VR), which allows you to shoot with lower shutter speeds and still get a sharp image. VR may be incorporated in the camera body instead of the lens.
• C In continuous auto, the camera will follow focus on a moving object when you keep your finger halfway down on the shutter button.
• M In manual mode the camera is focused by using the focusing ring on the lens. The focus indicator dot will light up when you are in focus.
Most DSLRs give you a choice of where to place your point of focus in the viewfinder. This could be a single point that you can move around the viewfinder and place where your subject is. Alternatively, you can group a number of the points together to cover a larger focus area in the viewfinder. This varies with different camera models.

Focusing modes
Focus lock
You will also have a focus lock on the camera. This may be a question of pressing the shutter release button halfway down, or there may be a separate button.
Exposure
The two devices that the camera uses to make an exposure are the aperture and shutter. Working in tandem, they determine the amount of light that creates the image when you release the shutter.
The aperture
A camera lens contains an iris diaphragm, based on the functioning of the iris in an eye. It is constructed of metal leaves that open and close, making a bigger or smaller aperture in the lens through which light enters the camera. The aperture thus controls the volume of light that’s allowed to reach the film or sensor.
The size of the aperture is calculated in f-stops. Confusingly, the smallest number on your lens, such as f/2, is the largest aperture, and the highest number, perhaps f/16, is the smallest. The reason for this is that these numbers are actually fractions, representing the focal length of the lens divided by the diameter measurement of the aperture.
The shutter
Located in the camera just in front of the film or sensor, the shutter controls the length of time that either is exposed to the light entering through the aperture. The main shutter speed settings are in steps, each of which halves or doubles the length of the exposure; for example, 1/250 second allows half the amount of light through the lens as 1/125 second, while 1/60 second allows twice as much.
Modern cameras have a large range of exposure time settings, from 30 full seconds to 1/8000 second. There is also a setting called either B or Bulb, which keeps the shutter open for as long as the shutter release button is held down (you will need a cable release or remote control to keep the shutter open for an extended period). Shutter speeds on the dial are in fractions of a second until they reach 1” second, the symbol “ denoting full seconds.
Your camera has different shooting modes: S (single), which takes a single frame each time you press the shutter release and C (continuous), which is a built-in motor drive that can take up to 6 frames per second (depending on your shutter speed) while the shutter button is held down or until the film is finished or the card is full. This continuous mode can be great to use when you are panning or trying to capture a fast-moving subject. Some cameras offer the option of low and high speed continuous shooting (CL and CH respectively).
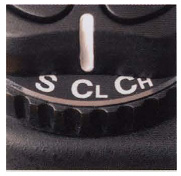
Shooting modes

All these aperture and shutter combinations have produced the same exposure for this picture. If either element of the combinations were to be changed the image would be brighter or darker.
1/250 second atf/4

1/125 second at f/5.6

1/60 second at f/8

1/30 second at f/11

1/15 second at f/16
The aperture and shutter function in relationship to each other, because in order to maintain what you or your meter calculate to be accurate exposure, both the volume of light entering through the aperture and the length of time the film or sensor is exposed to that light must be adjusted. If you increase the volume of light by enlarging the aperture, to maintain the same exposure you have to shorten the shutter speed.
Exposure meters
The exposure is calculated by your DSLR or SLR camera’s built-in exposure meter. When you compose a picture in your viewfinder, the meter analyses the light reflected off the subject and calculates what it considers to be a correct exposure of that subject.
When you are using the P, S and A modes at least part of the exposure is automatically made by the camera. In the case of M (manual), you have to set both the aperture and shutter yourself. Whether or not your photograph will be correctly exposed at the settings you have chosen is shown in the display in the viewfinder’s control panel so that you can adjust them if need be.
Although built-in meters in good-quality cameras are now very efficient, some photographers still prefer to use a separate handheld exposure meter. These use two methods of analysing the light and making exposure readings: like the camera’s meter, they measure the light reflecting off the subject, or they can measure the light falling on it, which is called an incident light reading.

When you are working with the exposure in M (manual) mode the exposure display in the control panel of the viewfinder shows if your picture is correctly exposed and, if not, whether you need to allow more or less light.
Quick tip
• Your camera’s exposure reading is only a guide to what is deemed correct. As you become more experienced you will want to adjust the reading to suit your own interpretation of the picture.
Handheld incident meters are used to take readings when studio flash units are providing the lighting. Handheld spot meters, which measure the light on a small area, are seldom used by the DSLR or SLR user now because most camera meters offer that facility.

Meter modes

Exposure compensation

Auto exposure lock

Self timer
Meter modes
Most cameras provide you with three exposure modes which evaluate the light reflecting off different areas of the picture.
Matrix mode (Nikon) or evaluative metering (Canon) averages the exposure over the whole viewfinder frame. It is recommended by camera manufacturers for all-round situations but does not work well with exposure compensation or on exposure lock.
Centre-weighted mode meters the whole frame but makes the centre of the frame (as marked in your viewfinder) the most critical. It is ideal for portraits and is also recommended when using strong filtration.
Spot meter mode (Nikon) or partial metering (Canon) takes a reading off a small centre circle (only about 2 per cent of the frame). It is ideal if you have a small but critical area in your frame that you want to be sure is well exposed. This is often much brighter or darker than the rest of the picture, but you can spot meter it and let the rest of the frame take care of itself.
Exposure compensation
When you are shooting in P, S or A modes the camera automatically calculates the exposure. If you want to override its reading, use exposure compensation. By pressing the button and rotating the control wheel you have a choice of making the pictures brighter or darker (shown on the camera as + or – respectively).
This can be useful when you have a light subject in front of a dark background, for instance, when you may need to give less exposure than the camera has calculated because it is trying to record detail in the dark background and will make your lighter subject in the foreground too bright. Conversely, if you have a dark subject in front of a bright background you may want to give more exposure.
Auto exposure lock (AE AF)
If your subject is off-centre in the viewfinder the exposure could be incorrect. The answer is to select centre-weighted or spot metering, put the subject in the centre of the viewfinder and hold the shutter button halfway down to set the focus and exposure. Use the auto exposure lock, recompose your picture and take the photograph.
Self timer
The self timer delays the shutter release, giving you time to push the button then run around to include yourself in the shot. If you don’t have a cable release or remote control to fire the camera on long exposures, use the self timer to avoid camera shake.
Quick tip
- Taking several shots of the subject at different exposures each side of normal exposure (bracketing) ensures that one will be correct. Some cameras can be set to do this automatically. You can select the number of steps you want to bracket. Keep shooting until the number of brackets you selected is finished.
Flash
Having flash at your disposal can be invaluable on many occasions, and modern automatic systems make it easier than ever to use.
Most cameras now have a built-in flash, but it’s something to use with care. Set onto auto, the camera will be popping a flash into just about everything, trying to produce a uniformly ‘normal’ picture every time, and that’s not the way forward for a creative photographer. However, the ‘fill-in’ flash works well in automatic to supplement ambient (existing) light. If you practise and study your camera manual you will be able to use it imaginatively as well as usefully.
Flashguns
As well as the built-in flashlight, the manufacturers all make separate dedicated flashguns. ‘Dedicated’ means that when they are connected to the hot shoe on the camera they can be controlled from it and work with the through-the-lens (TTL) automatic exposure. Check your manual for the maximum recommended shutter speed that will synchronize with your flash; you can use slower speeds, but if you exceed the maximum speed you will not get an image.
Flashguns have a very short flash duration which is so fast it will freeze almost any moving subject. They have more power than the built-in flash, and because they have their own battery power, they don’t drain the batteries of the camera. The swivel head can be angled to bounce light off walls or ceilings, which makes a lovely soft light – but be careful that the surface you are bouncing off is neutral, preferably white, or your flash will pick up the colours and cast them onto your subject.
There are many accessories such as diffusers, reflectors and colour filters available for flashguns. They become a really versatile and creative light source when you add an off-camera cable which connects the flashgun and the camera hot shoe, enabling you to light your subject from almost any direction (see pp.116-17), with the flash still dedicated to your camera’s automatic exposure.
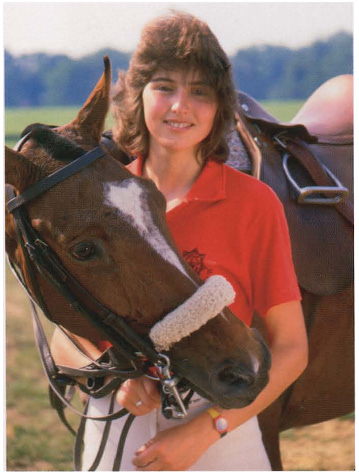
This young horsewoman was too strongly side-lit by the sun. I set the camera to P (program) and the camera did a perfect fill-in flash. JG
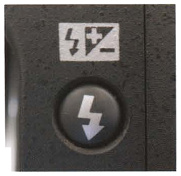
Flash button

Hot shoe

Flashgun
To calculate the correct exposure for flash when using manual mode, you will need to get the guide number from the instruction manual for your particular flashgun and follow the instructions on how to calculate the f-number.
White balance
On a digital camera, white balance solves the problem of colour casts without the need for the filters that are used with film.

The white balance button is used to set the colour according to the light.

I made this portrait of a child in a Moroccan bazaar. I like the way the shade light has made the dirty white walls blue, which has blended with the colour of the child’s clothes. If I had used the shade setting on white balance this subtle blending of colours would have been lost. JG
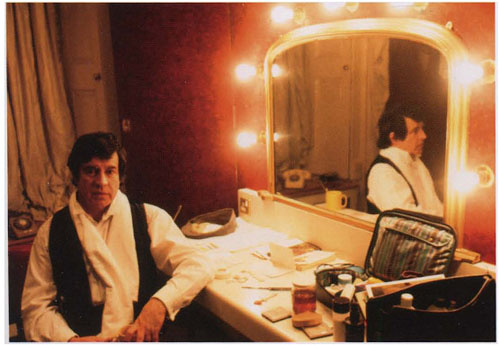
This portrait of the actor Alan Bates in his dressing room would have been drained of its warm glow if I had shot it on incandescent mode or auto as it would have been corrected to neutral colour balance. JG
There is no such thing as a pure white in the outside world. A building that is painted white, for instance, will change colour during the day as the colour of the light bouncing off it changes; if blue light is hitting it, the wall will photograph as blue.
White balance, or WB, gives you options for correcting colour balance for a number of different light sources. Once the camera has established a neutral white all the colours in your picture will fall into place, and the colour cast that has been taken out of the white will also be removed from the colours. Many of the new camera models also include the facility to fine-tune the colour balance in the camera after you have taken the shot, which can also be done in Photoshop.
However, this book is not intended just to help you take technically correct pictures, but to show you how to make exciting ones. The danger of digital photography is that it always attempts to make things uniform, and this is most evident on the white balance mode; WB technology has been developed to make every colour picture you shoot look as if you have taken it in direct sunlight.
The end result of this is that you could end up with blandly normal pictures that lack the excitement that all the amazingly variable light sources provide us with.
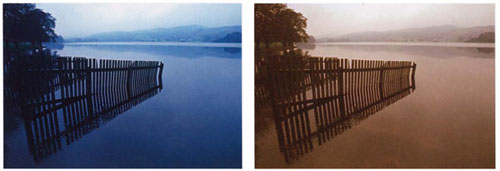
This landscape was shot on a very overcast day. I liked the composition but not the colour, which was boringly grey. By setting the white balance to incandescent I was able to get a blue cast which gave it an early-morning feel. I then tried a shot on shade setting and that warmed it to look like evening light. GH
Although it’s important to understand the white balance mode and its functions, don’t allow it to commandeer your own assessment of light.
Auto
This automatically sets your camera to suit any lighting conditions, giving a fairly good neutral colour balance. However, if you just leave white balance set to auto all the time you are in danger of missing out on capturing the subtle beauty of different light conditions. When shooting in daylight, for example, try setting the white balance to the direct sunlight setting so you can capture the different light qualities that change throughout the day.
Incandescent
An ordinary household tungsten bulb gives incandescent light. It is much warmer (yellow/orange) than daylight and requires the camera to add blue to balance it back to neutral. The incandescent setting provides a more neutral colour balance than auto, which tends to be warmer.
Fluorescent
Use this setting when you are shooting in fluorescent light; it will achieve a much better colour balance than auto white balance succeeds in doing.
Direct sunlight
Like daylight-balanced colour film, this setting gives a natural colour balance in direct sunlight in the middle of the day.
Flash
Flash tends to be slightly cooler than daylight; this setting warms it up a little.
Cloudy
On overcast days the light is cooler. This setting warms it to match direct sunlight.
Shade
Light in the shade is much cooler than bright sunlight because it mainly comes from indirect blue sky light. This setting warms the light to match direct sunlight.
Preset
You can manually set the white balance to correct any light source to neutral. This is accomplished by photographing a grey or white surface in the light in which you are working. You can also set the colour balance to a pre-selected photograph of your choice. Refer to your manual for instructions.
Essentials
This is a list of essential items that you will find invaluable – in fact, sometimes they can be as important as your camera.
Compass and torch
Carrying a compass is a great idea as it helps you to plan ahead as to where the sun will rise and set when you are shooting landscapes. You can also work out which way buildings are facing to choose the best time of day to take a photograph. A torch is handy to find things in your gadget bag and to see camera controls at night. It can also be useful as a small light source for shooting portraits or still life.

Compass and torch

Cleaning equipment

Cammera bag
Cleaning equipment
Your camera is a precision instrument. Take care to protect it from dirt, water, and particularly sand, which is a sure killer of unprotected cameras. Keep a plastic bag with you for emergencies.
A dirty lens covered in fingerprints and grime will act as a diffuser and degrade your images. Keep the lens clean, first by trying not to let it get dirty to start with. Ideally, use a UV filter to protect the lens as it will be much cheaper to replace than a new front lens element – it won’t affect your exposure values and its only function is to reduce haze.
To clean a lens, use a blower brush first to remove any dust and grit then carefully clean it with a microfibre lens cloth and lens cleaning solution if needed. Don’t scrub it – use gentle strokes or you will risk scratches on the surface.
The image sensor in a DSLR is particularly vulnerable to dust spots. When you are changing lenses, make sure the camera is turned off and don’t allow dust to enter the camera. You can get specialized sensor-cleaning equipment or have your camera manufacturer’s service department do it.
Camera bag
The selection of a camera bag is most important. Buy the best quality bag you can afford to protect that expensive camera. Hard cases that protect camera gear in the worst conditions are heavy to carry about, but some now have built-in wheels. Soft bags in a variety of materials and a huge range of styles are now available. Backpacks are great for hiking and are also useful in urban situations as they aren’t easily identifiable as containing valuables, but shoulder bags are much quicker and more convenient to work from.
When buying a bag, take your equipment to the shop to make sure that it will fit in and the bag will suit your way of working. A good bag will last a very long time; the Billingham one pictured here has been working hard for 30 years.
Flashgun
A separate flashgun has great creative advantages over the built-in flash you may have on your camera. As well as the dedicated flashguns described on p.33 there are also manual and automatic flashguns available; the manual ones have a fixed light output and you find the aperture you need from a table on the flashgun, while on the automatics you set your camera aperture to match the flashgun and it controls the exposure.
Most flashguns allow you to rotate the flash so you can bounce it off walls or ceilings to get indirect light. The most creative way to use the flashgun is to attach it to an off-camera cable (see pp.116-17), so you will probably want to buy one of these too.

Flashgun

Laptop

Fold-up reflector
Laptop
An increasing number of photographers take their laptop computer out and about with them, and you may think it a good idea to do the same. You can download your pictures on the spot, check the shots on the larger screen, save the images to the hard drive and also output to a CD if you want to be sure the pictures are safe. With the right software and cable you can also shoot with your camera tethered to the computer –the image appears on the screen when you make the exposure.
If you prefer to travel lighter you will need to have some other way of making records of locations and so on. Take a notebook, or something more technological such as a Blackberry, depending on your taste.
Fold-up reflector
Reflectors bounce light back onto your subject, almost as if they are an extra light. They are usually white or silver, or gold to add a warm glow. This type pictured below is convenient as it has a handle and packs into a pouch for easy carrying. There are many sizes and types available, but you can also use a variety of materials such as card, paper, cloth, kitchen foil and so on.

Tripod

Camera support

Multipurpose tool
When you use a reflector remember that it bounces the main light back, so position it for maximum effect. For a portrait, for example, placing it below and in front of the subject will lighten the eye-socket shadows. For still life, use pieces of card, foil or small mirrors to add sparkle and soften shadows.
Tripod
This is an invaluable piece of equipment when you are using slow shutter speeds as it prevents camera movement during exposure. While modern lenses with vibration reduction have helped the photographer handhold the camera at slower speeds than previously, for long exposures a tripod is still needed.
A tripod is also a great help for shooting a still life. You can set up and compose your subject, then lock the camera onto the shot. This allows you to move lights and reflectors and adjust the subject without having to recompose each time.
When choosing a tripod you have to consider weight, height and ease of use. The higher, more stable ones are superior but are difficult to carry around for long.
A cable release or remote control is generally used in conjunction with a tripod to minimize camera movement when the shutter is released. In the absence of one of these, use your self-timer to fire the shutter.
Camera support
Some photographers carry a bean bag with them. This is nothing more complicated than a small bag half-full of beans, rice, polystyrene beads and so on. It suffices as a camera support when you don’t have a tripod or are in too difficult a position to use one. Alternatively, anything to snuggle the camera into will do, placed on something handy such as a wall or bench; the picture above shows a sweater. This allows you to do long exposures without the camera moving. Again, use a cable release, remote control or self-timer to fire the shutter.
Multipurpose tool
This is an indispensable tool that can rescue you from a wide range of small problems. Where there is any well-used equipment things will inevitably go wrong, and this gadget may get you out of trouble. It is invaluable for everything from repairing a broken fingernail to removing a wine cork when celebrating a great shoot.
Review
In this section of the book, you have discovered the basics about the equipment you need and some extra items you may like to acquire.
Always remember, though, that the possession of a range of technology and gadgets isn’t the most important factor in whether you are a good photographer or not. Too many people concentrate more on equipment than on their images, constantly poring over the reviews of new products in magazines rather than thinking about the content of their photographs.
The range of sophisticated equipment available is indeed vast and it’s amazing how much the price of cameras has dropped in recent years; relative to inflation, the Leica of 30 years ago would cost about £8,000 today. Although most of us can be quite excited by the technology, it’s not the camera that takes the picture and it still needs a great eye and imagination to achieve a stunning shot.
Improving as a photographer doesn’t come from buying a new camera – it’s all down to getting experience and the way to do that is to start shooting lots of pictures, learning from your mistakes. Start working your way through the projects in the following pages and you’ll soon see results. Most importantly, have fun and enjoy making pictures.

This picture was shot in late afternoon in shade. The light was very blue and I was tempted to warm it up, but decided that the cold light was sympathetic to the mood and that the yellow dress was so saturated it would survive the blue cast. It made a warm shape to comfort the cold little boy. JG
Pre-shoot checklist
It makes sense to refer to a checklist of equipment and settings before you go out. This one should cover most eventualities.
- A fully charged battery, and a spare too if possible.
- Formatted memory cards, or film of your chosen type and speeds.
- File type and image size selected.
- ISO set to your chosen speed.
- White balance set to auto or the light source that you will be shooting in.
- Exposure compensation set to 0.
- Shooting mode, focus mode, exposure mode and meter mode selected.
- Lenses, cleaned and set to auto or manual. VR set to on or off.

This was lit from below by a flashgun under a sheet of opal Perspex. The fast flash has frozen the splash made by the cherry dropping into the cocktail. GH