Exposure
Capturing the light
This lesson will take you forward from the basic facts you learnt about exposure on pp.30-31. In the following pages you will discover how you can take control and use exposure in an imaginative way.
When we take a photograph we are basically trying to reproduce our subject onto the film or digital sensor by means of translating light into an image. Louis Daguerre, after making his first photographic image in the 1830s, reportedly exclaimed, ‘Eureka! I have seized the light. I have arrested its flight. The sun itself in future shall draw my pictures!’
It’s said that Daguerre’s discovery was an accidental one that resulted from leaving an exposed glass plate in a cupboard where there were spilt drops of mercury which gave off vapour. No one today would recommend some of the more hazardous dabbling with chemicals the pioneers of photography indulged in during their attempts to find ways of advancing the techniques of this new medium, but the principle remains the same: the photographic image stems from the capturing of light.
Creative exposure
After framing the subject and focusing the lens to provide a sharp image, the photographer – or the automatic mode on the camera – then sets the combination of the aperture and shutter to control the amount of light reaching the film or sensor to obtain a correct exposure.
However, this exposure is defined by what the equipment manufacturers believe will give the maximum amount of colour and tonal reproduction that is faithful to the subject. In fact, as you will discover in this lesson, the correct exposure is a highly subjective matter.

The snow was lit by early-morning sunlight and the blue sky filled in the shadows. I needed to keep the snow light but retain the texture. I added +1 stop exposure compensation to the normal exposure. GH
Exposure is not merely a technical equation – it is one of the most creative decisions you can make when you are taking a photograph. While a basic average exposure may record how the subject appears to the eye, it may not express how you as a person responded to the subject at the time. Perhaps a darker or lighter image would better capture the mood you were feeling when you took the picture.
The personal response
In spite of the incredible sophistication that manufacturers have built into the modern camera, they have not yet managed to incorporate a human heart, aesthetic taste or sense of humour into their machines. That is still down to the photographer’s input – but to be able to express your creative feelings you need to understand what the camera is doing, and how to use all this amazing technology to help you take more imaginative pictures. This lesson will help you to explore the possibilities that are open to you and encourage you to depart from what the technology tells you.
Seeing the big picture
The double-page picture on pp.40-41 is a high-key portrait achieved by using soft front light and a red filter over the lens. I gave it +2/3 exposure compensation because I wanted to produce a thick (dark) negative from which it is easier to make a light print. Once I had developed and fixed the print I gave it a one-minute immersion in selenium toner to give it a sparkle and warm tone. JG

This was an exercise in ‘Old Master’ lighting – a diffused window without a reflector. I wanted to keep the image low key and moody. I took a spot reading off the highlight areas and shot at f/11 for a good depth of field. GH
Choosing the exposure
You will see the term ‘correct exposure’ used often, but the pictures here show that there is a wide range of exposures that may be right for the occasion.
All the pictures in this series, which is a bracket (see tip, p.32), have merit in their own way and could be described as correctly exposed – yet they vary from the lightest image to the darkest by 21/2 stops.
The darkest one (bottom right), at – 11/4 stops from ‘correct’ exposure, has turned the model into a near silhouette which is a very effective use of the body shape. The lightest (top left), at +11/4 stops, is also attractive because it looks soft and romantic. The shots in between are quite usable also. It’s a perfect example of how the right exposure is often a matter of personal taste, and depends on what you want your pictures to achieve.

These photographs were all shot with window light and a white reflector at 1/125 second and 200 ISO.
PROJECT 1
Bracketing
Bracketing your exposures is the safe way of achieving the density that captures the atmosphere that you are after.
Bracketing (see tip, p.32) is more critical for film users than digital photographers, because with a digital camera you can check the exposure on your monitor. However, bracketing is still valid for the digital photographer because it produces unexpected results that can prove to be more exciting than those the chosen exposure has given.
For this project, choose three different subjects such as a landscape, a portrait and a still life – bracketing isn’t suitable for reportage and action photography because of course the best action may be on the wrong exposure.
Bracket the exposures on each shot and see if a lighter or darker frame works better than the one the meter chooses. Don’t be tempted to delete what appear to be unsuccessful exposures – keep them so you can reassess them on the computer later.


These two photographs were shot one hour before sunset in the dunes of Death Valley in the American southwest. With the camera on a tripod, I made a big bracket of exposures from – 21/2 stops to +11/2 stops as I couldn’t decide on the exposure I wanted. I received a pleasant surprise when the picture at -2 stops was more interesting and dramatic than the normal exposure. JG
PROJECT 2
High-key photography
The high-key approach is ideal for subjects where a soft, dreamy look is wanted, for example in plants, nudes and portraits of children.
The photograph on pp.40-41 is a classic example of a traditional high-key portrait. Note how little highlight detail has been kept, with the result that the sitter’s skin is very pale and the viewer’s attention fixes on her eyes and mouth.
The old maxim for high-key photography is to expose for the shadows and let the highlights take care of themselves. The subject matter needs to be one that benefits from being light, not just in the sense that there needs to be pale tones present but also that it should suit the atmosphere that high key gives.
What you are after for this project is lighting as close to shadowless as you can get. It’s a good idea to have small areas of black in the picture to contrast with the overall light tones, such as the stems in the picture below. Bracket your exposures, starting on the normal exposure and overexposing in 1/2 stop steps up to +2 stops.

When honesty (Lunaria) pods dry they turn translucent white like tracing paper. This shot was made using back light, with a white reflector to fill the front. It is almost a silhouette, but the light coming through the pods has lit them up. A normal exposure reading would have turned the whole picture medium grey, so I overexposed by +11/2 stops to keep it light. GH

Most objects in this picture are predominantly white. The light was bounced off a large white reflector on the front left, with a white reflector on the right side to fill in and soften any shadows. I then overexposed by +2 stops from normal to get the high-key effect. GH

This intimate subject required a high-key approach. One light hidden behind the subjects illuminated the white sheet I used for the background. A large white reflector was placed each side of the camera to act as a soft front light. I used a warm-up filter and overexposed by +1 stop to give the light, delicate feel. GH

This portrait was taken in front of the Carlton Hotel during the Cannes Film Festival. The subject, who looked like a still from a 1920s movie, was completely front-lit by a bright but overcast day. The conditions were perfect for me to overexpose by +1 stop in order to emphasize her high-key make-up. JG
PROJECT 3
Low-key photography
A low-key picture is predominantly dark in tone, which gives a dramatic effect suitable for a range of subjects from atmospheric landscapes and interiors to urban scenes with an air of menace.

On a stormy day in the English Lake District this shaft of light hit the lake for a brief moment. I was shooting on infra-red black and white film, which has provided grain and high contrast. I took a highlight reading off the bright clouds and printed the picture dark and moody so the light on the water would be the focal point. JG
For a successful low-key picture the critical elements are the choice of subject matter, the light and the exposure. When all these come together successfully you will find you have taken exciting shots that convey a strong sense of atmosphere to the viewer.
Choose a subject that will benefit from looking dark and moody and look for light that is throwing deep shadows with little or no reflection. The exposure needs to be less than normal in order to keep the highlights and mid-tones rich and dark.
In contrast to high-key pictures, this time you expose for the highlights and let the shadows take care of themselves. To do this, use your spot meter mode to take a reading off the highlight area of your subject. The result is that the rest of the picture will be underexposed and low key.
An alternative way to achieve low-key exposures is to bracket on the minus side using exposure compensation, for example -1 stop, -2 stops, -3 stops, which will give you a range of density to choose from.

This shot of the little boy was exposed for dramatic effect. In reality, the scene looked much lighter to the eye. The low-key effect has come from underexposing by 2 stops. I achieved this by bracketing and chose the darkest picture. JG
PROJECT 4
Sunrise and sunset
There can be few photographers, professional or amateur, who haven’t felt impelled to photograph the stunning sight of the sun rising or setting in a sky glowing with pink and purple.
When you are photographing a sunrise or sunset it’s very tempting to point the camera directly at the sun. If you accept the camera’s metering of this the sun will appear in your photograph as an intense red ball but everything else will be underexposed. If you want to hold some other surrounding detail you need to add +2 stops exposure (see right).
An alternative approach is to keep the sun to the side in the viewfinder, take a reading, then recompose and take the picture with that exposure. This will give you a more average exposure without the direct brightness of the sun fooling the meter into underexposing.
Shooting the sun
For this project, shoot a sunrise or sunset using the ball of the sun as the focal point and include some other interesting feature. The ball of sun never looks as big in the picture as you expect it to be, so use the longest lens you have.
Experiment with exposure compensation until you reach a good compromise between strong colour and detail in the rest of the frame. It’s advisable to bracket to make sure of getting some good shots. There are no prizes for getting the picture in one exposure – a beautiful picture is the prize.
The second part of the project is to turn your back to the sunset and take advantage of the warm light to shoot romantic landscapes or even portraits. If the colour is too pale in your photographs, use a warming filter or warm up the white balance.

This dark picture was taken with the normal reading selected by the camera meter.

Given +2 stops exposure, the camera has included the detail.

Here the sun is used as the focal point of a pattern. Knowing the tree would be silhouetted in such strong back-light, I took readings of the sun and the bottom left and top of the frame, arrived at an average and set the exposure on manual. GH
PROJECT 5
Silhouettes
The cutting of profiles from black paper originated in Europe in the early 1700s and became extremely popular. It was not only fashionable but also a much cheaper way of having your portrait made than commissioning a painting.

This silhouette is a straight imitation of the original cut-out look. I used a flash gun on an extension cable hidden behind her head, pointed to bounce off the white background and create the silhouette. I bracketed the exposures to make sure I got a white background and no detail in her face. JG
When photography was invented, shooting silhouettes was an easy technique to master and it has remained popular with photographers. A simple way to make a silhouette is to hang a piece of tracing paper or a thin white sheet inside a window on a bright sunny day. To get the correct exposure, set the camera to manual mode, take a reading of the sheet, then add +2 stops to the normal reading to ensure the sheet will be white.
Place your model about 2m (61/2ft) in front of the sheet and make sure the room lights are turned off so your model will be in relative darkness. A wide aperture is best to keep the sheet out of focus, and if you are on a slow shutter speed you will need a tripod. You will get a sharper edge to the portrait if you use a low ISO setting. You may have trouble focusing on the dark face, in which case focus on the edge where the face meets the background. Compose your portrait and shoot.
The assignments here are first to make a silhouette against a window as described, or use the flash technique shown left. Secondly, make one outside, remembering that the light behind your subject has to be at least 3 stops brighter than the light falling on it.

Early morning and late afternoon are silhouette times of day; any subject caught between the low-angled light and the camera will appear in silhouette. In this shot, made at about 4pm, the sun has kicked off the sea and sent all the bathers into silhouette. The exposure was +1/2 a stop. JG

The girl’s silhouette against the dramatic flames makes an unusual Bonfire Night image. I framed the picture and waited until she turned her head so I could see her profile. I took a direct centre-weighted reading and added +1 stop exposure compensation so the flames wouldn’t be too dark. GH
PROJECT 6
Multiple exposures
Two or more exposures mixed with each other can produce some unusual and interesting results. Once you have got to grips with the technique you may find you want to experiment with more complicated moving subjects.
Multiple exposures can of course be done in Photoshop, but the degree of control you have on the computer means that often the results lack spontaneity. The fun of trying it in-camera is that it is a more random, hit-and-miss method. Accidents often produce very creative images that, even if they don’t entirely please you, can send you off on new paths of exploration. Film shooters will find it even more experimental as the results can’t be seen until the film is processed.
Mixing images
The more images you mix together the more complicated the picture becomes. For this project it’s best to start with just two images. You will need to use a camera with a multiple-exposure facility – or one where the film is wound on by hand in traditional fashion.
Choose your main subject first then look for a background. The best results generally come from overexposing the main shot at normal or +1/2 stop then underexposing the background, which allows the main shot to stand out. If each exposure is the same, one image tends to mix with the other and you can end up with an abstract pattern – it depends on the subjects you choose.
Try making a double portrait, too. For this you need to make both exposures normal as the two shots will not be overlapping.

To get this double portrait of John, I had him wear a black sweater, then put up a black backdrop to stop any background details showing through his face. I set the camera to multi-exposure and selected 2 shots. I shot his profile first, leaving space to the right of the shadowed side of his face to add the second shot. I then recomposed with John facing me and made the second exposure. GH

This tree abstract was done by shooting bare branches against the sky. I did the first exposure with the camera horizontal and the second vertical, keeping both exposures the same. The 90-degree criss-cross pattern has given an effect like reflections in a pond. GH

I took the portrait first, underexposing by -1/2 stop, then shot the trees at -1 stop to get the sky dark enough. It took three attempts to get it right. I think the glow of the face against the tree pattern looks satisfyingly spooky. GH

I chose this photograph out of a bracket of exposures. There was still some daylight left to add to the light of the lamps and I used centre-weighted, aperture-priority exposure. I couldn’t decide how I wanted this to look, but it turned out that the darkest exposure gave me the atmosphere of Venice at dusk. JG

This shot of an oil rig in the Arabian Gulf was taken at sunset but I used only the light trail of the sun and its hot colours to compose my picture. There are many ways of shooting a sunset, and the usual one of pointing the camera at the ball of the sun can sometimes be boring. JG
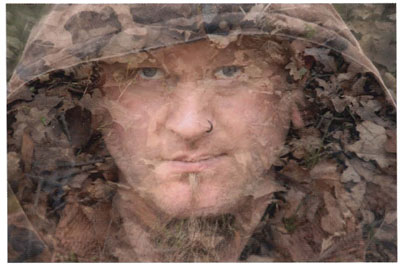
Ian was wearing a camouflage jacket and hood, and the idea was to double-expose dry leaves over his face to add to the camouflage effect. In my first try both exposures were the same but his face was too obscured. I then underexposed the leaves by -1 stop and used normal exposure for his face, giving a great result. GH
Exposure review
- There are more ways of getting the exposure right than simply accepting the camera’s version of correct exposure.
- Choosing high-key or low-key lighting, silhouettes and multiple exposures gives you the chance to add atmosphere to your pictures and exercise your creativity.
Project 1 Bracketing
You should have seen from the project how density (light or dark) affects colour, tone and the mood of your photograph. Bracketing is a great way to learn this.
Project 2 High-key photography
If you didn’t achieve a satisfactory result, you may have chosen the wrong subject with too much shadow – rethink your subject matter and lighting. If the picture was too bleached out you possibly overexposed too much. Next time, try reducing the exposure.
Project 3 Low-key photography
If your pictures didn’t have the right mood, maybe you chose a subject that lacked enough shadow; in the case of a portrait, perhaps your model didn’t wear sufficiently dark clothing. If the exposure was wrong, study the exposure brackets as they will help you to see how to get your exposure right next time.
Project 4 Sunrise and sunset
One problem you may have had is missing the right moment, which is quickly over. You cannot chase a sunrise or sunset – you need to plan ahead, set up and wait. A compass reading can be very helpful to establish where you should be. If you don’t have a really long lens, you may be disappointed at how small the sun ball appeared in your picture. Instead, try excluding the sun and make beautiful pictures with the colours.
Project 5 Silhouettes
You may have found that the exposure difference between the background and the subject wasn’t enough. If you had too much detail in the subject, perhaps your flash fired an automatic fill-in – check that it is turned off.
Project 6 Multiple exposure
If you were disappointed with the result, it’s probably because you chose subjects that weren’t sympathetic to each other, or the exposures were too similar. Try again, making one of the exposures darker than the other. If that fails, change one of the subjects or start from scratch.
A double portrait with details of the first showing through the second means that you didn’t achieve a sufficiently dark shadow area on the first. Take a look at John’s profile on p.51 and aim for a similar effect.