Aperture
Using aperture creatively
The ability to control the depth of field in a photograph offers you the chance to convey mood, draw the viewer’s attention to a particular point of interest in the composition and influence colour and tone.
You have learnt about the functions of the aperture and shutter as the mechanisms that control the exposure; now it’s time to discover the use of the aperture as a creative tool.
The aperture controls the depth of field in the photograph – that is, the distance in front of and behind the point of focus that is held sharp. Many photographers keep their cameras almost permanently set to aperture priority, choosing to make the depth of field a major part of their creative decision about how their shots will look.
Handling colour and tone The ability to decide upon the depth of field you want gives you considerable control over colour and tone. When colours are out of focus they merge together; when they are sharp they become hard-edged, each colour separated from its neighbours. To be able to change the relationship of colours and tonal range by enlarging or reducing the aperture is very exciting.

I shot these back-lit poppy buds on a 300mm lens at full aperture (f/4.5). The combination of the long lens and wide aperture has isolated the buds against swirls of orange colour. GH

I wanted the tramlines of Melbourne to be in sharp focus from front to back, which I achieved by stopping down to f/22. Using a 300mm lens compressed the perspective. I underexposed the background by -21/2 stops to make the tramlines stand out against the darkness. JG
Influencing emphasis Your chosen aperture also affects the emphasis that you place on the subject matter. For instance, if you want to isolate your sitter in a portrait shot and make the viewer study the face without being distracted by the background, you would shoot with the aperture wide open; the face would be sharp but everything in the foreground and background would be out of focus. On the other hand, if you decide that the sitter’s environment is important to the story – for example, an artist in the atmosphere of her studio – you would then choose to stop down to a smaller aperture to keep the surroundings and any foreground more sharply in focus.
Checking your settings
You can check the depth of field by using your depth of field preview button if your camera has one, or digital photographers can check it on the LCD screen. However, you must take careful note of the shutter speed that your camera has set. Stopping down to a smaller aperture to obtain greater depth of field may have necessitated a slower shutter speed that requires a tripod or an increase in the ISO setting.
Seeing the big picture
Just before I took the double-page photograph that opens this lesson I was packing my equipment away in the car. The man and his dog appeared from the side of the road and, spotting a good shot, I rushed to get the camera out again. I zoomed the lens to 200mm and shot at full aperture of f/4.5 to throw the background out of focus. GH
Depth of field
For creative photography, making a positive decision about what the depth of field will be is equally important across all genres from still life to sports.
Some students of photography find depth of field a difficult technique to understand, but it’s really quite simple and it’s important to grasp it because it is such a potentially exciting creative tool.
The still life and portrait photographs shown here use aperture in exactly the same way, though this might not be immediately obvious because the subject matter is so different.

Using a very wide aperture of f/1.8 has left only a minimum area of the guitar in focus at the far end of the fretboard.
Still life
This guitar makes a good subject for a still life because you can easily see the effect the choice of aperture has. The left-hand picture was shot at f/1.8 on a 50mm lens; note just how limited the depth of field is. The right-hand shot was taken at f/22 and the guitar is now sharp right through from front to back. You can use this variable depth of field to place the visual emphasis wherever you choose. With the aperture wide open you can make the viewer concentrate on the only part of the object in focus; by stopping it down, you can be more descriptive by keeping everything in focus. A tripod was used here to make sure the positioning of the guitar was the same in both pictures and that there was no camera movement.

Even though the guitar is angled directly away from the camera, an aperture of f/22 has succeeded in recording it all in focus.
Portrait
This portrait of Ines was set up with a foreground, middle ground and background. The lens was a zoom, set at 80mm, and the first shot was taken with the aperture wide open on f/2.8. Both the flowers and the street scene behind are completely out of focus. This has placed the full emphasis of the picture on Ines, as the eye is not distracted by any other detail.
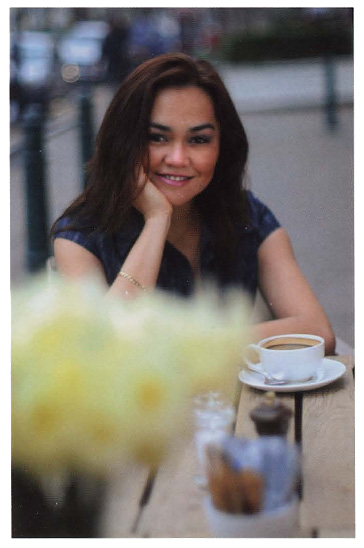
With the aperture wide open on f/2.8, there is nothing in this picture for the viewer’s eye to fasten on except Ines herself.
For the second shot the aperture was stopped right down to f/22. Now the flowers are sharp and a street scene has become visible behind Ines. You can see the obvious application of the aperture here; the first picture is solely a portrait of Ines, while the second picture is a portrait of Ines at the street café.
A tripod was used because in aperture priority the camera automatically slowed the shutter speed down to 1/2 second to maintain the same light value when the aperture was stopped down to f/22.
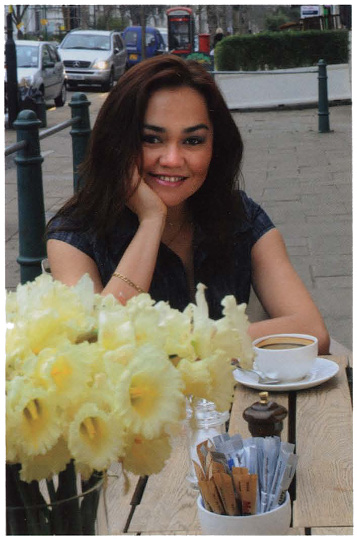
Stopping the aperture down to f/22 has placed Ines in an urban scene, giving the viewer information about her surroundings.
Quick tips
- A lens with apertures as large as f/2 or even f/1.4 is called a fast lens. The faster lenses are bigger, heavier and much more expensive.
- If you want a fast lens but have a limited budget, consider buying a good second-hand one on eBay. Alternatively, many shops selling used cameras offer a warranty period.
PROJECT 1
Shooting with a wide-open aperture
The purpose of this project is to practise using the aperture wide open (maximum aperture). If you have always allowed the camera to decide the aperture, you will find it a revelation to take control of your backgrounds.
With the camera focused on a foreground subject, you can throw the background out of focus by setting the aperture to its widest opening. The longer the focal length of the lens or zoom setting, the shallower the depth of field will be and therefore the more dramatic the effect.
Remember to consider the background in terms of colour rather than information and if possible place your subject so that the background colour works well with the part of the picture that is in focus – for example, a complementary colour or one that echoes even a small patch of colour on the subject will provide a coherent picture that pleases the eye. An unrelated colour won’t add to your picture, and if it is strident too it will distract attention from your subject.
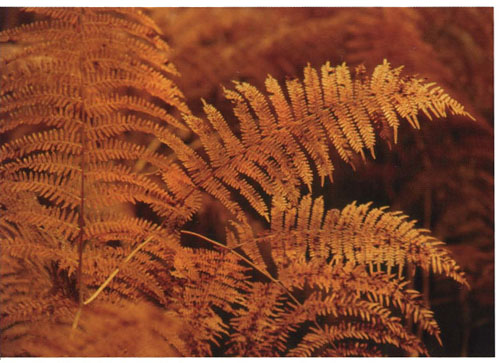
This photograph was shot on a zoom setting of 135mm at f/3.5. Throwing the background to the fern out of focus draws attention to the beautiful structure of the plant and loses the confusing detail of the background foliage. I used the shade setting in white balance to add extra warmth. GH

This is a typical long-lens wide-aperture portrait, albeit of a bird. It was shot in Kenya from a jeep, using a 400mm lens at f/3.5. The camera was supported by a bean bag. The straggly bushes behind have been converted into a lovely green background that zings the bird forward to the eye. JG
PROJECT 2
Using selective focus
Choosing a very shallow depth of field to place emphasis on the point of interest is known as selective focus. It enables you to achieve dramatic shots and to draw the viewer’s eye to your subject.
The first project in this lesson explored the effects of using full aperture and throwing the background out of focus. In the second project this idea is taken a step further to include an out-of-focus foreground as well. How unsharp the foreground will be depends upon the length of the lens, the size of the aperture and, very importantly, the distances between the lens, foreground and subject. This technique is often seen when the photographer wants to create a soft, romantic mood in a picture.
Practicalities
Sometimes your subject falls perfectly into place, but you may often find that you have a perfect background but nothing in the foreground to work with. If you can’t achieve what you need by repositioning your subject a little, try to add your own foreground object, for example a branch, some flowers or even a scarf.
If you want both the background and subject sharp and the foreground out of focus, you need to keep the subject and background as close together as possible, with the foreground still close to the lens.
You will probably find this project trickier than the first. To make it easier, take your subject with you – a patient friend who will move back and forth while you experiment. Taking a range of shots with varying apertures such as f/2.8, f/4 and f/5.6 will help you to learn how to achieve different effects; sometimes you may want backgrounds or foregrounds to be slightly unsharp rather than completely out of focus.

I spotted this family through the trees at sunset. The out-of-focus foreground adds an atmosphere of this being a secret place where they are in their own private world. I waited until the group made an interesting shape; the boy pointing at something adds an element of mystery. This was shot on a zoom set to 200mm with a wide-open aperture of f/3.5. JG

This shot of a lemon was the result of playing around with some kitchen objects. I used a 80mm lens and stopped down to f/5.6, which kept the cutlery out of focus but made it still recognizable. Rather than this being just a straightforward photograph of a lemon the cooking process is now implied. GH
PROJECT 3
Stopping down
Sometimes you will want everything in your photograph to be in focus. Unlike shallow depth of field, where you have to make choices as to how much or how little, this is an absolute which depends only on the capacity of your lens.

It was essential that this shot of the Wrigley Field Baseball Park in Chicago was sharp from foreground to background; I needed to hold detail in the city skyline as well as in the fans below my vantage point. Shooting on a 24mm lens at f/16, I did just that-the picture works well. JG
The two main reasons for stopping down to hold focus through from foreground to background are the need to be descriptive about a place or event and the desire for a hard-edged, graphic composition.
When you are shooting stopped down you will get most effect by using a wide-angle lens or a wide-angle setting on a zoom. As stopping down to small apertures means increasing the amount of time that the film or sensor is exposed to light, remember to keep an eye on the shutter speed as you will need to use a tripod if the shutter speeds are getting long enough to risk camera shake. A rough guide is to use a tripod if the shutter speed, in fractions of a second, is less than the length of your lens or zoom setting – for example, a speed of 1/60 with a 105mm lens will require camera support.
As objects in the background will be sharp, you will need to search the viewfinder very carefully to make sure there are no distracting objects that will spoil your picture, such as the old classic of a telegraph pole growing out of the top of your subject’s head. If you are shooting on a digital camera you can also take a shot and check again on the LCD screen. If it’s not possible to move the subject or unwanted object, editing it out in Photoshop is the modern option.

Zion National Park is noted for its rock formations, which look as if they were formed by the stirring spoon of a giant. To describe them best the picture needed to be sharp from front to back. A 24mm lens at f/16 has done the trick, with a polarizing filter to take the shine off the rocks and intensify the blue sky. JG
Quick tip
- The best way to maximize depth of field is to focus on a point one-third of the way into your composition, then stop the lens down to a small aperture, such as f/16. Lenses maintain two-thirds of their depth of field past the point of focus and one-third in front. This point of focus is known as the hyperfocal distance.

These ‘kettles’ are used in the distillation of Cognac. I wanted my composition using the round and oval shapes to be as clear and sharp as possible. By shooting on a wide-angle 20mm lens and stopping down to f/11, I have maintained sharpness from front to back. The shutter speed was 1/8 second, with a tripod. JG

The Madagascan spice market would look pretty shot at any aperture. I decided to hold it all in focus to make sure the colours and the round shapes of the bags would be well separated. I used a zoom lens at a wide-angle setting, stopped down to f/11. JG

I back-lit these seedheads by placing them in front of a window with a white net curtain. I used a desk lamp as a warm front light on the seedheads and shot on a 150mm lens at f/5.6. The out-of-focus background makes a pleasing pattern without being too conspicuous. GH

This photograph was for an annual report and I wanted it to be descriptive rather than arty. The whisky barrels needed to look close together and sharp all the way through, so I used a 75mm lens setting on my zoom and stopped down to f/16 with a warming filter. It was shot outside in the storage yard in sunlight. JG
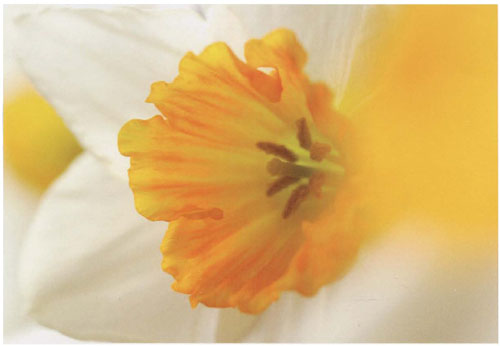
By using a wide aperture of f/4 on a 105mm macro lens I was able to isolate the trumpet of the daffodil. The out-of-focus foreground and background has added a soft, romantic feeling to the picture. GH
Aperture review
- Setting your camera to aperture priority allows you to take creative decisions about how much of your photograph you want to be in sharp focus.
- A shallow depth of field gives you the chance not only to guide the viewer’s eye but also to influence colour and tone.
Project 1 Shooting with a wide-open aperture
This should have been the easiest of the three projects because in principle, once you have set your aperture wide open and focused on your subject, the background will be out of focus. If it wasn’t sufficiently out of focus, you may have had your zoom set to a wide angle, which gives a greater depth of field than a telephoto lens. Alternatively, your subject may have been too close to the background.
Did you remember to consider the colours in the background? You are in effect washing the colours together to create an attractive background that doesn’t distract from the subject.
Project 2 Using selective focus
If your foreground was not as soft as you expected it to be, you may not have set a large enough aperture or you may have been using too short a focal length on your lens. Other things to consider are that the foreground was too close to your main subject, or not close enough to your lens. Selective focus works best when the foreground detail is very soft.
Did the out-of-focus foreground colours work well with your main subject? With selective focus, you need to consider both foreground and background colour.
Project 3 Stopping down
If your image was unsharp all over this was probably caused by camera movement because your shutter speed was too slow for you to handhold the camera. Always check your shutter speed and if need be use a tripod.
If you didn’t maintain sharpness throughout the picture you may have been inadvertently using the telephoto setting on your zoom. Longer lenses do not have the inherent depth of field of wide-angle lenses even when they are at minimum aperture.