Lenses
The creative lens
Modern lenses range from wide-angle to super telephoto and can create images of extreme sharpness, coupled with the latest auto-focus technology that has produced photographs impossible to achieve with manual focus.
The angle of view of a 35mm focal length lens on a digital SLR camera is based on the angle of view of the human eye, and it is therefore referred to as a standard lens; the equivalent lens on a similar film camera is 50mm. However, we have many more choices available to us than just the standard lens length. Indeed, most digital SLRs are bought with a zoom lens included, which takes you from wide angle through normal to telephoto length.
Exaggerating perspective
You will know that a wide-angle lens includes more of a scene while a telephoto lens brings you closer to the subject, but those are not the most interesting properties of lenses. The photographer’s creative decision as to which focal length setting to use is based mainly on the ability of the lens to control perspective.
The longer the focal length of the lens, the more it condenses perspective, making the foreground and background appear closer together than they do to the human eye. Conversely, the wider the angle of the lens the more it exaggerates the perspective, so that the distance between foreground and background expands.
The old adage ‘the camera never lies’ has become increasingly wide of the mark in these days of digital manipulation but, as far as perspective goes, the lens has always been capable of considerable exaggeration.
In this lesson you’ll find some projects that will encourage you to explore the ability of the lens to distort perspective for compositional effect – but let’s not forget that some of the greatest pictures ever made were taken with standard lenses. Indeed, several of the photographic legends used the standard lens for most of their careers, most famously Henri Cartier-Bresson and Ralph Gibson.
The focal length you choose also has considerable influence on the depth of field; telephoto lenses have less depth of field than wide-angle lenses. Here again the camera can produce images that are not familiar to the human eye.

The wide-angle 24mm lens has distorted Chris’s face dramatically, elongating and narrowing it. By exaggerating the perspective it has enlarged the appearance of his nose and his ears have almost disappeared.
The portraits below of the actor Chris Knowles show how important it is to choose the right focal length when making portraits. They demonstrate how, by changing the focal length of a lens, you can actually change the shape of a face.
Many inexperienced photographers take portraits using the wide-angle setting on their lens which, as you can see, is very unflattering. However, there are times when you may want to use the distortions of the wide-angle lens for effect – for instance, if you were shooting a clown and wanted to exaggerate the size of his nose.
A fresh view
Auto-focus technology has made focusing so fast and accurate that it has enabled photographers to take shots that were once beyond capture; the speed at which the lens can follow fast-moving subjects has produced innovative images. Zooming during exposure can also bring a dynamic effect, even with a stationary subject.
Seeing the bigger picture
Sunrise in Kenya’s Maasai Mara is magical. Photographs of sunset and sunrise can be disappointing because the sun looks so much smaller in the composition than expected, but the double-page shot that opens this lesson was taken with a 600mm lens that has ‘pulled up’ the sun behind the animals. To fill the frame with the ball of the sun would require a 2000mm lens. JG

This photograph was taken with a standard 50mm lens and there is still some distortion in a close-up such as this. Taken from further back, with slightly with more space around his head, his facial proportions would look natural.

The telephoto 120mm lens is more flattering because it has eliminated the distortion of his features. This is faithful to how Chris looks in life. You can see why the medium telephoto lens is favoured by portrait photographers.
The angle of view
Modern zooms have a wide range of focal lengths in one lens, allowing you versatility without having to carry around a heavy load of equipment.

18mm
24mm
35mm
50mm

70mm
110mm

200mm
Manufacturers make a range of lenses from the widest 6mm fisheye, which covers more than 220°, right up to super telephotos of 2000mm with a 2° angle of view. Lenses at the farther ends of the range are mainly used for specialist purposes and the demonstration of the angles of view here was done with an 18-200mm digital zoom lens, since that is the most popular range of focal lengths.
You can of course get fixed focal length (prime) lenses for all these lengths as well. They have larger maximum apertures and, from a perfectionist’s point of view, are sharper and have less distortions.
These pictures were all taken from exactly the same place, using the zoom to increase the magnification.
Control of perspective
The main creative contribution that lenses can make to photography is the ability to alter perspective, reassembling spatial relationships in a scene.
While the angle of view and magnification associated with different focal length settings on the zoom is immediately obvious, the more important property of lenses is their control of perspective.
Once you have understood the principles of this you will be able to manage perspective in your photographs as you choose. The demonstration here, again using a 18-200mm digital zoom, shows you how the choice of focal length will affect your images. On the following pages you’ll find projects suggesting ways to explore this principle in practice.
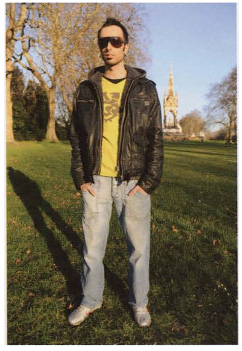
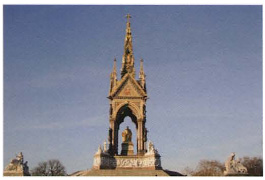
At the 18mm setting the camera is 1.5m (5ft) from Antonio in order for him to fill the frame. He has been distorted by the wide-angle lens, and the memorial appears to be pushed further away than it does to the eye as a result of the wide-angle lens’s ability to stretch perspective.
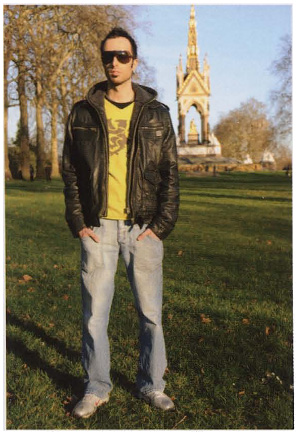
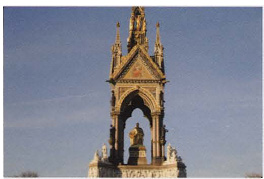
To keep Antonio the same size in the frame on the 35mm setting, the camera position was moved to 3m (10ft) away. The memorial has been pulled closer to Antonio – the perspective our eyes see.

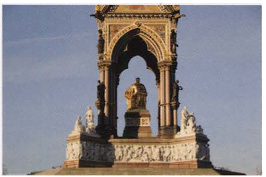
On the 80mm setting, the camera was moved back to 9m (30ft) from Antonio to keep his size roughly the same. The perspective has been compressed by the longer lens and the memorial now appears closer than it does to the eye.

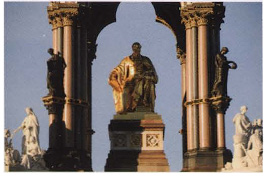
At a lens length of 200mm, the camera was moved 20m (66ft) away from Antonio. You can see only a portion of the memorial now and he appears to be standing within a few metres (yards) of it.
PROJECT 1
Wide-angle lenses
The wide-angle lens is a wonderfully creative tool, allowing you to stretch the effect of perspective. This has obvious use in landscapes, but it can also add interest to architectural and close-up shots.
Exaggerated perspective has many applications and you can use it to add drama to your pictures across all genres. Unless you are shooting open landscapes, a wide-angle lens also makes you get in close to your subject, giving the feeling that you – and therefore the viewer too – are part of the scene. This proximity to the subject also means that when you are working in crowded places, you can avoid including people in the foreground.
A wide-angle lens has greater depth of field than longer lenses, so use this to your advantage if the subject needs to be sharp from front to back. A wide-angle lens stopped down to its minimum aperture will give you maximum depth of field.
Try some shots using subjects where the perspective lines already exist, such as buildings, roads or lines of trees – and don’t forget to shoot some still-life subjects too.
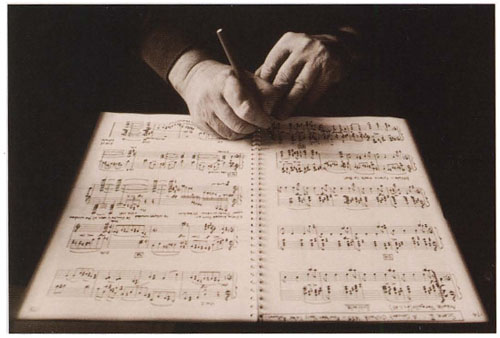
A 20mm lens has enabled me to get in close to see the score but also the perspective exaggeration has made it an interesting composition. I added to the effect by burning in around the edges to remove distracting detail on the desk and background. JG

The dawn light reflecting off the road into Death Valley inspired this picture. I used a 24mm lens on my film camera (the equivalent of 16mm on digital) to make the road dominate the picture. The lens has stretched the perspective, pushing the background further away and making the road look as if it goes on forever. JG
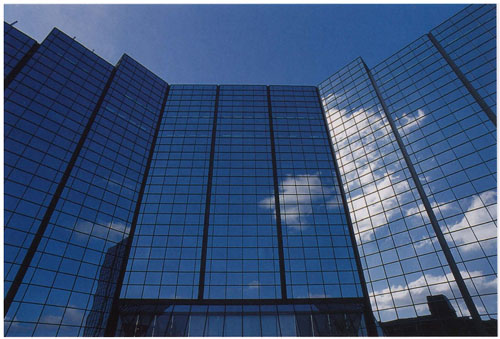
The drama of this composition was created by aiming a 18mm lens up at the building. The converging lines of perspective made an interesting design, with the building and sky almost becoming one. GH

This market shot is typical of how I use wide-angle lenses. The 12mm lens has enabled me to get in close and look right down into the baskets of vegetables. The perspective has been stretched by making the baskets big, with everything else diminishing into the background. JG
PROJECT 2
Telephoto lenses

This sheep farmer was photographed with a 180mm lens at f/2.8. The compression of the perspective has the effect of pressing the lambs in tighter to him and pulling up a soft green out-of-focus background behind him. JG
This project concentrates on the ability of the telephoto lens to compress the composition, allowing you to play with perspective, and also to bring you closer to subjects that you cannot approach directly.
The longer your lens the more dramatic will be the compression of perspective so, for this project, you should ideally use a lens of at least 200mm for a film camera and 150mm for digital rather than a medium telephoto of only about 75mm. You are looking for the effect of foreground, middle ground and background looking almost pasted together.
Practically speaking, your telephoto lens can also be used for bringing the subject towards you. Telephotos are the everyday tools of sports photographers because they can get them closer to the action, which might be at the far side of a football field, for example. If you are a fan of sports, try photographing your favourites.
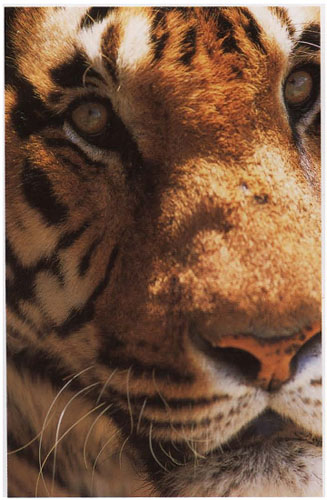
Another area where the telephoto lens is a must is in wildlife photography. Whether you are out in the wild or at your local zoo, a long lens will give you close-ups of creatures that are either too shy or too dangerous for you to get near to.
If neither sports nor wildlife appeal to you, other good subjects to try include city streets, portraits with out-of-focus backgrounds, or landscapes with a prominent foreground and background.
Here a 300mm lens has brought the ship closer. It was about 4.8km (3 miles) out to sea, and shot on a standard lens would have looked about a quarter of this size. JG

I didn’t want to get too close to this chap for obvious reasons. The 200mm setting on the zoom has taken me through the bars at the zoo and right into his face, eliminating a messy background. JG
Perspective in portraiture
PROJECT 3
This project reinforces the creative possibilities of perspective management by showing you the results you can get from using both a wide-angle and a telephoto lens on a familiar subject.
In these two portraits, taken with 18mm and 75mm focal lengths, you can clearly see that the 18mm wide-angle lens has stretched the perspective. Diego’s hands appear enormous and his head small. In the second portrait, the longer lens has compressed the perspective and his hands are now in correct proportion to his head.
Ask friends to pose for you and try using a range of lens lengths to see how their features and the settings you have chosen are affected by perspective. Clearly the photograph below right is the most naturalistic, but you may wish to emphasize aspects of your model’s life by enlarging salient features – the grimy, roughened hands of a gardener or the hands of someone knitting, for example.
Wide-angle distortion of the human body was favoured by Surrealist photographers. You may enjoy experimenting with extreme wide-angle for abstract effects.

Here the perspective given by the wide-angle lens has placed the emphasis on the drink that Diego is holding.

The longer focal length of the 75mm lens has now attracted the viewer’s eye to Diego’s face and his drink has become incidental.
Quick tip
• When shooting an environmental portrait using a wide-angle setting to exaggerate the perspective, be careful that the face doesn’t fill more than 20 per cent of the frame as it may become distorted.
PROJECT 4
Zoom movement
You can have great fun with your zoom lens by zooming it during the exposure, giving a dynamic and explosive feeling of movement to a subject even if it is stationary throughout.

This is an example of the pause, zoom, pause method. I set the camera on 1” second shutter speed and the 35-105mm zoom to 35mm. I paused the zoom at 35mm for about 1/4 second to create the small figure then zoomed out to 105mm and paused again, producing the foreground figure and blur. The tennis player kept still throughout. JG
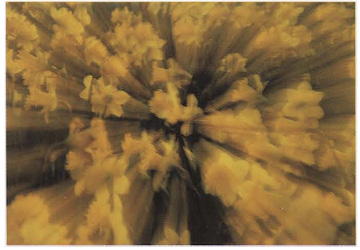
I made a continuous zoom throughout the whole exposure for this shot of daffodils. I composed the picture using the telephoto setting, then with a 1/4 second shutter speed zoomed to wide-angle as soon as I pressed the shutter button, gaining an abstract effect. GH

The picture here is a result of the pause and zoom technique. I set the shutter speed to 1/2 second, paused for 1/4 second at the 35mm zoom setting, then zoomed to 105mm throughout the last 1/4 second. This has resulted in a recognizable face for the boy then a wild zoom. JG
For this purpose you will have to set a slow shutter speed to give the lens time to get through its zoom, so you will usually need to use a tripod.
First compose your subject using the telephoto setting on the lens, then zoom to wide-angle during the exposure. Practise a few times to get the idea before you commit to film; if you shoot digital you can check immediately to see if you got it right. Next, reverse this by composing with the wide-angle setting and zooming to telephoto.
By varying the shutter speed, the speed of the zooming and the movement of the subject an infinite number of effects is attainable. You will of course need to keep notes on your exposures and methods so you can repeat effects you like.
Pause and zoom
To get a multi-stepped effect, try adding pauses of about 1/4 second between your zoom movements. You will need to keep the point of interest in the centre of the viewfinder because the zoom effect fans out around the middle of the picture. If you want the point of interest off-centre you will have to crop the picture later, as was done with the tennis player above.
Close-up photography
PROJECT 5
The pleasure of close-up photography is that you can reveal details and textures you’re not usually aware of. What’s more, you don’t need models, suitable weather or a great deal of space to practise it.
If you don’t have a macro facility on your camera, you can buy a close-up filter for the front of your lens or extension tubes that fit between the camera and lens. Neither solution is expensive. Take your camera and lens to a photography shop and try out some attachments to see which gives you the magnification you want.
You will also need to support your camera on a sturdy tripod and use a cable release to minimize any vibration. If you don’t have a cable release use the self-timer, which will allow the camera to settle down before the shutter releases.
Finding a subject
First choose some everyday objects that you take for granted, such as scissors, pencils or CDs, and clean them carefully – any dirt or fingerprints will ruin your pictures. Place them on a plain background to start with so the basic graphic shape will be apparent and try a range of compositions.
Next, photograph a flower, selecting a detail such as a petal or stamen to focus on. The closer you are to it the shallower the depth of field will be; with the lens set at full aperture, any background details will go completely out of focus, isolating the point of interest. With the aperture stopped down, background details will be sharper but the extra detail could be quite distracting.

I focused on the top of these rose petals and shot on the macro setting of my zoom at a setting of f/4 to keep the background petals out of focus, creating a soft, dreamy look. GH

This was shot with the macro setting on my zoom at f/13. I lit it with a 60 watt desk lamp, with a white reflector to hold detail in the shadows. Using Photoshop, I changed it to Grayscale and toned it blue. GH

I used a 55mm macro lens at f/8 for this shot of a peacock feather, placed on a piece of paper that picks up and echoes some of its colours. It is lit with window light only. JG

The idea here was to make the fairground elephant look as if it was lumbering out of the frame. As it happened, the lights in the background make it seem as if it’s being chased by a swarm of angry neon bees. Zooming can be a hit or miss technique, but the odd lucky accident can be great fun. GH
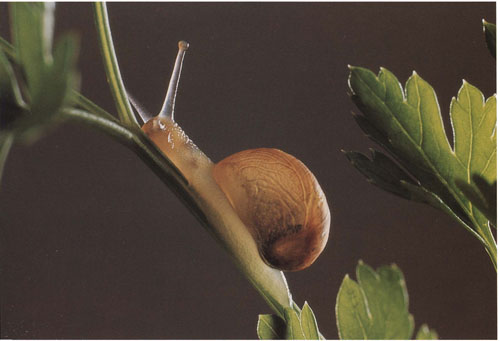
I placed a parsley stem in front of the camera, using some adhesive tape to keep it in position. I added the snail and, when it reached the right position, focused the 55mm macro lens and exposed it at f/11. GH
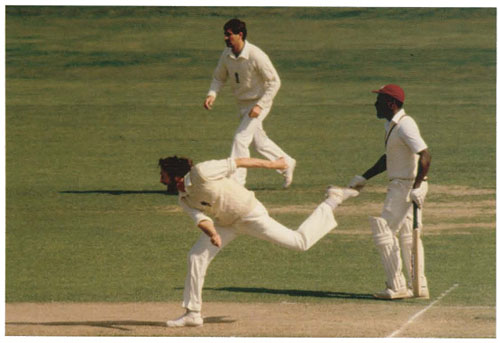
As a cricket fan, I shot this from the stands, using a 300mm lens plus a 1.4 teleconverter to take it to 460mm. When using a telephoto lens for sports it is best to shoot from a high angle like this to gain a clear foreground and background. JG
Lenses review
- Good-quality modern zoom lenses give you the ability to use a range of lens lengths without having to carry a bag full of equipment.
- The creative use of lens lengths allows you to control perspective, while zoom movement and the use of macro photography offer a new look at the world.
Project 1 Wide-angle lenses
Do your photographs give the effect of the foreground stretching towards you? If not, maybe your lens wasn’t wide enough. If parallel lines stretching into the distance don’t appear to converge it’s likely you weren’t angling the camera down enough.
Project 2 Telephoto lenses
Your photographs should show the compression of distance that comes from a telephoto lens. If this isn’t obvious, try again and check the length on your zoom – the telephoto effect becomes obvious at about 120mm on a digital camera or 180mm on film.
If your background is too sharp and distracting even at full aperture, your subject was probably too close to the background.
Project 3 Perspective in portraiture
If your wide-angle lens did not sufficiently exaggerate the scale between the hands and face, ask your model to push his or her hands further from the body and closer to the camera. To appreciate the difference in perspective, make sure the hands are in the same place for the telephoto lens shot.
Project 4 Zoom movement
If you are having trouble with this technique, don’t give up – it takes quite a bit of practice to get a smooth zoom throughout an exposure. Try a longer shutter speed to give you time to get through the zoom action.
Project 5 Close-up photography
If you failed to clean the subject well enough before you photographed it, that’s something to chalk up as a lesson that never needs to be relearned – it’s very disappointing to put a lot of work into pictures only to find dust or a fingerprint on the final image!
If your picture was spoiled by subject movement, for example in the case of a flower in the breeze, have another go but this time use flash to freeze it.