Light
The magic ingredient
Light has been described as the magic ingredient of photography, and indeed the quality of beautiful light does have something magical about it. However, light is of course more than a matter of aesthetics – it is the very essence of photography, making the creation of the image possible.
Painters have always been obsessed with light, and their preference for a certain light quality usually defines their style; think of Rembrandt and his love of the window-lit portrait and Turner for his early dawns and sunset skies. The artist has his or her palette and brushes to interpret the light, while we photographers have our camera with the light as our palette. For inspiration, have a look at the work of notable photographers such as the legendary Ansel Adams, Edward Weston and Irving Penn, just three of the great interpreters of light.
The quality of light
The colour of natural light changes throughout the day, affecting the colour and form of every object it falls on. We can manipulate the colour of light by using filters or by changing the white balance on our digital cameras, but often it is hard to improve on what natural conditions offer; a setting sun can turn the greyest and drabbest street into gold, offering pictures that would have seemed inconceivable just an hour earlier.

This shot would not have been worth taking if the horse had not been beautifully back-lit by the late afternoon sun. JG
Remember too that the description ‘bad light’ or ‘good light’ is relative: while a dull, overcast day may be unsuitable for a Utah landscape, for example, it may be perfect for photographs of Utah citizens, since harsh shadows make for unsatisfactory portraits.
Light affects not only colour but also texture, tonal balance, mood and even the apparent shape of everything in our world. Not only can we take advantage of the light we find, both indoors and out, we can nearly always take control by introducing our own incandescent and flash lights, diffusers and reflectors, working with the light already present or shutting ourselves in a dark room and building light from scratch.
The ability to read light in photographic terms is not a skill learned easily in the classroom – it is gained from observation and is really a lifetime study. During your day-to-day travels, get into the habit of observing the quality of light around you and try to understand the moods it is creating. The projects on the following pages will also help you to understand the many different qualities of light.
Seeing the big picture
In the picture on pp.108-9, the soft glow of light preceding the sunrise was bright enough to silhouette these Buddhist monks in Sri Lanka against the water. The dawn light was the main attraction; the composition was a matter of waiting until the figures formed this pattern where one leads you to the next in a gentle curve. It was shot with a 35mm lens. JG
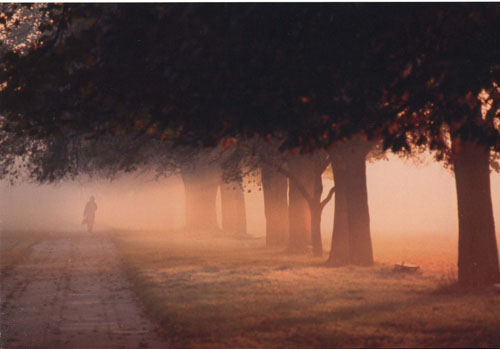
A reward for early rising – the dawn light filtering through the mist was the reason for taking the picture. GH
Time of day
Here are some examples of how the quality of light changes during the day and the effect those changes have on your photographs. Note how both the angle and the colour of the light are transformed.

This is the eerie, colourful light that occurs just before the sun rises. There is not yet any dust in the atmosphere so the light is clean and sharp.

In this shot, taken not long after dawn, the sun burned through the branches and back-lit the mist, accentuating the blue of the atmosphere.

Here, early morning in Stockholm gave sharp northern light, perfect for high-definition architecture. The sun was high enough for the sky to be blue.
Midday sun directly overhead is tricky for portraits as shadows are very black but good for graphic compositions.
Quick tips
• Black and white photographs are equally affected by the change of angle and intensity of the sun throughout the day.
• The time of day particularly dominates the tonal composition of subjects such as landscape and architecture.

Mid afternoon, when the sun is getting lower in the sky again, provides a combination of detail and shade and offers you a choice to expose for either highlights or shadows according to what you wish to show.

Dusk can provide some beautiful soft glowing light. Try photographing every couple of minutes until it gets dark.

A sunset can be the focal point of a composition, or you can turn your back on it and use the very warm light for portraits – or indeed almost anything.
Weather
As you can see below, the weather can have an enormous influence on light quality. Some great pictures have been taken in extreme weather conditions when everybody but the photographer was keeping warm and dry indoors.

Mist acts like a thin translucent veil over a picture. It softens and subdues detail, allowing you to compose with blocks of tone and colour.

Some of the best landscape light happens during and after storms. With patience you might get this spotlight effect illuminating your subject.

It’s impossible to plan a shot of a rainbow; you need to react quickly as it can be gone in seconds. This one is particularly bright and saturated.

Much denser than mist, fog can give a ghostly look. You can use it to simplify the picture by isolating the subject and masking out background detail.

Wet surfaces make lovely shiny highlights and colours tend to pick up a glow from all the reflected light bouncing around.

Bright sun can make for difficult lighting conditions; it’s too harsh for many subjects, but is ideal for texture and strong shadows.
Single light source
The apparent shape of any object is dependent on the angle and intensity of the light falling on it. The exercise here, using a single light source, shows how the shape of the sitter’s face appears to alter with each shift of the light.
An important point of this exercise is that learning about lighting is not enough – you also need to study the geography of each face that comes in front of your camera. Your first priority is to look at the structure of the face and from your observations you can then light it to its best potential – for instance, it wouldn’t be a good idea to front-light a round face from above the camera as it would make it look rounder still.

Placed immediately above the camera, the light has flattened Christine’s face and made it appear wider than it really is.

With the light still from the front but now 1m (3¼ft) above head height, her face appears narrower and longer.

The light is now 45° from the camera and 1m (3¼ ft) above head height – the classic portrait light.
Quick tips
• As you can see, you can produce a great variety of light effects with just one light and a reflector. There’s no need to buy a set of lights.
• You could also achieve the same results using a hand flash with an extension cord (see pp.116-117).

Here the light is side on to Christine’s face. Side light narrows the face as it leaves one side in shadow.

Side light, plus a reflector placed next to her face on the shadow side, makes the face appear much wider again.

The light is now behind her head. A reflector held above and in front has bounced the back light onto her face.
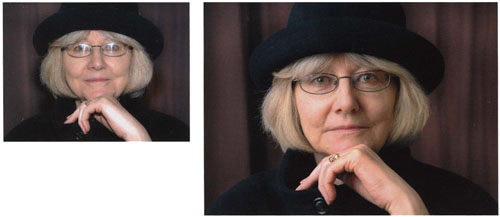
Window light
If you have a window and a white card for a reflector you don’t need artificial light. Even on a sombre winter’s day the light may be low but it will still be good quality – you will just need a tripod so you can use a slow shutter speed.
This set of portraits was shot on a digital camera with the white balance set to auto. This wasn’t a good decision – the colour balance is very inconsistent because of the changing camera angles, but it has provided a useful lesson. If you are taking a series of window-light shots, set the white balance to daylight so that the pictures will have a consistent colour balance, thus avoiding the need to fix them later on the computer.
Quick tips
• When shooting black and white film by window light be generous with the exposure – set +½ or +2/3; stop to make sure you maintain shadow detail.
• For modern masters of window light, look at the work of Irving Penn and Jane Bown.

Yamila side-lit by the window. The shadow side has some detail because the white room offers some reflection.

Side light but with a reflector added to fill in the shadows – the face appears broader than in the first picture.

Yamila and the camera turned 45° towards the window – the classic portrait light, a good mix of light and shade.

Yamila is now looking directly towards the light, with the window behind the camera. Her face is evenly lit.

This is a back-lit silhouette with a difference. Shot against the Venetian blind, it has made an interesting picture.

Here the same back light is coming through the blind, with a gold reflector added to find some detail in her face.

With Yamila turned just a few more degrees towards the window than directly side-lit, the light has just caught her right eye, adding sparkle.
Making the most of flash
From small units built into cameras to large studio packs, flash is a way of providing portable bright white light whenever you need it.

This is a direct flash shot using the flash as the main light. In aperture priority, I set the camera and flash to f/8. The camera balanced the background exposure. GH
Most cameras have a built-in flash that can be a very useful light source, but if you use it as a matter of course you risk ruining the beauty of natural light. In situations with strong back-light, indoor available light and extreme high-contrast light and shadow, the flash will automatically turn on, possibly spoiling any atmosphere the subject may have. On the plus side is the extremely short flash duration (up to 1/30,000 of a second) even a built-in flash has, allowing you to freeze rapid subject movement.
This is a direct flash shot using the flash as the main light. In aperture priority, I set the camera and flash to f/8. The camera balanced the background exposure. GH
A more creative way to use flash is with a dedicated flashgun that fits onto the camera’s hot shoe. Better still, by attaching it to a cable so that you can hold it away from the camera (known as off-camera flash) you can light the subject from any angle and still maintain the flash’s auto connection to the camera.

Here on-camera flash is combined with a slow shutter speed. The fast flash has frozen the boy kicking the leaves and because I panned the camera a little to follow his movement the 1/15 second shutter speed has blurred the background. JG
Direct flash (above) can be rather harsh and in this picture it has caused highlight reflections in Margaret’s glasses, hiding her eyes. In the shot shown right I have rotated the flash to bounce off a white wall, making a softer, more pleasing light. GH
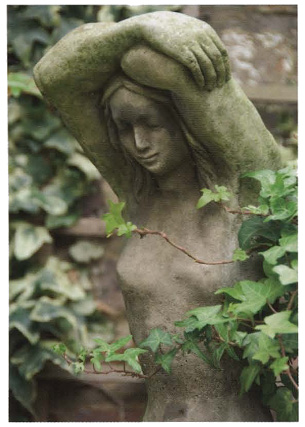
This shot was taken using natural overcast light in early evening. The aperture was f/5.6 and the shutter speed 1/30 second. The sculpture looks flat and blends into the background.

Adding fill-in flash from the built-in camera flash has made matters worse by diluting most of the shadow.

With a manual setting of aperture f/5.6, shutter speed of 1/250 and off-camera flash set to auto, held 1m (3¼ft) above head height, the background is much darker as the daylight is underexposed.

Here the exposure settings are the same as the shot shown top right but the off-camera flash is held at a three-quarter angle to the sculpture and 50cm (20in) below head height.

Again with the same settings, the off-camera flash is at a three-quarter angle and 50cm (20in) above head height. It has created a more dramatic picture and isolated the figure from the background.
Quick tip
• If you feel you’d like to take the off-camera flash technique further, you can buy a wireless remote flash-triggering device that frees you from the restriction of cable lengths. These are quite expensive, but they’re very effective.
PROJECT 1
Flash in daylight
This project teaches you how to use flash as a main light source in daylight – valuable when light levels are low or for dramatic effect.

I used off-camera flash and hid a second small flash on a stand behind the subject’s head. I underexposed the background by setting the camera to -1½ stops. At normal exposure the sky would have looked like a sunny day. JG
It will help you to carry out this project successfully if you think of the flash and daylight as two different light sources. The aperture will control the flash exposure and the shutter speed will determine the density of the background.
Your choice of aperture will depend on the depth of field you require. You will find this technique easier if you set the camera to aperture priority mode rather than manual.
Set the flash to auto, then the camera and flash to your required aperture. Use the exposure compensation to reduce the background density – the examples here are a guide to how to achieve the density you would like. The camera will alter the shutter speed accordingly. Remember not to exceed your flash synchronization shutter speed – this is usually 1 /250 second but on the newest cameras can be higher.

I used flash as the main light because the daylight was very low, leaving the man’s eyes in shadow. The flash was on an extension cord, 1m (3¼ft) above the camera. I set the camera exposure compensation at -1 stop and the flash on auto. The effect was to make him stand out from the background while still holding some atmospheric background detail. JG

For this shot I used a flash gun mounted on the camera. The flash was on auto and the camera was set at -2 stops exposure compensation. Matt looks as if he is pasted on to the underexposed dark background. The short duration of the flash has frozen the movement. JG
Night photography
PROJECT 2
Night-time opens up a whole new world for you to photograph. Urban scenes offer a wide range of light, often in exhilarating colours.
Apart from photographs taken at dusk, in moonlight or during a lightning storm, all night photography relies on the presence of some form of artificial lighting. This may consist of streetlights, illuminated arcades and fairgrounds or floodlit buildings. The subject may be the whole scene, perhaps with dramatic shadows, or the pattern made by the lights themselves.
To make the most of what light there is, you could look for scenes in which there are light-reflecting surfaces – buildings, foliage, vehicles and so forth. The highlights in the picture can be doubled by choosing a rainy night – preferably just after a shower – when they are reflected in the wet pavement. It is often possible to make use of the surface of a river or lake in the same way.
Moving objects, such as cars or boats, can leave light trails across your picture if you select a slow shutter speed. High viewpoints will help to spread the objects apart and allow space for them to move about. They will have to be travelling at an angle to you – if they are moving in a direct line away from you they will be a single point of light. With a bit of practice, you’ll find it possible to create striking patterns of light and colour.

Photographing St Paul’s Cathedral across the Thames, I used a 200mm lens to make it look closer. I set the aperture to f/4 to let the lights in the foreground go out of focus, forming a frame around the cathedral. GH
Quick tips
• Use a tripod or find a support such as a wall to keep the camera steady.
• Use a cable release or remote release to open the shutter (alternatively, you can use the self-timer).
• If you are shooting on film, take a notebook and pen to jot down down your exposures.
• A torch is handy to help you to see the camera controls.
• In bad weather you will need warm clothing, an umbrella, and a plastic bag to go over the camera.

Sitting at a café opposite the Duomo in Siracusa, Sicily, I supported my camera on my folded jacket on the table. I set the camera to 800 ISO and program mode with matrix metering. Digital cameras handle this kind of exposure problem very well – I just checked my exposures on the screen after each shot. This picture was +½ on the exposure compensation. JG

This was taken in central London, just before dark. The camera was on a tripod, and the exposure was I” second at f/5.6. Two cars and a white van went by during the exposure; the ghost of the van has lightened the top half of the frame. GH
PROJECT 3
Candlelight
While candles give light that is soft, warm and flattering, you may not have thought of them as a photographic light source because they don’t appear to be sufficiently bright. However, a few can create a surprising amount of light.

Here candles are the main light source. The blue light coming from the left is from a torch with a blue filter. The white balance was set to incandescent. GH

This picture was shot at a Carols by Candlelight event. Candles throw more light than you might think – I simply set a large aperture of f/1.2 on a 50mm lens. Using flash would have spoilt the picture. JG

This was taken on daylight balanced film, which has made the candlelight orange. There was also an incandescent light on the right side. I didn’t have a blue filter with me to cool it down, but as it turned out I like the very warm colour; it adds more emotion. GH
As you can see from the photographs here the colour of the light is very orange, though it appears to be more neutral to the eye. Setting your white balance to incandescent is a good starting point – you need to keep at least some of the warm colour or it will simply look like ordinary white light. Film users will need a blue correction filter, or no filter at all.
Candles flicker, and in doing so bathe the subject in light rather than hitting a particular spot. That is why they create a glow on subjects when you use a long exposure (1/8 second or more). The colour combined with the flicker tends to smooth the complexion, making flattering portraits. In black and white it has the same effect as shooting with an orange filter.
Avoiding camera shake
If you set a low ISO speed you will probably need to use a tripod in order to avoid camera shake at slow shutter speeds. Try a high ISO speed such as 1600 too – this may allow you to handhold the camera, making the pictures more spontaneous in the case of portraits. The pictures will be grainier (or noisier in the case of digital) but that can add to the candlelight effect. It is especially pleasing in black and white.
Photographing on a lightbox
PROJECT 4
Lightboxes are generally used for viewing negatives and transparencies but are a great light source. This is an exciting project and you will produce some beautiful images. They can look great in black and white too.
If you don’t have a lightbox you can produce the same effect by placing a light beneath a sheet of opal Perspex, or a sheet of glass with tracing paper laid on top. The light may be flash, incandescent or fluorescent. When translucent items such as flowers, leaves or feathers are placed on top, the light shines through them and gives an X-ray effect.
You will need to use close-up (macro) focus and don’t forget to set your white balance (or use a filter for film) to match the light source you are using. It is a good idea to bracket your exposures, as the back-light may cause your meter to underexpose. You can use a reflector to add some top light – if silver foil is too bright, try white card instead. If possible use a tripod so the camera can be kept in position, allowing you to move the subject around without having to recompose with the camera each time.
Translucency and texture
Pressed flowers and leaves have beautiful translucency and texture. To press them, place them between sheets of blotting paper and put a heavy weight on top. In about a week they will be pressed and dried, with great shapes perfect for lightbox subjects. Try experimenting with unpressed items too.

This pressed mauve anemone flower has a glow to it which is caused by the light coming through the petals. I composed the image with the carpel and stamens in the centre, making it look like an eye. GH

I went in very close to this pressed fern frond to isolate the shapes. I cropped it square then toned it blue in Photoshop to resemble a Dutch Delft tile. GH
Shooting on a lightbox will usually produce a white background around the objects you are working with. To get some texture into the background, try adding a piece of paper to the lightbox. Tissue paper works well, and you can use colours too.

Here I laid two fresh rose stems over each other and created a pattern. Where the leaves cross over a darker shape is created, giving a three-dimensional effect. GH

I took the pictures shown right and below for the jacket of a murder novel set in Dover, Kent. This one was shot at 8.30am, looking into the early-morning sunlight. The light has back-lit the famous white cliffs, making them look very sombre and foreboding. The publisher chose this one of the two because it better illustrated the dark theme of the novel. JG

Fifteen minutes after I took the photograph above, I shot the cliffs from a different position, this time with the light behind me – the traditional front-lit picture of the white cliffs of Dover. Both of these photographs were red-filtered, darkening the sky and, in this shot, emphasizing the whiteness of the cliffs. JG

In daylight the sign at a restaurant called Ed’s Diner doesn’t have especially exciting colours, but night-time transforms it. I shot it on a compact camera using the auto mode and exposure compensation of +½ stop as the bright lights shining into the camera made the exposure meter misread the conditions. GH
Light review
- The quality of the light can make the difference between a mundane photograph and a stunning one.
- The colour and angle of light changes throughout the day, giving very different effects; artificial light gives you extra choices.
Project 1 Flash in daylight
This project is all about the balance between daylight and flash. If your photographs weren’t as you hoped, the most likely reason is that you didn’t underexpose the background sufficiently. Getting it right can be time-consuming but, once mastered, the technique will stay with you. Digital photographers can experiment and view the results as they go along; film photographers will need to bracket and note the settings for future use.
Project 2 Night photography
You may have encountered high-contrast situations that neither a film nor sensor can deal with, such as car headlamps in a dark street. If you expose for detail in the street, the headlamps will be overexposed; if you expose to make the headlamps less bright the street will become almost black. It’s best to avoid extreme high-contrast situations at night. If your light-trail pictures weren’t successful, the shutter speed may have been too fast.
Project 3 Candlelight
You may have found your subject underexposed because the bright light from the candle upset your metering. Taking a spot reading off the subject will solve this. If the colour balance was too warm, try the incandescent white balance setting, which cools the colour but still maintains a yellow/orange glow; if you want a strong orange colour, set the white balance to daylight.
Project 4 Photographing on a lightbox
If you had trouble getting the image sharp you may have gone closer than your lens can focus, in which case you need a macro lens or a close-up filter to shoot at that distance. In close-up shots of small objects the slightest movement of one of them can radically change the composition of the picture; if you weren’t happy with your picture try rearranging them, remembering that the spaces between the objects (the negative shapes) are just as important as the shapes of the objects themselves.