Image enhancement
The digital revolution
While many people using black and white film tinkered about with their images in the darkroom, colour film was altogether more tricky. With image manipulation software, however, a whole new world opened up.
What you can achieve on the computer, from simple retouching to a complete transformation of the image, is exciting – but there are pitfalls. One is that the ease with which you can sort out faults in your photographs can lead to a mindset of ‘That’ll do, I’ll fix it later in Photoshop,’ when you are taking them. It’s so easy to fall into a lazy way of thinking that before you know it your standards can take a nosedive and you find you are no longer shooting with the discipline and precision that you once were.
A second pitfall is that many people are so entranced by what they can do they lose sight of whether it’s a good idea to do it at all. Just because you can make a person or animal sprout wings it doesn’t necessarily mean you should! Having said that, the retouching and enhancing tools are wonderful aids to image-making as long as you don’t let them take you over.
Using Photoshop
This lesson is not an in-depth teaching class on Photoshop techniques; there are many excellent books on that subject already. What you will find here are some simple ideas and instructions that you can use to improve your pictures in Photoshop, and some special effects to change things for the sheer fun of it.
All the manipulation and retouching here was done on the basic Photoshop Elements package, which is often included with printers and scanners when you buy them. There’s nothing in these pages that is at all intimidating, but there are very effective ways of enhancing your pictures in one way or another.
Nearly every magazine you see on the newsagents’ shelves demonstrates the potential of Photoshop. Magazine covers are now so retouched that the people on them look almost plastic, like photographic cartoons. Nothing real is allowed; no wrinkles or laughter lines that reveal the character of the subject. In the case of celebrities, perhaps they are indeed frightened to reveal themselves to us.
However, most of the people you photograph will be friends or family, and although it’s tempting as a photographer to make everything perfect because you can, where do you stop? There’s a danger that we will lose faith in the truth of photographs that we once thought of as the records of our visual history – so use Photoshop with care and good judgement.
Seeing the big picture
For the double-page picture that appears on pp.164-5, I photographed pieces of green, mossy tree bark from above on a white background. I wanted them to look not like bark but a shoal of surreal fish, so I used Photoshop to invert the positive image to a negative. I then filled the spaces between the pieces of bark with a contrasting yellow. GH
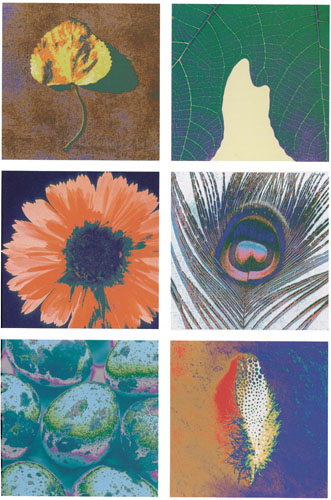
These images were all enhanced with Photoshop Elements techniques using Hue/Saturation, Solarize filter, Brightness/Contrast and Film Grain filter. They are from a small calendar, in which I used individual pictures for each month of the year and matched the colours to the seasons they were in. GH
Quick tip
• Photoshop
Elements is the most popular of the image manipulation software programs, but there are many others available. They include:
• Corel Paint Shop
Pro Photo X2
• Roxio PhotoSuite
• GIMP GNU Image
Manipulation Program. This is available as a free download from the website www.gimp.org.
PROJECT 1
Cropping
When you haven’t had time to compose a photograph carefully, or have had a change of mind about the composition, cropping is the answer.
The crop tool is very simple to use. Find some images that are crooked, or where you didn’t get close enough to the subject or couldn’t exclude unwanted items around the edge of the image.
Select the crop tool, click and drag your cursor across the picture to make the crop you want. If you would like it to be a certain size or ratio, use the palettes bar to choose the size and resolution.
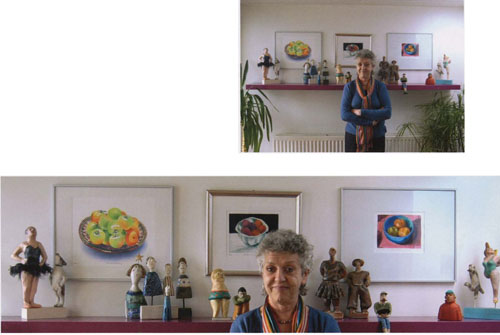
Judy has a collection of art and sculptural figures and I wanted to photograph her with them. I made a simple crop to a panoramic format to exclude the unwanted parts of the picture, such as the plants and ceiling cornice. GH
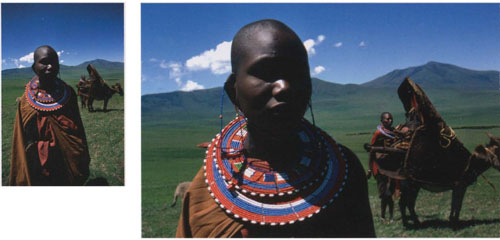
It’s interesting looking back on old pictures and reassessing them. Photoshop gave me a second chance at composing this picture, and I decided to try a radical adjustment. I still like the original (left), but I find the second a more intimate portrait of the Maasai girl. JG
PROJECT 2
Colour correction
One of the most useful aspects of image manipulation software is that you can correct colour where your filters or white balance didn’t do the job.
If you have a scanner, you could make this a project for sorting out colour problems in your old slides or colour negatives. The steps I used to adjust these images and render them more acceptable are typical of the sort of adjustments you will need to make.

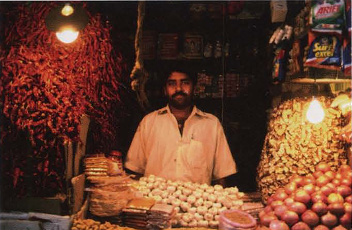
This shot was taken in a market in Goa. The bare tungsten bulbs have sent the daylight transparency film very red. I didn’t have a colour correction filter with me. Photoshop has taken out the aggressive red (right), keeping the colours warm but natural. JG
1 Scan a 35mm slide or negative.
2 Open the picture in Photoshop.
3 Enhance > Auto Colour Correction.
4 Enhance > Adjust Colour > Hue/Saturation > Saturation -15 to make the colour less bright.
5 Enhance > Adjust Lighting > Brightness +15/ Contrast +25.

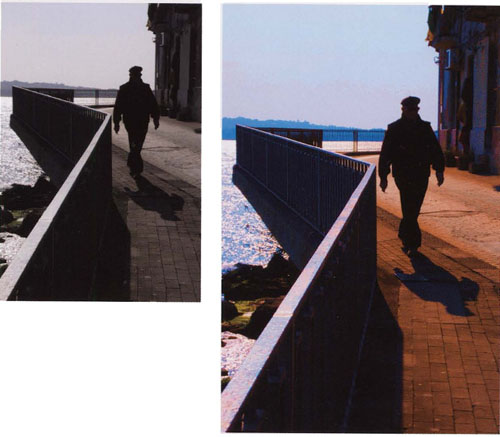
Madagascar, early morning; when I first saw this picture I wished I had used a polarizing filter on the lens to make a deeper blue sky. So I added blue in Photoshop and though it looks a bit melodramatic, I like it. JG
1 Scan a 35mm slide or negative.
2 Open the picture in Photoshop.
3 Enhance > Adjust Colour > Colour Variations. Tick midtones, intensity amount medium.
4 Decrease Red 2 clicks. Increase Blue 2 clicks.
5 Enhance > Adjust Lighting > Brightness -20/ Contrast +17.
PROJECT 3
Removing unwanted details
You’re certain to have pictures where you couldn’t help including unwanted passersby, street furniture and so on – have a go at tidying them up, as here.

This was a quick reflex shot – the couple looked up and the moment was gone. When I saw the picture, the feet in the background had to go. I retouched them out in Photoshop. JG
The Healing Brush Tool was used to remove the legs and feet in the background, but the Patch Tool and Clone Stamp Tool would have worked equally well.
1 Using the Navigator panel, zoom the image to 100%.
2 Select the Healing Brush Tool in the toolbox.
3 Adjust the brush size in the brush palette. I chose 150 pixels diameter.
4 I set brush hardness to 35% so it is slightly soft around the edges.
5 Healing Brush > Set Mode to Replace, Source to sampled, and tick the Aligned button.
6 Sample an area next to the bit you want to remove then move the brush over a portion of the unwanted area. Click and drag the mouse, so the brush paints the sampled area over the unwanted area. I repeated this a number of times until the legs were gone. Make sure you change the sampled source area so you blend it to look as natural as the background around it – if you use the same piece you will get noticeable repeats.
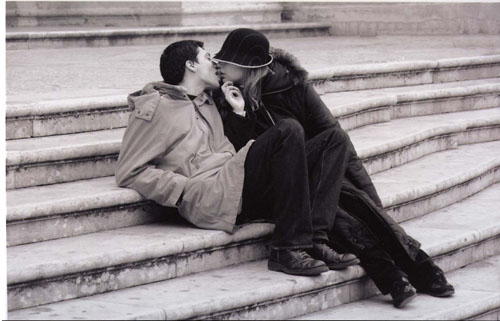
I decided to remove the colour, preferring the image in black and white, then adjusted Brightness +15/Contrast +10 to give it a crisper look.
PROJECT 4
Toning
On the computer you can tone your images in all the colours that are available to the darkroom printer, and more.
For this project, choose a colour or black and white picture and tone it to a single colour of your choice. Pick one you are pleased with – it’s a mistake to think that a bad picture can be rescued by some toning!

This is a traditional Sardinian pastry that is an Easter treat for children. To me, the picture has a sculptural look so I added the blue tone to give it a cool marble feeling. JG
1 Open the picture in Photoshop.
2 Go to Image >Mode and make sure RGB is selected, even if the picture is black and white.
3 Enhance > Adjust Colour > Adjust Hue/Saturation.
4 Make sure Preview button is turned on, and turn Colorize on.
5 Gently slide Hue back and forth to get the colour you want.
6 Adjust Saturation to get the strength of colour you want. I reduced it a bit so it wasn’t so bright. Using the Lightness slider isn’t a good way of doing this.
7 Select OK. Use Enhance > Adjust Lighting > Levels or Brightness/Contrast to get the picture looking great.

This portrait was taken four years ago but it looks as if it could be 40 years ago. I added the sepia in Photoshop to enhance the old, traditional feel of the picture. JG
PROJECT 5
Hue/Saturation
Here is another creative use for the Hue/Saturation option, this time to bring some strong colour into subdued images.
This method works well on an image that has very limited colour. You can’t use it on black and white, however – even though the images shown here are bland there are colours hidden in them.
Find some photographs that are lacking in strong colour and practise using the Hue/Saturation tool to amplify them. The results will depend on the images you use and the effect you want.

I often take pictures of shadows. These usually fall on plain walls or colourless pavements, so I find I have a very monochromatic picture. This is a way of making striking colour images with them. GH
1 Open your picture in Photoshop.
2 Enhance > Adjust Colour > Hue/Saturation. Make sure Preview is turned on, but leave Colorize off. Choose a single colour channel in the Edit box.
3 Push the Saturation slider to the right until you get an effect. If nothing happens, maybe your image doesn’t have the colour you have chosen in it. Try the other colours one by one.
4 To colour the seat in the bike shot I used the Paintbucket tool set to black.
5 Add a bit of Brightness/Contrast and it’s finished.
6 If you want to change the overall colour, use the Hue slider.
The light conditions produced an almost monochromatic picture. I like the black and white starkness but was interested to see how much colour was recorded by the sensor. I have just amplified the small amounts present. JG
PROJECT 6
Adding colour
This method of adding colour can also be used on black and white images. If you wish to, you can pick out just one or two elements in a composition.
Shown here is a basic, straightforward way in which to fill in areas of colour. There are more subtle and sophisticated means of doing it, using the selection tool and Layers, but as a starting point try this Paintbucket method.
You can use a colour or a black and white picture; I chose this photograph of barrel lids, as it is simple and has no detail in the areas I wanted to colour. It was shot in black and white and is a favourite of mine. If you are using a black and white (Grayscale) picture, make sure you put it into RGB mode before you start.
The Paintbucket tool will fill any area with the colour you select. If you have edges such as the black lines around the lids in my picture, Paintbucket will fill the space confined by the lines. This picture was perfect as it has large contained areas that seemed to be begging to be filled with vibrant colour.

I shot this photograph at a barrel factory on an overcast day where the sky acted as a giant softbox. I spread a large sheet of black felt on the ground and composed the lids, then used a 28mm lens to get some perspective. GH
1 Open the picture in Photoshop.
2 Image > Mode > RGB.
3 Click on the foreground colour window in the toolbox, and use the eyedropper to select the colour you want.
4 Select Paintbucket in the toolbox. Place the Paintbucket icon over the area you want to fill in and click to fill with colour.
PROJECT 7
Solarization
This technique was perfected in the darkroom by Man Ray, though its origins lay in many instances where negatives or prints were exposed to light in error.
Solarization is a technique that mixes a negative and positive image together, achieved by exposing a photographic negative or print briefly to light during development of the image.
It has mainly been used in black and white photography, but the photographer Richard Avedon pioneered colour versions of the technique with pictures of the Beatles in the 1960s.

This was an experimental project, playing with ideas for a poster. GH
1 Open the picture in Photoshop.
2 Filter > Stylize > Solarize.
3 I used Enhance > Adjust Lighting > Brightness/Contrast to lighten my picture. I didn’t like it much as the background was too dark so I decided to invert it to negative.
4 Filter > Adjustments > Invert. This worked better with a lighter background.
5 Enhance > Adjust Colour > Hue/Saturation. I changed the Hue to make the flower yellow.
6 Enhance > Adjust Lighting > Brightness/ Contrast to fine-tune the picture.
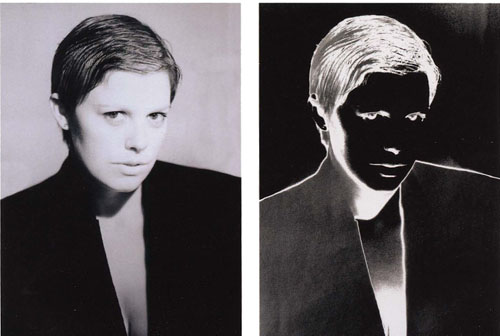
I decided to have a look at this portrait solarized. It’s not a question of which version of the portrait is better – rather it’s showing an interesting alternative way of presenting the picture. JG
1 Open the picture in Photoshop.
2 Image > Mode > Grayscale.
2 Filter > Stylize > Solarize.
3 Enhance > Adjust Lighting.
4 Brightness/Contrast to adjust if needed.
PROJECT 8
Posterization
This digital technique reduces both colour and black and white images into fewer tones, giving a graphic effect such as you might see on a poster.
Posterization breaks up the large range of continuous tones in a photograph into a much smaller number of steps, thereby simplifying the tonal range throughout the image. As a starting point, look for photographs that contain simple bold shapes with a small range of colours and work up to more complicated compositions as you gain experience with the Posterize dialogue box settings.
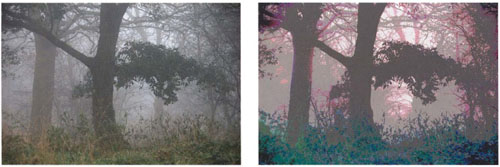
The photograph in its original state (left) has an interesting structure but fog has muted the colour and tone. Because it has large flat areas it looked a good candidate for posterization, which has turned it from a photograph into a graphic design. GH
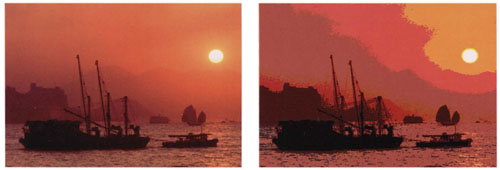
I tried several different pictures to see how posterization would affect them. Most of them didn’t work well as they had too much detail. However, I felt the boat picture in Hong Kong was interesting; the smooth sky has broken into steps, giving the image a 1950s retro look. GH
This method is the same for both pictures.
1 Open the picture in Photoshop.
2 Filter > Adjustments > Posterize. I used level 5 in the Posterize dialogue box. The lower the number, the more pronounced the effect. Try from 2 to 9 and see what happens.
3 Enhance > Adjust Colour > Hue/Saturation. I made slight changes to the colour to arrive at the final image.
Quick tip
• Once you have posterized a picture to your satisfaction, use the Type Tool in Photoshop to finish off the image by adding a title and your name in whatever colour and layout you want. It will make a stunning and individual poster for your wall.

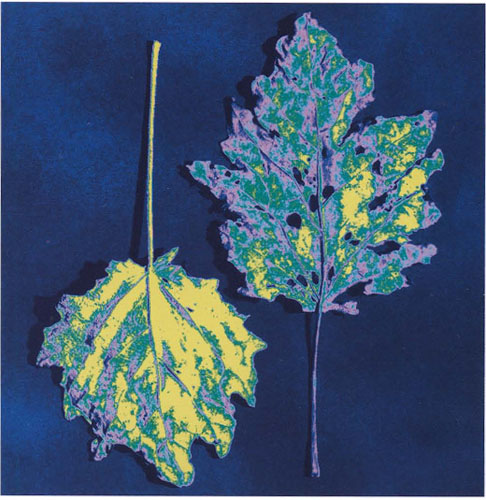
I twisted this picture anti-clockwise when I cropped it to make the pumpkins look as if they were trying to keep balanced. I then introduced colour to the black and white photograph using Photoshop as I did for the leaf image below. GH
Here I coloured a black and white picture using Hue/Saturation and selecting the Colorize button, then applied the Solarize filter. I returned to Hue/Saturation to tweak the individual colour channels to my satisfaction. GH

This photograph was shot in black and white at sundown in the Sinai Desert. I decided to experiment in Photoshop for a poster idea. After scanning it from a print I toned it, giving the look of a red desert sunset. JG
Image enhancement review
- The arrival of digital photography and image manipulation software has made it easy to transform your pictures on the computer.
- Photoshop is a vast and complicated software program, but you can achieve effective results using quite simple techniques.
Project 1 Cropping
Did you enhance your pictures by cropping, or did you just change their shape? Don’t be afraid of being very radical – try using a quite small section of the original.
Project 2 Colour correction
This is an exercise to use colour correction to improve the colour balance without changing the spirit of the photograph. Don’t overdo it and kill the original picture.
Project 3 Removing unwanted details
This is another subtle exercise – you are improving your picture by just tidying it up. As in the example, getting rid of one little thing can make a big difference.
Project 4 Toning
If you feel you have overdone the toning, try using a slight blush of colour just to alter the mood.
Project 5 Hue/Saturation
There is a danger of this project resulting in some corny pictures – try it on very simple images to avoid this.
Project 6 Adding colour
If the colour bled out of the area you wanted you will have to close the gap it found in the barrier by retouching with the Clone Tool or Paintbrush.
Project 7 Solarization
This is a foolproof technique – whether the end result is over the top or elegant is a matter of taste!
Project 8 Posterization
This project is a good way of using older pictures to get a feel for how an image is constructed. Posterization can revive pictures that you think lack originality.