Chapter 2
Work with Layers, Selections, and Masks
Layers, selections, and masks are the key to image editing in Photoshop. You improve or enhance photographs and create designs by adding different types of layers to your original file. You can duplicate a layer or build a complex multilayered image combining layers and layer effects with selections and masks.
A layer is similar to a transparency sheet with or without an image on it. You can edit, transform, or add filters to a layer independently from other layers. You can make one layer alter the look of a layer above or below it. You can combine different types of layers for creative designs. You can flatten all the layers to finalize an image or save a file with the layers for future editing. You can copy, paste, or just drag a layer from one document to another.
Selections enable you to isolate areas in your image and apply different effects or filters without affecting the rest of the image. You can even select areas on one layer and create a new layer with that selection. You can make selections and refine them with many Photoshop tools depending on the type of area that you need to isolate or remove. You can copy, move, paste, and save selections.
A mask is a selection shown as a grayscale image: The white areas are selected; the black areas are not. You can use masks to block out areas of an image or to prevent edits. You can mask with painting tools or even vectors.
#16 Edit an Image with Added Layers and Blending Modes
Difficulty Level: 
#17 Organize the Layers Panel with Names and Colors
Difficulty Level: 
#18 Use Layer Filters to Quickly Find the Layer You Need
Difficulty Level: 
#19 Modify a Photo with an On-Image Adjustment Tool
Difficulty Level: 
#20 Add Layers as Smart Objects for Flexible Changes
Difficulty Level: 
#21 Apply Filters as Smart Filters for Dynamic Adjustments
Difficulty Level: 
#22 Make a Selection with the Quick Selection Tool
Difficulty Level: 
#23 Paint a Quick Mask to Make a Detailed Selection
Difficulty Level: 
#24 Select Just Skin Tones and Adjust Only the Faces
Difficulty Level: 
#25 Adjust a Selection with the Refine Edge Tool
Difficulty Level: 
#26 Blend Two Photos Together with an Automatic Layer Mask
Difficulty Level: 
#27 Use a Gradient Fill Layer to Improve Your Image
Difficulty Level: 
#28 Use Auto-Align and Auto-Blend Layers to Combine Photos
Difficulty Level: 
#29 Create Photographic Designs with Vector Layers
Difficulty Level: 
#16 Edit an image with ADDED LAYERS AND BLENDING MODES
Difficulty Level: 
Layers are one of Photoshop’s most powerful features and essential to editing any image. Layers let you edit nondestructively — that is, work on your images without damaging existing pixels. You can add layers by clicking the New Layer button in the Layers panel or by dragging a layer from another open document; you can also add layers by adding a special type of layer such as a vector layer, type layer, or adjustment layer, or by duplicating another layer. You can even turn on and off the visibility of individual layers to quickly compare your modified image with the original.
By editing a duplicated layer you avoid changing the original, and by applying adjustment layers you not only preserve the original pixels but also keep the overall file size lower. With multiple layers, you can apply different layer blending modes, which control the way the colors in one layer interact with the rest of the colors in the image, without permanently affecting the original image. In addition, you can change the effects of one layer on another by changing the opacity of any layer, or by clicking and dragging layers into different positions in the Layers panel to change their stacking order.
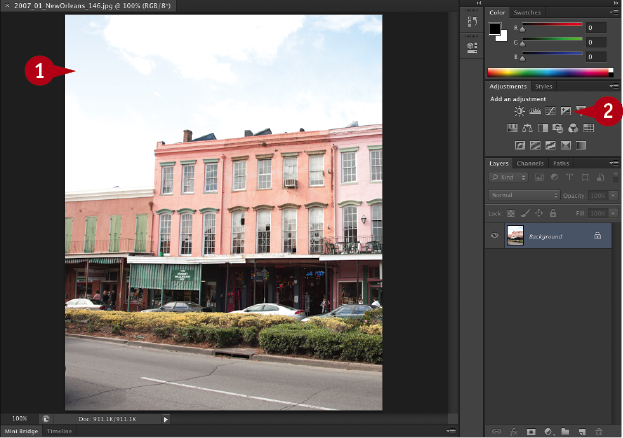
 Open an overexposed image.
Note: This task is intended to help you understand layers. In this example, the exposure in an overexposed photo is adjusted with an adjustment layer and a layer blend mode change. You can accomplish the same effect or the reverse effect in various ways.
 Click Exposure or another adjustment layer.
Note: You can select any of the adjustment layers for this task, because you are only using the layer and not actually applying the adjustment.
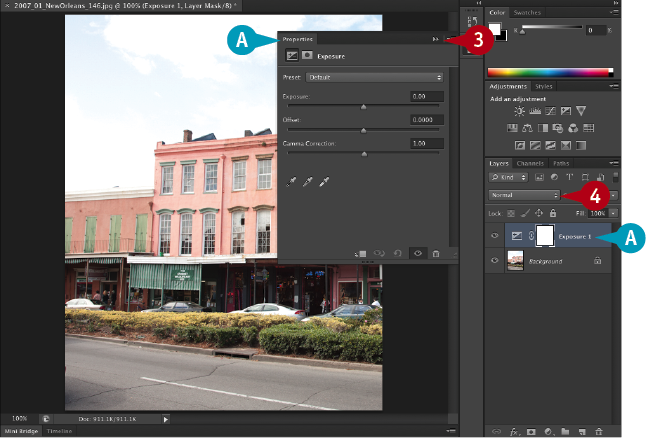
A Photoshop places an adjustment layer above the Background layer and opens the Properties panel.
 Click here to close the Properties panel if necessary to see the photo.
 Click the drop-down menu and change the blend mode to Multiply.
The exposure appears darker.
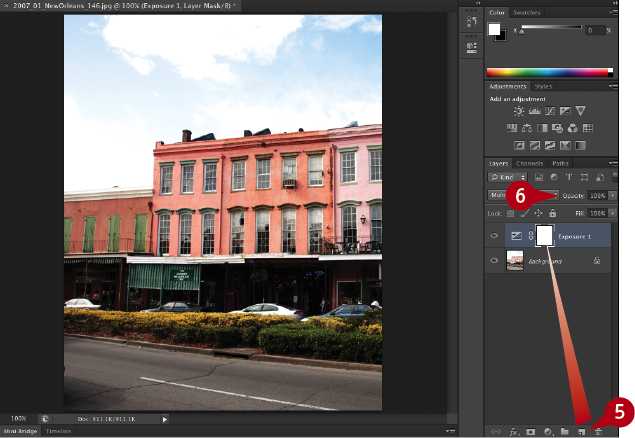
 Click and drag the adjustment layer over the New Layer button in the Layers panel.
Photoshop duplicates the layer and the exposure appears even darker.
 Click Opacity and drag to the left to lower the opacity of the top layer until the photo appears properly exposed.
Note: You can also double-click the adjustment layer button, Exposure ( ) in this example, to reopen the Exposure Properties panel and drag the Exposure slider to adjust the image.
The exposure changes.
 Repeat steps 5 and 6 until the exposure appears correct.

 Click the eye icon to toggle the visibility of any layer to compare the effect.
#17 ORGANIZE THE LAYERS PANEL with names and colors
Difficulty Level: 
Although the tasks in this chapter add only a few layers to each image, depending on the complexity of the project, you will often accumulate many more layers in the Layers panel as you work. You can view all the layers at once by scrolling through the list, or you can expand the Layers panel by clicking and dragging the Layers panel tab to separate it from the other panels on the screen. You can also close any panel tab groups you are not using so the Layers panel expands automatically to fill the space. You can name individual layers to help you remember which one applied a specific adjustment to an image. You can also color-code your layers to help you visually organize the Layers panel. Whether you work alone or with a group of designers and share projects, organizing your Layers panel with names and colors streamlines the entire editing process.
Close Tab Groups
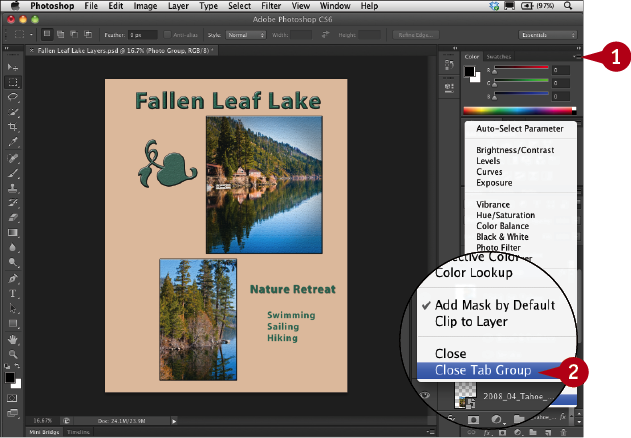
 Click the panel menu button on any unused tab group.
 Click Close Tab Group.
The tabbed group disappears and the other tabbed groups expand to fill the space.
Note: You can optionally repeat steps 1 and 2 for other unused groups.
Note: You can also click and drag a panel out of a group to maintain it on the screen before closing the other tabs in the tabbed group.
Rename Layers
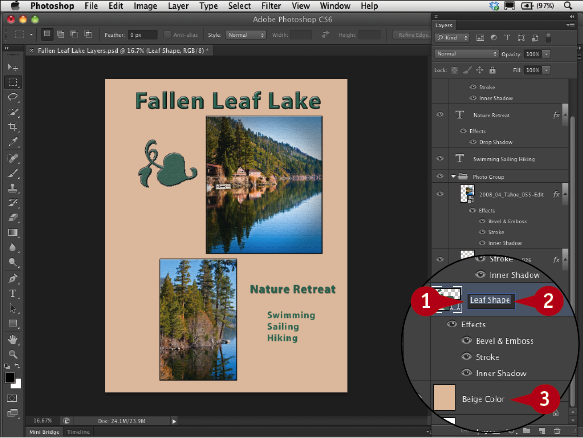
 Double-click the name of a layer.
 Type a new name in the box.
 Repeat for any other layers to give each layer a distinctive name.
Color-Code Layers
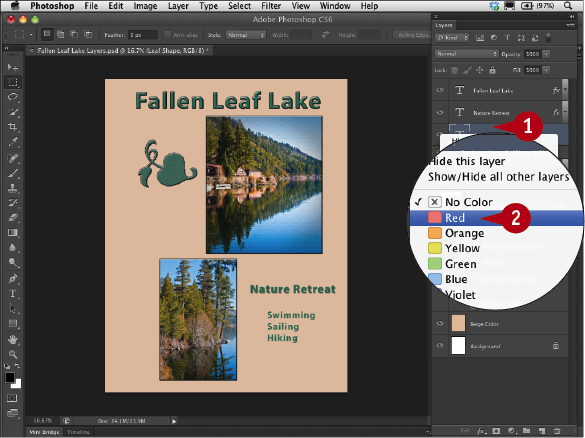
 Control+click (right-click) a layer.
 Click to select a color for the layer.
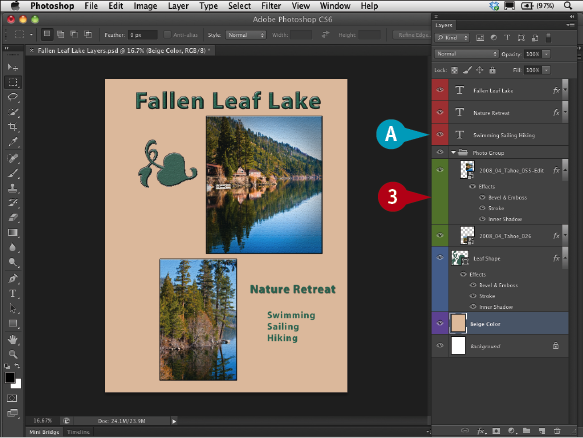
A The layer’s eye icon box changes color.
 Repeat steps 1 and 2 to color-code other layers.
#18 USE LAYER FILTERS to quickly find the layer you need
Difficulty Level: 
Photoshop CS6 includes a new feature that enables you to filter the layers in the Layers panel based on specific criteria to help you more easily find, select, and organize layers. This is especially important in documents that contain a large number of layers or for workgroups where different people might be working on different parts of a large file.
You can filter the layers by clicking the layer filter drop-down menu at the top of the layers panel and selecting Kind, and then clicking the icon to filter by pixel layers, adjustment layers, type layers, shape layers, or Smart Object layers. You can also filter layers by selecting a different type of filter in the drop-down menu. You can then filter by the layer name, by a specific type of layer effect, by the blend mode, by an attribute such as locked layers or visible layers, or by the layer color.
The layer filtering switch enables you to view only the filtered layers and then toggle the filter off to view all the layers.
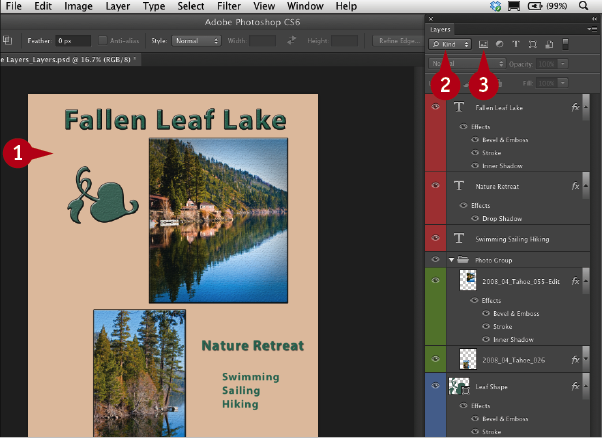
 Open a file that has multiple layers and different types of layers.
Note: Pixel layers are those that include pixels, such as a photo or rasterized image. Other types of layers can contain shapes or type. Others, such as adjustment layers, may not show anything on the layer and simply affect the layers below. Layers and groups can be color coded and/or named.
 Click the layer filter drop-down menu and select Kind.
 Click the filter for pixel layers icon.
Only the layers filled with pixels appear in the Layers panel.
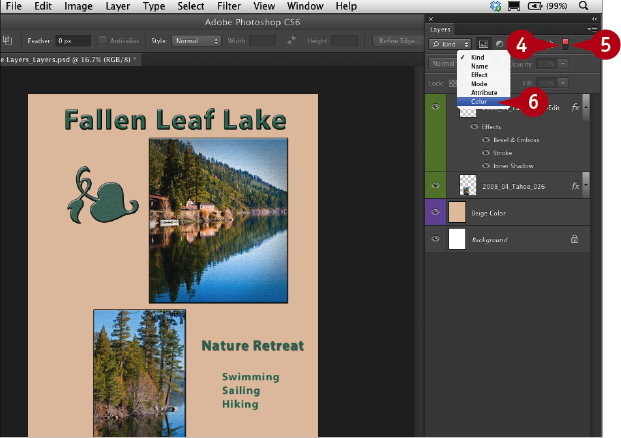
 Click the layer filter switch to turn the filtering off.
All the layers are again visible.
 Click the layer filter switch to turn the filtering on again.
 Click the Filter drop-down menu and select Color.
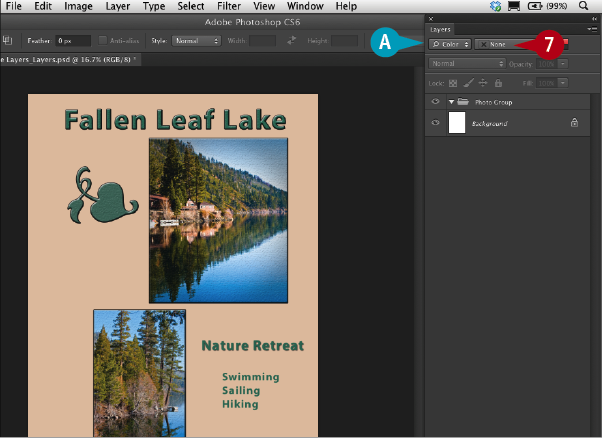
A The Layer Filter bar changes.
 Click the drop-down menu and select a color such as green.
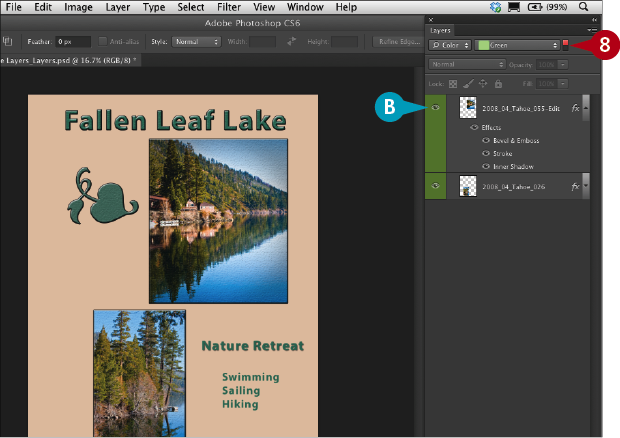
B Only the layers coded with that color appear in the Layers panel.
 Click layer filter switch to turn layer filtering off.
Layer filtering is temporarily turned off and all the layers appear in the Layers panel again.
Note: To remove all the filters, click the layer filter drop-down menu and select Kind. Click any of the filter icons, such as pixels or type, to deselect them if necessary.
#19 Modify a photo with an ON-IMAGE ADJUSTMENT TOOL
Difficulty Level: 
Some adjustment layers include a targeting tool for editing specific areas in an image.
With a Curves adjustment layer, you click in the image using the On-image adjustment tool to set a point on the curve and drag up or down to edit the contrast and tones. The shape of the curve in the Properties panel changes to match. Each time you click another area in the photo, a new point is set and dragging alters the curve.
With a Hue/Saturation adjustment layer, you click a particular color in the image with the On-image adjustment tool and drag left or right to reduce or increase that color’s saturation. Each time you click a different area in the image, the corresponding color’s saturation decreases or increases in the photo and the color slider moves in the Properties panel.
When you use a Black & White adjustment layer to convert a color photo, you can adjust the range of tones by clicking with the tool and dragging left or right directly on dark or light areas in the photo.
This task applies a Black & White adjustment layer. The steps are basically the same for the other types of adjustment layers with an On-image adjustment tool.
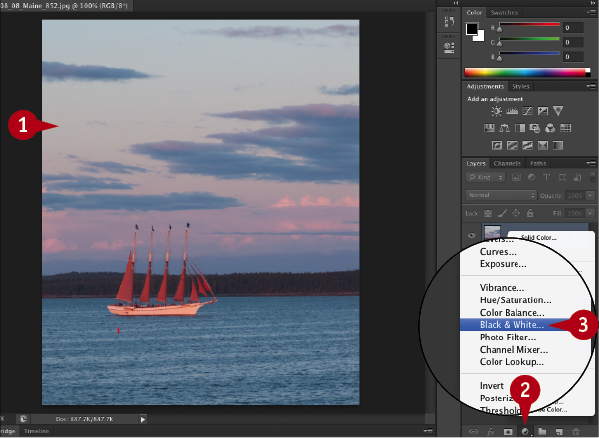
 Open a color photo.
 Click the Adjustment Layer button in the Layers panel.
 Click Black & White.
Note: You can optionally click the Black & White Adjustment Layer button ( ) in the Adjustment Layer panel.
The photo changes to black and white and the Properties panel opens.
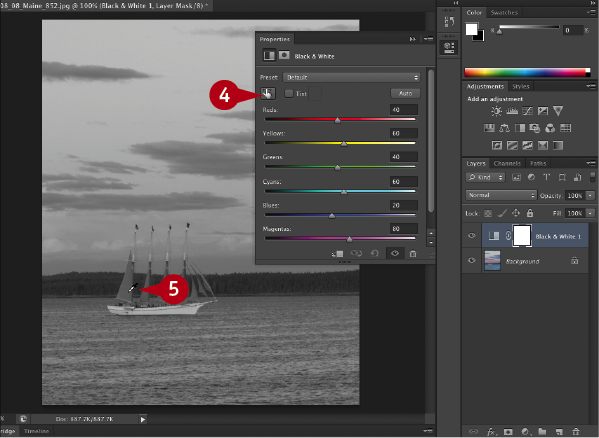
 Click the On-image adjustment tool.
 Click in the image on an area to lighten and drag to the right.
Note: The mouse pointer changes to an eyedropper.
The grays in the area are lightened and the corresponding sliders in the Properties panel move.
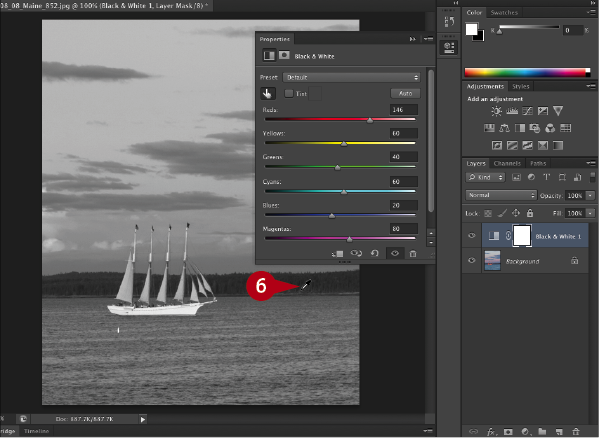
 Click in the image on an area to darken and drag to the left.
The grays in the area are darkened and the corresponding sliders in the Properties panel move.
 Repeat steps 5 and 6 for any other tones to adjust.
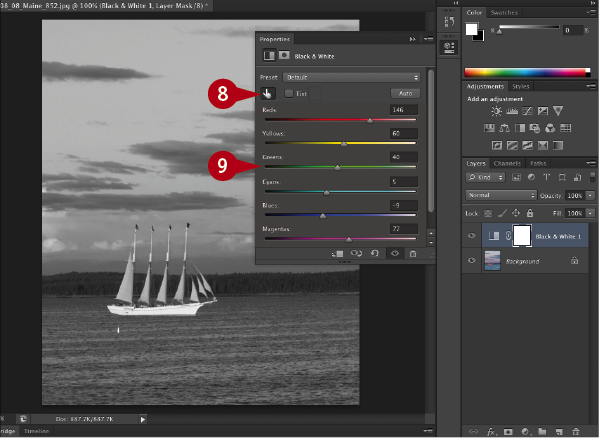
 Click the On-image adjustment tool again to return the tool to the Properties panel.
 Click and drag any sliders to edit other tones.
#20 ADD LAYERS AS SMART OBJECTS for flexible changes
Difficulty Level: 
A Smart Object layer is a special type of layer used for nondestructive editing. This type of layer gives you creative flexibility because the original pixel data of the image, or vector data in some cases, is preserved. You can edit a Smart Object layer and then change the adjustment you applied without altering the image quality.
For example, when you transform or scale a regular image layer to reduce the size, some pixels are removed. If you then transform the layer back again, you lose image quality because your previous changes permanently altered the actual pixels. However, if you open the same photograph as a Smart Object layer, or convert the layer to a Smart Object layer, you can scale the layer without any image data loss.
You can open a document as a Smart Object, convert one or more layers in Photoshop to Smart Object layers, or move a Smart Object layer into another document, maintaining its quality as a Smart Object. You can also place an Illustrator or other vector file into a document as a Smart Object and maintain the vector’s sharp edges or forms even when resizing.
Open an Image as a Smart Object
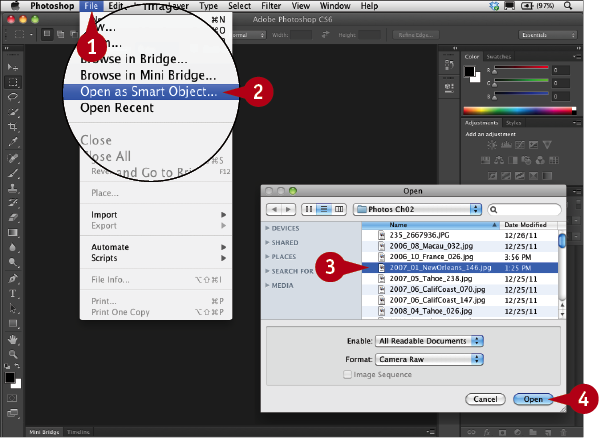
 Click File.
 Click Open As Smart Object.
The Open dialog box appears.
 Navigate to and click a file to open.
 Click Open.
The file opens as a Smart Object.
Convert an Open Image Layer to a Smart Object Layer
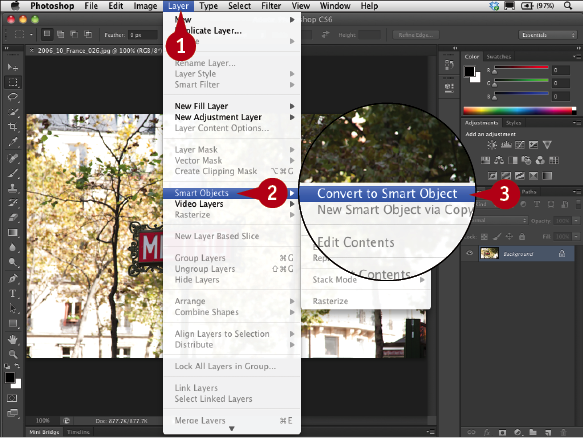
 With an image already open, click Layer.
 Click Smart Objects.
 Click Convert to Smart Object.
The layer is changed to a Smart Object layer and appears in the Layers panel with the Smart Object button. The layer is also renamed to Layer 0.
Note: You can also click the panel menu button ( ) and select Convert to Smart Object.
Open an Image as a Smart Object and Copy It to another Document
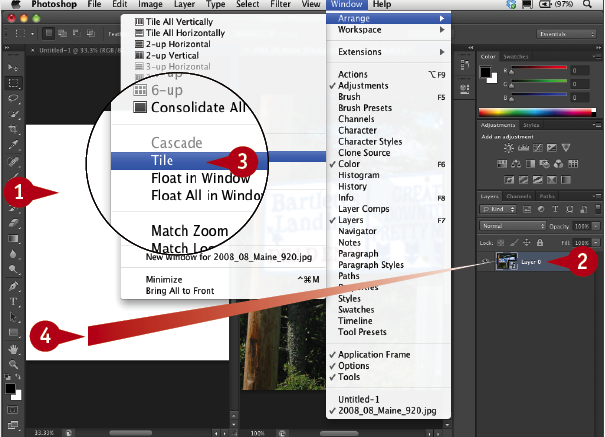
 Open a new blank document.
 Open an image as a Smart Object as in the first section of this task.
 Click Window ⇒ Arrange ⇒ Tile so you can view both images on-screen.
 Click and drag the Smart Object layer from the first document to the blank document.
Note: You can close the Smart Object document after you have moved it.
The Smart Object layer appears in the other document.
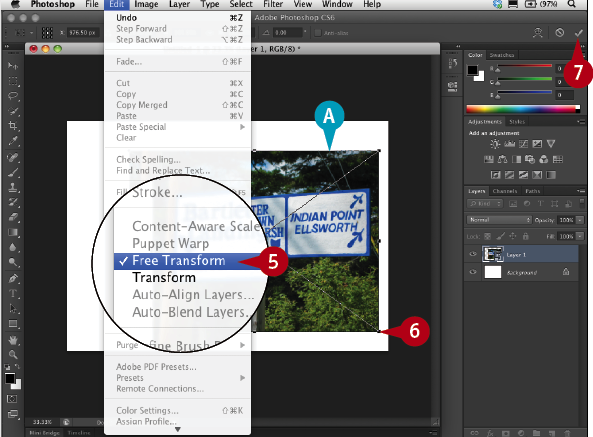
 Click Edit ⇒ Free Transform.
A Handles and a bounding box appear on the Smart Object layer.
 Shift+click and drag an anchor point to reduce the photo size.
 Click the Commit button to apply the transformation.
The image on the layer is scaled down, but can be resized back up to its original size without any data loss.
#21 APPLY FILTERS AS SMART FILTERS for dynamic adjustments
Difficulty Level: 
Filters in Photoshop are used to add blur, reduce noise, sharpen, or style an image. When you apply a regular filter, you permanently alter the pixels. By applying a Smart Filter instead, you can edit and change the settings of the filter at any time, even after the document has been saved and reopened. Any filter applied to a Smart Object layer becomes a Smart Filter.
You can apply a Smart Filter to the entire Smart Object layer or to a selection on a Smart Object layer. You can remove or hide Smart Filters at any time. You can add multiple Smart Filters one on top of another and then change the order of the Smart Filters to change the resulting effect. You can also add a mask to a Smart Filter. You can then paint on the mask with black to hide or white to reveal different areas of the filter and create detailed edits on specific areas, all without altering the image data.
Most Photoshop filters, with the exception of Liquify and Vanishing Point, can be applied as Smart Filters.
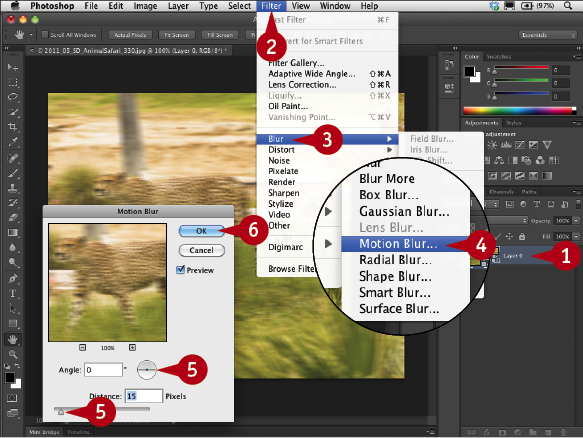
 Open or convert an image as a Smart Object as shown in the previous task.
 Click Filter.
 Click Blur.
 Click Motion Blur.
The Motion Blur dialog box appears.
 Click and drag the Distance slider and adjust the angle in the dialog box that appears.
 Click OK.
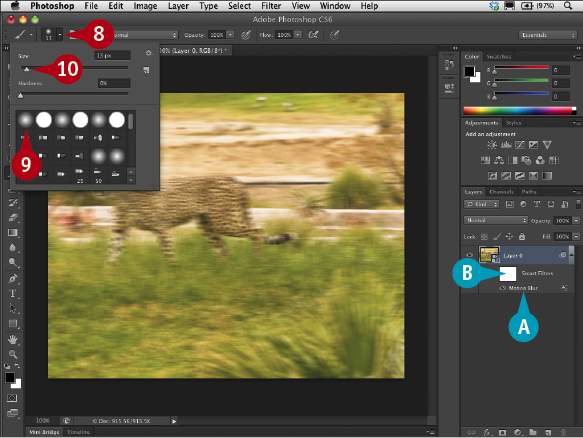
A The Smart Filter appears below the Smart Object layer in the Layers panel.
B A layer mask is automatically applied to the Smart Filter.
 Click the Brush tool.
 Click the Brush Preset drop-down menu to open the Brush picker.
 Click the first soft-edged brush in the Brush picker.
 Click and drag the Size slider to adjust the size.
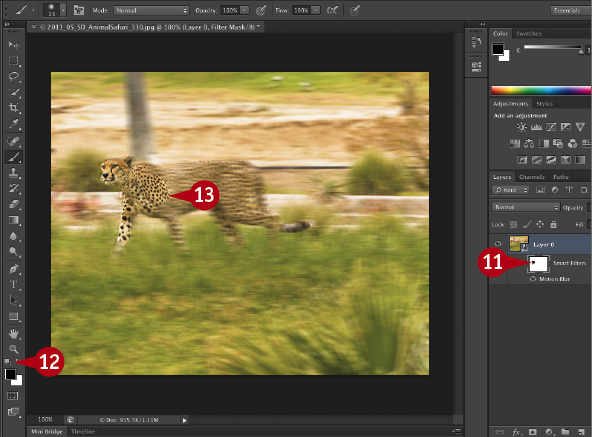
 Click the Smart Filter layer mask thumbnail to select it.
 Click the Default Colors icon to restore the default foreground and background colors, making sure black is the foreground color.
 Click in the image to paint with black to remove the filter from specific areas.
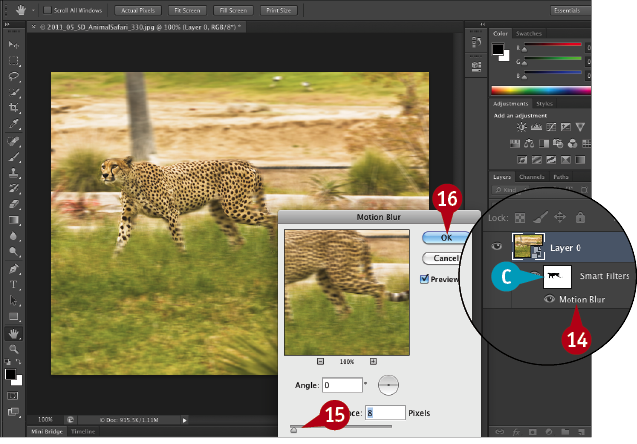
C The painted areas appear black in the layer mask, and the filters are removed from those areas in the photo.
 Double-click the filter name to reopen the dialog box.
 Adjust the filter’s settings.
 Click OK.
#22 Make a selection with the QUICK SELECTION TOOL
Difficulty Level: 
The Quick Selection tool in Photoshop enables you to easily select broad areas of an image by simply painting over them. You can use the Quick Selection tool to remove a background and isolate the main subject.
You can brush over different parts of a photo, varying the brush size as you work, or just click areas for a more limited selection. Once you have made your first selection, the tool automatically changes to the Add to Selection tool, so you can easily add areas without pressing any additional keys. You can subtract from the selection by pressing and holding Option (Alt) as you paint, or using the Subtract from Selection tool in the Options bar.
This task shows the basic steps for selecting a subject and putting it on a separate layer. You can also select the background on a duplicated layer and press Delete (Backspace) to remove the background from the image, leaving just the subject on the layer. With any active selection you can click Layer in the menu and click Inverse to invert the selection.
For most selections, you will also need to use the tools in task #23 and/or task #25 to improve or refine the selection.
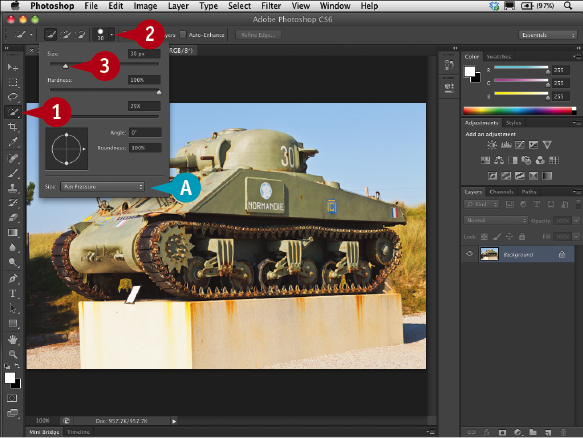
 Click the Quick Selection tool.
 Click the Brush Preset drop-down menu to open the Brush picker.
 Click and drag the Size slider to adjust the brush tip size.
A If you have a pen tablet attached, you can click the Size drop-down menu to set the brush size with Pen Pressure.
 Press
Press  +spacebar (Ctrl+spacebar) and click to zoom in, or click and drag in the image to dynamically zoom in.
Note: Although on a Mac the Spotlight feature momentarily opens with the same keystrokes, using  +spacebar in Photoshop still zooms in.
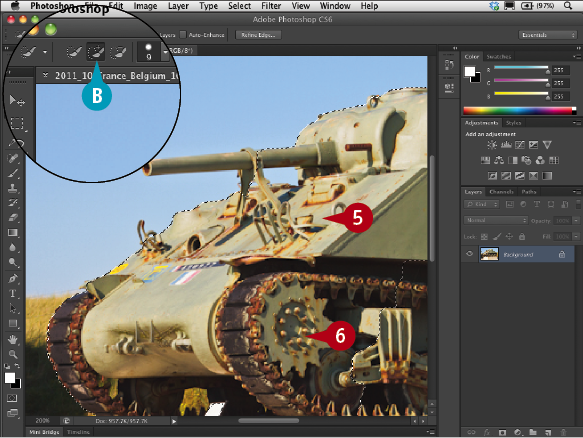
 Click and drag inside the part of the image you want to select.
 Click and drag in another area to be selected.
B The tool changes to the Add to Selection option.
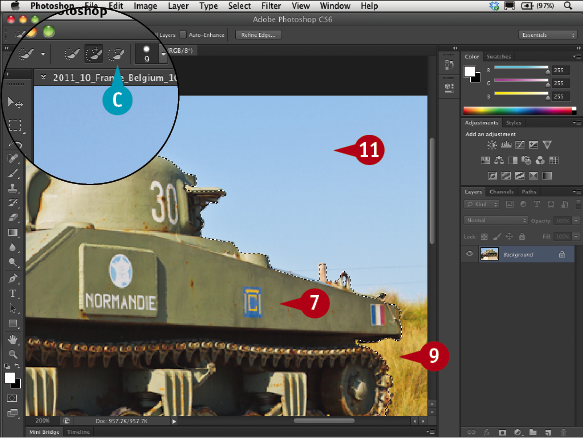
 Continue changing the brush size and clicking and dragging in the image to select more areas.
 Press and hold Option (Alt).
C The tool temporarily changes to the Subtract from Selection tool.
 Click in areas that you want to remove from the selection.
 Press and hold the spacebar and click in the image to move to a different area.
 Click any other areas to remove them from the selection.
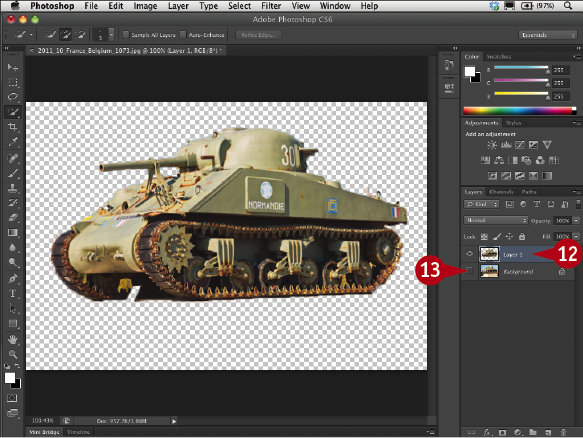
 Press
Press  +J (Ctrl+J) to put the selection on its own layer.
The selected area appears on a new layer above the Background layer.
 Click the eye icon to toggle the Background layer’s visibility.
#23 PAINT A QUICK MASK to make a detailed selection
Difficulty Level: 
You can select a rectangular or elliptical area with the marquee tools or select free-form or geometric areas with the lasso tools, or make other selections with the Quick Selection tool. You can also use the Brush tool in Quick Mask mode to make a detailed selection or to adjust any previously selected area.
The Quick Mask mode is an editing mode in which protected areas are covered with a translucent colored mask. You paint directly on the areas you want to select, adjusting the brush size as you work to make the selection more precise. The quick mask covers the area with a translucent red so you can see what you are selecting. You can also specify a different masking color if the area you are selecting has a lot of red in it.
Using this masking technique, you are actually masking the areas you paint, so you must invert the selection before making any adjustments. The areas you painted over are then selected, and the remainder of the image is now masked.
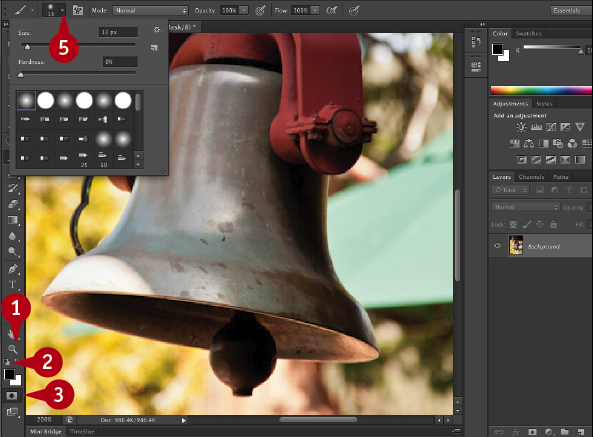
 Click the Zoom tool and click and drag to enlarge the area you want to select.
 Click the Default Colors icon to set the foreground color to black and the background to white.
 Click the Quick Mask Mode button.
 Click the Brush tool.
 Click the Brush Preset drop-down menu to open the Brush picker.
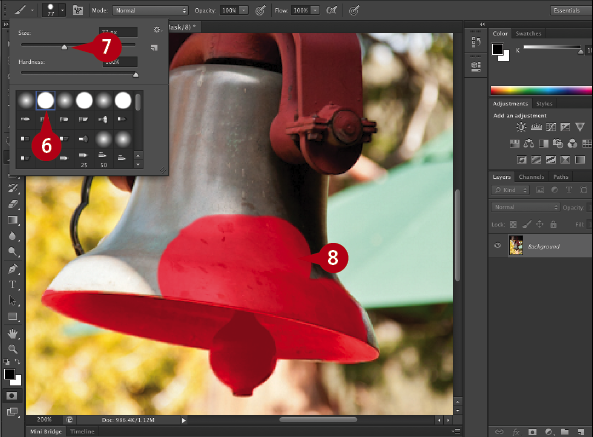
 Select a hard-edged brush.
 Click and drag the Size slider to adjust the size.
 Paint over the areas you want to select.
The painted areas are covered with a red translucent mask.
Note: Press the left bracket key to reduce the brush size as you work in detailed areas.
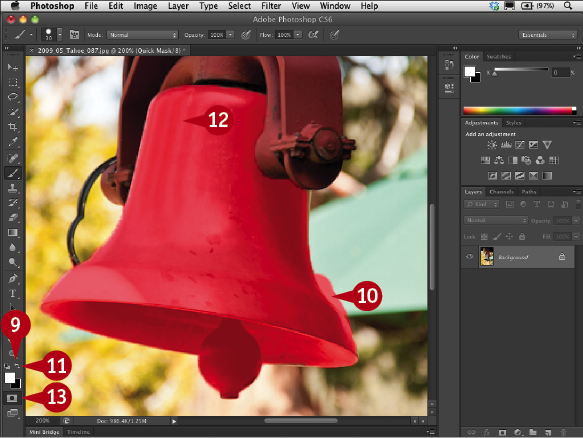
 Click the Switch Colors icon to reverse the foreground and background colors and make white the foreground color.
 Paint over any areas that you do not want selected.
 Click the Switch Colors icon to make black the foreground color again.
 Continue painting until the whole area is covered in red.
 Click the Quick Mask Mode button to turn off the Quick Mask mode.
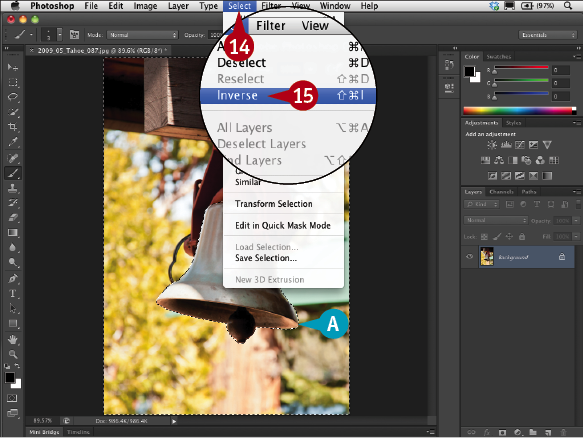
A Dashed lines indicate the areas that were covered with the red overlay and are not selected.
Note: You can optionally press Option+spacebar (Alt+spacebar) to zoom back out to see the edges of the image.
 Click Select.
 Click Inverse.
The selection now includes only the area you painted in the Quick Mask mode.
#24 SELECT JUST SKIN TONES and adjust only the faces
Difficulty Level: 
Portrait retouchers spend a lot time working on faces, improving color and tone, hiding blemishes, enhancing eyes, and more. Yet even everyday snapshots of people can be greatly improved by editing the faces in the image. For example, a Levels adjustment on just the faces can bring the attention of the viewer to the subjects in the image and make an everyday snapshot much more interesting. However, making a selection of just the faces in a photo can be difficult or time consuming.
Photoshop CS6 includes a new tool for limiting a selection to the skin tones in a photograph. When you choose Select ⇒ Color Range, Photoshop automatically selects what it sees as skins tones. You can further refine the automatic selection by checking the Detect Faces check box, which appears when the Skin Tones color range menu is open.
You can use this new tool as a starting point and then refine the facial selection with the other selection tools to quickly get a more defined selection.
Note: Photograph copyright © Photospin.com.

 Open a photograph showing a face or faces.
 Click Select.
 Click Color Range.
The Color Range dialog box appears.
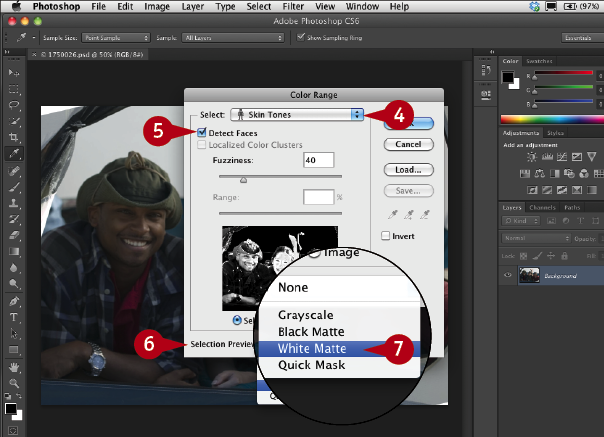
 Click the Select drop-down menu and click Skin Tones.
 Click Detect Faces (
 changes to
  ).
).
 Click the Selection Preview drop-down menu.
 Click White Matte.
Note: You can select any preview color that makes viewing the selected areas easier.
Note: Move the Color Range dialog box so you can see more of the photo.
The skin tones appear in color in the image window. Everything else turns white.
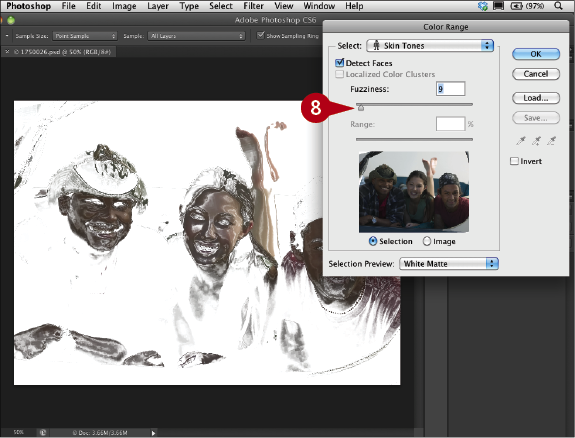
 Click and drag the Fuzziness slider all the way to the left.
The image turns completely white and the preview box completely black.
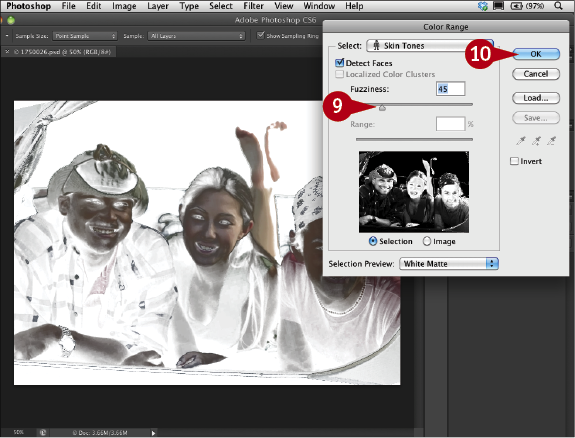
 Click and drag the Fuzziness slider slowly to the right.
The selected area expands.
 Click OK when most of the faces are selected.
Making selections of skin or faces generally requires refining the selection. You can use the Quick Selection tool or the Lasso to add to or delete from the selection. With these tools, press and hold Option (Alt) as you click to remove areas from the selection or  (Ctrl) as you click to add areas to the selection.
You can also use the Quick Mask mode to edit the selection by painting on the areas to keep with a white paint brush or painting with a black paint brush to remove areas from the selection.
Once your selection is made, you can then use any tools to edit the area without affecting the surrounding pixels.
You can use the Skin Tones selection option as in this task to quickly brighten faces in a snapshot with a Levels adjustment layer. However, you can also use this Skin Tones selection tool and then invert the selection to adjust the surrounding areas or clothes instead.
The selection marquee appears on the photo.
Note: You can adjust the selection using any of the selection tools as in previous tasks to more precisely select just the skin tones.
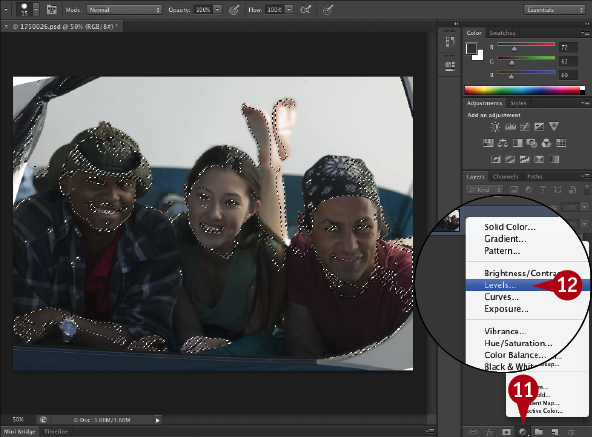
 Click the New Fill or Adjustment Layer button.
 Click the Levels adjustment layer.
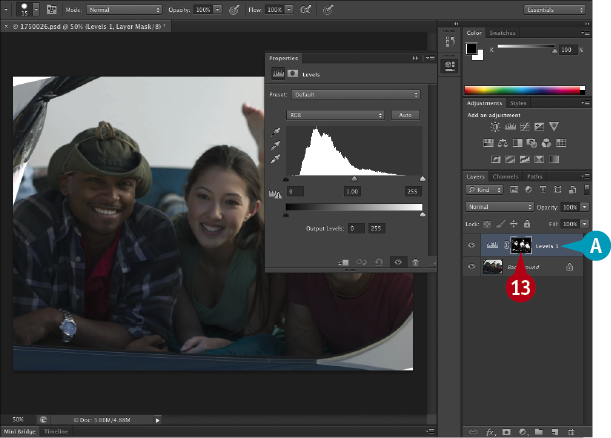
A A Levels adjustment layer and a mask are added in the Layers panel.
 Option+click (Alt+click) the layer mask thumbnail on the adjustment layer.
The image shows only the layer mask in black and white.
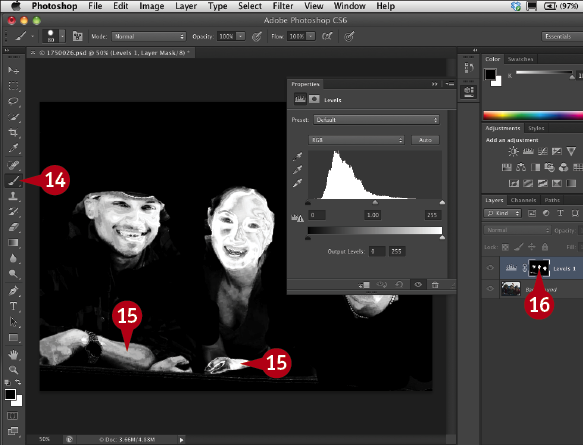
 Click the Brush tool.
Note: Make sure that black is the foreground color. Press X if necessary to change it.
 Paint with black over the white areas in the image that are not faces to remove them from the selection.
 Option+click (Alt+click) the layer mask thumbnail on the adjustment layer.
The image returns to the normal view.

 Click the Levels button in the Properties panel.
 Click and drag the slider to the left until the skin tones are lightened or to the base of the curve.
The adjustments are applied to the selected skin tones only.
#25 ADJUST A SELECTION with the Refine Edge tool
Difficulty Level: 
The Refine Edge floating panel is accessible in the Options bar when working with any selection tool. Using Refine Edge, you can clean up selections, soften or feather the edge outlines, and remove edge artifacts, or jaggies. The panel offers various previewing options, showing the selection on a white or black background, against a red overlay, or on an empty layer to help you see the edges of the areas you are selecting and the changes you are making. You can use the Refine Edge panel with any active selection, regardless of the tool used to create the selection. The Refine Edge tool is particularly useful when selecting very irregular edges, such as animal fur. Whenever there is a selection in the image, the Refine Edge button appears in the Options bar.
With the subject selected, you can use the tool to fine-tune the details in the edges of your image to get the best selection possible.
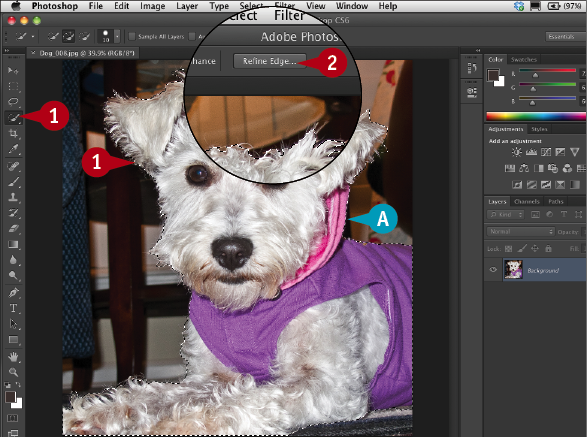
 Open an image and make a selection using any of the selection tools.
A The foreground subject is selected.
Note: Depending on the image, you might select the background and then invert the selection to show the subject matter in the selection marquee.
 Click the Refine Edge button in the Options bar.
The subject appears against a solid background.
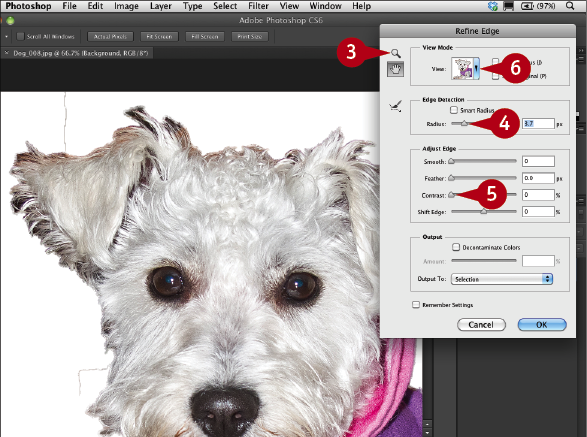
 Click the Zoom tool in the Refine Edge panel and click in the image to enlarge certain areas.
Note: Click the Hand tool ( ) in the Refine Edge panel and click and drag to move around the image.
 Click and drag the Radius slider to refine the edge selection.
 Click and drag the Contrast slider to remove edge artifacts and to sharpen edges.
 Click the View drop-down menu to select another view mode.
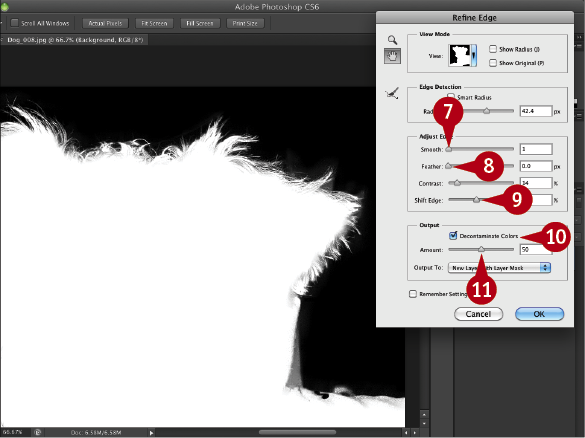
 Click and drag the Smooth slider to create a smoother selection outline.
 Click and drag the Feather slider to create a softer-edged transition.
 Click and drag the Shift Edge slider to adjust the selection edges.
 Click Decontaminate Colors (
 changes to
  ).
).
 Click and drag the Amount slider to replace the color fringes with the color of the subject.
 Repeat steps 4 to 11 to make the best selection possible.
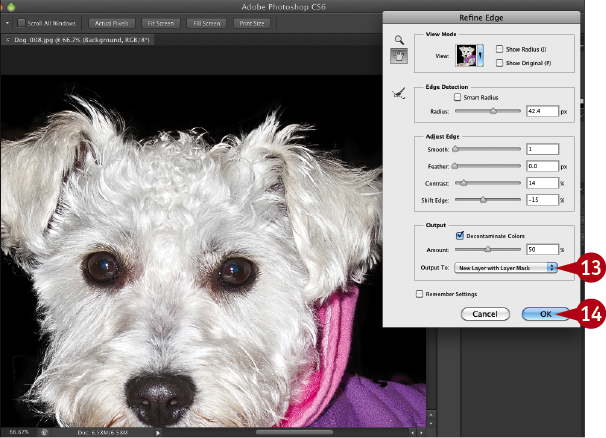
 Click the Output To drop-down menu to have the selected area appear as a selection or a mask on the current layer or placed on a new layer.
 Click OK to save the selection.
Your refined selection appears on the image as a new layer or as a new layer with a layer mask.
#26 BLEND TWO PHOTOS TOGETHER with an automatic layer mask
Difficulty Level: 
Layer masks open a world of imaging possibilities that you cannot create with traditional tools. Using a layer mask to hide parts of an image, you can easily blend one photograph into another and create designs sure to grab a viewer’s attention. For example, you can blend a photograph of a wedding couple into a photo of the bride’s bouquet, or blend a photo of a potato with a photo of a person lying on a couch.
Generally, to blend a photo on one layer into the photo on the layer below, you add a layer mask to the top layer and paint with black on the layer mask to blend the images. To hide some of the area you just revealed, simply reverse the colors and paint with white.
You can also have Photoshop create the layer mask for you automatically. By copying one photo to the clipboard and creating a selection on the other photo, you can use Photoshop’s Paste Into command. You can then use the Brush tool to add or remove areas if necessary. You can also adjust the way the images blend using the Opacity slider on the Layers panel.
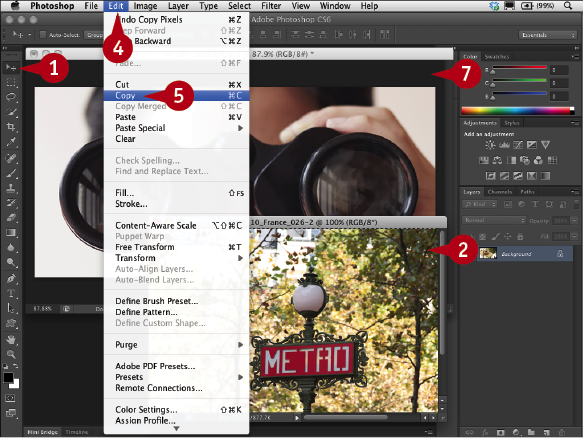
 With the two photographs you want to blend open, click the Move tool.
 Click the photo that will be blended into the other to target it.
 Press
Press  +A (Ctrl+A) to select the entire image.
Note: You can also click Select ⇒ All.
 Click Edit.
 Click Copy.
 Click the close button on this photo.
 Click the main photo to target it.
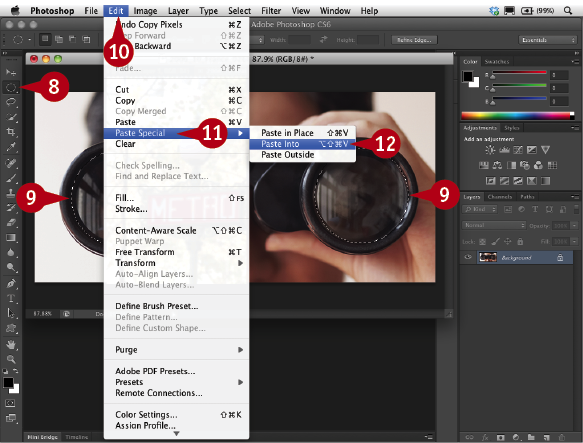
 Click the Marquee tool or any other selection tool.
 Click and drag on the areas to fill to select them.
Note: You can adjust any selection with the current tool by pressing  +Option (Ctrl+Alt) as you click and drag to remove from a selection, and pressing Shift as you click and drag to add to a selection.
 Click Edit.
 Click Paste Special.
 Click Paste Into.

A The first photo appears in the active selection.
 Click the Move tool.
 Click and drag in the area to reposition it.
 Press
Press  +T (Ctrl+T) to make the Free Transform anchors appear.
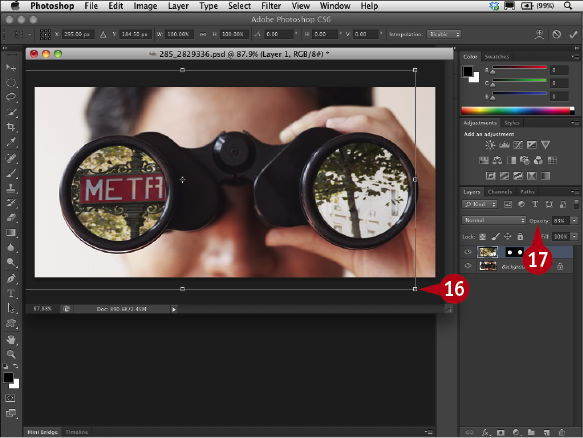
 Shift+click the anchor points to resize the photo.
 Click the layer’s Opacity slider and drag to the left to blend the images more naturally.
#27 USE A GRADIENT FILL LAYER to improve your image
Difficulty Level: 
Adjustment layers give you many options for editing and re-editing your images. You can give a scenic photo a more dramatic look or simply increase the colors in a sky with a Gradient Fill adjustment layer. The colors you see are often better than what your camera captures, particularly when you photograph a sunset or a sunrise. You can easily increase the intensity of the sky with a Gradient Fill. You can enhance the existing colors by using a black foreground color, using a more intense version of the same color, or even selecting another color to create a stylized image. You can adjust how much of the photo to cover with added color. Because you are using a fill layer, you can go back and increase or decrease the amount of color after you apply the Gradient Fill layer. You can even change the color that you applied to get a different effect or to create a more dramatic look. This technique is most effective on a photo with a large sky area and an open horizon.
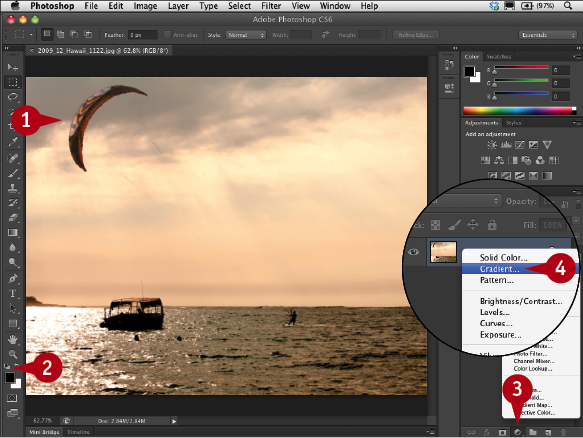
 Open an image that has a large area of sky.
 Click the Default Colors icon to set the foreground to black.
Note: You can optionally click to select a color to use as a gradient for a creative effect.
 Click the New Fill or Adjustment Layer button.
 Click Gradient.
The Gradient Fill dialog box appears, and a foreground-to-transparent gradient is applied to the image.
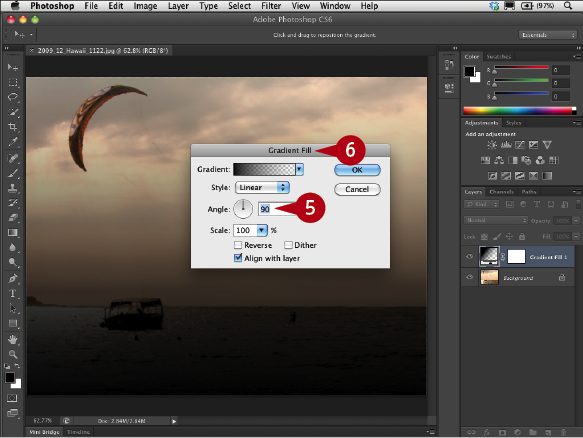
 Make sure that the angle is set to 90 degrees.
 Click and drag the dialog box so you can see more of the image.
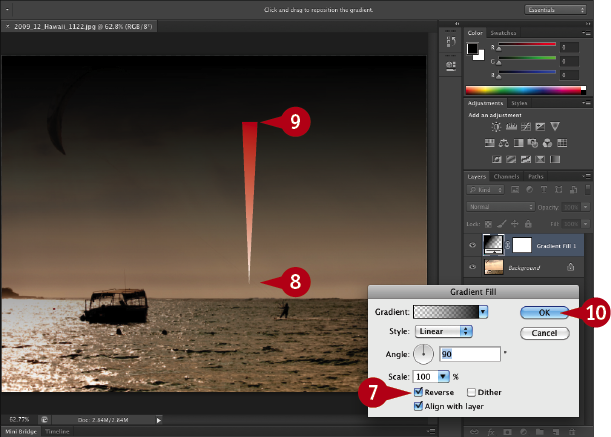
 Click Reverse (
 changes to
  ).
).
The gradient reverses to black or the selected color at the top, changing to transparent at the bottom of the image.
 Position the cursor over the image.
 Drag upward in the image until the gradient covers only the sky.
 Click OK.
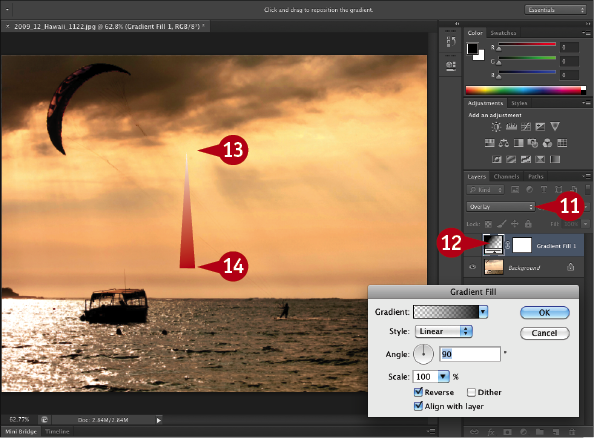
 Click the blend mode drop-down menu and click Overlay.
 Double-click the layer thumbnail for the gradient fill.
The Gradient Fill dialog box reappears.
 Position the cursor over the image.
 Drag downward in the image to increase the darkened sky or drag upward to lessen the effect.
Each time that you drag in the image with the Gradient Fill layer selected, the look of the sky changes.
#28 USE AUTO-ALIGN AND AUTO-BLEND LAYERS to combine photos
Difficulty Level: 
You can easily combine two or more separate photographs of the same subject and let Photoshop blend these to achieve a better image. You can combine images that do not have identical alignments and Photoshop can automatically align them. You can combine images photographed with different exposures, making some too light and others too dark, and Photoshop blends these to achieve better color and tone.
The Auto-Align Layers command aligns layers based on similar content in different layers, such as corners and edges, and automatically generates the required masks.
The Auto-Blend Layers command helps you create composites of a scene from multiple images with over- or underexposed areas or even content differences. Auto-Blend Layers creates masks on each layer and to hide or show different areas from each image to create a better and seamless composite image.
Using the Auto-Align and Auto-Blend Layers commands is not the same as creating an HDR (High Dynamic Range) image shown in task #78.
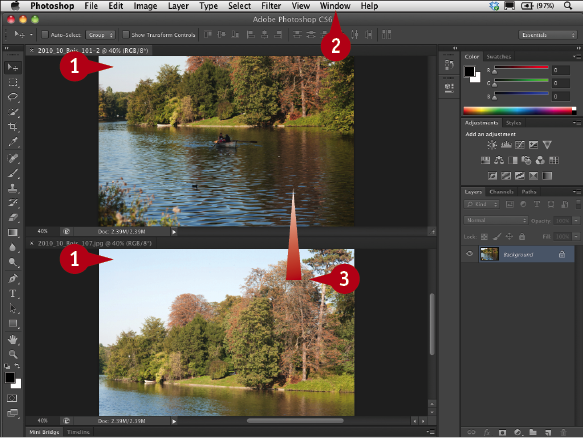
 Open multiple images to combine.
 Click Window ⇒ Arrange and select a window layout, such as 2-up Horizontal, so you can see all the images.
Note: Only two images are shown in this task; however, you can use multiple images.
 Shift+click and drag each image onto one image to make multiple layers on one document.
 Close all the other open images.

 Shift+click all the layers in the Layers panel.
 Click Edit.
 Click Auto-Align Layers.
 Click an alignment option (
 changes to
  ) in the dialog box that appears.
 Click OK.
Photoshop automatically aligns the layers based on the content.
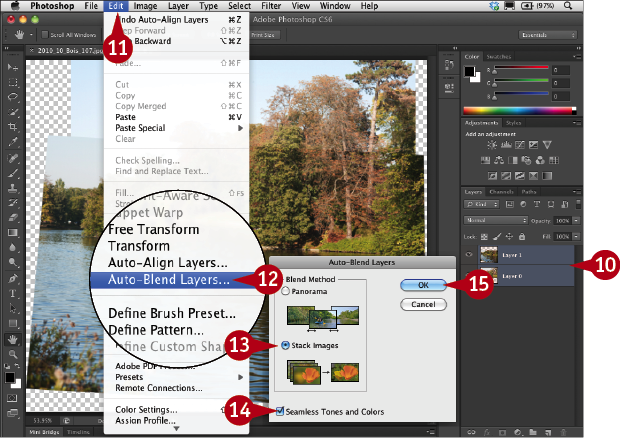
 Shift+click all the layers in the Layers panel.
 Click Edit.
 Click Auto-Blend Layers.
 Click Stack Images in the dialog box (
 changes to
  ).
).
 Click Seamless Tones and Colors in the dialog box (
 changes to
  ).
).
 Click OK.
Photoshop automatically blends the layers.
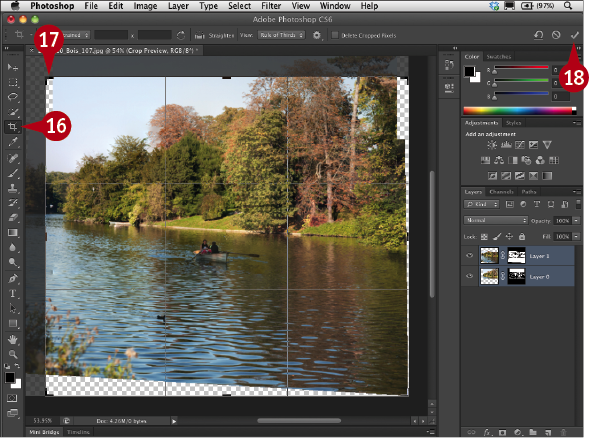
 Click the Crop tool.
 Click and drag in the image to select the finished composite.
 Click the Commit button to apply the crop.
Note: You can optionally click Layer ⇒ Flatten Image to combine all the layers into one composite image.
#29 Create photographic designs with VECTOR LAYERS
Difficulty Level: 
When you use a shape tool or the Pen tool in Photoshop, you create a vector layer. Vectors are resolution independent — you can scale them at any time and they maintain their sharp edges like the drawings in Illustrator. You can select any of Photoshop predesigned custom shapes for vectors or create your own shape with the Pen tools. You can also load custom shapes you purchase from third-party vendors. You can add shapes alone or in combination with other shapes to create novel designs or logos. When you draw a shape and create a vector layer, you can add to that shape on the same layer or you can create new vector layers with each shape you draw to create new designs. You can fill and stroke the vector shapes independently and still maintain the crisp Illustrator-type edges. You can add vector layers to any image as a design element or use the shape as a mask by clipping the image to the vector layer.
Note: Photograph copyright © Photospin.com.
Note: This task starts with a new white document set to US letter size.
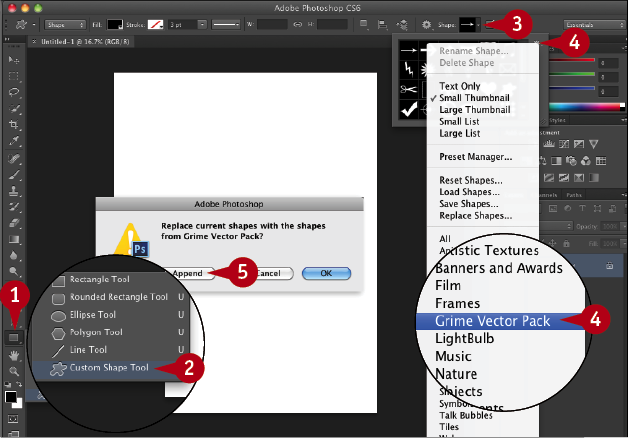
 Control+click (right-click) the Rectangle Shape tool.
 Click the Custom Shape tool.
 Click the Shape drop-down menu in the Options bar to view the shapes.
 Click the gear menu button (
 ) and click a set of shapes from the menu such as Grime Vector Pack.
 Click Append in the dialog box that appears.
The selected shapes are added to the menu.
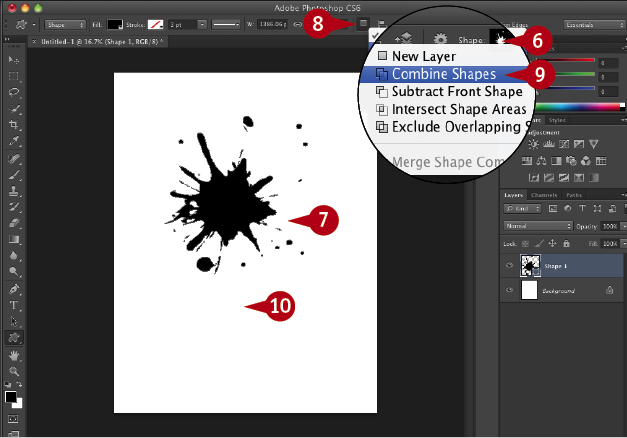
 Double-click a shape in the menu.
 Click and drag on the document.
A black shape appears on the white document.
 Click the Path Operations button in the Options bar.
 Click Combine Shapes.
 Click and drag on the document again.
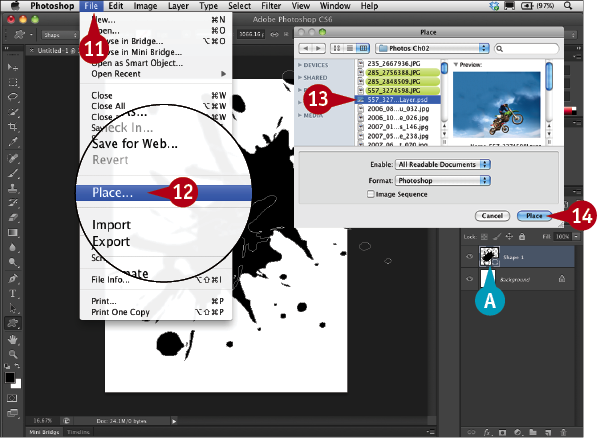
A The two black shapes are combined on one vector layer.
 Click File.
 Click Place.
 Click a photo in the Place dialog box that appears.
 Click Place.
The photo appears on top of the design.
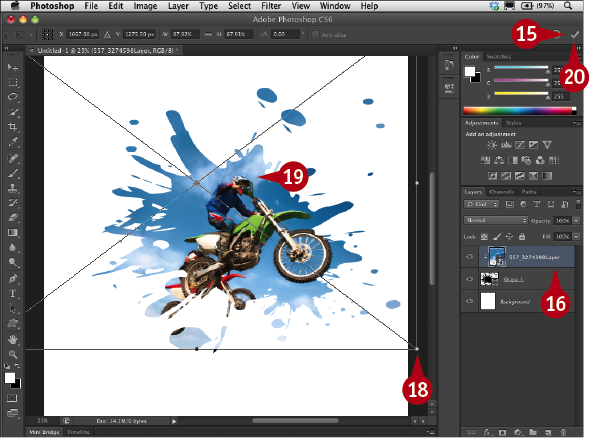
 Click the Commit button to apply the placed image.
 Opt+click (Alt+click) on the line between the photo layer and the vector shape layer to create a clipping mask.
Note: You can also click Layer and click Create Clipping Mask to clip the photo to the shape.
 Press
Press  +T (Ctrl+T) to make the Free Transform anchors appear.
 Shift+click the anchor points to resize the photo.
 Click and drag on the image to adjust the photo in the shape.
 Click the Commit button to apply the transformation.
The photo fits inside the custom shape.


