Chapter 3
Straighten, Crop, and Resize
Whether you work on design projects and professional photographs, or simply use Photoshop to improve your snapshots, your digital photos almost always need to be resized or adjusted to fit your projects. A well-balanced image, free from odd-looking distortions, can mean the difference between a snapshot and a good photograph. The overall layout of the image and where the main subject is placed in relation to the background are essential visual elements in any image. A crooked horizon or unbalanced subject matter can make even a great image look like the work of a beginner.
Photoshop includes a variety of tools and filters to improve the composition of any image. The improved Crop tool makes cropping easier and gives you more visual control. You can choose to delete the cropped pixels, making the crop permanent, or you can leave that option deselected so your crops are nondestructive and can be easily changed. You can crop by selecting a preset aspect ratio, flip the orientation of the crop box, or crop to a specific size and resolution. You can toggle the visibility of the cropped area to better judge your composition, all while keeping your file completely editable.
You can correct perspective or lens distortion with the Crop tool or Lens Correction filter. You can combine images to create a panorama using Photoshop’s Photomerge; the software does most of the work for you.
Photoshop makes all such traditionally time-consuming or difficult tasks quick and easy. New tools and resampling algorithms help you straighten, crop, adjust, and resize images, saving hours of tedious work to make all your images look better.
#30 Crop Your Images Using Guides to Improve Composition
Difficulty Level: 
#31 Easily Level a Crooked Horizon
Difficulty Level:
#32 Expand the Canvas with a Reverse Crop
Difficulty Level:
#33 Crop Creatively for a Diptych, Triptych, or Quadriptych
Difficulty Level: 
#34 Change Your Perspective with the Crop Tool
Difficulty Level: 
#35 Correct Geometric Distortion with the Lens Correction Filter
Difficulty Level:
#36 Improve the Field of View with the Adaptive Wide Angle Filter
Difficulty Level:
#37 Assemble a Panorama Using Photomerge Automation
Difficulty Level:
#38 Resize Your Image with Minimal Visible Loss
Difficulty Level:
#30 CROP YOUR IMAGES USING GUIDES to improve composition
Difficulty Level:
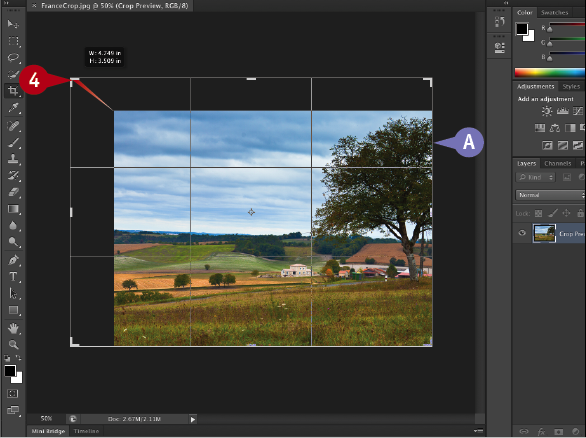
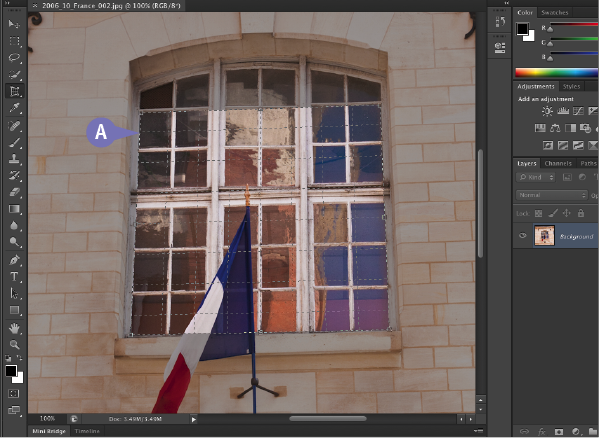
Perfectly composing a photograph in the camera’s viewfinder is not always possible; however, you can strengthen the composition of your images by changing the placement of the horizon or the relative position of the main subject using Photoshop’s Crop tool.
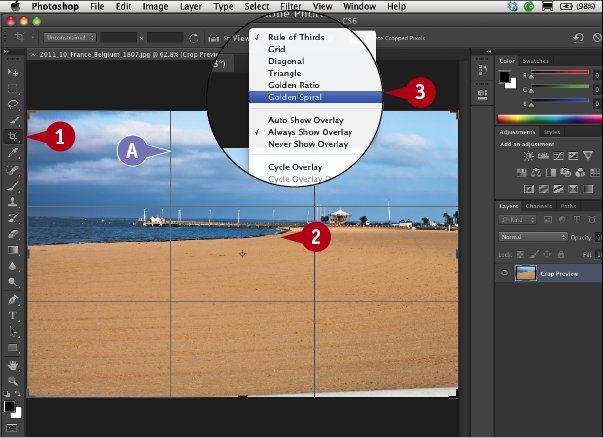
Designers and photographers use various techniques to balance an image and focus the viewer’s attention. They may offset the main subject to guide the viewer into the image, or they may use an overlay, such as the Rule of Thirds principle, as a guide. Photoshop CS6 now includes a number of traditional overlay guides that you can place on your image to help you adjust the composition.
Photoshop’s overlay guides are applied by default once you click in the image with the Crop tool. You can use them, change the overlay style, or turn them off to compose your crop visually any way you want.
You can also crop by specifying dimensions in the Options bar, using one of the preset sizes, or by creating and saving your own preset.
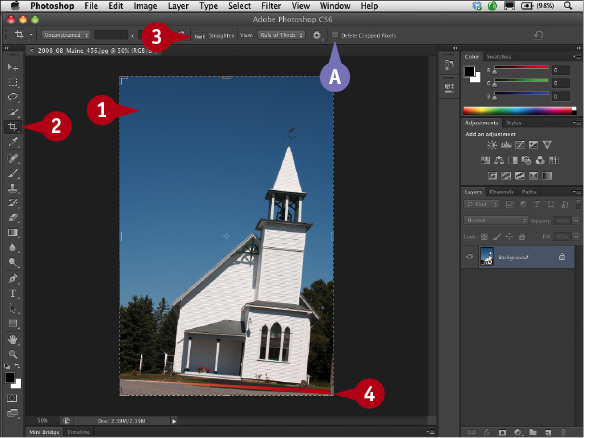
 With the image you want to crop opened, click the Crop tool.
The crop box is automatically set to the image edges.
 Click in the image.
A The Rule of Thirds overlay is now visible.
 Click the View drop-down menu in the Options bar to change the view options for the Crop tool.
B The overlay changes.
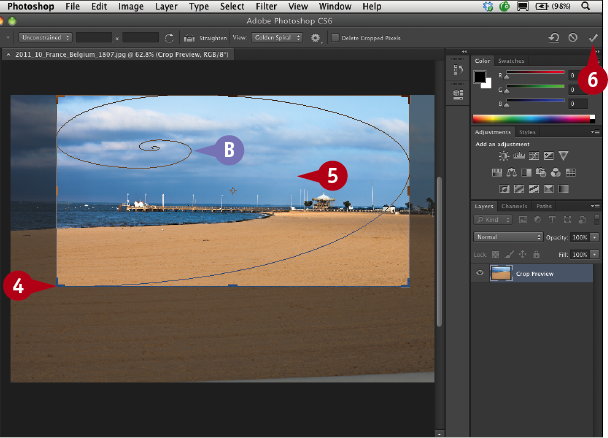
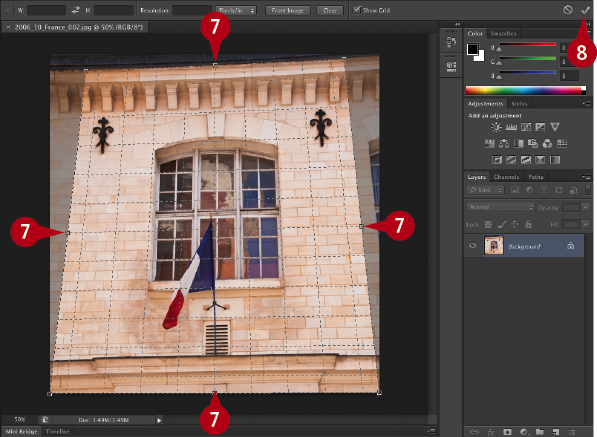
 Click and drag the side anchors to reposition the crop on the image.
 Click and drag anywhere inside the crop lines to change the overall area to be cropped.
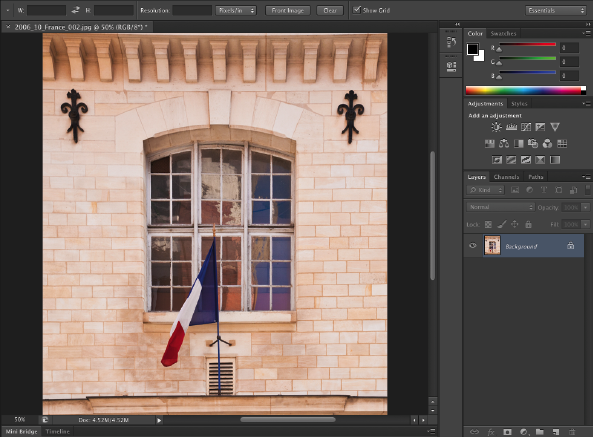
 Click the Commit button to apply the crop.
#31 Easily level a CROOKED HORIZON
Difficulty Level:
Keeping the horizon perfectly horizontal when you are shooting is not always easy. You can adjust the angle of the horizon line in Photoshop without doing any calculations.
Photoshop CS6 now includes a straighten tool in the Crop tool’s Options bar. When you click and drag the Straighten tool along a line that should be horizontal or vertical, the image is rotated, the canvas automatically expands, and the crop box adjusts to fit the maximum size of the straightened image.
At this point the window displays a nondestructive preview of the cropped image. You can click just outside the crop box to go back into crop mode. The canvas then expands and you can re-edit the crop box until you see the final image you want. You can also click the Reset button in the Options bar or press Delete (Backspace) to reset the crop box. And if the Delete Cropped Pixels box in the Options bar is unchecked, you can even change the crop after clicking the Commit button.
Open an image that has a crooked horizon line.
Click the Crop tool.
A Make sure Delete Cropped Pixels is unchecked.
Click the Straighten tool in the Options bar.
Click and drag from one side of the image to the other, along what should be a horizontal or vertical line.
The image is rotated and the window displays a preview of the straightened image.

Click the Commit button to finish the crop.
Click any of the crop anchors to view the cropped pixels.
Note: The hidden pixels are preserved even after you save the file as cropped.
#32 Expand the canvas with a REVERSE CROP
Difficulty Level:
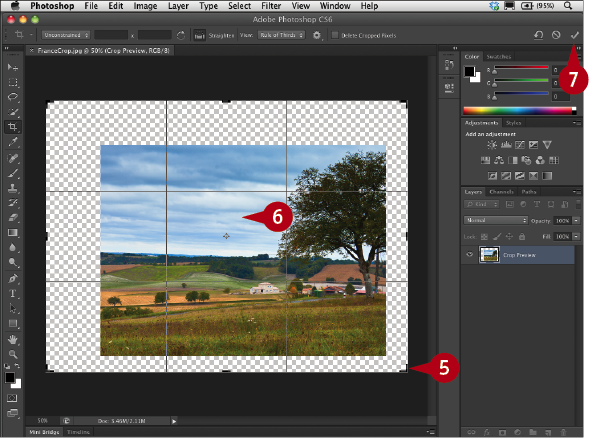
When you think of cropping, you generally think of reducing the physical size of an image by cutting away areas around the borders. In Photoshop, you can use the Crop tool to expand the canvas, giving your photo a larger border, or giving a design more background area.
Although you can expand the canvas by selecting Image ⇒ Canvas Size and setting the specific dimensions for the canvas, as shown in task #110, using the reverse crop method is quick and gives you a preview as you work of how your image will appear on the expanded canvas. And Photoshop’s Crop tool gives you more flexibility because you can drag the crop marquee handles to create an uneven border.
You can use this technique to enlarge your canvas visually or use precise dimensions for your final image. By specifying the width and height for your finished design in the boxes in the Options bar, you can click and drag out the crop marquee in the image and maintain the exact dimensions you typed.
Open an image.
Note: If necessary, click Window ⇒ Application Frame so that the workspace fills the open space.
Click  +minus sign (Ctrl+minus sign) to add some space around the image.
The image view becomes smaller on the background area.
Click the Crop tool.
A The crop marquee appears on the image.
Click and drag the corner or side anchor points of the crop marquee to extend the crop area.
The canvas enlarges as you drag and fills with transparency. The current canvas dimensions appear just over the edge of the crop marquee.
Repeat step 4 to get the visual proportions you need.
Click and drag directly on the image to move it around on the canvas if necessary.
 Click the Commit button in the Options bar to commit the crop.
The Background layer changes to a regular layer with transparency, named Layer 0.
 Click the Default Colors icon in the toolbar to reset the background color to white.
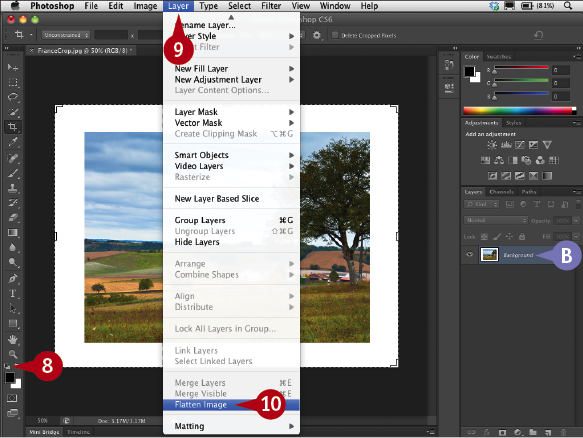
 Click Layer.
 Click Flatten Image.
Note: You can optionally click the Layers panel drop-down menu and select Flatten Image.
B The transparent area is filled with white and Layer 0 changes into the Background layer.
TIPS
Change It!
Click the Crop tool ( ) and type the width and height for your finished design in the boxes in the Options bar. You can also click a preset size. Then when you click and drag out the crop marquee in the image, it maintains the exact ratios you typed.
Customize It!
Click Unconstrained from the drop-down menu in the Options bar. Enter specific file dimensions that you use often. Unconstrained changes to Custom. Click the drop-down menu and select Save Preset. Name your custom crop preset in the dialog box that appears and click OK.
Try This!
You can add a colored border instead of white. Before flattening the layers, click the default Background color icon in the Tool bar and select a color in the Color Picker that appears. Then when you flatten the layers, the added border is filled with the new color.
#33 CROP CREATIVELY for a diptych, triptych, or quadriptych
Difficulty Level:
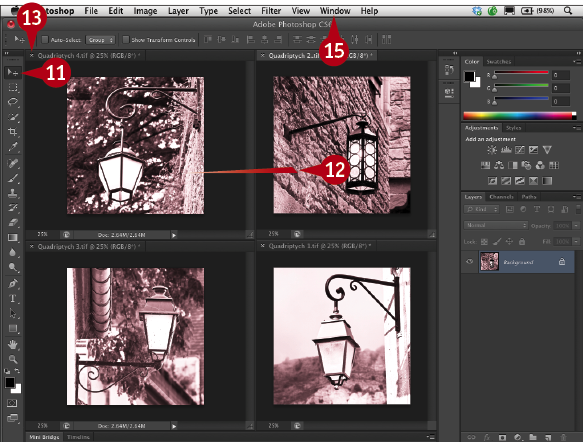
Artwork comprised of two or more photographs, drawings, or paintings normally involves changing width and height, resolution, cropping, and mathematical calculations. With Photoshop, you can easily create such art pieces without any math. The images can be of different sizes and even have different aspect ratios.
You select images whose colors and tone or subject matter will complement each other. Using the Crop tool and a custom size and resolution preset, you crop each image. You then create one document with the different images on layers and move each layer to position it on the final art piece. You can place the images two up, three up, or four up both horizontally or vertically. You can add space between the images, and you can add more canvas all around the artwork as a whole.
The following task uses four images to create a quadriptych. You can also create diptychs and triptychs by moving one image layer to one side or the other.
Start by opening the four images, and tile them across the screen by clicking Window ⇒ Arrange ⇒ Tile.
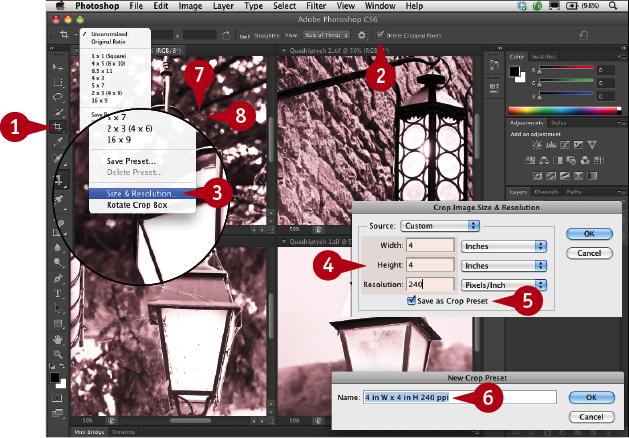
Click the Crop tool.
Click Delete Cropped Pixels ( changes to
  ).
).
Click the drop-down menu and select Size and Resolution.
Type the settings for width, height, and resolution in the dialog box that appears.
Click Save as Crop Preset ( changes to
  ) and click OK.
Type a name for the crop preset in the dialog box and click OK.
Click the first image.
Click and drag in the image to adjust the crop area.
Press Return (Enter) to apply the crop.
Repeat steps 7 to 9 for each additional image to adjust the dimensions.
 Click the Move tool.
 Shift+click and drag one image onto another image.
 Close the file for the image you just dragged.
 Repeat steps 12 and 13 for the other images until all the images are layered onto one file.
 Click Window ⇒ Application Frame so that the workspace fills the open space if necessary.
One file with multiple layers remains on the screen.
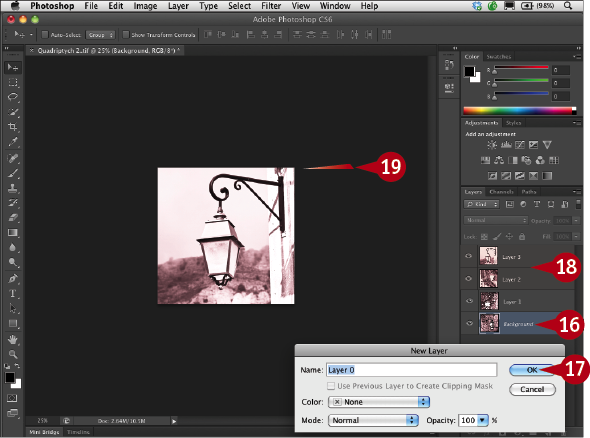
 Double-click the bottom Background layer.
The New Layer dialog box appears.
 Click OK to change the name to Layer 0.
 Shift+click the top two layers in the Layers panel to select them.
 Shift+click and drag on the image, dragging to the right until the outline of the two top images snaps to the edge of the underlying image.
Note: You can no longer see the two top image layers on the screen.
 Shift+click the two middle layers in the Layers panel to select them both.
 Shift+click and drag on the image, dragging down until the two middle images snap to the bottom edge of the visible image.
 Press +minus sign (Ctrl+minus sign) to zoom out.
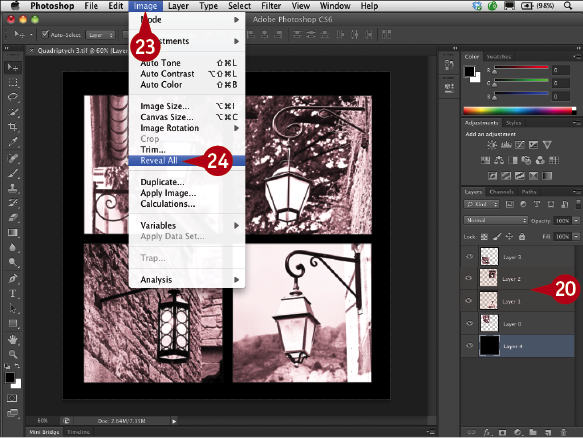
 Click Image.
 Click Reveal All.
The window displays all four images in a quadrant.
TIPS
More Options!
To add space around the images, click the Crop tool () and select Original Ratio from the drop-down menu. Click and drag to expand the canvas with a reverse crop as in task #32. Then click each layer and use the arrow keys to move the layers individually the same number of steps. Click the New Layer button ( ) and drag the new blank layer below the four photo layers. Click Edit ⇒ Fill and select a color from the Color Picker to fill the layer with color before flattening the image.
Did You Know?
On a Mac, the Application frame groups all the workspace elements into one window. You can move or resize the Application frame or any of its elements, and all the parts correspond, avoiding any overlapping panels and tools.
Did You Know?
When the two images meet as you click and drag one image to the edge of another (in steps 19 and 21) the black arrow of the Move tool changes to a white arrow.
#34 CHANGE YOUR PERSPECTIVE with the Crop tool
Difficulty Level:
When you photograph an object from an angle rather than from a straight-on view, the object appears out of perspective, displaying keystone distortion. The top edges of a tall building, for example, photographed from ground level, appear closer to each other at the top than they do at the bottom. If you photograph a window and cannot get directly in front of it to take the shot, the window appears more like a trapezoid. Depending on the photograph, you can correct this type of distortion with a number of Photoshop’s tools.
The Crop tool in Photoshop has a special option that enables you to transform the perspective in an image and quickly adjust the keystone distortion. Your image must have an object that was rectangular in the original scene for the Crop tool’s perspective function to work properly. You first adjust the cropping marquee to match the rectangular object’s edges and then extend the marquee to fit your image. When you click the Commit button, Photoshop crops the image as large as possible while maintaining the angles of the rectangular object.
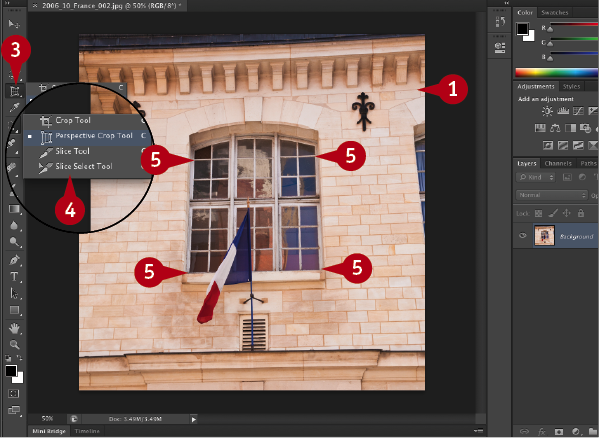
Open a photo containing a distorted rectangular object.
Press +spacebar (Ctrl+spacebar) and click and drag in the image to zoom in.
Click and hold the Crop tool.
Click Perspective Crop Tool.
Click each corner of a rectangular object.
Note: The image moves across the window as you drag the Perspective Crop tool, so you can place each perspective anchor on a corner while the image is in the zoomed view.
A A crop marquee surrounds the area to be straightened.
Press Option+spacebar (Alt+spacebar) and click and drag in the image to zoom out.
Click and drag out each of the center anchor points to fit the edges of the entire image.
Click the Commit button in the Options bar to commit the crop.
Photoshop realigns the image and improves the perspective.
TIPS
Attention!
The Crop tool () may not fix the perspective distortion of an image that has already been cropped for size. Also, if the perspective crop does not look straight, you may not have placed the corner handles precisely. Click the Cancel button ( ) in the Options bar and try readjusting the cropping marquee.
Keyboard Shortcuts!
Press C to access the Crop tool. Press Return (Enter) to commit the perspective crop or Esc to cancel it, or Control+click (right-click) the image and select Crop or Cancel from the menu.
Important!
If there are any settings for width, height, or resolution in the Options bar with the Perspective Crop tool selected, be sure to click Clear before starting to place the crop corners.
#35 CORRECT GEOMETRIC DISTORTION with the Lens Correction filter
Difficulty Level:
Depending on the focal length of a camera lens or the f-stop used, a photograph may show common lens flaws such as barrel and pincushion distortion. Barrel distortion causes straight lines to bow out toward the edges of the image. Pincushion distortion displays the opposite effect, where straight lines bend inward. If the camera tilts up or down or at any angle, the perspective also appears distorted. The Lens Correction filter in Photoshop can help you correct these and other lens defects.
The Lens Correction filter in Photoshop includes an automatic correction based on specific lens profiles. If your lens and camera are listed in the profiles, you can click the option to automatically correct geometric distortion as well as remove a vignette, the appearance of darker corners or edges in the image, and any chromatic edge discolorations, called chromatic aberration.
You can also choose to correct the distortions manually using the tools on the left of the Lens Correction dialog box. You can line up the perspective of the buildings with a vertical plane and even turn on the filter’s image grid to make your adjustments more accurately.
Use the Automatic Correction

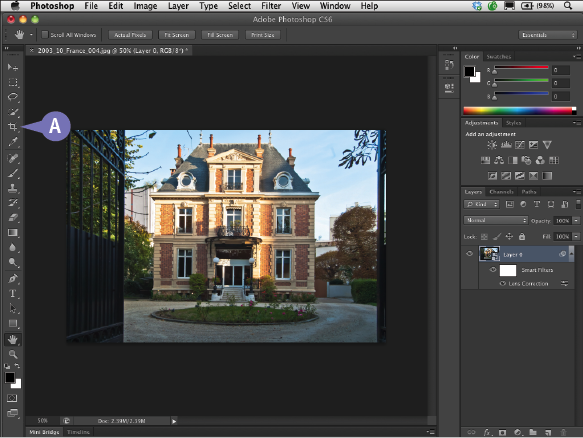
Open an image as a Smart Object, or open a file and convert it to a Smart Object layer.
Note: Opening as a Smart Object enables you to make changes nondestructively and edit the changes after they are applied. See task #20 for information about Smart Objects.
Click Filter.
Click Lens Correction.
The Lens Correction dialog box appears with a large preview of the image.
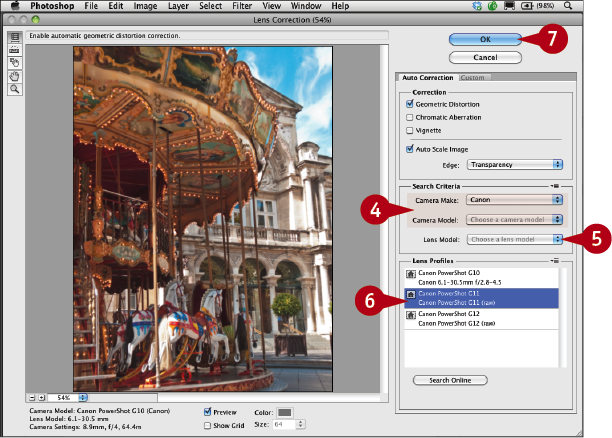
Click the Camera Make and Camera Model drop-down menus and select the camera make and model.
Click the Lens Model drop-down menu and select the lens model if applicable.
Click the Lens Profile.
If the correction is satisfactory, click OK to commit the changes.
Use the Custom Correction
Repeat steps 1 to 3 from the previous set of steps.
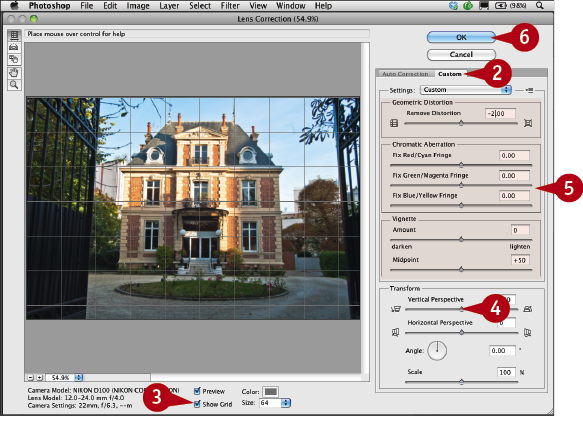
Click the Custom tab.
Click Show Grid ( changes to ).
Drag the Vertical Perspective slider to align the building with the grid.
Note: The type of distortion in the image determines what sliders to adjust.
Click and drag any of the other sliders to adjust the image.
Click OK to commit the changes and reopen the photo in Photoshop.
The image reopens in Photoshop with a changed perspective plane.
A You can optionally click the Crop tool and crop the image to fit if necessary.
TIPS
Try This!
In the Lens Correction dialog box, click the Auto Scale Image check box ( changes to ) and select Edge Extension from the drop-down menu. Photoshop automatically tries to fill the empty corrected areas with areas similar to the edges of the photo.
Did You Know?
If your camera or lens model is not listed, you can click the Lens Profiles panel menu button ( ) and select Browse Adobe Lens Profile Creator Online. You can then search online for profiles created and uploaded by other photographers, and even try them in an online preview mode before you save the profile locally to your computer.
More Options!
You can also download the Adobe Lens Profile Creator tool from http://labs.adobe.com to generate your own custom camera and lens profiles. You can save the profiles to a folder for use with Photoshop and Camera Raw, as well as Lightroom. You can also send the profiles to Adobe to share with other photographers.
#36 IMPROVE THE FIELD OF VIEW with the Adaptive Wide Angle filter
Difficulty Level:
The Lens Correction filter in the previous task is used to correct lens aberrations and geometric distortion and is applied globally to images. However, using the Lens Correction filter to correct the distortion in a photo taken with a fisheye or a very large field-of-view lens may not always give a visually pleasing result. The Adaptive Wide Angle Correction filter, new in Photoshop CS6, is intended to fix visual distortion on areas near an edge or the bending of straight lines characteristic of photos taken with wide-angle lenses and fisheye lenses.
The filter reads the metadata from the photo file to deduce the focal length and crop factor. You can apply an auto wide-angle lens correction if the filter can find a profile for the specific camera and lens combination used to take the photo. You can also select a lens type, perspective, or fisheye, and specify which lines should be straight by adding both horizontal and vertical constraints. You can continue to adjust the photo until the scene more closely reflects a natural view, and then crop it as necessary in Photoshop.
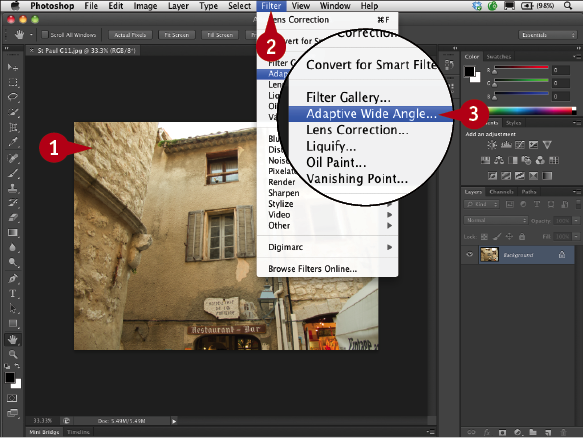
Open a photo taken with a rectilinear wide-angle lens or a fisheye lens.
Click Filter.
Click Adaptive Wide Angle.
The Adaptive Wide Angle dialog box appears.
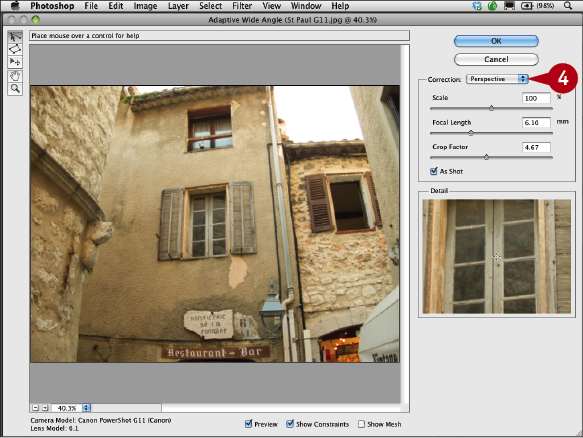
Click the Correction drop-down menu to select a correction model, Perspective in this example.

Click the Constraint tool.
Click and drag along a visually distorted line.
The line straightens and the image adjusts in that area.
Repeat step 6 on other vertical or horizontal lines.
The image continues to adjust according to the constraint lines.
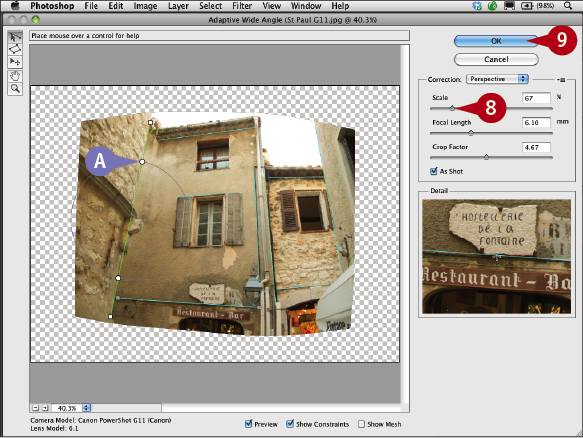
A Each constraint line also has an angle constraint circle with two anchor points. Click an anchor point and drag to adjust the angle of the line as needed.
Click and drag the Scale slider to the left if necessary to view the adjusted photo.
Click OK.
The adjusted photo reappears in Photoshop, where you can crop away the excess background area using the Crop tool.
TIPS
Did You Know?
You can click and drag along multiple vertical and horizontal lines with the Constraint tool ( ) to correct the wide angle distortion. To delete a constraint line, click one of the end points and press Delete (Backspace).
Try This!
Press Shift as you click and drag a constraint line. Or Shift+click any of the constraints you already placed on the image. The constraint forces the line in the photo to be either perfectly vertical or horizontal. Depending on the photo, the correction may look realistic or it may completely distort the perspective.
Important!
The Adaptive Wide Angle filter helps straighten bending lines to make a wide-angle photo more closely resemble human perception. It does not correct for vignetting or chromatic aberrations.
#37 Assemble a panorama using PHOTOMERGE AUTOMATION
Difficulty Level:
You can combine multiple photographs into one continuous image to create a panorama. For example, you can take two or more overlapping photographs of a scenic horizon, or even a number of scans of parts of a large document, and then assemble them in Photoshop with the Photomerge command. You can combine photos tiled horizontally as well as vertically.
The Photomerge command in Photoshop can automatically position and blend each layer using individual layer masks. You can start with the files open, or you can use the Photomerge dialog box to search for the images to use.
To make any Photomerge project as successful as possible, photos or scans intended for merging should have an overlap of 25 to 40 percent. You should also maintain the same exposure for each photograph or keep the same scanning settings for each scan. If you are shooting the photos, use a tripod to keep the camera level so the photos line up correctly. By shooting in the Portrait mode or vertically, and shooting more images, you have a larger area to crop from for your final image, giving you a better result.
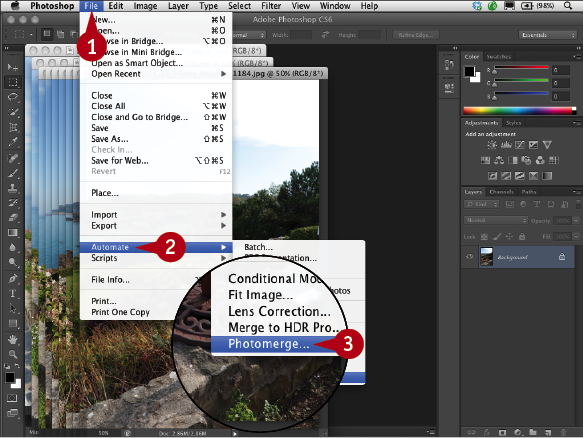
Click File.
Click Automate.
Click Photomerge.
The Photomerge dialog box appears.
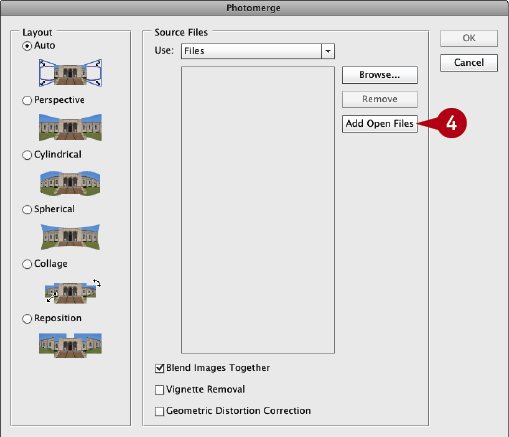
Click Add Open Files.
Note: If the files are not already open, click Browse, navigate to the images in the Open dialog box that appears, and +click (Ctrl+click) the images to select them.
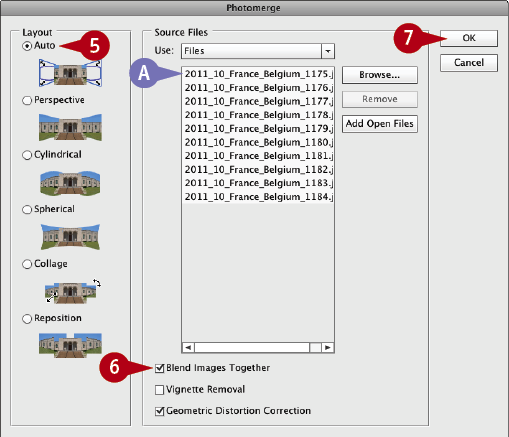
A The open files are listed in the dialog box.
Click Auto to select the automatic layout ( changes to
  ).
).
Note: If you shot a series of images that cover 360 degrees, use the Spherical alignment option ( changes to ).
Make sure that Blend Images Together is selected.
Note: Depending on the images, you can also select Vignette Removal and Geometric Distortion Correction.
Click OK.
Photoshop aligns the images based on content and blends them into a single image.
Note: The new image is a multilayered file.
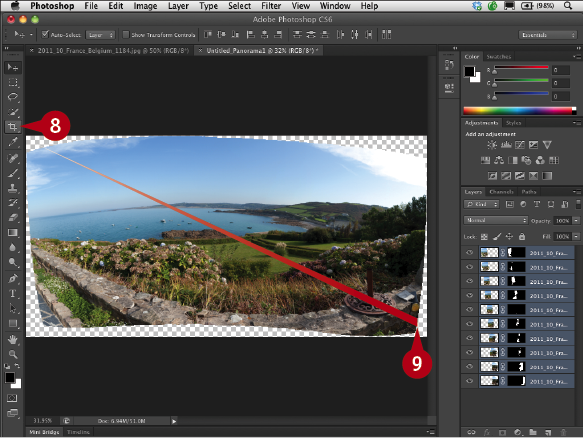
Click the Crop tool.
Click and drag across the blended image to make your final panorama.
Adjust the corner anchors to fit your image.
Press Return (Enter) or click the Commit button to complete the crop.
The panorama is cropped to the selected edges.
TIPS
Did You Know?
Each layout option in the Photomerge dialog box (step 5) aligns the merged images in different ways. Auto applies either a Perspective, Cylindrical, or Spherical layout based on the overall content. Perspective uses one image as a reference and adjusts the perspective of the others by overlapping the content of the reference image. Cylindrical reduces the bowed shape that can occur in some merged photos, and Spherical has the opposite effect. Collage and Reposition help Photoshop align uneven images.
More Options!
Select Vignette Removal ( changes to ) if your images have darkened edges caused by a particular lens. Select Geometric Distortion Correction ( changes to ) to compensate for barrel or other lens distortions.
Change It!
You can add more files to the merge by clicking the Browse button again in the Photomerge dialog box, and navigating to the new source files to be added. You can remove a file from the list by selecting the file and clicking Remove.
#38 RESIZE YOUR IMAGE with minimal visible loss
Difficulty Level:
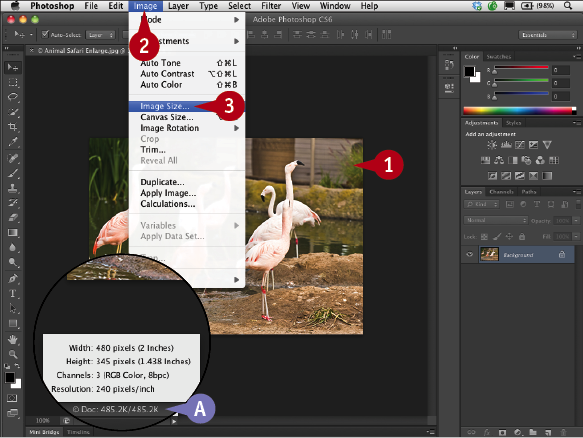
You often need a different size image than the original. You can resize images using the Image Size dialog box.
By deselecting the Resample Image check box in the dialog box, you can adjust the width, height, or resolution without affecting image quality or pixel dimensions. However, to change the overall size of an image, you must check the Resample Image box, and Photoshop resamples by adding or removing pixels to adjust for the changes.
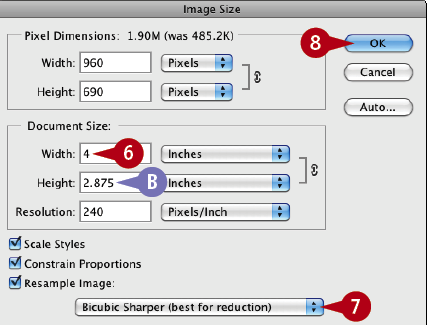
Photoshop’s interpolation algorithm — the way that it assigns values to added pixels and smoothes transitions between juxtaposing pixels — works well to preserve the quality and detail as long as the size changes are not extreme. Third-party plug-ins such as Alien Skin’s Blow Up, OnOne’s Perfect Resize Pro, and AKVIS Magnifier sometimes get better results when enlarging greater than 150 to 200 percent, depending on the image.
The generally recommended resampling method for reducing image size is Bicubic Sharper, and Bicubic Smoother is intended for enlarging. Photoshop CS6 now includes Bicubic Automatic, which selects the best resample method based on the type of resize. However, depending on the image, many photographers find that the Bicubic Sharper resampling method actually works best both for enlarging and reducing photos.
Open a photo that you want to enlarge.
A The current size of the image as shown on-screen appears here.
Click Image.
Click Image Size.
The Image Size dialog box appears, showing the current size of the opened image.
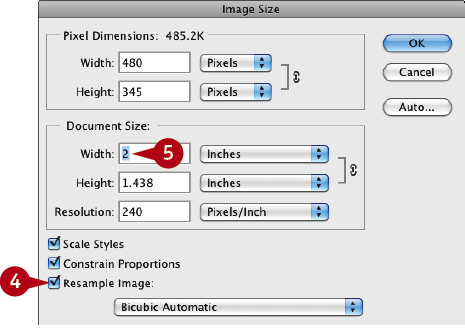
Make sure that the Resample Image check box is selected.
Double-click in the Document Size Width box to highlight the contents.
Type the width that you want for the final printed image.
B The height automatically adjusts proportionally.
Click the drop-down menu and select Bicubic Sharper (best for reduction).
Click OK.
A progress bar may appear depending on the speed of the computer’s processor and the size of the image as Photoshop processes the enlargement.
The enlarged photo appears.
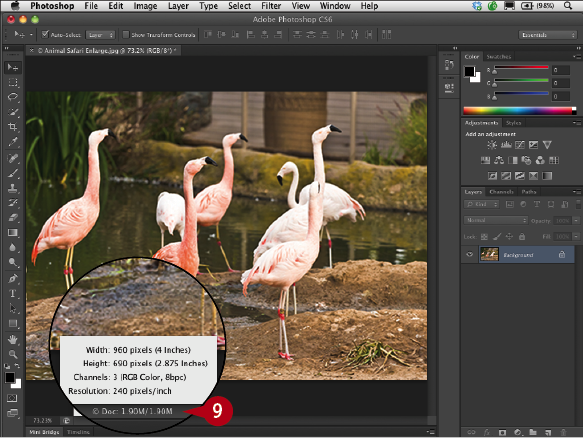
Click here to check the file size in the window frame.