Chapter 6
Process Photos in Camera Raw
Camera Raw is a plug-in automatically included with Photoshop. RAW is a file format, such as CR2 on advanced Canon cameras or NEF or Nikon’s advanced cameras.
All digital cameras first record the raw data on the sensor, and then the camera’s internal processor converts the data into the file you see on the camera’s LCD screen. If you select the JPEG file format in your camera, the camera’s built-in processor applies the manufacturer’s predetermined settings, and it decides what capture data to keep and what data to throw away to create a pleasing image. It also automatically compresses the file. When you make any changes to a JPEG or even a TIFF file, with Photoshop, you change pixels that have already been processed and compressed inside the camera.
If instead you select the RAW format on your camera, the RAW file includes all the original uncompressed captured data. You can then process the file with Camera Raw in your computer, so you can control the desired tonal rendition, color balance, saturation, and other characteristics of the final image.
You can still adjust JPEG and TIFF files in addition to RAW files with Camera Raw and benefit from nondestructive edits. Then all the image data in the file, whether it is a JPEG, TIFF, or RAW file, is preserved and the adjustments are simply stored as metadata, in a separate small file, called a sidecar XMP data file.
#63 Set the Preferences to Open Any Image in Camera Raw
Difficulty Level: 
#64 Open Camera Raw Files as Smart Objects Automatically
Difficulty Level:
#65 Recover Blown Highlights with Camera Raw
Difficulty Level: 
#66 Synchronize the White Balance for a Group of Images
Difficulty Level:
#67 Visually Adjust the Tone Curve with the Targeted Adjustment Tool
Difficulty Level: 
#68 Improve a Sky with the Camera Raw Graduated Filter
Difficulty Level: 
#69 Create a Split Tone in Camera Raw for a Special Effect
Difficulty Level:
#70 Add Creative Adjustments with Camera Raw
Difficulty Level:
#63 Set the preferences to OPEN ANY IMAGE IN CAMERA RAW
Difficulty Level:
Most digital cameras can create JPEGs and sometimes TIFF files. Advanced digital cameras can also write a manufacturer’s proprietary camera RAW format, such as NEF or CR2. The DNG file format, an open format created by Adobe, is also a RAW file format.
The RAW file is the most direct representation of what the camera sensor captured because the data is not processed or compressed in the camera. Such proprietary RAW files require specific software to convert the file so you can see and use it with the computer. Photoshop includes the Camera Raw plug-in to convert RAW images. However, Camera Raw is also a powerful image editor on its own.
Camera Raw automatically launches whenever you open a manufacturer’s proprietary RAW file. However, you can set the Camera Raw preferences to automatically open both JPEGs and TIFFs as well and take advantage of the Camera Raw editing tools.
You can then open any photo using Camera Raw and make specific adjustments. The edits are visible on your monitor; however, they are actually saved as data. You have not altered any of the pixels in the file.
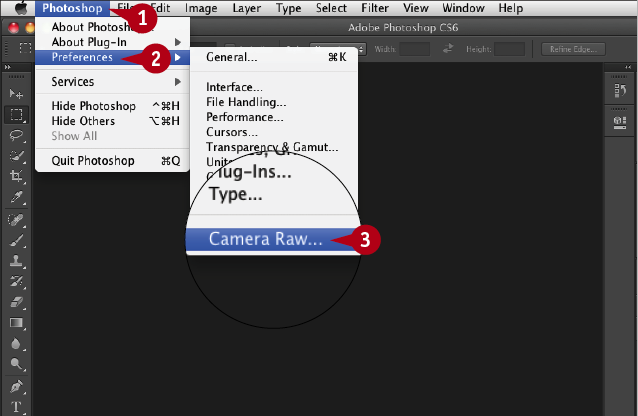
 Click Photoshop (Edit).
 Click Preferences.
 Click Camera Raw.
The Camera Raw Preferences dialog box appears.
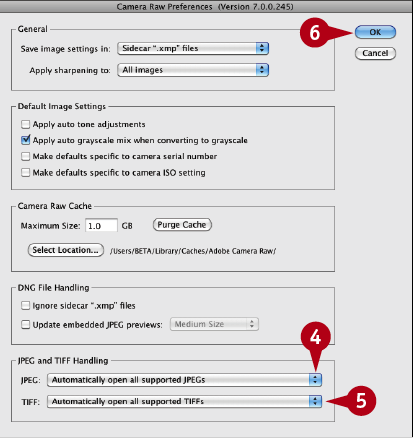
 Click the JPEG drop-down menu and select Automatically Open All Supported JPEGs.
 Click the TIFF drop-down menu and select Automatically Open All Supported TIFFs.
 Click OK to save the Camera Raw preferences.
#64 OPEN CAMERA RAW FILES AS SMART OBJECTS automatically
Difficulty Level:
Although you cannot directly edit pixels on a Smart Object layer, as you can when using the Brush tool on a regular layer, working on files as Smart Objects has many benefits. You can make edits to Smart Objects without permanently changing the original file’s data, so you can scale, rotate, or transform the layer and still go back to the original if you do not like the changes. When you apply filters to Smart Objects, the filters become Smart Filters, and Smart Filters can be re-edited even after they are applied to the Smart Object layer. You can duplicate a Smart Object layer multiple times, and when you edit any one of the duplicates or the original, all the other copies are updated at the same time.
You can create Smart Objects by opening a file as a Smart Object with the menu, by using the Place command, or by converting an already open file to a Smart Object. However, if you set the Camera Raw preferences to open all JPEGs and TIFFs as in the previous task, you can also have Camera Raw automatically send the file to Photoshop as a Smart Object. This setting is not obvious; however, once you set it, the option continues to work until you deselect the option.

Open an image in Camera Raw.
Make any adjustments.
Click the blue underlined photo description.
Note: This description is also a link to the Workflow Options dialog box.
The Workflow Options dialog box appears showing the settings of the image.
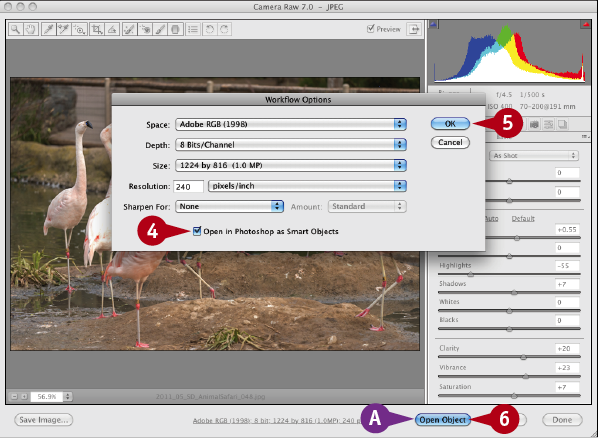
Click Open in Photoshop as Smart Objects ( changes to
  ).
).
Click OK.
A Open Image changes to Open Object in the Camera Raw dialog box.
Click Open Object to open the file as a Smart Object.
Note: All Camera Raw files will open as Smart Objects until you deselect this option.
#65 RECOVER BLOWN HIGHLIGHTS with Camera Raw
Difficulty Level:
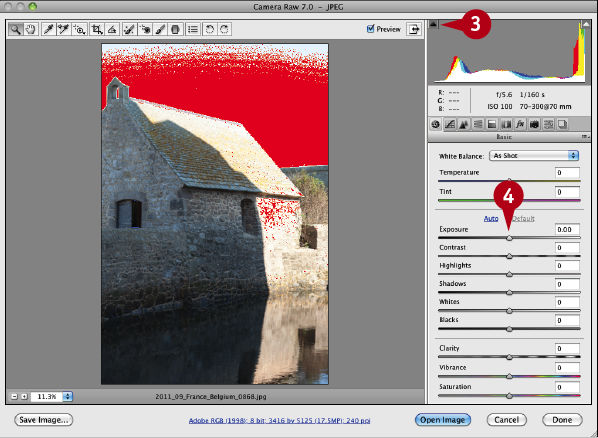
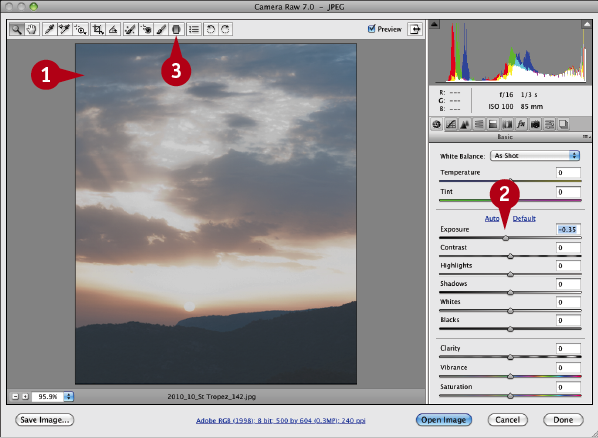
Clipped or blown highlights print as completely white areas because the image has no pixel information in these areas. Clipped highlights can ruin an otherwise good photograph and are often difficult to control with other tools. With an image open in Camera Raw, you can see the blown-out highlights by clicking the Highlight Clipping warning triangle in the histogram. The highlights without any colored pixels appear in red. Conversely, clicking the Shadow Clipping warning triangle in the histogram makes the overly dark shadow areas or completely black areas with no tonal range appear in blue.
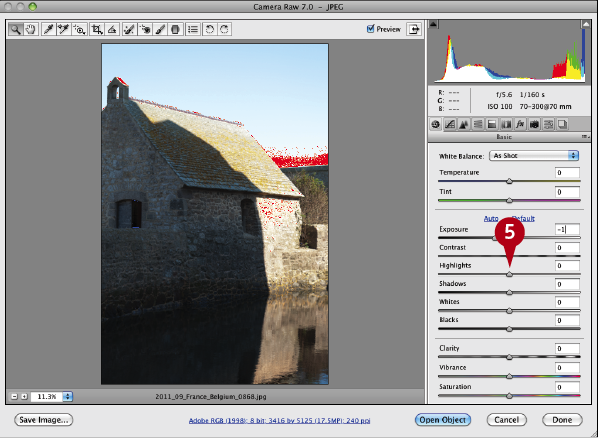
In Photoshop CS6, the highlight recovery in Camera Raw is always enabled and linked to the Exposure slider. You can adjust the image by working with the sliders in the order they are listed in the Basic pane. First normalize the image brightness using the Exposure slider. Partially clipped highlights can be recovered by applying a negative Exposure compensation of up to –1 stop. You can then recover any leftover clipped highlights by slowly moving the Highlights slider to the left, which leaves the overall brightness of the image unchanged.
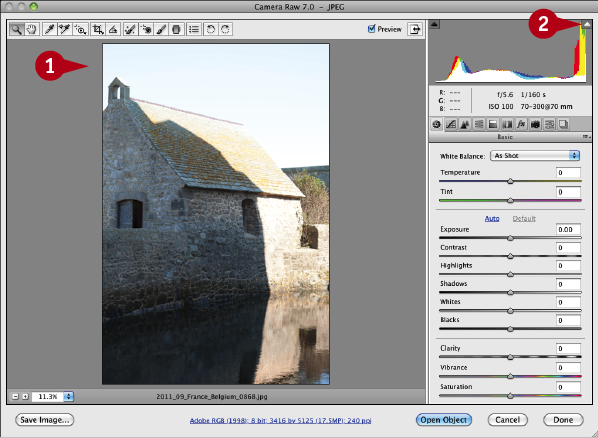
With the Camera Raw preferences set as in task #63, open a photo from Photoshop, Bridge, or the Mini Bridge.
The file automatically opens in Camera Raw.
Note: You can also open most camera manufacturers’ RAW files by double-clicking the file in any folder or in Bridge.
Click the highlight clipping warning triangle to view the overexposed highlights.
The blown-out highlights appear in red.
Click the clipped shadows button to view any underexposed shadows.
The underexposed shadows appear in blue.
Click and drag the Exposure slider slowly to the left.
The red-colored highlights are reduced or removed.
Click and drag the Highlights slider slowly to the left just until there are no more red-colored highlights.
The blown highlights are removed and the photo displays a better exposure.
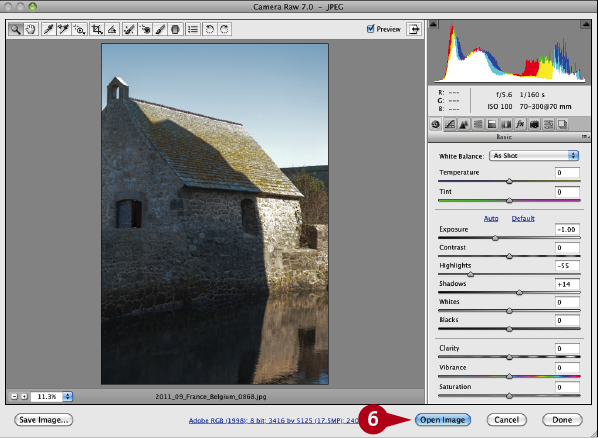
Click Open Image to open the image in Photoshop.
Note: You can optionally click Save Image to save the image with the new adjustments without opening the image.
TIPS
Did You Know?
Camera Raw includes an Adjustment Brush tool ( ) so you can selectively paint adjustments, including Moire and Noise reduction, onto specific areas of a photo. You can then refine the amount of the adjustments by moving the appropriate sliders. You can also use the Graduated Filter tool (
 ) in Camera Raw to apply a gradual blend of selected adjustments over specific areas of the photo.
Try This!
You can quickly access the Camera Raw preferences from within Camera Raw by clicking the Open Preferences Dialog button ( ) in the Camera Raw toolbar.
More Options!
Use the Highlights and Shadows sliders to set the relationship between the midtones, highlights, and shadows. Use the Whites and Blacks sliders to adjust how much of the highlights and shadows are clipped. Use these sliders to help preserve the overall tonal relationships in the image.
#66 SYNCHRONIZE THE WHITE BALANCE for a group of images
Difficulty Level:
A digital camera records the white balance setting as metadata. This data is applied when you open the file in the Camera Raw dialog box. You can easily adjust the white balance by using the White Balance tool and specifying an object that should be white or gray, or clicking a gray card if you included one in an image. Camera Raw then determines the color of the light in which the scene was shot and automatically adjusts the colors in the image to make those objects appear neutral-colored.
One of the benefits of opening all the images in Camera Raw is that you can not only edit one photo at a time, but you can work on one photo and then apply the identical changes to multiple images opened at the same time. This is particularly useful in adjusting the white balance of a group of photos taken at the same time and under the same lighting conditions.
You can select photos of the same or different file types from the Open dialog box, Bridge, or the Mini Bridge. When they open in Camera Raw, you make the edits to one photo and then synchronize those edits with other open images in the Camera Raw dialog box.
From Photoshop, Bridge, or the Mini Bridge,  +click (Ctrl+click) multiple images captured in the same light and open them.
The images all appear in Camera Raw.
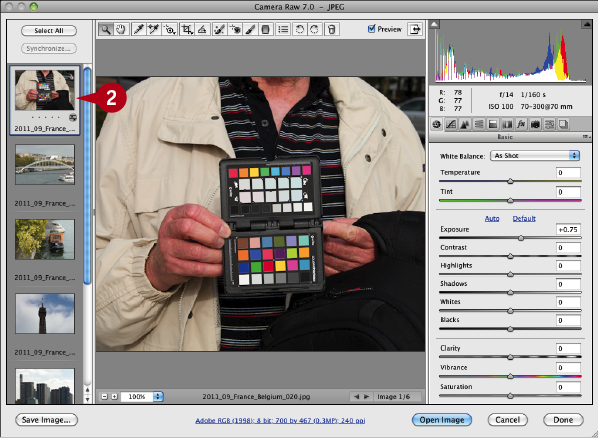
Click to select an image with a white or gray reference.
Note: The image shown here uses a ColorChecker Passport from X-rite. You can also use a photo with a known neutral gray area as a reference target.
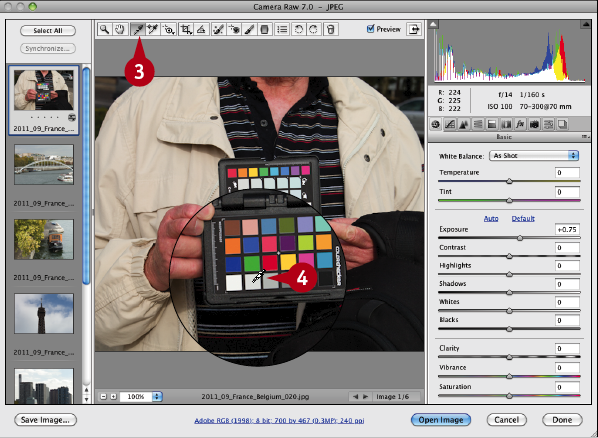
Click the White Balance tool.
Click the reference area or an area that should be white or neutral gray.
A The white balance changes and the Temperature and Tint sliders adjust accordingly.
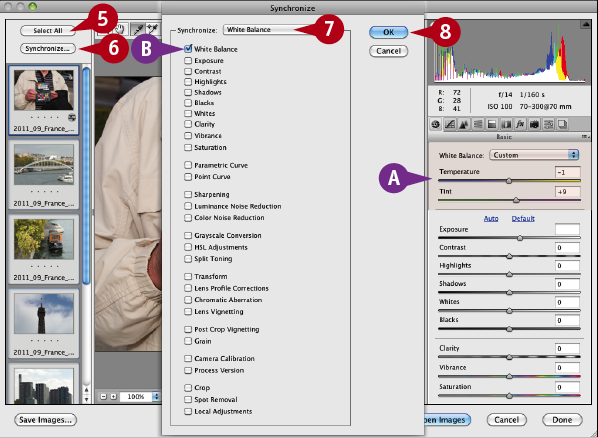
Click Select All or Shift+click the other images in the Camera Raw dialog box.
Click Synchronize.
The Synchronize dialog box appears.
 Click the Synchronize drop-drop menu and select White Balance.
B Only the White Balance check box remains checked.
 Click OK.
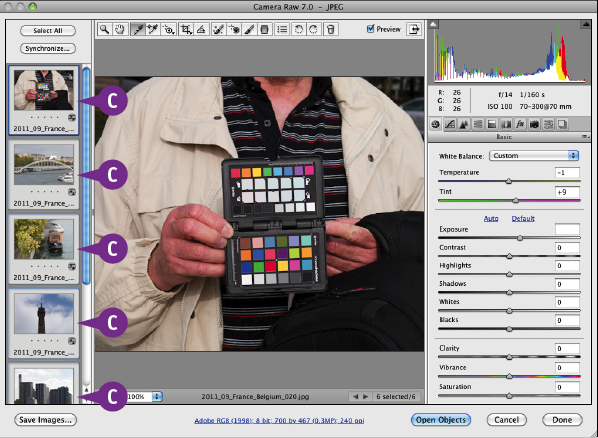
C The white balance changes in all the other selected images and the photos appear with the Edit icon.
TIPS
More Options!
You can convert most RAW files from the various camera manufacturers into DNG files using the Adobe DNG converter, available on Adobe.com. You will then be able to open them in the future even if the manufacturer no longer supports the older file formats. Also, DNG files do not require a separate XMP, or sidecar, file to be linked with the original file for viewing edited photos.
Important!
The Temperature and Tint sliders adjust to make the selected color as neutral as possible. When you select and click a neutral gray area in a photo, avoid clicking a highlight area that contains a specular highlight. You can always double-click the White Balance tool ( ) to reset White Balance to As Shot and try a different area.
Did You Know?
After you process and edit a camera RAW file using the Camera Raw plug-in, an Edit icon ( ) appears on the image thumbnail in Bridge. If the image has been cropped, the Crop tool icon (
 ) appears.
#67 VISUALLY ADJUST THE TONE CURVE with the Targeted Adjustment tool
Difficulty Level:
Think of a camera RAW file as your photo negative. When you process the photo in Camera Raw, you can reprocess the file at any time because although changes are viewable, you have not altered any pixels, so you can continue to make changes to render the image as you want it to appear.
Once you have made adjustments in the Basic tab, you can fine-tune the image using the other tabs in the Camera Raw dialog box. You can click the Tone Curve tab to make adjustments to the values in specific tonal ranges in the image. Using the Point tab of the Tone Curve pane, you can add points and click and drag the line into an S-curve. You can also adjust the curve and the tones in the image using the Targeted Adjustment tool. When you select the tool and drag directly up or down on different areas in the image, the tones and the curve adjust accordingly. Using this visual method of adjusting the Tone Curve is intuitive and natural.
Open an image in Camera Raw.
Make White Balance and Basic tab changes as in previous tasks.
Click the Tone Curve button.
The pane changes to the Tone Curve.
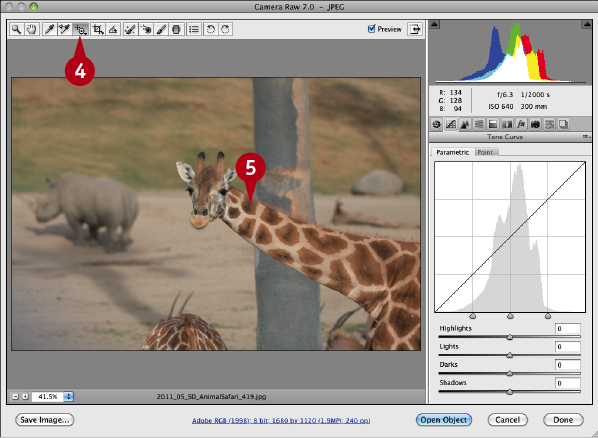
Click the Targeted Adjustment tool.
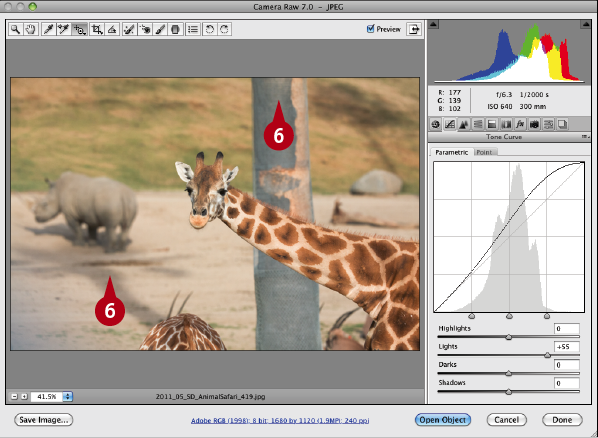
Click an area in the image that should be lighter and drag the tool slowly up.
The areas are brightened and the image curve changes.
Click an area in the image that should be darker and drag down.
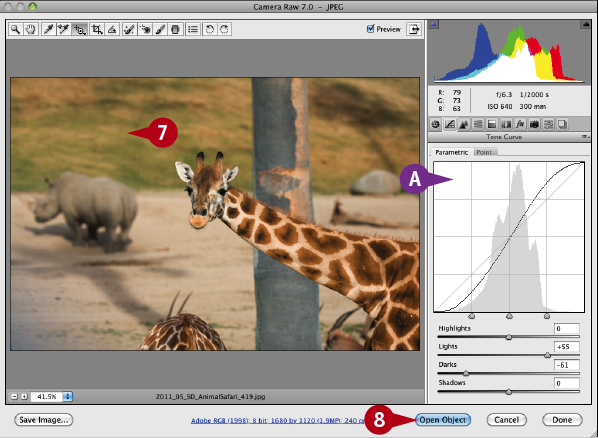
A The image shows more contrast and the image curve changes.
Repeat steps 5 and 6, clicking and dragging on other parts of the image until the tones look balanced.
Depending on your settings, click Open Image or Open Object to open the image in Photoshop either as a layer or a Smart Object layer.
#68 IMPROVE A SKY with the Camera Raw graduated filter
Difficulty Level:
When you first open an image in Camera Raw, the tools in the Basic tab help you adjust the overall brightness, white balance, and saturation of the image. On other tabs, you can adjust different tones and colors individually, make lens corrections, alter colors in the image, sharpen and reduce noise, and even save some or all of your settings as presets so that you can reapply them to similar images.
The Graduated Filter tool in the Camera Raw dialog box enables you to apply tonal changes similar to using a photographic graduated filter on a camera lens, but with more flexibility. For example, you can easily dramatize an open sky in a landscape photo by changing the exposure, saturation, clarity, and color of the sky or a large area and completely change the mood of the image.
You can open any file from Camera Raw as a Smart Object in Photoshop. Then you can easily reopen the Camera Raw dialog box and change the settings as you work before you save the file in Photoshop.
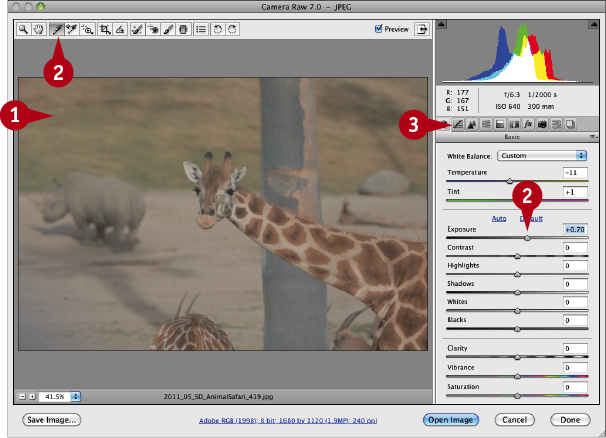
Open an image with a large sky area in Camera Raw.
Click and drag the Exposure slider to balance the brightness.
Click the Graduated Filter tool.
The Graduated Filter options appear under the histogram.
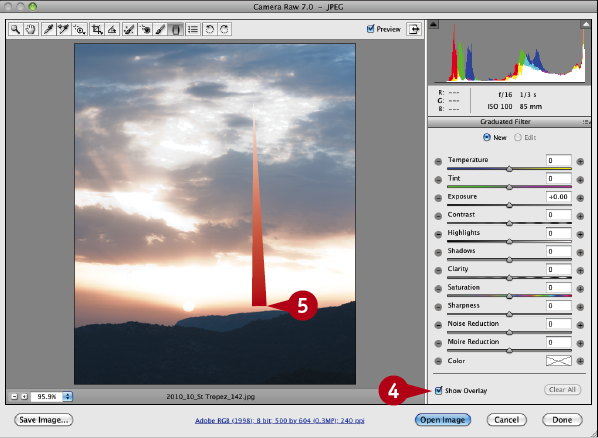
Click Show Overlay ( changes to ).
Press and hold Shift and click and drag from the top of the image to where the sky meets the foreground.
A The Graduated Filter overlay appears with two adjustment pins on the image.
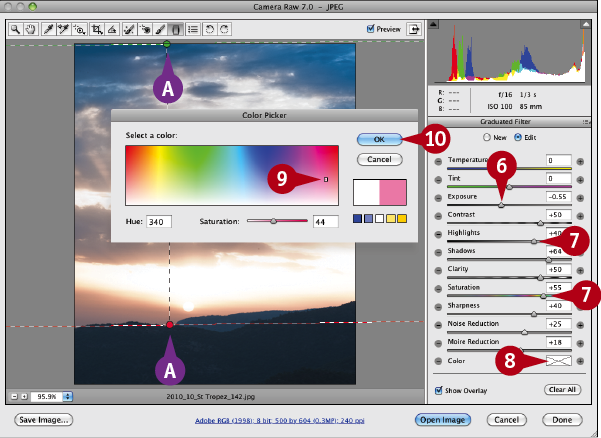
Click and drag the Exposure slider to the left to darken the sky.
Click and drag the other sliders on the Graduated Filter panel to increase the intensity of the sky.
Click the Color box.
The Color Picker appears.
 Click a color to apply to the sky.
 Click OK.
The sky in the photo changes.

 Shift+click the Open Image button.
The button changes to Open Object and the image opens as a Smart Object in Photoshop.
Note: You can optionally click Save Image to convert and save the image with the Graduated Filter adjustment, or click Done to apply the changes and close the dialog box without opening the image in Photoshop.
TIPS
More Options!
Once you have applied the Graduated Filter settings, you can continue to adjust the image in Camera Raw. Click the Zoom tool ( ) to return to the Basic panel. The adjustments you applied with the Graduated Filter remain on the image.
Try This!
You can apply multiple Graduated Filter adjustments to an image by applying one and then selecting New ( changes to
  ) to start another one. You can always go back and edit any adjustment. Make sure that Show Overlay is selected and click the Graduated Filter pin on the image.
Important!
With Camera Raw, you control the colors in the image by what you see on the screen, so it is essential to work with a properly calibrated and profiled monitor as discussed in task #14.
#69 CREATE A SPLIT TONE in Camera Raw for a special effect
Difficulty Level:
Creating split tone effects in the traditional darkroom was difficult and labor-intensive. With Camera Raw, you can easily create a split tone look, in which a different color is applied to the shadows and highlights. You can also visually add or remove tones while previewing the image.
This feature of Camera Raw lets you associate hue and saturation with the lightest colors separately from the hue and saturation values associated with the darkest colors in the image. You can then adjust the Balance slider to emphasize the tone of the highlights or the tone of the shadow areas.
Because you create the split tone in Camera Raw, the alteration to the image is completely nondestructive. The original image always remains intact. You can reopen Camera Raw to change the color or saturation amounts at any time to adjust the effect.
You can apply a split tone to either a grayscale or a color image; however, the toning is often most effective on a grayscale photo with high contrasts.
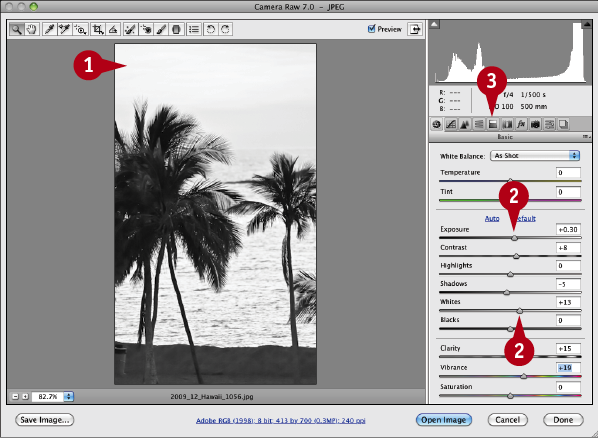
Open an image in Camera Raw.
Make any adjustments as in the previous tasks.
Click the Split Toning tab.
The Split Toning pane appears.
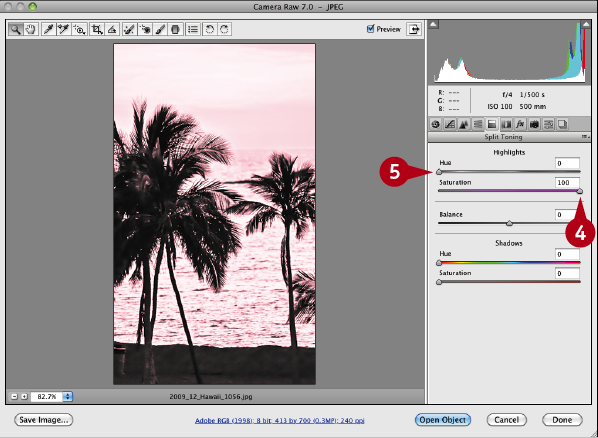
Click and drag the Highlights Saturation slider to 100.
Click and drag the Highlights Hue slider to select the color for the highlights.
The highlights in the image appear in a fully saturated color tone.
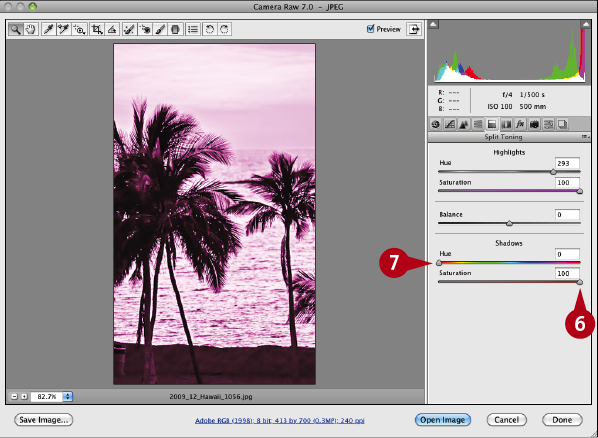
Click and drag the Shadows Saturation slider to 100.
Click and drag the Shadows Hue slider to select the color for the shadows.
The shadow areas in the image appear in a fully saturated color tone.
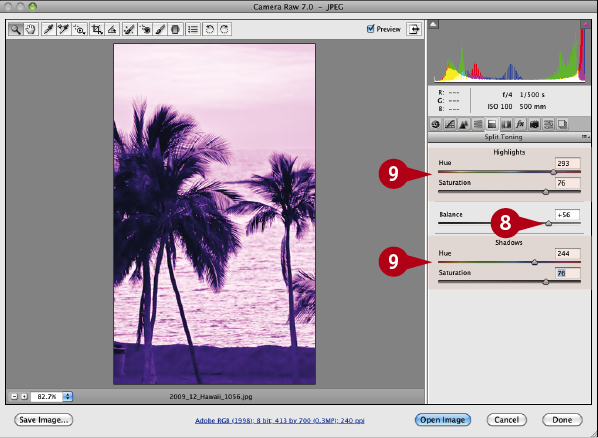
Click and drag the Balance slider to the right to shift the toning more into the highlights or to the left to emphasize the tones in the shadows.
Click and drag both the Highlights and the Shadows sliders to adjust the split tone effect.
Repeat steps 8 and 9 to adjust the split tone image.
The grayscale image appears as a split tone image with tinted shadows and highlights.
TIPS
Did You Know?
You can open any image into Camera Raw from the Open dialog box in Photoshop. Click File ⇒ Open. Click the Format drop-down menu at the bottom of the Open dialog box and select Camera Raw from the list.
More Options!
If you add a split tone to a color image, you can still convert it to grayscale after applying split toning by clicking the HSB/Grayscale button in Camera Raw ( ).
).
Try This!
You can use a more gradual approach by leaving the Saturation slider set to 0 and pressing Option (Alt) as you drag the Hue sliders. The preview shows a 100% saturation of that hue. After you select the hue, you can move the Saturation sliders to the amount that you want.
#70 ADD CREATIVE ADJUSTMENTS with Camera Raw
Difficulty Level:
Camera Raw is intended for processing the uncompressed captured data of RAW image files. In addition, you can use Camera Raw to open JPEGs and TIFFs. The Camera Raw tools can help you improve tones, color balance, and other characteristics of your photos. However, you can also use Camera Raw creatively when interpreting your images. You can simplify the details and boost the colors of a photograph in preparation for turning it into a painting with the tools and techniques shown in Chapter 9. You can also use Camera Raw to soften skin tones on snapshots when you do not want to spend a lot of time retouching the photo. If you have a JPEG file with a lot of artifacts because it was taken with a cell phone or other low-resolution point-and-shoot-type camera, you can use Camera Raw to rescue that photo by reinterpreting it in a more artistic fashion.
By exaggerating the use of the Clarity, Vibrance, and Saturation sliders, you can change an image’s look from photographic to artistic. And by dramatically pushing the noise reduction sliders, you can reduce artifacts and soften the photographic details.
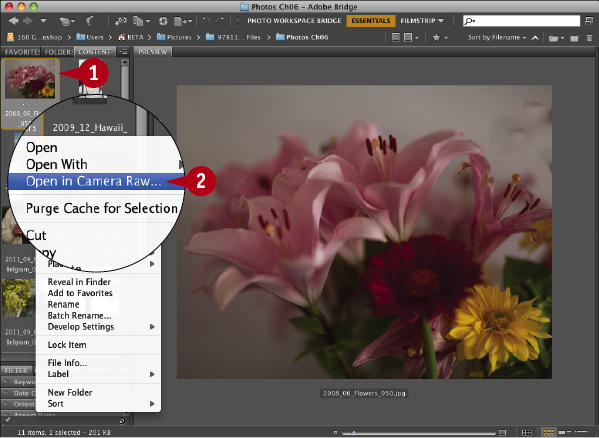
From the Bridge or Mini Bridge, Control+click (right-click) a photo.
Click Open in Camera Raw.
The Camera Raw dialog box appears.
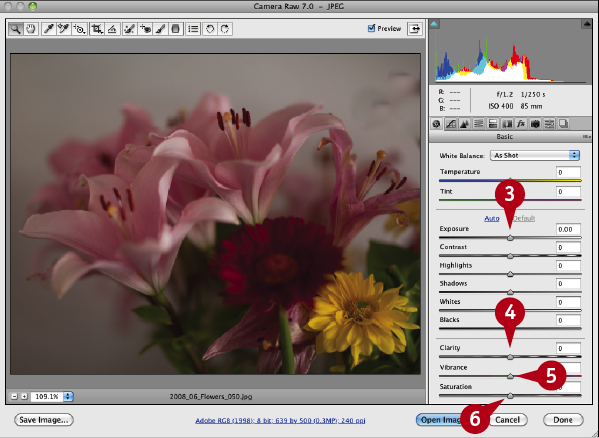
Click and drag the Exposure slider if necessary to balance the brightness.
Click and drag the Clarity slider to the right.
Click and drag the Vibrance slider to the right.
Click and drag the Saturation slider to the right.
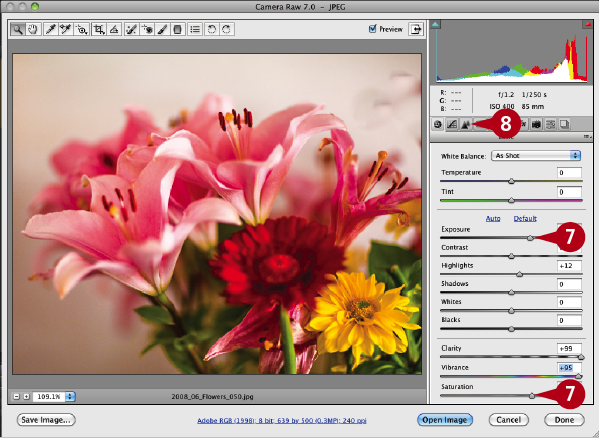
Continue adjusting the sliders until the colors appear more intense.
Click the Detail button.
The Detail panel opens.
Make sure the Sharpening Amount slider is set to 0.
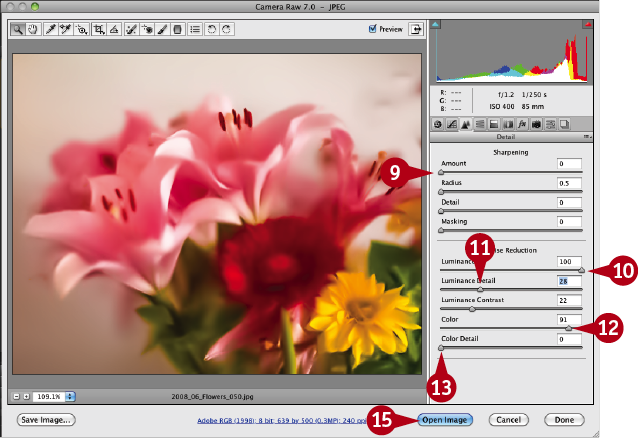
Click and drag the Luminance Noise Reduction slider all the way to the right.
Click and drag the Luminance Detail slider to the left.
 Click and drag the Color Noise Reduction slider to the right.
 Click and drag the Color Detail slider to the left.
 Continue adjusting the sliders until the image appears soft and painterly.
 Click Open Image to open the image in Photoshop.