Walking is one of the most important movements we do. Alongside walking, though, are other functional whole-body motions we can call on each day: getting up, getting down, carrying, lifting, reaching, taking the stairs, and touching your toes. These activities open up not only our knees, hips, and shoulders, but also the experiences available to you.
GETTING DOWN AND BACK UP AGAIN
The ability to comfortably transition between the ground or chair and standing is very underrated. I can tell you from my experience working with many folks that it’s sorely missed once it’s gone. But here’s the silver lining: it’s not really gone—you’re just out of practice, maybe by a handful of decades.
As simple as it seems, getting down and back up again requires joint mobility and enough muscular strength to lift our body away from the ground. We’re full-grown humans! We’re heavy!
 Lora Says
I currently teach these exercises in a group class format. Part of my teaching strategy includes full disclosure of my continuing problems and spectacular victories. Students see me walking around town and will correct any errors they spot. It seems to me that if they see the errors in me they’ll be more aware of them in themselves. I was at a concert where one of our students came up to me at the intermission and said, “I saw you use your arms to help you stand. Is that the best you can do tonight?” The “standing” reminder pleased me because we’re making an impact on others and getting coaching ourselves.
Many goldeners find getting down to the ground and back up again daunting, so if you’re one of them, rest assured you’re in good company. In fact, many people of varying ages have lost the ability to rise from the floor with comfort. Our beds, couches, and chairs, as comfortable as they are, prevent us from making it down to the floor. And so we must slowly start using our body in the ranges of motion that have been stifled by use of furniture, until we redevelop enough strength in our legs, hips, and arms to carry us more easily.
If you’re not regularly getting down to the floor, strengthening the muscles for this skill can start at chair level.
CHAIR SQUAT
You’re already getting up multiple times a day—from your favorite chair, out of your car, and off the toilet. How you get up, though, dictates which muscles you’re strengthening and which you’re not.
Lora Says
When I first tried the standing exercise I saw that both my knees were attempting to knock together. By raising the height of the seat with two yoga blocks, I could stay aligned as I lifted or lowered myself. One day later I used only one block and in two more days I didn’t need a prop at all. It was the fastest “fix” I’ve made and a very satisfying one, as I’d not even noticed the knee-knocking propensity before.
Common strategies for getting up without using much strength:
• Use momentum (giving it the ol’ heave ho!).
• Push down with your arms.
• Pull yourself up with your arms.
• Shift your weight forward to use the muscles on the front of your thighs.
Try getting up and down a few times to see if you’re currently using any of these methods and note which ones.
Strategies to help you start using more muscle:
• Decrease momentum (raise yourself slowly).
• Shift your weight back as you stand (pressing with your heels, NOT your toes).
• Lean forward with your chest and reach forward with your arms.
• Keep your knees in line with your hips (don’t let them drop in toward each other).
The best way to incorporate these new getting-up techniques is to practice them first as an exercise.
Tip from the Goldeners
If you’re not able to rise from the chair without lots of momentum, or if standing up with this form causes any pain, stack towels or place a book or yoga block on the seat to give yourself a little lift. As you get stronger, you can decrease the height of your bolster.
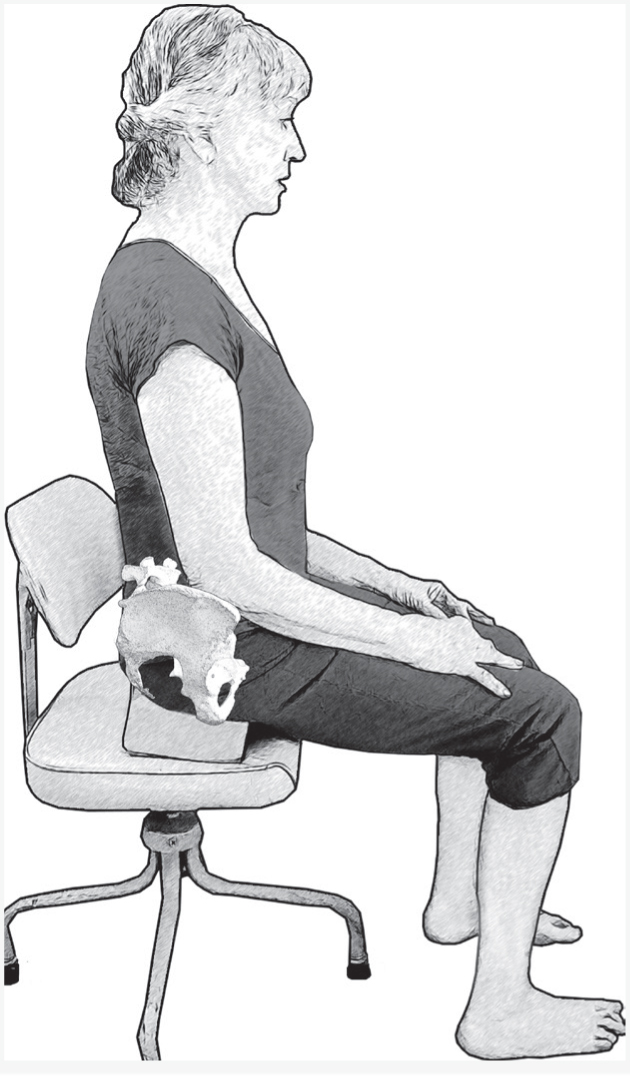
Start by sitting on a flat, hard chair (i.e., a kitchen chair). Scoot forward toward the front edge of the chair, tipping the top of your pelvis forward.
Adjust your feet so that your ankles stack directly below your knees.
Reaching your arms and leaning your torso forward, shift your weight back into your heels as you stand up, then rise, and then lower yourself slowly.
Once you start paying attention, you’ll find that we lift and lower ourselves many times during the day. Exercises are an excellent place to train, but the next step is to make mindful form part of your life—whenever you stand up from or sit down on a flat chair, or sit down on and rise up from the toilet. All of the people I’ve worked with have found it advantageous to make every lift and lower a strength-builder.

Cozy Chairs
Many of the chairs in our homes are cozy—puffy, stuffed, pillowed—and easy to sink into. They’re the “dessert” version of furniture in that while they make us feel good, they’re not always providing the best “movement nutrients.”
Getting up and down from these chairs can be tricky because they don’t often allow a body alignment that’s conducive to using your muscles. If you’re interested in strengthening your body, throughout the day opt for firmer chairs that require you to work your body more on the up, down, and lounge portions of sitting, and save the cushioned-up version of sitting for those times when you want to indulge.
TRAINING YOUR GET UP/GET DOWN MUSCLES
If you regularly attend an exercise class that includes floor work—like yoga or Pilates—you may already be able to get down to and up from the floor with ease. If this is you, start paying attention to how you’re getting up. Check to see which leg and/or arm you depend on most. These are likely your stronger limbs. See if you can switch your lead leg and arm to more evenly condition your body.
Your floor is the best piece of exercise equipment you may not be using. Here are a few routines to try. Pick one each day and note how you do.
• Get up and down from the floor ten times in a row.
• Start seated on the ground and rise six times, each time choosing an alternating lead hand and foot.
• Start lying down on the floor and rising from your back three times and then from your abdomen three times.
CARRYING, LIFTING, AND REACHING
Just like the furniture in our homes makes it convenient to not use the muscles and joints of the lower body, other aspects of how we’ve arranged our homes have made it convenient to not have to use our arms much. This isn’t only true of a goldener’s home—it’s true of most homes in our culture.
For example, I grew up in a house with a kitchen organized in a way that ensured the things I needed to cook with were easy to access. Not only easier to find, but easier to reach. “Easier to reach” is another way of saying “takes less movement.” And so, to get your body moving more, you might consider rearranging your kitchen so that it takes more movement.
I don’t mean you need to mix everything up so every meal requires many extra steps searching in vain for the item you can no longer find—just that you can arrange it so your day-to-day life requires that you reach up a little higher more often than you currently do, or squat or bend down a little lower.
Here are some suggestions to get you started:
• Place your tea or coffee filters on the top shelf.
• Put the mugs way down low.
• Put your plates at the back of a cupboard.
• Organize your refrigerator so that your most-used ingredients are in the most difficult-to-reach spot.
The last time I had dinner at my father’s house, I went looking for a glass of wine, only to find he had taken my advice and was now storing the wine under the sink. “I get more shoulder and hip movement that way!” he said. (I don’t know if I mentioned it yet, but my love of movement actually comes from my dad, who took me—forced me, really—on countless daily walks.)
CARRYING
Many people find that their back or shoulders hurt when they’re carrying something. In the same way you can make over how you stand for better muscle recruitment, you can make over the way you’re positioned when you carry to better use your legs, torso, and upper body.
Assume the position!
• Straight feet
• Weight back in heels
• Weight centered between your right and left legs
• Center your pelvis
• Center your ribcage
Using your arms to reach, hold, and carry requires a lot of shoulder strength and mobility—and shoulder strength and mobility require, you guessed it, a lot of arm movement. Carrying things requires that your arms and trunk muscles work well together, and these muscles depend on a stable torso. As you work to keep your ribcage down while walking and standing, you might find you feel very hunched over.
That’s because one of the ways we mask the excessive curvature in the upper back is by lifting the chest (which is really the ribcage) up and out to make it look like we’re standing up straight. While our heads are lifted and now stacked over our hips, the excessive curvature in our spine remains (and now we’ve also compressed our low back excessively). Here are some exercises to improve your shoulder and upper-spine mobility (letting you keep your ribs down and your head up) and your upper body strength.
RAMP YOUR HEAD
This postural adjustment is so important and effective, I’m including it twice. The human head is heavy. If you couple the weight of your head with the weakness of your upper body and a lot of computer and book-reading time, the result is a head out in front of the rest of the body. The other adjustments you’re making to how much you move and how your body is positioned will help to improve this situation, but you need to be working on the alignment of your upper body as well. As often as you can—while walking, waiting in line, sitting at the computer, or driving in your car—slide your chin back while lengthening the back of your neck. This not only changes the placement of your head, it gets you using the muscles that are there to support your head.

Swallowing Is Movement Too
Difficulty swallowing and choking while eating are prevalent issues in goldener populations—a phenomenon often chalked up to general weakness of all the muscles, including those in the throat. While this could be a contributing factor, the angles food has to move through to get from mouth to stomach can also impact the ease with which it’s swallowed.

We think of food just having to move down into our stomachs, but in fact there are two stages of movement for food being swallowed: horizontal (from the front of your mouth to the back of the throat) and then vertical (down through your throat)—see image page 167.
If your head is often out in front of you, a position that not only slightly lifts your chin (think how your head would be positioned while looking through a lower bifocal lens) but also places your throat on a diagonal, your position alone makes the movement of food harder. Next time you eat, remember that your head position is directly related to throat position and can be affecting the space and work necessary to get food down safely. Yes, cut and chew your food well, but also, mind your posture when you’re eating and see if you notice a difference!
FLOOR ANGELS
Begin by reclining on a bolster or stacked pillows so that your ribcage can lower toward the floor. Stretch your legs out straight.

Reach your arms out to the sides, keeping your palms facing up and your elbows rotating up in the direction of the ceiling. Lower your arms and the backs of your hands toward the floor, keeping your elbows slightly bent. Once you’ve opened your arms as far as they can go, slowly move them up toward your head—like you’re making snow angels. Try some however you can, and then try some only going as far as you can keeping your thumbs on the floor.

Once you’ve done this for a while, try a few times monitoring your ribcage position—making sure that your ribs are staying down and not raising up as your arms move overhead.
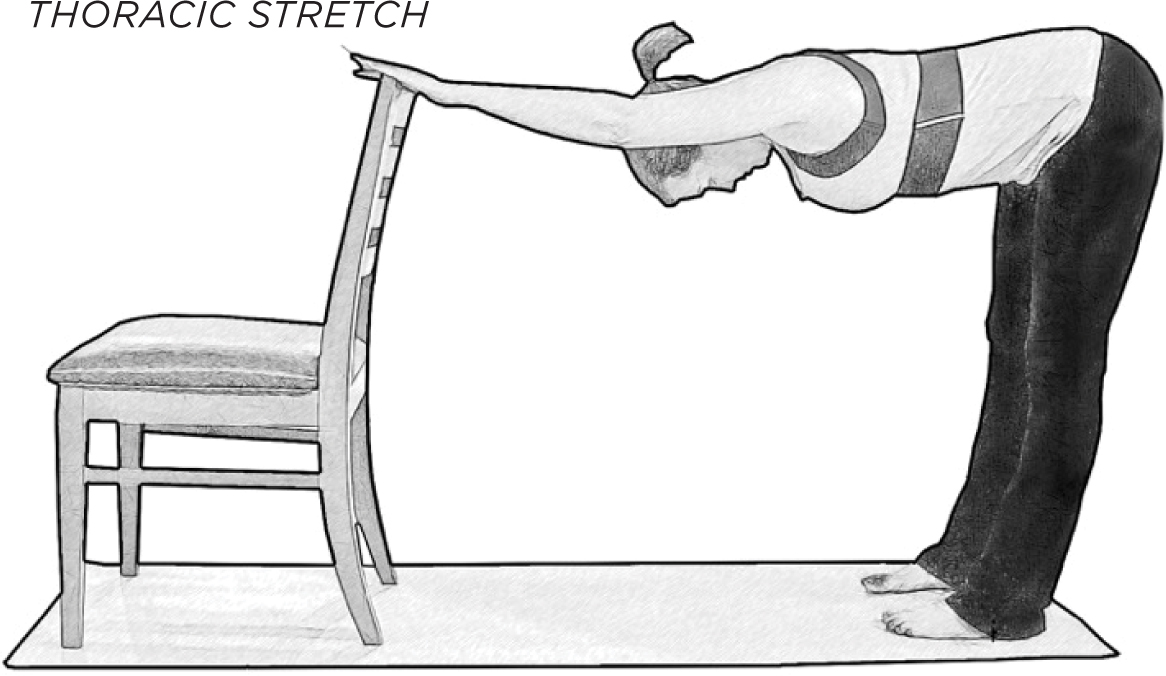
THORACIC STRETCH
Stand facing a wall, countertop, or back of a chair (start higher and work your way down over time). Placing both hands on the wall (or other support), slowly back up until your arms are fully outstretched, lowering your chest through your arms. If you can, straighten your legs and shift your weight back toward your heels so you can easily wiggle your toes. Allow your neck to relax and your head to drop. (See image page 172.)
DOORWAY REACH
Reach your arms up until you can touch the wall above the doorway, and then lower your rib-cage down as much as you can. If you can’t do both arms at once, do one arm at a time walking your fingers up the wall to the right of a doorway, as far as you can. Lowering your ribs will intensify the motion in your arms and shoulders. Repeat both sides.
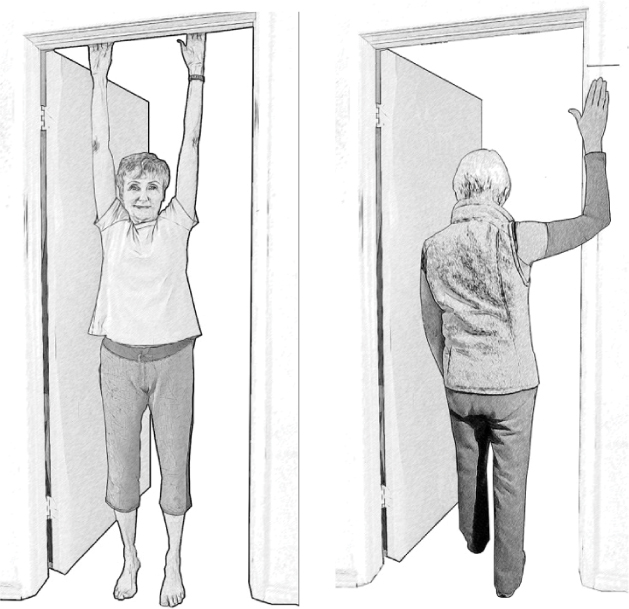
Check the position of your elbows. Do they always point outward? Try a few with your elbows pointing straight ahead and see how this movement changes the stretch in the arms, shoulders, and torso.
If you’re getting up and moving more throughout the day, you’ll find yourself walking through doorways more often. Each time you do is a chance to spend ten to fifteen seconds moving your arms and shoulders in new ways and fitting more movement into your day!
STRENGTHEN THE MUSCLES BETWEEN YOUR RIBS
Breath can move in and out of your body in many ways, and one of those ways requires the movement of your ribs. This movement keeps the muscles in your ribcage strong, which can come in handy when you need to do things like cough—a movement essential to a well-functioning breathing system. To mobilize and strengthen this area, try the following exercise.
Seated or standing in the aligned position, firmly tie an elastic resistance band or pair of pantyhose or tights around your ribcage, just beneath your chest muscles or breasts (at the height of a bra strap or heart-rate monitor). If you don’t have anything, place your hands on your hips then slide them up until they’re on the sides of your ribcage, and lightly press as if to hold the ribcage narrow.

Inhale slowly, trying to stretch the band by expanding the ribcage. If you don’t feel the band’s tension increase at the end of your inhale, re-tie the band a little more snugly and try it again.
Exhale, being aware of how your ribcage can pull away from the ring of elastic and closer to an imaginary vertical pole running up through the center of your body. Repeat, using each exhale to bring the ribs inward.
Now instead of exhaling, try a slow cough in the same position, bringing the ribs inward.
You should find (feel!) that breathing, especially the exhale, engages the muscles between the ribs and throughout the abdomen. You can use the elastic to teach you how to find and use these muscles, but once you’ve got the motor skill, you can do this exercise without the tactile assistance of the band.
TAKING THE STAIRS WITH EASE
Whether there are two to three steps up to your house or an entire flight to your second story, steps are a part of everyday life for most of us. Out of all the “real life” movements people do, I hear the most complaints about knees on the stairs. The size and shape of steps are fixed, and don’t usually match well to the stride length we would choose to take naturally were we on a hill. Steps work better for people with certain limb lengths and are much harder to accommodate for people with other limb lengths.
While there’s not much we can do about the fixed shape and size of a step, we can change the shape of our body as we take the stairs—which often alleviates pain and can improve strength at the same time.
 Joyce Says
I began walking to do all my errands each day a few years ago, after I moved to where I had a three- to four-mile radius from my house to the city business areas. The challenge was carrying my grocery bags and knapsack and maintaining my balance, and balancing the weight on my body. My preferred method of carrying everything soon became clear. The heavy water bottles were carried most easily balanced on my horizontal forearm and hugged against my torso or hoisted up to my shoulder. The knapsack could be loaded with contents that did not jab into me. More fragile bags were either hugged lightly next to my body or carried in my hands.
I enjoy the challenge of accommodating the varying loads and the experience of carrying everything I buy. Gradually my strength grew, and I now accomplish it all without strain and with a lot of enjoyment. Whole-body movement is a possible lifestyle in urban areas—just saying!
Tip 1: Keep your torso upright. One of the reasons we lean forward is to use momentum instead of leg muscle. Keeping your torso vertical will make your legs work more, which will make them stronger and make you more capable of taking the stairs.
Tip 2: Check your knees. As you’re stepping up, look down at your stepping-up leg’s knee. Does it collapse inward or outward as you step up or down? Use the muscles in your hip to hold your knee in the same plane as your ankle—adjust your knee inward or outward to get it centered. This will keep you from using the ligaments of the knee and increase the amount of muscle you’re using.
 Joan Says
We live on a ten-acre ranch on the side of a mountain in a forest of coastal oaks and black walnut trees. While developing the land to build our home, in my early sixties, I would carry a twenty- to twenty-five-pound sprayer backpack for weed abatement. Being on a mountain, some of the hillsides are very steep and slippery, making it difficult for me to keep my balance and footing, especially with weight on my back. So, we put in some three hundred individual wooden steps in the very steep areas around the perimeter to facilitate this annual task. I no longer carry the spray backpack; however, I continue to alternate hiking our trail system with going up and down the steps to work my quads, hamstrings, balance, and endurance.
Tip 3: Use your calves more! As you walk upstairs, don’t just use the front leg to pull you up—push off with the foot on your back leg as well. This not only reduces the load to the knee, it keeps your calf strength up. As you go down stairs, you may notice that you land on the lower step with your toes pointed. Instead of quickly crashing from your toes to your heel, slow down and let your calf muscles control your descent. This, too, uses the muscles around the knees less and your calves more!
I suggest practicing each of these tips as separate exercises, where you’re paying attention to form. Then, when you take the stairs, this improved form will come naturally to you!
The Importance of Reaching Your Toes
The shoes you choose to wear could be increasing your risk of falling. In one study researchers found that the footwear most often worn at the time of a fall-related hip fracture were shoes that didn’t attach properly to the foot, like slippers or slip-ons (Sherrington and Menz 2003). Slip-on footwear often appeals to goldeners because it takes less effort (read: I don’t have to bend over) to get them on.
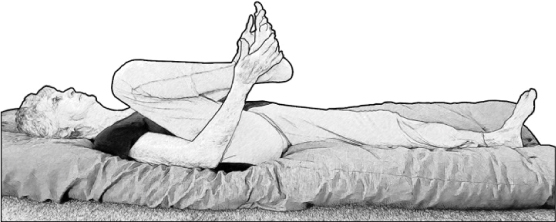
If you’re having trouble reaching down to put on or tie up footwear, try this movement. Lie on your back (doing this each morning before you get out of bed is a great idea) and, maintaining a relaxed breath, bring one knee toward your chest.
Can you reach your foot with one hand? Can you grab that foot with both hands at the same time? Try the other side. Work up to being able to hold each foot in both hands in this position for one minute.
Having enough mobility to reach our feet is crucial. This not only prevents the progression to slide-on-only footwear, but also enables other aspects of foot care, like toenail maintenance, splinter removal, and callus care—all extremely important for all of us, including goldeners!
 Shelah Says
I am one lucky person! For thirty-five years I have lived in the same second-floor apartment that gives me lower-body strengthening every day without any extra time or planning. Then, fifteen years ago, my studio moved to the third floor. More “no extra time or planning” movement strengthening.
I would be remiss not to mention that at times the stairs have been a challenge, especially when my back was injured. In that case it was slow and steady, with gratitude for the sturdy railings.
Heavily loaded bags can also be a problem. I leave the bag at the bottom of the stairs and carry up the contents in manageable loads. If all else fails I ask for help from my eldest son, who lives with me, or from understanding neighbors.
For me the answer to staying mobile is lifestyle, making “practice” part of my daily routine.
SQUAT TO POT
There’s a form to walking and there’s a form to taking the stairs and yes, there’s a form to toileting as well!
Relatively speaking, toilets are a recent invention. Until we started using them exclusively, humans squatted to eliminate. As inconvenient as that may seem to our joints that have never had to do this motion, squatting, it turns out, is very convenient for our internal pipes and tubes involved in toileting.
Straining to toilet is often a direct result of poor alignment of our “eliminating tube” (the descending colon)—so much so that squatting protocols have been added in physical therapy treatments of the pelvic floor and digestive system.
Goldeners and the Pelvic Floor
Many goldeners experience pelvic floor issues, from incontinence to pelvic organ prolapse to prostate problems. Pelvic floor disorders tend to be thought of as a “goldener” issue, but it’s really a phenomenon increasing across many demographics. As with many other diseases and ailments, I’ve found pelvic floor disorders to often be the symptom of a mostly sedentary lifestyle—correctable through more mindful movement practices (moving more), better standing and sitting alignment, and a change in habits that cause pressure on pelvic organs and the pelvic floor. If you’re experiencing any kind of pelvic floor disorder, you might notice that some of the exercises and adjustments in this book decrease the symptoms of things like incontinence, pressure, and pain. The issue is much too large to address comprehensively in this book, but there are many other resources available, including the additional exercises used by these goldeners to improve their prolapse symptoms. Find them in the Appendix, page 307.
One way to get into a toileting alignment with ease is to use a squat platform—a low-profile stool that wraps around the front of your toilet, gently lifting your knees into the squatting position while sitting on the toilet. For many, this simple adjustment not only gets them moving their knees and hips more, but allows for an easier movement—if you catch my drift.
 Joan Says
After a lifetime of constipation and difficulty eliminating, I am now, after my movement program—which includes squatting to toilet using a Squatty Potty—symptom free. Elimination is regular and without any effort. Accomplishing this health benefit is huge. In addition, I have strength in my hips, knees, and ankles that I didn’t have before. My ankles don’t “give way” suddenly when I’m walking as they did before I began moving differently and more, including squatting to toilet.