2 |
THE MAGIC NEEDLE |
A vicious squall was raking the treeless tundra below Alaska’s Mt. Sanford. Snow driven by a 40-mph gale blew horizontally past the cabin windows. The quarter-inch-thick guy wires supporting the cabin whistled and shrieked as the wind dealt body blows to the flimsy plywood walls. Visibility—between the gusts—sometimes reached 50 yards. Somewhere out in the maelstrom, Chris Haaland and Sara Ballantyne were carrying a load of mountaineering gear toward the foot of Sanford’s Sheep Glacier.
Only rolling brown hills dissected by wandering streams lay between the cabin and the glacier. All looked identical, particularly when viewed through ice-encrusted lashes and a punishing veil of flying snow. To make the route-finding even more difficult, Chris and Sarah planned to return to the cabin that evening, after caching their equipment.
But Chris and Sara had one thing going for them. They knew approximately where the cabin was on the map and where they wanted to go. Based on that knowledge, they had taken a course off the map. In other words, they had used a compass to measure the angle between true north and the direction they needed to travel.
As soon as they stepped from the cabin, they sighted along their course as far as they could see, picked a landmark, and headed in that direction. Whenever they reached a high point—a ridge or hilltop—they built a small pile of stones, called a cairn, to aid their return.* Then they sighted along their course again, picked another landmark, and continued.
Eventually they felt rather than saw that they had reached a low pass. Below them lay Sheep Glacier. They cached their loads, turned around, and began following their cairns toward home. Without the cairns to correct their course periodically in the rough terrain, they might well have wandered away from their route without realizing it. At dusk, with the storm still pounding the tundra outside, they walked into the welcome shelter of the cabin.
Chris and Sara had navigated across 6½ miles of tundra—and back—using nothing but a compass, a few piles of rocks, and an initial course taken off the map. Once the storm closed in, the map was of little further use. If they had had even a few minutes’ visibility before the squalls blew in—just long enough to take a compass bearing off their destination—they wouldn’t even have needed the map. Ingenuity and a compass are often enough by themselves to find your way.
Contrast Chris and Sara’s adroit use of a compass in foul weather with that of a group of seven experienced skiers near Aspen some winters back. Caught in a whiteout above timberline by a fierce snowstorm and unable to find their destination, a backcountry ski hut, the entire group bivouacked in an open pit with no tent and with sleeping bags designed for the 50-degree warmth of a cabin, not the near-zero cold of a February night in the high country. The next day the group splintered into three contingents. One pair of skiers did successfully navigate through the storm back to the trailhead where they had parked on the north side of the range and escaped unharmed. The other two groups, however, both failed to pull out their compasses at a critical juncture and ended up going south instead of north. The pair of lost skiers spent another night in the open before finding a cabin, while the trio of wayward adventurers endured an additional two nights outdoors before finding shelter. Four of the lost skiers suffered frostbite, two quite seriously, before they were rescued.
In retrospect, it’s easy to point out the many mistakes the lost Aspen skiers made. But there is also an important lesson to be learned: It is at those times when panic is baying at your heels and every instinct you have is commanding you to plunge ahead heedlessly that you most need to slow down, pull out your compass, take a deep breath, and navigate carefully to your destination.
Compass Basics
The most basic compass is simply a magnetic needle suspended on a pivot so that the needle can align itself with the Earth’s magnetic field. The needle is usually mounted in some kind of circular housing marked with the cardinal directions: north, south, east, and west. Although even the simplest compass lets you roughly determine directions, for precise navigation you need something more sophisticated.
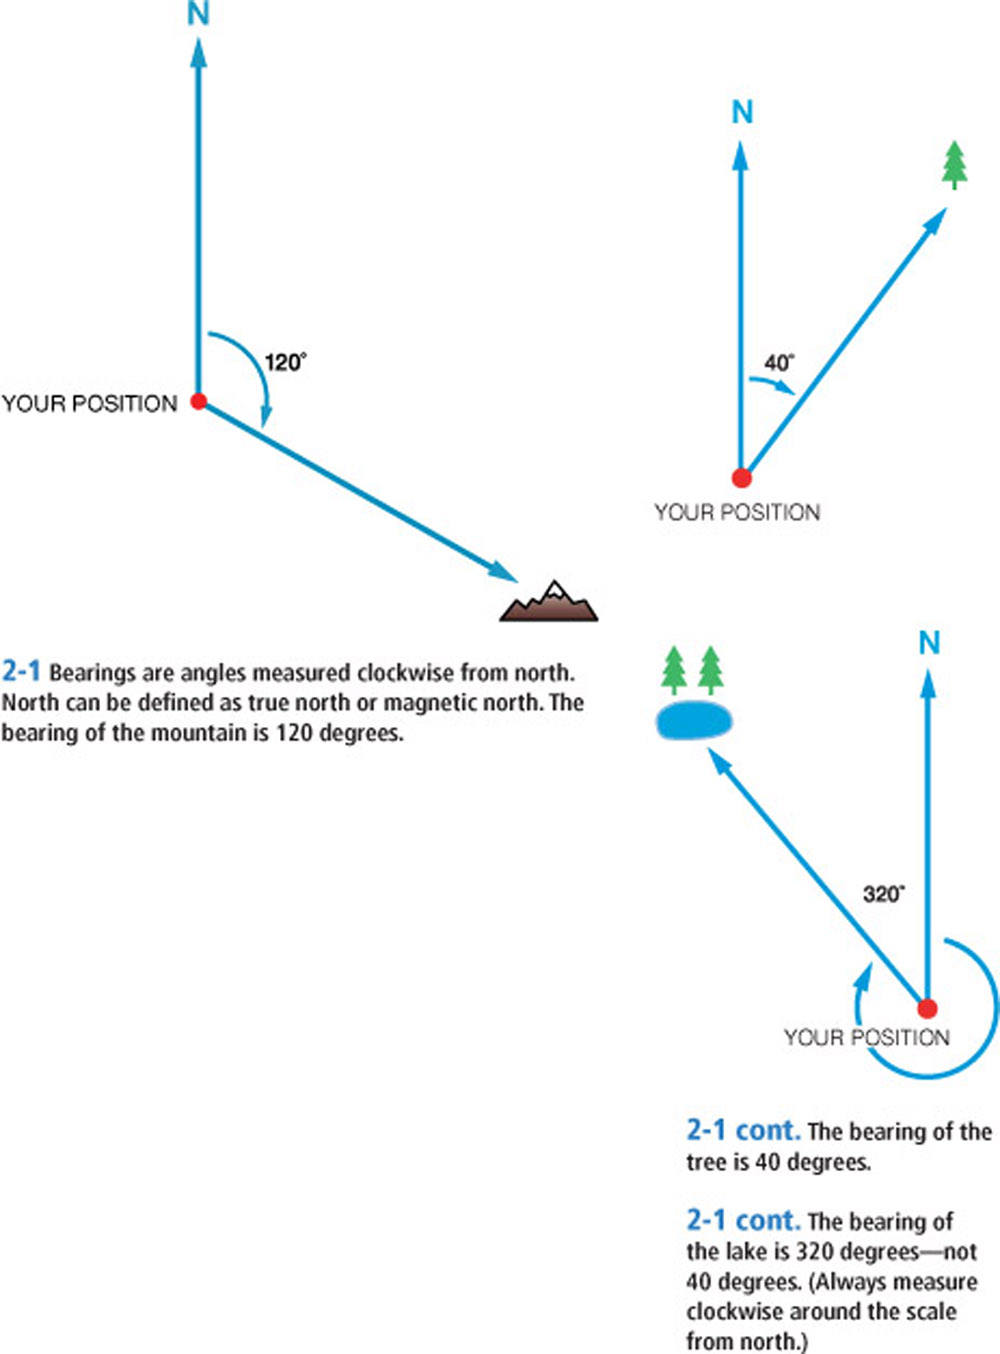
First, you need a compass that lets you sight some landmark in the field and take its bearing. A bearing is nothing more than the angle between a line heading north from your position and a line heading toward the landmark. (The north line can be defined as either true north, the direction of the North Pole, or magnetic north, the direction the compass needle points. I’ll get into that difference later.) For now, study figure 2-1 and memorize this concept: A bearing is an angle, measured in degrees, between a line heading north and a line heading toward your landmark. You always start counting at the north line, and you always count clockwise around the compass dial.
Second, you need a compass that lets you measure angles on a map. Once again, the angle of interest will be between a line running north and a line running through your position and some mapped landmark. I’ll call that angle a course, since you will normally use that angle to pick the course you will travel. For that purpose the compass needle is unnecessary. What you really want is a protractor: a device for measuring angles.
Since it’s awkward to carry around both a compass and a protractor, compass manufacturers have combined the two instruments into one. They’re called protractor compasses, or, more commonly, baseplate compasses, and they’re fundamental to most of the navigational techniques discussed in this book. Figure 2-2 shows their basic parts.
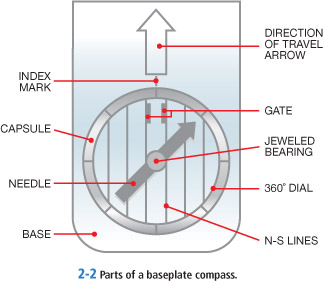
The baseplate compass is named for its clear rectangular base. The circular housing for the compass needle is mounted at one end of this rectangular base. Let’s call that circular housing the capsule. The capsule rotates in relation to the baseplate. The outer edge of the capsule is marked “north,” “south,” “east,” and “west” and is also marked in degrees, increasing as you move around the capsule clockwise. Zero degrees equals north; 90 degrees equals east; 180 degrees equals south; 270 degrees equals west; and 360 degrees once again equals north, or zero. Inside the capsule you’ll usually see a series of parallel lines. They’re called north-south lines because they lie parallel to a line running through the north and south points on the capsule.
Most baseplate compasses have an arrow inscribed on the base. It’s called the direction-of-travel arrow because it indicates the direction you want to go when the capsule is set to a course you’ve taken off the map. You point the same arrow at a landmark in the field when you want to measure a bearing. The foot of the direction-of-travel arrow serves as the index mark where you read off the number of degrees to which the capsule is set. To set the capsule to any angle between zero and 360 degrees, turn the capsule until the correct number of degrees is aligned with the index mark.
The compass needle rotates within the capsule, coming to rest when the north end of the needle points to magnetic north. Many map-and-compass operations require you to twist the capsule until the north end of the needle points to the north mark on the capsule. To make it easy to determine when the needle and the capsule’s north mark are accurately aligned, the capsule has a long, thin rectangle or box inscribed on its bottom surface. I’ll call that rectangle the gate. Later in this book, when I say, “Place the needle in the gate,” I mean to align the needle so it lies entirely inside the gate and so its north end points to the northern end of the gate, which is usually marked in red.
Together those three moving parts—baseplate, capsule, and needle—let you measure the bearing of a landmark in the field and measure courses on the map. I’ll tell you how after I finish discussing compasses.
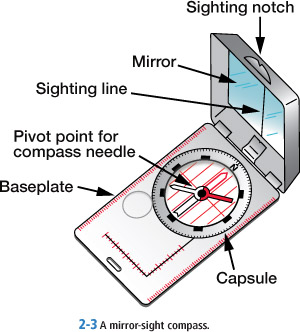
Some baseplate compasses have a mirror attached to the baseplate with a hinge (figure 2-3). When you’re taking a bearing, that mirror lets you see both the object you’re sighting and the capsule at the same time. Using the mirror significantly increases the accuracy of your bearing measurement compared to just holding the compass in your hand at waist level and trying to point the direction-of-travel arrow at the object you’re sighting. The mirror also lets you admire your handsomely weather-beaten features after a week in the backcountry—greasy hair, burnt cheeks, and all. More importantly, the mirror can also be used as an emergency signaling device. For the first and third reasons only, I recommend a mirror-sighting model. I’ll explain in detail how to use a mirror-sight compass later in this chapter.
As I’ve already mentioned, compass needles almost never point to true north. The difference in direction between true north and magnetic north is an angle called the declination. All USGS maps state in the bottom margin the declination for the region covered by the map. Compensating for the difference between magnetic and true north when doing map-and-compass work with a standard baseplate compass requires some simple addition and subtraction. When you take a bearing in the field, you’ve measured an angle between magnetic north, indicated by the compass needle, and your landmark. When you take a course off a map, however, you’ve measured an angle between true north, indicated by the top of the map, and your landmark. You have to reconcile the different starting points for your measurements, a process I’ll describe in the next chapter.
If you’d rather not mess with that, you can buy a “set-and-forget” compass that lets you set the declination and forget about it until you travel to a different area of the country. Let me explain.
On standard baseplate compasses the gate marked on the capsule is fixed in relation to the capsule. When you place the north end of the needle in the north part of the gate, the needle points exactly at the north mark on the capsule.
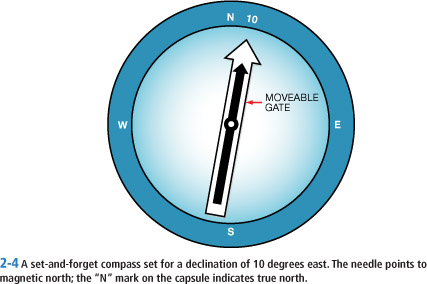
Set-and-forget compasses, on the other hand, have a gate that moves in relation to the north mark on the capsule. You set that moveable gate at an angle to true north equal to the declination and forget about it until you travel to some different region, where the declination is different. Now when you place the needle in the gate, the needle points to magnetic north and the north mark on the capsule points to true north. See figure 2-4. There’s no need to do any addition or subtraction, or even to remember what the declination equals. Set-and-forget compasses are indeed much easier to use, and I strongly recommend them.
Every compass worth buying will be fluid-dampened. That means a fluid within the capsule prevents the needle from swinging to and fro like a hypnotist’s watch. Good compasses will still function at –40 degrees F, although it’s best to keep the compass inside your coat to prevent bubbles from forming as the liquid contracts. High altitude, particularly when combined with severe cold, can also cause a bubble to appear. The bubble won’t interfere with accuracy unless it’s bigger than a quarter inch in diameter. Usually the bubble will disappear when you return to normal temperatures and sea level. If it doesn’t, you may have a leak. Avoid buying a compass that already has a large bubble in the capsule.
You should also protect your compass from extreme heat, such as the dashboard of your car. High temperatures cause the liquid to expand, which can rupture the capsule.
Be sure to buy your compass in the region where you intend to use it. Only along a line known as the magnetic equator, which lies near the geographical equator, do compass needles sit level with the Earth’s surface. North of the magnetic equator, they dip to the north; south of the magnetic equator, they dip to the south. Manufacturers compensate by counterbalancing the compass needle so that the needle pivots freely when the compass is held horizontally. Silva, for example, makes compasses balanced for five different magnetic zones. If you take a compass balanced correctly for the United States to Australia, the needle is likely to bind when you hold the compass level.
It’ll make my job—and yours—a lot easier if you go out and buy yourself a baseplate compass and a topo map before you continue reading this book. There’s nothing like having the real thing in your hands to make all this talk of aligning needles in gates and twisting capsules to different bearings seem as simple as it really is. If a picture is worth a thousand words, then actual experience is worth 10,000.
Using a Compass in the Field
Now that you’ve got a map and compass in your hands, you’re about ready to use it. First, though, you need to know about a common pitfall. Dale Atkins, a mission leader for Colorado’s Alpine Rescue Group, tells a story that illustrates the point perfectly.
One day several years ago, a group of hunters drove to the trailhead below Mt. Evans, got out of their truck, and spread out their map on the hood. They carefully oriented the map with the compass and just as carefully followed the direction the compass needle said was north. That night, when two teenage members of the group did not return, the adults reported them missing. Dale and a search team from Alpine Rescue drove to the trailhead.
“They went north,” the adults said, pointing toward a small peak. Dale walked 30 feet away from the truck and got out his compass.
“But north is that way,” he said, pointing in a direction 45 degrees away from the peak. Fortunately Dale’s search team found the teenagers unharmed.
The hunters’ mistake? Using their compass on the hood of their truck. Any metal object, even much smaller ones like pocket knives and belt buckles, can throw off the compass needle. The same is true of all electronic devices. Any time current flows through a wire, it generates a magnetic field. That field can affect the compass needle.
Before using your compass, therefore, make sure nothing metallic or electronic is affecting it. Once you’ve done that, trust it. Only once in all my years of compass use have I set my compass down on a rock and found that some metallic ore in the rock was affecting the needle. Simply standing up and walking a few feet freed the needle from the rock’s influence.
The first technique to learn is how to take a bearing off a landmark and then walk that bearing. Since you’re not, at this time, relating your bearings to a map, there’s no need to worry about the difference between true north and magnetic north. You can simply relate all directions to magnetic north.
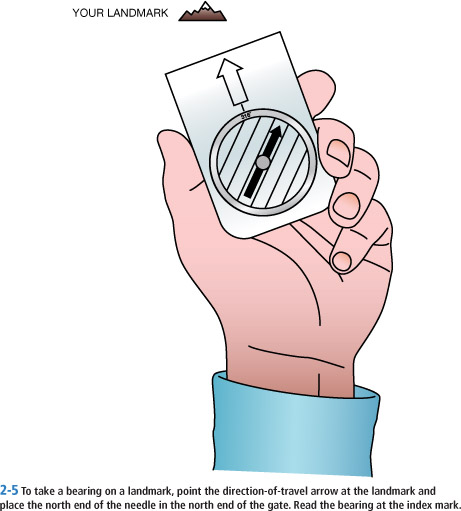
Let’s assume you bought a baseplate compass without a mirror sight. To take a bearing off a landmark in the field, point the direction-of-travel arrow at the landmark. Hold the compass level so the needle can swing freely. Now hold the baseplate still and rotate the capsule until you’ve put the needle in the gate—in other words, until the north end of the needle points to the north mark on the capsule. Then read the bearing at the index mark. Figure 2-5 shows you how. In this example, the bearing is 316 degrees.
All that you’ve done is to measure the angle between a line heading toward magnetic north, as indicated by the compass needle, and a line heading toward your landmark, as indicated by the direction-of-travel arrow. The angle is always measured clockwise around the compass dial, starting at north.
You can use a mirror-sight compass just like a regular baseplate compass. To do so, open the mirror housing all the way until the compass lies flat. On most models a line will be inscribed on the mirror. It lies parallel to the long edges of the compass and starts at a notch in the center of the cover’s top edge. That line serves as the direction-of-travel arrow. Holding the compass at waist level, proceed as you would with a standard compass.
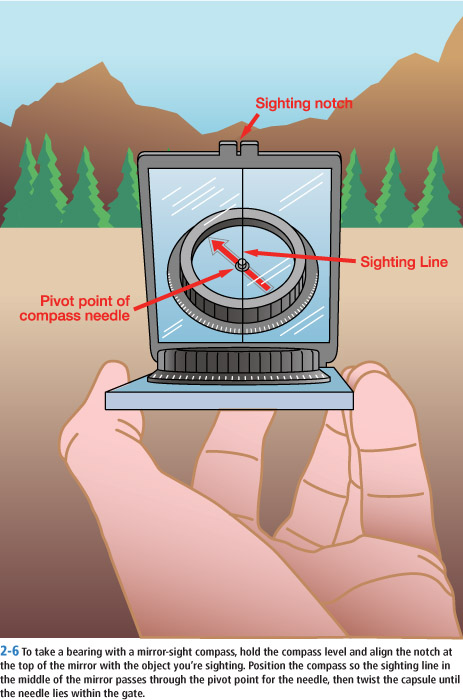
For more accuracy, however, hold the compass level at about the height of your chin. You’ll have to adjust that height a bit if you’re sighting an object either above or below your position. Now open the mirror cover until you can see the capsule in the mirror. The mirror and baseplate should form an angle of 70 degrees or less. Hold the compass so the line inscribed on the mirror (the sighting line) passes directly through the needle’s pivot point as you look at the reflection of the capsule. Doing that ensures that the long edges of the compass point directly at the landmark. Now sight the landmark through the notch in the center of the cover’s top edge. Place the needle in the gate by twisting the capsule. Double-check that the sighting line on the mirror is still passing through the needle’s pivot point. Read the bearing at the index mark (see figure 2-6).
Now you’ve got a bearing on your landmark. Let’s say that you, like Chris and Sara, want to walk toward this particular landmark. Just after you start, a storm rolls in, so you’re forced to navigate by compass. Or perhaps you’ve climbed to a mountaintop and want to take a different way down. You can see your destination—a lake, let’s say—but shortly after you drop off the summit, you’ll be in thick woods and the lake will be invisible. You could just start out walking the bearing, figuring you’ll get there in an hour or two. But walking in a straight line in rough terrain, when visibility is bad or when there are no directional clues—for example, when hiking through a forest on a cloudy day—is a lot tougher than you’d expect.
In fact, a 2009 study at the Max Planck Institute for Biological Cybernetics in Germany found that hikers traveling through a forest on an overcast day, with no visible sun to orient from, invariably ended up walking in circles. Other subjects attempted to walk across a grassy field while blindfolded. None could walk a straight line, and some subjects ended up walking in circles as small as 66 feet in diameter. Even subjects who felt completely confident that they were heading in the right direction quickly wandered off their desired course, often eventually heading back the way they had come. The study concluded that we simply can’t trust our senses to guide us unless we have some visible landmark or a compass to orient us. No one, it seems, actually has “a good sense of direction” built into their head.
That point came home to me dramatically in 1980. It was the morning of our tenth day on Alaska’s Mt. Hunter, and we were in deep trouble. Already our ascent had taken three days longer than we expected, and we were still far from home. The mountain’s steep ice and steeper rock had sapped our strength, and the frequent storms punctuating the unremitting cold only exacerbated our difficult situation. It was time to get out of there, but the desperate climbing below made it clear we could not descend down the south face. The only way out lay across the summit plateau and down the long and difficult west ridge. The intense cold had frostbitten my fingers, and it was threatening to do the same to Peter Metcalf’s and Pete Athens’s toes. We could have wolfed our remaining food in a single meal, yet we knew it would be many more days before we would eat our fill again. But at least the day had dawned clear, and the first few miles across the summit plateau appeared to be easy.
Shortly after we emerged from our snow cave, our next landmark, the junction of the west ridge and the summit plateau, came into view. We hurried on as fast as the deep snow and our emaciated bodies would permit.
Within an hour clouds boiled up from below and engulfed us in a soundless white void. Like fools, we had neglected to take a compass bearing on our landmark. But at least we could measure a course on the map based on our best estimate of our position. I was leading and Pete Athens was in the rear, trying to keep our three-man rope team heading in the right direction by shouting course corrections.
The storm intensified. Athens shouted to me to turn left 90 degrees—a direction that my instinct told me was 90 degrees wrong. For a minute we tried to argue over the screaming wind. Then I gave up and obeyed the compass.
Three hours later, exhausted, with darkness imminent and our position a mystery, we dug another snow cave. As we chipped wearily at the ice, the storm vanished as quickly as it had come. We bolted from the cave. There, only a quarter of a mile away, shining in the low light of the setting sun, was the junction of the west ridge and the plateau. Without a map and compass, the skill to use them, and at least one cool head to insist we should trust them, we might have wandered on the plateau for another day or longer, worsening our frostbite, hastening the deterioration of our already wasted bodies, and further reducing the chances of descending safely.
A disciplined approach to navigating is all that’s required to avoid wandering in circles. Once you’ve got a bearing on your distant landmark, sight through the compass again, but this time, pick a landmark close at hand. In really foul weather or in the woods, that might mean something only a hundred yards away. Walk to that object, sight again, and pick another landmark at the limit of good visibility. Continue until you reach your destination.
Let’s say you encounter some obstacle you can’t walk over as you follow your compass bearing. It could be a lake; it could be a stream where you’ll have to walk up or down to find a ford or fallen log; it could be a wide crevasse in a glacier or a hill ringed with cliffs. If you can see across the obstacle, the solution is simple. Sight along your bearing to some object on the far side of the obstacle, do whatever you have to do to get around the obstacle, and walk to the object you sighted. Pick another landmark along your former line of travel, and continue.
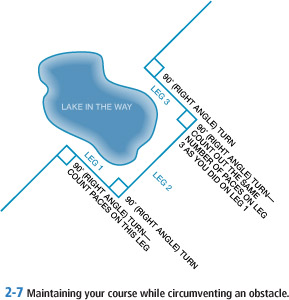
If you can’t see across the obstacle—the fog’s too thick, let’s say, or you’re confronting a cliff—then you’ll have to maintain your sense of direction while you skirt the obstacle. First, decide if you want to go around the obstacle to the right or left. Let’s say right looks easier. Make a right-angle (90-degree) turn to your right and walk far enough to clear the obstacle. Count your steps as you go. Now turn 90 degrees to your left, which puts you back on your original bearing, and walk until you’re sure you’ve cleared the obstacle. There’s no need to count steps here. Make another left-hand 90-degree turn and walk the same number of steps you counted after your first turn. That puts you back on your original line of travel. Turn right, sight a landmark on your original bearing, and proceed. All you’ve done is walk three sides of a rectangle so that when you arrive on the far side of the obstacle, you’re back on your original line of travel. Figure 2-7 makes all this clear.
To simplify making all those 90-degree turns, use the short edges of the baseplate to sight landmarks. To make the initial 90-degree right turn, for example, face in roughly the correct direction and sight along a short edge of the baseplate while keeping the needle in the gate. Pick a landmark and go, counting your steps. When you’ve cleared the obstacle, make the first left turn by sighting an object along your original bearing, using the compass in the normal way. To make the second left turn, face in roughly the correct direction and sight again along a short edge of the baseplate with the needle in the gate. Pick a landmark, pace out your measured distance, and you’re back on track.
To return home, you want to walk in exactly the opposite direction—180 degrees opposite. To do so, you can either add 180 degrees to your original bearing or subtract it. Use whatever operation keeps the result between zero and 360. Or you can align the south end of the needle in the north end of the gate on the capsule. Either operation will point you toward home. You then pick landmarks and walk toward them in exactly the same way you did heading out.
All by itself, a compass can often get you to your destination. Add a detailed topographic map, and you’ve got very few excuses for getting lost. I’ll describe how to use the two together in the next chapter.
Footnote
*Cairns should be used only when absolutely necessary and should be knocked down and scattered during your return trip so that no evidence remains of your passage.