3 |
PUTTING THE NEEDLE TO THE DRUNKEN SPIDER |
The call was urgent: Two mountaineers were overdue on James Peak. Given the vicious midwinter storm pummeling Colorado’s Front Range, overdue probably meant lost and in trouble. The dispatcher for Alpine Rescue, who had received the call, immediately paged all available members.
Dale Atkins met several teammates at the trailhead and formed a search plan. They would begin by climbing St. Mary’s Glacier. Then they would head west across the treeless alpine barrens toward the 13,294-foot summit of James Peak. When they finished searching there, they would turn to the north and descend to James Peak Lake. Snowmobiles would meet them at the lake and take them back to the road.
A westerly gale made every step a struggle as they started up St. Mary’s Glacier. The unrelenting wind kicked up a ground blizzard that slashed visibility to a few feet. The worst gusts struck like tsunamis, threatening to knock them flat. All the searchers possessed tremendous winter mountaineering experience, however, and were intimately familiar with the James Peak area. There seemed to be no need to fool around with their maps and compasses, which remained securely stowed inside their packs. They completed their search of the region above timberline without locating the missing climbers, turned to the north, and descended to the lake.
No snowmobiles! Surprised, they radioed their dispatcher. The snowmobiles, they were told, were at the lake and waiting. “Where are you guys?” the dispatcher asked.
The search group started walking around the lake. A dam emerged through the flying snow. Suddenly a sickening feeling of recognition flashed into their minds. Somehow they had turned south near the summit, not north, and descended to Loch Lomond, on exactly the wrong side of the mountain. Sheepishly, they walked back to their vehicles. The lost mountaineers hiked out a day later, uninjured. Every winter thereafter Alpine Rescue’s members gave the mission leader for that search a roll of bright pink surveyor’s tape so he could mark his trail and find his way home.*
As those hapless searchers demonstrated, the best map-and-compass skills in the world are worthless if you don’t pull out the tools and use them. It can be really hard to locate your position if the first time you check your map is several hours after you wander away from the last landmark you can identify. It’s particularly hard to find yourself if you don’t keep track of the direction you’re traveling. That sounds obvious, but as Dale and company showed, even the best can get cocky about their ability to navigate without navigational tools.
Orienting the Map—and Yourself
The best place for your first map check is the trailhead. Start by finding your location on the map. Usually that’s easy: You’re at the end of the road or at the marked point where the trail leaves the highway. Sometimes, though, it’s not so obvious, such as when you’re starting a cross-country hike. If you haven’t parked near some obvious, mapped landmark, you may need to use the more sophisticated techniques I’ll describe later to pinpoint your position.
Next, orient the map. In other words, place the map on some flat surface (not the hood of your car!) so that directions on the map correspond to directions in the field. It’s always easiest to visualize what you’re doing if the map is oriented. Sometimes you can orient the map by eye. If there’s a lake straight ahead of you and a prominent hill to your right, twist the map until the lake lies straight ahead of your position on the map and the hill is to the right of that position. Here’s another way to look at it: A map is oriented correctly if a line drawn from your position on the map to the mapped lake points straight toward the real lake. In similar fashion, all other directions on the map will also correspond to reality.
Sometimes, though, you can’t orient by eye. The landscape may lack any obvious mapped features. Or it may have too many features, and you can’t tell which is which. In that case you need to use your compass to orient the map.
Here, and for the rest of this chapter, I’m going to assume that magnetic north and true north lie in exactly the same direction. That assumption will make it a lot easier for you to learn. In the next chapter I’ll tell you how to compensate for the difference that usually exists between those directions.
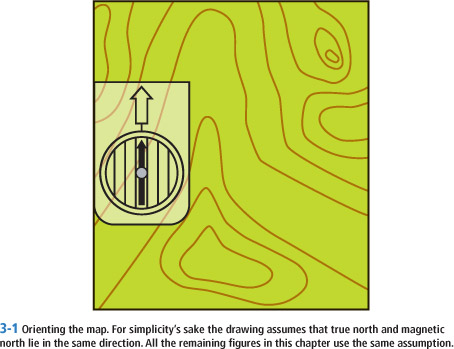
On almost all maps north is at the top of the sheet. To orient the map roughly, hold the compass horizontally and glance at the needle. It points north, of course; place the map so the top also points north. Note that when the map is oriented correctly, the left and right margins will represent lines running north and south.
To orient the map more accurately, set the capsule to zero degrees. Place the compass on the map so one long edge of the baseplate lies atop either the left or right margin. Now rotate map and compass together as a unit until you’ve placed the needle in the gate, so the north end of the needle points to the north mark on the capsule. The map is now oriented. Every direction on the map corresponds to directions in reality. Figure 3-1 shows a correctly oriented map.
Now that you’ve found your position and oriented the map, take a look around and identify some nearby landmarks. Determine your general direction of travel. Does your route run north, south, east, or west? Try to develop a feel for the relationship between the cardinal directions and major terrain features. You might note, for example, that the valley you’ll be hiking up runs east and west, while the region’s highest peak is basically to the north. Knowing where you started and what direction you’re traveling will help prevent dumbness attacks like placing the south end of the compass needle in the north end of the gate.
And while you’ve got the map out, try to create a mental image of the terrain you’ll be traveling through. Maybe you head east up that creek for 2 miles, then make a sharp left just past a big cliff, leaving the main trail and following a spur trail that climbs toward a pass to the north. Knowing that kind of thing will help you start looking for a trail junction at the appropriate time. Don’t count on a sign to jolt you into looking up from your companion’s boot heels.
Make it a habit during your hike to get out your map and compass every hour or so and locate your position on the map. Keep track of the time you started and the time it takes you to reach various landmarks—that trail junction, for example. It’ll give you a sense of your pace that day, which will help you keep track of your location.
Identifying Landmarks Using Map and Compass
Let’s say your goal for the day is the summit of some peak. You reach it at lunchtime and sit down to admire the enormous panorama of mountains spread out before you. Orienting your map will give you a rough idea which peak is which. If you want to know accurately, however, you’ll need to get a bit more sophisticated.
First, take a bearing on the peak you’re interested in, using the technique I described in the previous chapter. A glance back at figure 2-5 should refresh your memory. That bearing, you’ll recall, is just the angle between a line heading north and a line leading to the peak. The angle is measured clockwise from the north line. Although you used the direction-of-travel arrow or notch in the mirror to sight the peak, note that you would have gotten exactly the same result if you’d sighted along one long edge of the baseplate.
Now you’re going to transfer that angle to the map. One line of the angle, represented by the compass gate and the north-south lines inside the capsule, will point north; the other line, represented by one long edge of the baseplate, will run right through your position and toward the peak you’re interested in.
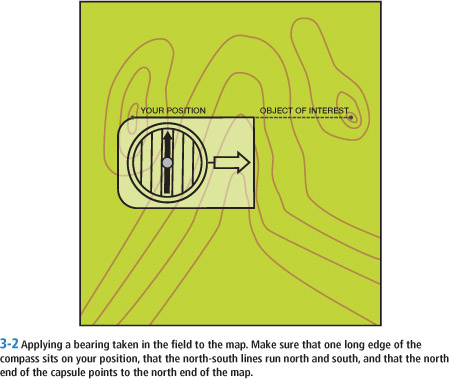
To make the logic of the next step easier, orient the map before continuing and then reset the compass to the bearing you just measured. Now place the compass on the map so that the compass gate points north, toward the top of the map, and so that one long edge of the baseplate sits on top of your position. Note that the long edges of the gate (and the north-south lines in the capsule) run parallel to the right and left margins of the map. Don’t twist the capsule in relation to the baseplate. Ignore the compass needle. You’re simply using the compass as a protractor now, so the needle is irrelevant.
The long edge of the baseplate that is sitting atop your position now points directly at the peak you’re interested in. Figure 3-2 shows a compass placed correctly on the map. Note—this is important—that you must make sure you follow the long edge of the baseplate in the direction indicated by the direction-of-travel arrow. With the map oriented correctly, you’ll see that the long edge of the baseplate not only points to the paper mountain—it also points to the real one.
Technophiles among my readers should note that a GPS receiver can’t easily tell you the name of that magnificent peak on the horizon. It can tell you where you are, but you already know that. The easiest way by far to identify landmarks when you know your position is a little old-fashioned map-and-compass work.
Measuring Courses on a Map
Your map and compass will also help you solve the opposite puzzle. Once again, let’s assume you know where you are on the map. This time, though, you want to use the map to tell you which way to go. We faced this situation on the summit plateau of Mt. Hunter, for example. You’d face a similar problem if you were down in the woods at Lake Hereweare and wanted to know the direction to Lake Overthere.
To solve this problem, you need to measure an angle on the map and transfer it to the terrain. The angle, called a course, will be the angle between a line heading north and a line heading to your destination, with your position as the point (the vertex) of the angle.
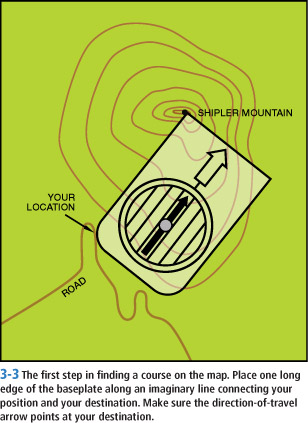
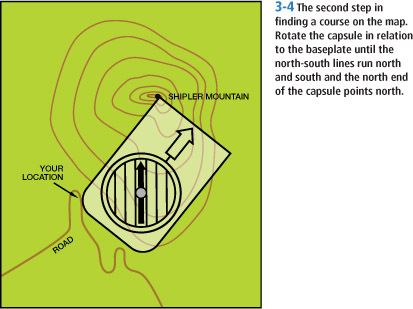
Start by laying one of the long edges of the baseplate along an imaginary line connecting your position and your destination. Sometimes, as in figure 3-3, the baseplate will be long enough to extend between the two; at other times you’ll need to mentally extrapolate a line along the long edge of the baseplate to position the baseplate accurately. (At home you can use a ruler to extend the line.) Be sure the direction-of-travel arrow points at your destination. Now twist the capsule until the gate points north, as shown in figure 3-4. Both the long edges of the gate and the north-south lines will run parallel to the left and right margins of the map. Once again, you’re using the compass as a protractor, so the needle’s gyrations are irrelevant. Read the course—the angle—at the index mark, where the direction-of-travel arrow abuts the compass dial.
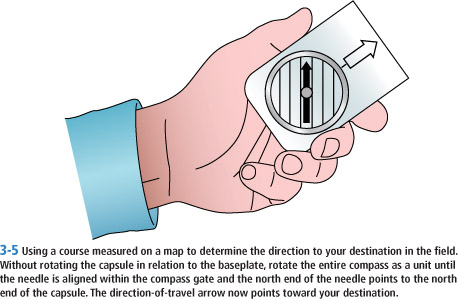
To transfer that angle to the field, pick up your compass and rotate it as a unit, without moving the capsule in relation to the baseplate, until you’ve placed the needle in the gate. As shown in figure 3-5, the direction-of-travel arrow now points in the direction you want to go. Pick a nearby landmark, walk to it, pick another, and proceed.
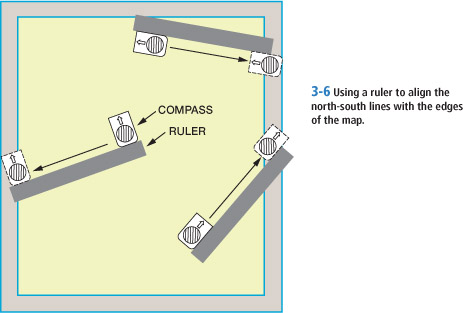
If you’re measuring a course at home as part of your trip-planning, you can use a ruler to align the north-south lines more accurately with true north and south. As before, place your compass so one long edge extends between your position and your destination. Butt your ruler up against that edge in such a way that one end of the ruler touches either the right or left edge of the map. Slide your compass along the ruler until the capsule is set over a margin. Now you can use the margin to align the north-south lines accurately. Figure 3-6 illustrates this technique.
The ruler won’t always reach the edge of the map of course, and you need a flat surface to work on. But it’s still a useful trick to know when you need high accuracy and conditions permit you to use it.
Now you’re pointed in the right direction: You’ve got a course, taken from the map. But as three friends and I discovered during the first day of the Colorado Grand Tour, the game’s not over. You haven’t gotten there yet.
Once again it was stormy, with intense winds and near-zero visibility. My friends were all ex–Outward Bound instructors; I had guided a couple of expeditions on Mt. McKinley. We were bound—we hoped—for Vail, 100 miles and seven days away. But the major storm blasting the Front Range was threatening to thwart us only hours after we started. We lunched at a drafty wilderness cabin and then climbed another quarter of a mile to a knoll clearly marked on the map. From there we needed to follow a broad ridge down through a saddle, then up to the snow-covered Rollins Pass Road. It didn’t seem possible to get lost following a ridge. Furthermore, we’d all done this leg of the tour before. Just to be sure, Kim Miller dug out the map and compass and determined our course: 270 degrees straight west. We weren’t going to commit the mistake Dale’s search party made on James Peak. We pushed on, leaning into the wind like circus clowns with weighted shoes, our heads bowed, our faces so swaddled in face masks and goggles that we felt like astronauts walking on the moon.
A half hour slipped away—much longer than it should have taken to reach the steep climb leading up to the road. Kim pulled out his compass and called a halt.
“You guys,” he said, “we’re heading east.” We crowded around in disbelief. In the storm we had walked in a complete semicircle and were facing the way we had come.
We righted our course and tried to hurry, but it was still two hours after dark when we arrived in Winter Park, our first night’s stop. The moral was clear: When the weather is foul, you not only need to check your compass, you need to check it frequently. Correctly using it once doesn’t guarantee safe arrival. Keep your compass in your pocket or hanging around your neck so you’ll have no excuse not to use it.
Identifying Your Location from Known Landmarks
In the examples above, I assumed you knew your location on the map but wanted to know the name of a distant peak or the direction you should travel. Now let’s assume you don’t know your location, but you can identify some landmark, such as a prominent peak that you recognize.
Two friends and I encountered an easy example of that kind of problem on a Memorial Day hike to Ypsilon Lake in Rocky Mountain National Park. We knew basically where we were; we were on the trail to the lake. But the packs were heavy (we had overnight camping gear as well as ski-mountaineering equipment) and we wanted to know our exact location on the trail. (What we really wanted to know was how much longer we’d have to suffer beneath those packs.) So I took a bearing on the prominent shoulder of a nearby ridge. Once again I had an angle between a line running north and a line leading to a landmark. I knew that my position had to be along the line of the angle that passed through the ridge’s shoulder. So I placed one long edge of the baseplate on the shoulder of the ridge and rotated the whole compass, without turning the capsule in relation to the baseplate, until the north-south lines ran north and south. The direction-of-travel arrow pointed at the landmark. Now I knew I had to be along the line defined by that long edge of the baseplate. I’ll call that a line of position. Since I also knew I was on the trail, I had to be at the intersection of my line of position and the trail. Figure 3-7 shows this graphically.
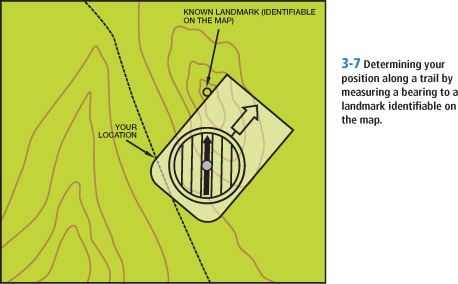
If the edge of the baseplate hadn’t reached from the shoulder to the trail, I would have estimated where the line of position crossed the trail. If I had really needed accuracy, I would have used a pencil to draw a line along the edge of the baseplate, then advanced the compass and extended the line of position until it crossed the trail.
You don’t need to be on a trail to use this technique. You could just as well be following a stream, a river, a pronounced ridge, or the bank of a large lake. Any kind of prominent, linear terrain feature will do. In all cases the best accuracy comes from picking a landmark at right angles to the terrain feature you’re following.
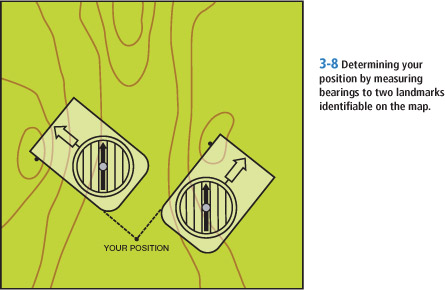
If you can identify two landmarks, you don’t even need to be following a terrain feature. Simply take a bearing off one, and pencil in your line of position on the map. Then take a bearing off the second, and pencil in that line of position. Your location is the intersection of the two lines. Figure 3-8 shows you how. If you can take a bearing off a third landmark and pencil in that line of position, so much the better. In a perfect world the three lines would intersect at exactly the same place. In the real world the three lines probably won’t intersect at a common point but rather form a triangle. Your true position should lie somewhere inside the triangle formed by the three lines of position.
Once you’ve identified your location with lines of position, perform a reality check. If the lines cross at a stream and you’re standing on a ridge, something is wrong. After we identified our position along the trail to Ypsilon Lake, we took a close look at the map. We had just hiked up a steep section of trail and reached a nearly level stretch. Our line of position from the shoulder crossed the trail right where the contours suddenly became widely spaced—in other words, where the terrain abruptly flattened out. Our location as determined by a line of position agreed with the other information we had about the terrain. Whenever you use a map and compass together, it’s a good idea to perform that kind of reality check on the results. The key to that is being able to visualize terrain from looking at a map. You can learn a certain amount of that from this book, but to really develop that skill, you need to practice out in the field.
Throughout this chapter I’ve employed a simplifying assumption: that true north and magnetic north lie in the same direction. Although that makes it easier to learn the principles of map-and-compass navigation, it’s rarely true in the real world. In the next chapter I’ll tell how to compensate for that difference.
Footnote
*Although surveyor’s tape can be a valuable tool in some search-and-rescue operations, it should always be removed when the search is concluded to prevent degradation of the land’s wilderness character. It should not be used in ordinary route-finding activities.