6 |
WEIGHING AIR TO FIND YOUR WAY |
It was 2:50 a.m. and I’d already been grinding up the trail leading to the summit of 14,309-foot Uncompahgre Peak for an hour. My goal was to shoot sunrise from the summit, so I had a deadline. Sunrise waits for no photographer.
I glanced at the altimeter strapped to my wrist and suddenly became worried. I was pushing hard, yet the altimeter showed that I had gained only 770 feet since leaving the trailhead exactly one hour earlier. I knew my pace would slump as I reached higher altitudes. A quick mental calculation showed that I was moving too slowly. I had 2,900 feet to gain from the trailhead and less than four hours to do it. At the rate I was going, I could easily miss sunrise. This was the third day in a row in which I had gotten up at 1 a.m. to climb a 14,000-foot peak in the dark. Clearly I had not fully recovered from the first two efforts.
I increased my pace still further, testing the limits of my aerobic capacity. Feeling rather sick, with only minutes to spare, I finally arrived on the summit. Hastily I set up my 4×5 large-format field camera and had the great good fortune to capture spectacular sunrise light on the graceful cirrus clouds above Wetterhorn Peak.
On steep trails like that on Uncompahgre Peak, elevation gained per hour is often a better gauge of your pace than miles traveled per hour. Even an old-fashioned mechanical altimeter lets you calculate your pace by subtracting your starting elevation from your current elevation every hour. Modern electronic altimeters do the arithmetic for you by offering an altitude-difference mode that tells you the elevation gain and time elapsed since you last zeroed the altitude-difference setting. If you know your pace, of course, you can estimate your time of arrival more accurately.
For example, if you know from the map that the lake is at 9,000 feet and the pass is at 12,000 feet, you can take note of the time when you leave the lake and estimate your rate of ascent and time of arrival by how long it takes to climb the first 500 or 1,000 feet. If you leave the lake at 8 a.m. and take an hour to climb the first 1,000 feet, you can estimate you’ll take three hours to climb 3,000 feet, which will put you at the pass at 11 a.m. In reality, with rest stops and fatigue, you’ll probably arrive a little later.
Most electronic altimeters look like overgrown watches and in fact have all the normal watch functions. They’re much lighter and less bulky than the typical handheld GPS unit. Some manufacturers of handheld GPS receivers have recognized the value of an altimeter and begun including one in some higher-end models. If you’re planning to bring a GPS receiver regardless, these devices let you combine two tools into one.
Altimeters are also highly useful navigational tools. In the dark or in a whiteout, with no landmarks visible and no possibility of taking a compass bearing, an altimeter can sometimes pinpoint your location much faster than a GPS receiver. One glance at the altimeter gives you the elevation of the contour line you’re on. If you have a second line of position—you know you’re on a particular trail, for example, or following a particular stream or ridge crest—then your position is pinpointed exactly. You’re standing at the intersection of the contour line and the second line of position.
Sometimes, particularly if you’re following a trail or ridge, your contour line will intersect twice. In that case, having even the vaguest idea of where you are (which side of the pass you’re on, for example) should tell you your location exactly.
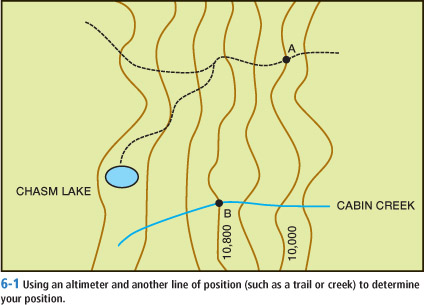
Figure 6-1 shows two examples. If your altimeter reads 10,000 feet and you know you’re on the trail to Chasm Lake, then you know you’re at point A, where the 10,000-foot contour line intersects the trail. Since that contour line intersects the trail only once, there can be no confusion. If it intersected twice, you would have to determine which of the two intersections marked your position by other means: the general lay of the land, the time spent on the trail, and your estimate of your pace.
In the second example, let’s say you’re bushwhacking up Cabin Creek and your altimeter reads 10,800 feet. You know you’re at point B, where the creek intersects that contour. The same contour line never intersects a stream twice, of course, because streams constantly flow downhill.
The second line of position can also be a compass bearing. Perhaps you’re in thick woods and get a glimpse of an identifiable peak. Or perhaps you’re above timberline in a storm and get a glimpse through a hole in the clouds of some identifiable pass. With a little luck the compass bearing will cross the contour line indicated by your altimeter at something close to a right angle. If, however, the bearing runs parallel to your contour line, all you’ve done is confirm your altimeter’s reading. You can’t pinpoint your position, although you might be able to narrow it down, depending on the exact shape of the contour line. Mountaineers often find altimeters valuable even when a compass is useless and a map serves only to indicate the elevation of the top and bottom of the climb. On a first ascent on the north face of Alaska’s Mt. Foraker in 1983, we used an altimeter to keep track of our progress up a steep rib. Since we were making very little horizontal distance on the map, compass bearings couldn’t pinpoint our position. Our altimeter, though, let us gauge our rate of ascent and ration our food accordingly.
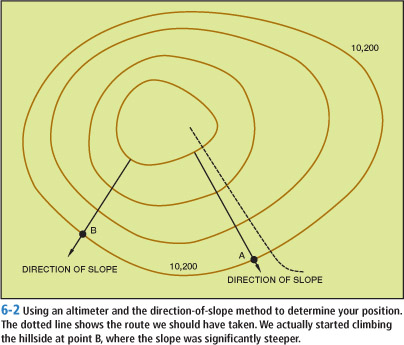
In some situations your compass, altimeter, and map can pinpoint your location even in a whiteout. The key to this direction-of-slope method is using the compass to determine the bearing of an imaginary line pointing straight downhill. Skiers would call it the fall line. By definition, that line will be perpendicular to the contour line (determined by your altimeter) on which your position lies. Take a look at figure 6-2. If your altimeter tells you you’re on the 10,200-foot contour, for example, and your direction-of-slope line runs at a bearing of 150 degrees—southeast—you know you must be at position A. If the bearing is 210 degrees, you know your location must be position B.
This method won’t help you everywhere, obviously. You can’t determine your position on a broad hillside resembling a tilted tabletop, for example, nor can it help you if the hillside is cut by multiple ravines and you don’t know which ridge or ravine you’re in. But knowledge of this method would have helped prevent three friends and me from getting lost on the Commando Run, a ski tour from Vail Pass to Vail, Colorado. The dotted line on figure 6-2 shows the route we should have taken. Instead of climbing the hill there, however, where the slope was gentle, we continued contouring at the 10,200-foot level until we reached point B. When we finally turned uphill, we found ourselves forced to switchback repeatedly, an exhausting and tedious process, and then cross a steep and avalanche-prone chute at the very top of the slope. A quick map check an hour earlier would have saved a lot of energy.
Choosing an Altimeter
In all of the techniques I’ve just described, the accuracy of your position estimate depends on the accuracy of your altimeter. Accuracy depends in part, of course, on how much you spend, but it also depends, to a large degree, on you. To maximize your altimeter’s usefulness and minimize possible errors, you need to know a little bit about how altimeters work.
Altimeters are closely related to barometers. Both work by measuring air pressure: in effect, the weight of a column of air rising above the instrument’s position. The higher you go, the less atmosphere lies above you. Altimeters translate the air pressure at your location into an altitude reading.
Both mechanical altimeters and electronic ones use a small, sealed metal capsule to sense air pressure. Most of the air inside is removed during manufacturing, so a partial vacuum exists. As the pressure outside the capsule varies, the walls of the capsule flex in and out. In a mechanical altimeter those movements, which are only a few thousandths of an inch, are translated via a complex mechanism to the movements of a pointer, which rotates around a dial to indicate the elevation. In an electronic altimeter a special wire crisscrosses the surface of the capsule, forming what’s called a “strain gauge.” As the surface of the capsule flexes in and out with changing pressure, the wire is stretched slightly or allowed to relax. That changes its electrical resistance. Complex circuits translate that change in resistance into a voltage, which in turn is converted into a pressure reading.
All metals expand and contract as the temperature fluctuates. Really cheap altimeters can’t compensate for that, which means that a change in their temperature causes them to register an apparent change in altitude even when the instrument is stationary and the pressure unvarying. Using a cheap altimeter that’s not temperature-compensated can lead to errors of as much as 600 feet if you take the instrument out of a warm pocket and let it chill to ambient temperature on a wintry day. To minimize such errors, let the altimeter adjust to the prevailing temperature before setting it to your starting altitude. Then keep the altimeter in an outside pocket of your pack so it remains at approximately the same temperature.
Better instruments incorporate some element in their design that counteracts the effect of changing temperature. Mechanical altimeters usually use a bimetallic strip made of two metals fused together that have widely different rates of expansion and contraction when heated or cooled. When the strip is heated, for example, the strip bends away from the metal that expands the fastest. That bending is used to counteract expansion in other parts of the instrument that would otherwise lead to an apparent change in altitude.
Electronic altimeters also require temperature compensation, since the resistance of the strain gauge changes with temperature. Most use a second sensing element (another strain gauge, in other words) that is not bonded to the surface of the capsule and so is not under strain. This second sensing element is wired so its output cancels out changes in output from the primary sensor that are due solely to temperature changes. You can control one potential source of error, therefore, simply by buying a high-quality, temperature-compensated instrument.
Maintaining Your Altimeter’s Accuracy
There are two other sources of error, however, that you must control. The first type of error arises because air pressure fluctuates constantly, even at the same elevation, as the weather changes. Changes in pressure cause the elevation reading to change. If you’re moving up or down in elevation at the same time, it’s impossible for you to sort out the two influences, and your altimeter can’t tell the difference.
The only solution is to reset your altimeter, as often as possible, at known elevation points—the trailhead (always!), a pass, a lake, a summit, or the point where a trail crosses a stream or cuts across a prominent ridge. If you arrive at a lake that the map tells you is at 3,000 feet, for example, and your altimeter tells you it’s at 3,100 feet, you can adjust the altimeter back down to 3,000 feet. If you can reset your altimeter every hour or so, you can limit the error due to weather to 40 feet or less. With a mechanical altimeter resetting the “reference altitude,” as it is called, is a matter of turning a large dial in relation to the pointer. With an electronic altimeter it’s usually a matter of entering the altitude mode, then resetting the altitude as you might reset the time on a watch.
Larger errors due to weather are common when you camp somewhere for a day or longer. If there is a major weather change during the night, for example, the difference between evening and morning readings can easily be several hundred feet. If you know the exact elevation of your camp from the map, you can correct as you normally would. If you can’t determine your elevation from the map, the best way to maintain the accuracy of your altimeter readings is to note the reading when you arrive in camp and then reset the altimeter to that reading when you leave.
A second source of error is more subtle. All altimeters need some standardized method to convert pressure into altitude. They do this by referring to an internal database of standard pressures at different altitudes called the US Standard Atmosphere. That database must include a standard temperature as well, however, because cold air is denser and therefore heavier than warm air. A problem arises, therefore, if the temperature of the air through which you’re traveling is different from the standard temperature for your elevation. If the air is warmer than the temperature used in the standard-atmosphere database, your altimeter will underestimate the actual elevation change. The air is less dense, and therefore a 1,000-foot change in actual elevation will not be accompanied by as big a change in pressure as predicted by the standard atmosphere. Your altimeter therefore reads low when you’re climbing and high when you’re descending. To give you a concrete example, if you hike on a warm summer day from the trailhead at 9,000 feet to a pass at 12,250 feet, your altimeter might read only 12,000 feet at your destination—an error of 250 feet. If you reset your altimeter to the correct elevation of 12,250 feet before beginning your descent, it will be reading high by about 250 feet when you reach the trailhead.
In a similar way, on a very cold winter day your altimeter will overestimate the altitude change as you gain or lose elevation. Going up, it will read high; going down, it will read low.
Standard-atmosphere temperatures are calculated by averaging the day and night temperature year-round, so they’re usually colder than you actually experience in summer during the day, when most people go hiking. For example, the standard-atmosphere chart shows a temperature of 32 degrees for an elevation of 7,500 feet. As anyone who has visited the Rockies in summer knows, temperatures at that elevation during the day are nowhere near that cold. In Estes Park, for example, at 7,500 feet, the average high in July is 78 degrees.
You can correct for this elevation error if you have a thermometer, a calculator, and a standard-atmosphere chart with you, but it’s not worth the bother. The easiest way to correct both for errors due to weather changes and errors as you move up and down in an atmosphere that is not at the standard reference temperature is simply to reset the altimeter at known elevation points as frequently as possible. With less effort than it takes to sight a single landmark and plot the bearing on the map, your altimeter will then serve you well as a navigational tool.