Chapter 5
Getting Input from the User
IN THIS CHAPTER
 Working with text fields and areas
Validating numeric data
Creating check boxes
Setting radio buttons
In the first four chapters of this minibook, I discuss how to create JavaFX programs using only two basic JavaFX input controls: labels and buttons. If all you ever want to write are programs that display text when the user clicks a button, you can put the book down now. But if you want to write programs that actually do something worthwhile, you need to use other JavaFX input controls.
In this chapter, you find out how to use some of the most common JavaFX controls. First, you read about the label and controls that get information from the user. You find out more details about the text field control, which gets a line of text, and the text area control, which gets multiple lines. Then I move on to two input controls that get either/or information from the user: radio buttons and check boxes.
Along the way, you discover an important aspect of any JavaFX program that collects input data from the user: data validation. Data validation routines are essential to ensure that the user doesn’t enter bogus data. For example, you can use data validation to ensure that the user enters data into required fields or that the data the user enters into a numeric field is indeed a valid number.
Using Text Fields
A text field is a box into which the user can type a single line of text. You create text fields by using the TextField class. Table 5-1 shows some of the more interesting and useful constructors and methods of this class.
TABLE 5-1 Handy TextField Constructors and Methods
Constructor |
Description |
|
Creates a new text field. |
|
Creates a new text field with an initial text value. |
Method |
Description |
|
Gets the text value entered in the field. |
|
Asks for the focus to be moved to this text field. Note that the field must be in a scene for the focus request to work. |
|
If |
|
Sets the maximum width for the field. |
|
Sets the minimum width for the field. |
|
Sets the preferred size of the text field in columns (that is, the number of average-width text characters). |
|
Sets the preferred width for the field. |
|
Sets the field's prompt value. The prompt value will not be displayed if the field has a text value or if the field has focus. |
|
Sets the field’s text value. |
The TextField class is defined in the javafx.scene.control package, so you should include the following import statement in any program that uses a text field:
import javafx.scene.control.*;
The most common way to create a text field is to call the constructor without arguments, like this:
TextField text1 = new TextField();
You can set the initial value to be displayed like this:
TextField text1 = new TextField("Initial value");
Or, if you need to set the value later, you can call the setText method:
text1.setText("Text value");
To retrieve the value that the user has entered into a text field, call the getText method like this:
String value = text1.getText();
As with any JavaFX control, managing the width of a text field can be a bit tricky. Ultimately, JavaFX will determine the width of the text field based on a number of factors, including the size of the window that contains the stage and scene and any size constraints placed on the pane or panes that contain the text field. You can set minimum and maximum limits for the text field size by calling the setMinWidth and setMaxWidth methods, and you can indicate the preferred width via the setPrefWidth method, as in this example:
TextField text1 = new TextField();
text1.setMinWidth(150);
text1.setMaxWidth(250);
text1.setPrefWidth(200);
Another way to set the preferred width is with the setPrefColumnCount method, which sets the width in terms of average-sized characters. For example, the following line sizes the field large enough to display approximately 50 characters:
text1.setPrefColumnCount(50);
Note that the setPrefColumnCount method does not limit the number of characters the user can enter into the field. Instead, it limits the number of characters the field can display at one time.
Whenever you use a text field, provide a prompt that lets the user know what data he should enter into the field. One common way to do that is to place a label control immediately to the left of the text field. For example:
Label lblName = new Label("Name:");
lblName.setMinWidth(75);
TextField txtName = new TextField();
txtName.setMinWidth(200);
HBox pane = new HBox(10, lblName, txtName);
Here, a label and a text field are created and added to an HBox pane so they will be displayed side-by-side.
JavaFX also allows you to display a prompt inside of a text field. The prompt is displayed in a lighter text color and disappears when the field receives focus. You use the setPromptText method to create such a prompt:
TextField txtName = new TextField();
txtName.setPromptText("Enter the customer's name");
Here, the text Enter the customer's name will appear inside the text field.
To retrieve the value entered by the user into a text field, you use the getText method, as in this example:
String lastName = textLastName.getText();
Here the value entered by the user in the textLastName text field is assigned to the String variable lastName.
Figure 5-1 shows the operation of a simple program that uses a text field to allow the user to enter the name of a character in a play and the name of the actor who will play the role. Assuming the user enters text in both fields, the program then displays an alert box indicating who will play the role of the character. If the user omits either or both fields, an alert box displays to indicate the error.
Figure 5-1 shows what the main stage for this program looks like, as well as the message box windows displayed when the user enters both names or when the user omits a name. The JavaFX code for this program is shown in Listing 5-1.
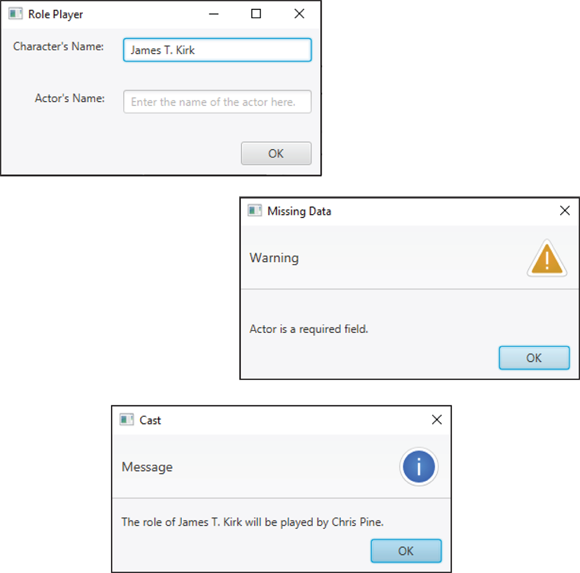
FIGURE 5-1: The Role Player application in action.
LISTING 5-1 The Role Player Program
package com.lowewriter.RolePlayer;
import javafx.application.*;
import javafx.stage.*;
import javafx.scene.*;
import javafx.scene.layout.*;
import javafx.scene.control.*;
import javafx.geometry.*;
public class RolePlayer extends Application→10
{
public static void main(String[] args)
{
launch(args);
}
TextField txtCharacter;→17
TextField txtActor;
@Override public void start(Stage primaryStage)
{
// Create the Character→23
Label lblCharacter = new Label("Character's Name:");
lblCharacter.setMinWidth(100);
lblCharacter.setAlignment(Pos.BOTTOM_RIGHT);
// Create the Character text field→28
txtCharacter = new TextField();
txtCharacter.setMinWidth(200);
txtCharacter.setMaxWidth(200);
txtCharacter.setPromptText(
"Enter the name of the character here.");
// Create the Actor label→35
Label lblActor = new Label("Actor's Name:");
lblActor.setMinWidth(100);
lblActor.setAlignment(Pos.BOTTOM_RIGHT);
// Create the Actor text field→40
txtActor = new TextField();
txtActor.setMinWidth(200);
txtActor.setMaxWidth(200);
txtActor.setPromptText("Enter the name of the actor here.");
// Create the OK button→46
Button btnOK = new Button("OK");
btnOK.setMinWidth(75);
btnOK.setOnAction(e -> btnOK_Click() );
// Create the Character pane→51
HBox paneCharacter = new HBox(20, lblCharacter, txtCharacter);
paneCharacter.setPadding(new Insets(10));
// Create the Actor pane→55
HBox paneActor = new HBox(20, lblActor, txtActor);
paneActor.setPadding(new Insets(10));
// Create the Button pane→59
HBox paneButton = new HBox(20, btnOK);
paneButton.setPadding(new Insets(10));
paneButton.setAlignment(Pos.BOTTOM_RIGHT);
// Add the Character, Actor, and Button panes to a VBox→64
VBox pane = new VBox(10, paneCharacter, paneActor, paneButton);
// Set the stage→67
Scene scene = new Scene(pane);
primaryStage.setScene(scene);
primaryStage.setTitle("Role Player");
primaryStage.show();
}
public void btnOK_Click()→74
{
String errorMessage = "";→76
if (txtCharacter.getText().length() == 0)→78
{
errorMessage += "\nCharacter is a required field.";
}
if (txtActor.getText().length() == 0)→83
{
errorMessage += "\nActor is a required field.";
}
if (errorMessage.length() == 0)→88
{
String message = "The role of "
+ txtCharacter.getText()
+ " will be played by "
+ txtActor.getText()
+ ".";
Alert a = new Alert(Alert.AlertType.INFORMATION, message);
a.setTitle("Cast");
a.showAndWait();
}
else
{
Alert a = new Alert(Alert.AlertType.WARNING, errorMessage);→101
a.setTitle("Missing Data");
a.showAndWait();
}
}
}
This program isn’t very complicated, so the following paragraphs just hit the highlights:
- →10 The name of the program’s main class is
RolePlayer. - →17 These class variables allow any of the
RolePlayerclass methods to access the two text fields. - →23 These lines create a label to identify the Character text box. The field is set to a minimum width of 100 pixels and is right-justified so that the labels for that identify the two text fields will be aligned properly.
- →28 These lines create the Character text field with a minimum and maximum width of 200 pixels. The prompt text is set to
Enter the name of the characterhere. This text will appear within the text field whenever the text field does not have focus, unless the user has entered something else. In Figure 5-1, the Character text field has focus so the prompt text isn’t visible. - →35 These lines create a label to identify the Actor text field. Like the Character label, the Actor label’s width is set to 100 pixels and it’s right-aligned.
- →40 These lines create the Actor text field, set its width to 200 pixels, and assign prompt text. You can see the prompt text in Figure 5-1 because the Actor text field doesn’t have focus.
- →46 These lines create the OK button. The
btnOK_Clickmethod is called when the user clicks the button. - →51 These lines create an
HBoxpane and add the Character label and text box to it. - →55 These lines create another
HBoxpane and add the Actor label and text box to it. - →59 These lines create a third
HBoxpane to hold the button. - →64 Now that all the controls are created and added to
HBoxpanes, the threeHBoxpanes are added to aVBoxpane so that the text boxes with their associated labels and the button are stacked vertically. - →67 These lines create a scene to show the
VBoxpane and then add the scene to the primary stage and show the stage. - →74 The
btnOK_Clickmethod is called whenever the user clicks OK. - →76 The
errorMessagevariable holds any error message that might be necessary to inform the user of missing data. - →78 This
ifstatement ensures that the user has entered data into the Character text box. If no data is entered, an error message is created. - →83 This
ifstatement ensures that the user has entered data into the Actor text box. If no data is entered, an error message is appended to theerrorMessagefield. - →88 This
ifstatement determines whether any data validation errors have occurred by testing the length of theerrorMessagefield. If the length is zero, no error has been detected, so the program assembles themessagevariable to display which actor will be playing which character. Then, an Alert box is used to display the message. - →101 This line displays the error message if the user forgets to enter data in the Character or Actor text fields.
Validating Numeric Data
You need to take special care if you’re using a text field to get numeric data from the user. The getText method returns a string value. You can pass this value to one of the parse methods of the wrapper classes for the primitive numeric types. To convert the value entered in a text box to an int, use the parseInt method:
int count = Integer.parseInt(txtCount.getText());
Here the result of the getText method is used as the parameter of the parseInt method.
Table 5-2 lists the parse methods for the various wrapper classes. Note: Each of these methods throws NumberFormatException if the string can’t be converted. As a result, you need to call the parseInt method in a try/catch block to catch this exception.
TABLE 5-2 Methods That Convert Strings to Numbers
Wrapper Class |
parse Method |
|
|
|
|
|
|
|
|
|
|
|
|
 If your program uses more than one or two numeric-entry text fields, consider creating separate methods to validate the user's input. The following code snippet shows a method that accepts a text field and a string that provides an error message to be displayed if the data entered in the field can’t be converted to an
 int. The method returns a Boolean value that indicates whether the field contains a valid integer:
private boolean isInt(TextField f, String msg)
{
try
{
Integer.parseInt(f.getText());
return true;
}
catch (NumberFormatException e)
{
Alert a = new Alert(Alert.AlertType.WARNING, msg);
a.setTitle("Invalid Data");
a.showAndWait();
return false;
}
}
You can call this method whenever you need to check whether a text field has a valid integer. Here’s a method that gets the value entered in a txtCount text field and displays it in message box if the value entered is a valid integer:
public void buttonOKClick()
{
if (isInt(textCount,
"You must enter an integer."))
{
Alert a = new
Alert(Alert.AlertType.INFORMATION,
"You entered " +
Integer.parseInt(textCount.getText()),
"Your Number");
a.showAndWait();
}
textCount.requestFocus();
}
Here the isInt method is called to make sure that the text entered by the user can be converted to an int. If so, the text is converted to an int and displayed in an alert box.
Using Check Boxes
A check box is a control that the user can click to check or clear. Check boxes let the user specify a Yes or No setting for an option. Figure 5-2 shows a window with three check boxes.

FIGURE 5-2: Three check boxes.
 Strictly speaking, a check box can have three states: checked, unchecked, and undefined. The undefined state is most often used in conjunction with a
 TreeView control.
To create a check box, you use the CheckBox class. Its favorite constructors and methods are shown in Table 5-3.
TABLE 5-3 Notable CheckBox Constructors and Methods
Constructor |
Description |
|
Creates a new check box that is initially unchecked |
|
Creates a new check box that displays the specified text |
Method |
Description |
|
Gets the text displayed by the check box |
|
Returns |
|
Sets an |
|
Checks the check box if the parameter is |
|
Sets the check box text |
As with any JavaFX control, if you want to refer to a check box in any method within the program, declare a class variable to reference the control:
CheckBox chkPepperoni, chkMushrooms, chkAnchovies;
Then you can use statements like these in the start method to create the check boxes and add them to a layout pane (in this case, pane1):
chkPepperoni = new CheckBox("Pepperoni");
pane1.add(chkPepperoni);
chkMushrooms = new CheckBox("Mushrooms");
pane1.add(chkMushrooms);
chkAnchovies = new CheckBox("Anchovies");
pane1.add(chkAnchovies);
Notice that I didn't specify the initial state of these check boxes in the constructor. As a result, they’re initially unchecked. If you want to create a check box that’s initially checked, call setSelected method, like this:
chkPepperoni.setSelected(true);
In an event listener, you can test the state of a check box by using the isSelected method, and you can set the state of a check box by calling its setSelected method. Here’s a method that displays a message box and clears all three check boxes when the user clicks OK:
public void btnOK_Click()
{
String msg = "";
if (chkPepperoni.isSelected())
msg += "Pepperoni\n";
if (chkMushrooms.isSelected())
msg += "Mushrooms\n";
if (chkAnchovies.isSelected())
msg += "Anchovies\n";
if (msg.equals(""))
msg = "You didn't order any toppings.";
else
msg = "You ordered these toppings:\n"
+ msg;
Alert a = new Alert(Alert.AlertType.INFORMATION,
msg");
a.setTitle("Your Order");
a.showAndWait();
chkPepperoni.setSelected(false);
chkMushrooms.setSelected(false);
chkAnchovies.setSelected(false);
}
Here, the name of each pizza topping selected by the user is added to a text string. If you select pepperoni and anchovies, for example, the following message displays:
You ordered these toppings:
Pepperoni
Anchovies
If you want, you can add event listeners to check boxes to respond to events generated when the user clicks those check boxes. Suppose that your restaurant has anchovies on the menu, but you refuse to actually make pizzas with anchovies on them. Here’s a method you can call in an event listener to display a message if the user tries to check the Anchovies check box; after displaying the message, the method then clears the check box:
public void chkAnchovies_Click(){
Alert a = new Alert(Alert.AlertType.WARNING,
"We don't do anchovies here.");
a.setTitle("Yuck!")
a.showAndWait();
chkAnchovies.setSelected(false);
}
To add this event listener to the Anchovies check box, call its setOnAction method, like this:
chkAnchovies.setOnAction(e -> chkAnchovies_Click() );
Add a listener to a check box only if you need to provide immediate feedback to the user when she selects or deselects the box. In most applications, you wait until the user clicks a button to examine the state of any check boxes in the frame.
Using Radio Buttons
Radio buttons are similar to check boxes, but with a crucial difference: They travel in groups, and a user can select only one radio button at a time from each group. When you click a radio button to select it, the radio button within the same group that was previously selected is deselected automatically. Figure 5-3 shows a window with three radio buttons.

FIGURE 5-3: A frame with three radio buttons.
To work with radio buttons, you use two classes. First, you create the radio buttons themselves with the RadioButton class, whose constructors and methods are shown in Table 5-4. Then you create a group for the buttons with the ToggleGroup class and add the radio buttons to the toggle group.
TABLE 5-4 Various RadioButton Constructors and Methods
Constructor |
Description |
|
Creates a new radio button with no text |
|
Creates a new radio button with the specified text |
Method |
Description |
|
Gets the text displayed by the radio button |
|
Returns |
|
Sets an |
|
Selects the radio button if the parameter is |
|
Sets the check box text |
A ToggleGroup object is simply a way of associating a set of radio buttons so that only one of the buttons can be selected. The toggle group object itself is not a control and is not displayed. To display radio buttons, you add the individual radio buttons, not the toggle group, to a layout pane.
The usual way to create a radio button is to declare a variable to refer to the button as a class variable so that it can be accessed anywhere in the class, as in this example:
RadioButton rdoSmall, rdoMedium, rdoLarge;
Then, in the start method, you call the RadioButton constructor to create the radio button:
rdoSmall = new RadioButton("Small");
Thereafter, you can add the radio button to a layout pane in the usual way.
To create a toggle group to group radio buttons that work together, call the ToggleGroup class constructor:
ToggleGroup sizeGroup = new ToggleGroup();
Then call the setToggleGroup method of each radio button:
rdoSmall.setToggleGroup(sizeGroup);
rdoMedium.setToggleGroup(sizeGroup);
rdoLarge.setToggleGroup(sizeGroup);
 Toggle groups have nothing to do with how radio buttons display. To display radio buttons, you must still add them to a layout pane. And there’s no rule that says that all the radio buttons within a toggle group must be added to the same layout pane. However, it is customary to display all the radio buttons in a single toggle group together on the scene so that the user can easily see that the radio buttons belong together.
If you’ve worked with radio buttons in Swing, you’ll want to note an important distinction between the way JavaFX toggle groups work versus how button groups work in Swing. In JavaFX, radio buttons that are outside a toggle group are independent of one another. In Swing, radio buttons that are outside a button group are all part of a default group. Thus, in JavaFX, always add radio buttons to a toggle group, even if the scene has only a single toggle group.