Chapter 1: Getting Familiar with the Foundations of C#
This chapter will provide the reader with an overall review of the most important concepts in C sharp. This is necessary because the upcoming chapters will build upon the things we review here. This allows the readers to become familiar with the idioms commonly used in advanced C sharp programming (which will be quite frequently used in the upcoming chapters). In this way, this chapter hopes to get the readers on the same page before we move on with advanced programming techniques and projects in the latter half of this book.
However, if you already have experience with object-oriented programming languages like Java, Javascript, C++, PHP, Visual Basic .NET, etc., you might think this chapter will probably not be worth your time, but this chapter will prove to be a really useful checkpoint where you can review the concepts you are already familiar with. On the other hand, most readers picking up this book will find this chapter to disclose certain aspects of not only C sharp but also .’NET’ programming that they were previously unaware of.
In short, the content here will provide the readers with foundations necessary for understanding the discussion of C sharp programming to create advanced applications throughout the course of this book.
The Essentials of an Object-Oriented Programming Language
There is a set of fundamental elements that form the core of the language itself in any object-oriented programming language. These elements are generally known as the object-oriented basics, but this title is quite misleading as these “basics” are not to be underestimated. To be more precise, these basics are wrapped around with an external shell that gives the object-oriented language its unique identity. This is why C sharp, even though it is an object-oriented language like C++, Visual Basic, and Java, has its own unique way of distinguishing itself from its family members.
In any object-oriented programming language, the underlying functioning principles remain the same. These principles are
essentially the “basics” of an object-oriented programming language, and they are a total of four. These basic principles are the following:
-
Encapsulation
-
Inheritance
-
Aggregation
-
Polymorphism
As such, any programming language that incorporates these principles is categorized as an object-oriented programming language. In order to implement each of these principal elements properly within their cores, programming languages use tools known as ‘idioms
’ and ‘constructors
.’ For instance, these include
-
Templates
-
Operator overloading
-
Interfaces
-
Multithreading
-
Multiple Inheritance
-
Exception handling
-
Pointers
-
Garbage collection, etc.
When exploring C sharp, we find out that the core of this object-oriented programming language implements the principal elements with operator overloading, inheritance, interfaces, exception handling, garbage collection, multiple interface inheritance, reflection, and multi-threading, but you might notice that C sharp shuns a few functionalities such as templates, raw pointers, and even multiple class inheritance. The reason why these functionalities were not included within the C sharp programming language is because of the argument, which, on one side, supports the claim that these features introduce more problems than they can potentially solve. On the other side, the belief is that these are key components of any object-oriented programming language, and the features they bring to the table are priceless, and they need to be included, but keep things simple and straightforward, further complications were avoided by simply not adding these features to C sharp.
However, this does not give much confidence to anybody who has any experience in programming. This is because the feature set of
templates, multiple inheritances, and pointers greatly facilitates the user in Web application and Web Services projects. Hence, this might be a monumental deal-breaker for some people, but C sharp does not disappoint their end-users. In order to make up for the lack of such tools, C sharp includes its own feature set that can help users to build Web Applications and Web Services. For instance, C sharp features a tool that allows for hosting applications on the Windows platform, namely, ‘COM interop
.’ Not only that, but C sharp also boasts multilanguage programming as well as rapid application development.
But through all this ramble, there is still good news. As we discussed before, all the object-oriented programming languages have the same core principles with a difference in the features implementing them. You will find that some features from other OOPLs carry on to C sharp. For instance, if you are comfortable with the syntax of C++ or Java, then you’ll find that the syntax of C sharp is strikingly familiar, thus allowing you to settle in considerably faster. This is just one of the many similarities you’ll find in C sharp when comparing it to other object-oriented programming languages, so it’s a good idea to make a quick comparison if you’re coming from such languages.
In the upcoming sections, we will discuss the object-oriented basics and discuss the relative features available in C sharp.
Defining Classes
Creating and defining classes is done the same way as you would in C++, albeit the underlying construct of this action is slightly different in C sharp. The following syntax demonstrates the construct required to define a class in C sharp.
Access-modifier class name
{
}
One thing to be mindful of is that just like C++, C sharp is a case-sensitive programming language. Thus, you need to be vigilant of the
case in which your classes have been defined when referencing them. Otherwise, the compiler will not recognize which class you are referring to.
The syntax demonstrated above has the potential of being confusing, so let’s clarify its elements. The syntax has two elements - the ‘access modifier
’ and the ‘name
.’ The second element is self-explanatory, i.e., it is the set of characters by which the class is recognized, but the first element's purpose is to define the scope of the class (you should already be familiar with ‘scopes’). Generally, classes are specified as ‘public
’ (which is the same as ‘global
’ in other programming languages) so that they can be accessed by any function in any program, as long as the header file is included (where the classes have been already defined).
So, if we replace the appropriate arguments in the syntax shown above, we will end up with something like this:
public class MyFirstClass
{
}
In the curly brackets, you fit in your class's contents (the functions, methods, and objects it includes). If you look a bit closer, you will see that the class's name has all the first letters of each word capitalized. This is not random or a mistake. Instead, we follow a convention here when naming classes. The purpose of a convention is to maintain consistency when programming, which can be really impactful in the long run, but it is not mandatory to follow this naming convention (known as ‘Pascal Casing’). It’s all up to you whether you choose to use it or not (the same goes for other numerous conventions in programming).
Using a Class in a Console Application
Assuming that you have some knowledge of programming or any amount of programming experience, then you must be familiar with the term ‘console.’ When you are using IDE software to code, you will find a small window in the bottom that looks similar to that of a
command prompt, giving the user feedback information when they execute certain commands (such as compile, debug, etc.). Moreover, a console will also display syntax errors in the code when asked to compile the project you have opened currently.
Similarly, suppose we want to work with C sharp to code applications, etc. In that case, we will do so by using an Integrated Development Environment (such as Microsoft Visual Studio), but we are not to confuse a ‘console’ with a ‘console application.’ While a console is natively open in an IDE at all times, a ‘console application’ on the other hand, is simply an executable file that does not have a fancy GUI. The interface through which the user interacts with the application is like a simple command prompt.
In such tasks, the most common action that you will likely perform during C sharp programming is implementing the classes you have defined in a certain console application. We can easily create a fresh console application by opening a ‘New Project’ within the IDE. The underlying code for the newly created console application is as follows:
using System;
namespace HelloWorld
{
/// <summary>
/// Summary description for Class1.
/// </summary>
class Class1
{
/// <summary>
/// The main entry point for the application.
/// </summary>
[STAThread]
static void Main(string[] args)
{
//
// TODO: Add code to start the application here
//
}
}
}
Now let’s break this code down a bit. At the very start of this code block, we notice a statement being used, which is ‘using
.’ The argument passed to this statement is ‘System
.’ In this block of code, ‘System’ actually refers to a .’dll
’ assembly file available through the .’NET Framework
’ installed on our computer (using Windows, obviously). We do not need to go into the details as to ‘why’ a fresh console application is using the ‘System.dll
’ assembly file. A simple answer to this question of ‘why’ is that this file contains the necessary elements required for ‘Common Language Runtime.’ It wouldn't be wrong if we even said that the .’dll’ file is the console application itself. The ‘using
’ statement we use in C sharp is synonymous with the ‘include
’ statement in C++ and the ‘uses
’ statement in Delphi.
In the next step, we specify the ‘name
’ of the console application through the ‘namespace
’ statement. The argument passed to this statement will be the name we assign the project, which in this case, would be the conventional name of the very first program created by a user, i.e., ‘Hello World.’ However, in the argument, we do not add spaces in between a single namespace.
The ‘slash’ symbols that you see in the middle of this block of code represent comments. Anything that is written after three/two slashes (\\\ or \\) is considered as additional commentary made by the programmer. Comments can be really helpful either when you need to go through the program's code later on its life cycle or if somebody else is exploring it.
After the initial three comments, we will see the very first class is defined. Since this is a code generated when we create a default console application, the classes' names and constructs are standard. It is recommended that you name a class you create something that is self-explanatory, short, and easy to recall (although not every name can have all three of these elements).
Up next, we have the core element of the entire application, the ‘Main()
’ member. If you have experience with C++, then you will be quite familiar with this member. Main is not a standard member. In fact, it has a special property that turns it into what we call a ‘static member
.’ The property associated with a ‘static’ member is pretty useful. It allows us to use the method(s) associated with such a member without having an ‘enclosing class’ to exist. In addition, an argument known as ‘string[] args
’ tells us that a bunch of strings (in the form of an array) are passed to the Main static member. These strings are basically the ‘Command Line Arguments’ that you will generally pass during a coding session.
Printing a Statement in a Console Application
Now that we understand the underlying elements of a console application let’s build one to display a simple phrase, ‘Hello World!.’ To do this, we will simply be filling in the necessary arguments to the statements shown in the code of a console application.
using System;
namespace HelloWorld
{
/// <summary>
/// Summary description for Class1.
/// </summary>
class Class1
{
/// <summary>
/// The main entry point for the application.
/// </summary>
[STAThread]
static void Main(string[] args)
{
Console.WriteLine("Hello World!");
Console.ReadLine();
}
}
}
To print out the phrase, we use two basic functions, namely, ‘Console.WriteLine()
’ and ‘Console.ReadLine()
.’ We specify the phrase or sentence we want the console application to display and pass it as an argument to the ‘Console.WriteLine()
’ function. Once this is done, the ‘Console.ReadLine()
’ function then stands by until it receives the carriage return it expects before it continues with its job. The purpose of the ‘Console.WriteLine()
’ function is the same as the ‘cout>>’ statement in the C++ programming language.
When analyzing the usage of the methods to print out the phrase “Hello World!”, you might notice that these methods were used without including an instance of the corresponding ‘Console object.’ If this were a normal scenario, then you would be absolutely right, but the truth is that these methods are actually static members present in a class named ‘Console
.’ So, if we want to call upon and use these methods, then we don’t need to create an instance of the corresponding class’s object.
Performing a ‘Read’ on the Command Prompt
We will now go over the approach through which we can effectively intercept the arguments specified to the console application. To do this, we simply pass a special argument to the ‘Console.WriteLine()
’ method. This argument is ‘args[0],
’ and you can see it being implemented in the following block of code:
using System;
namespace HelloWorld
{
/// <summary>
/// Summary description for Class1.
/// </summary>
class Class1
{
/// <summary>
/// The main entry point for the application.
/// </summary>
[STAThread]
static void Main(string[] args)
{
Console.WriteLine(args[0]);
Console.ReadLine();
}
}
}
When we execute this block of code, whenever we pass an argument to the command prompt, it is intercepted by the console application displayed on the console.
Passing an argument to the command prompt can be done in two ways (there are other ways as well, but for the sake of simplicity, we will just stick with two).
Let’s get into some details regarding the second method. Using the .’NET Visual Studio’ Integrated Development Environment is not that complex since you must have experience with other IDEs at this point. In order to use the IDE to pass an argument to the command line, we need to perform the following actions:
-
Open the Visual Studio IDE and look for the ‘Solution Explorer’ menu inside the ‘View’ tab.
-
Once you are inside the ‘Solution Explorer’ menu, you will find a list of all the projects that you have been working on or placed in the IDE’s browsing directory. Over here, you need to find the project you want to work on for this task and then just right-click it. This will open a drop-down menu, and from here, you select the ‘Properties’ option.
-
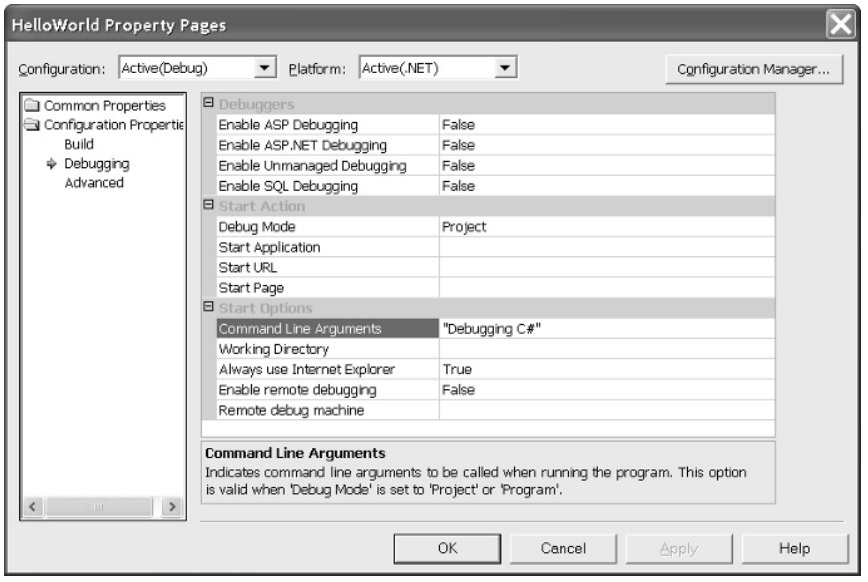
This will open a new window as shown below:
On the left-hand side, you will see a small file navigation interface. From here, double click ‘Configuration Properties,’ and inside, select ‘Debugging.’
-
In the 3rd category named ‘Start options,’ the first section will be ‘Command Line Arguments.’ Over here, you need to specify an appropriate value. In this case, we pass an argument ‘Debugging C#.’
-
Once we are done with passing a command-line argument, we can reboot the application we have opened in the IDE manually or by pressing the ‘F5 key’ as the shortcut key. Once the application runs using the IDE after a reboot, we will be able to see the argument passed to the command prompt.
Using Fields and Properties
‘Fields’ and ‘Properties’ are elements that are interestingly related to each other, but before we can discuss them, let’s first understand the underlying concept of ‘consumers’ and ‘producers’ in programming. ‘Consumers
’ are those people that are the end-users of things like classes. Similarly, ‘Producers
’ are those people that build these classes. An interesting thing to note here that both a consumer and a producer are programmers.
Now with that clarified, let’s talk about ‘Fields
.’ A ‘Field’ is simply a bunch of data that is contained within a class. Conventionally, the fields of a class are never public. Instead, they are set to ‘private’ by the producer, but there are times when consumers need access to the fields of a class they are using, but, since the fields are private, they are hindered. This is where ‘Properties
’ come in. Properties have the nature of duality. To elaborate, if a consumer is using this ‘Property Method,’ it will be indistinguishable as if the consumer were dealing with data. On the other hand, if the producer uses the same property method, it will function as if it were a method.
You might ask why you would even need access to the data fields of a class in the first place. Well, the answer to that is very simple and straightforward, having access to the data of a class allows the programmer to have the freedom to make changes to the class’s methods and even perform some tweaks to the class's objects. Similarly, using ‘Properties
’ allows us to control how the data in the class is accessed.
Defining a Field
The nature of a field, i.e., the type of data it contains, can generally be anything (it just needs to conform to the purpose of the class in which it will be used). Since this data is important to the class, it is generally kept private through the use of access modifiers (i.e., setting its scope to ‘private’). In this way, only the programmer who created the field (the producer) will be able to make changes to it. If anyone other than the producer wants to access the fields in a class and make changes to it, they will have to do so through ‘Property Methods.’
In the following block of code, we are creating a field that stores string data.
using System;
namespace HelloWorld
{
/// <summary>
/// Summary description for Class1.
/// </summary>
class Class1
{
private static string arg0 = null;
/// <summary>
/// The main entry point for the application.
/// </summary>
[STAThread]
static void Main(string[] args)
{
arg0 = args[0];
Console.WriteLine(arg0);
Console.ReadLine();
}
}
}
In this demonstration, you can find that we are not using an instance of ‘Class1
’ in this program. Now let’s modify this block of code a bit such that we actually use an instance of the corresponding class while it essentially performs the same job.
using System;
namespace HelloWorld
{
/// <summary>
/// Summary description for Class1.
/// </summary>
class Class1
{
private string arg0 = null;
public void WriteCommandLine( string arg )
{
Console.WriteLine(arg);
Console.ReadLine();
}
/// <summary>
/// The main entry point for the application.
/// </summary>
[STAThread]
static void Main(string[] args)
{
Class1 = new Class1();
class1.arg0 = args[0];
class1.WriteCommandLine(class1.arg0);
}
}
}
Basically, the revision involves how we use the ‘Main()’ method. Originally, this method handled the majority of the work to perform the corresponding job, but we changed the purpose of the ‘Main()’ method in the revision such that it’s the only job would be to act as a
‘startup method’ only. To account for the changes in the way the code works, we implement an instance of ‘Class1
.’
Defining Properties
Due to their nature and function, ‘Properties’ are basically considered as ‘methods’ (you might have guessed it when we talked about ‘Property Methods’ in the previous sections). Generally, properties can be used in one of two ways, either as a ‘right-hand side value
’ or as a ‘left-hand-side value
.’ If the property is being used as an RHS value, we call a specific property method known as ‘getter
.’ On the other hand, if the property is being used as an LHS value, then the corresponding property method we call is known as a ‘setter
.’
Properties also have access to modifiers defining their scope. Conventionally, properties are set to public. Here’s how a property would be defined:
Access-Modifier Type Property-Name
{
get
{
return field;
}
set
{
field = value;
}
}
In essence, the property has three basic elements - an access modifier (which is generally set to public), a ‘type,’ and last but not least, a name.
‘Properties’ can be of three types based on their use and implementation, i.e., ‘Read-only Properties,’ ‘Indexed Properties’ and ‘Write-only Properties.’ Before moving on, let’s discuss these different types of properties.
Read-Only Properties
The main element through which we can distinguish a read-only property is from observing if it possesses a ‘getter’ or a ‘setter.’ If the property only has a ‘getter’ then it is a ‘Read-only Property.’ Just like the name suggests, such properties only allow the users to view the property elements, such as its values, and the user has no authorization to make any changes.
Here’s an example where we access the value of a ‘Read-only Property’ for the temperature defined in a class. This temperature class features readings in both Celsius and Fahrenheit scale. Here’s how we can use the Read-only Property to fetch the scale in which the corresponding class's temperature will be displayed.
public enum TemperatureMode
{
Fahrenheit, celsius
}
class Temperature
{
private TemperatureMode mode = TemperatureMode.fahrenheit;
private double celsius = 0;
private double fahrenheit = 0;
public Temperature( double aTemperature, TemperatureMode aMode )
{
mode = aMode;
SetTemperature(aTemperature, aMode);
}
private void SetTemperature(double aTemperature, TemperatureMode aMode)
{
if( aMode == TemperatureMode.fahrenheit )
{
fahrenheit = aTemperature;
celsius = FahrenheitToCelsius(aTemperature);
}
else
{
celsius = aTemperature;
fahrenheit = CelsiusToFahrenheit(aTemperature);
}
}
public static double CelsiusToFahrenheit(double celsius)
{
return celsius * (9.0/5) + 32;
}
public static double FahrenheitToCelsius(double fahrenheit)
{
return (fahrenheit - 32) * 5.0/9;
}
public TemperatureMode Mode
{
get
{
return mode;
}
set
{
mode = value;
}
}
public double Value
{
get
{
return mode == TemperatureMode.fahrenheit ?
fahrenheit : celsius;
}
}
public bool Test()
{
return fahrenheit == CelsiusToFahrenheit(celsius)
&& celsius == FahrenheitToCelsius(fahrenheit);
}
}
To determine the scale on which the temperature will be converted to (in simpler terms, determining whether to use the Celsius scale or the Fahrenheit scale), the block of code shown above executes a corresponding enumeration.
Write-Only Properties
Just as a property with only ‘getters’ is the defining feature of a ‘Read-only Property,’ a property that only has ‘setters
’ is primarily known as a ‘Write-only Property
.’ In such a type of property, a user accessing the class can make changes to it and even to the property itself. Usually, you won’t come across write-only properties as much because they are not often used, as it can cause unnecessary complications due to the modification privileges given to the end-user.
However, this does not mean that write-only properties are entirely useless. For example, you can use the functionality of write-only properties for tasks such as requesting authentication from the user in the form of a passcode. Instead of using a read-only property to display the authentication code to the end-user, it would be better to use a write-only property and allow the user to type the correct passcode in by themselves.
Indexed Properties
This type of property is also simple, like the other two. Just as the name ‘Index’ suggests, this type of property is primarily used to communicate the items which have been placed in the corresponding class in the form of a ‘list.’ Since the main user will be a consumer, the form in which the requested data is displayed is in the form of ‘object[index]
.’
Here’s a demonstration of the use of ‘Indexed Properties.’
class IndexedProperty
{
private string[] args = null;
public IndexedProperty(string[] args)
{
this.args = new string[args.Length];
args.CopyTo(this.args, 0);
}
[System.Runtime.CompilerServices.IndexerName("Command")]
public string this [int index]
{
get
{
return args[index];
}
set
{
args[index] = value;
}
}
}
Using an Instance of a Class
In order to create an instance of an object and then have it run in the program where it was created, we need to call upon a ‘Constructor’ with the help of an operator. When we create an instance of an object, we can take a bunch of variables and link them to the instantiated object, but there’s a condition to perform this action: whenever we try to assign a variable to an object, both elements need to be compatible with one another. The instantiated object’s type and the variable’s type need to be similar, to be more precise. This linking process will fail if the types of the object and the variable do not match. The type compatibility even extends to the object’s predecessors. By predecessors, we mean those objects whose features this object instance inherited. So, if the variable’s type matches any of the object’s ancestors, then it can be assigned to the object. In other words, if we have a variable that was previously declared to be of the same type as an object’s ancestor, then we can use this variable with the very same object’s child instance as well.
If we want to create an instance of an object, we will need to use a ‘Constructor.’ A constructor is basically a method that is primarily
used during the process of creating an object (this includes creating an instance as well). A constructor has three elements, a name, an access modifier, and parameters. The name of the constructor is usually the name of the class to which it belongs to. The access modifier can be either public or private, and it can have numerous parameters or none.
The following example shows the process of creating an object instance with the help of a constructor.
// simple object creation
FileStream fs = new FileStream("c:\\temp\\killme.txt", FileMode.CreateNew);
fs.Write(new Byte[]{65, 66, 67, 68, 69}, 0, 5);
fs.Close();
// array examples
string[] strings = new string[10];
strings[0] = "Some Text!";
int[] integers = new int[]{0,1,2,3,4,5};
Defining an Interface
In the context of object-oriented programming languages, an interface isn’t any different from what you might actually be familiar with. The main use of the interface is to create a method of interaction for a specific class. To be more precise, an interface is an actualization of tapping into the functionality of a class. Consider a sound system installed in a vehicle. This sound system has two
circular controllers that can be rotated to navigate through the menu, increase or decrease the volume, change the radio station, or even shuffle through songs being played through external media. Now, let’s narrow things down a bit. Let’s say that these hardware controllers allow you to tune the radio station, and you can also do this without having to use these knobs as well. For instance, you can have a small infrared controller that can do this task for you. In this scenario, the tuning of the radio stations is done through an underlying interface, and we can access the functionality of this interface through external tools. If you think about it, the sound system's volume is controlled through a specific ‘volume interface.’ We can connect to this interface to leverage its volume changing functionality through an infrared remote, hardware buttons, or even voice control. As such, the hardware buttons controlling the volume are seen as the ‘physical controls.’ The aspect we are controlling is ‘volume,’ which is known as the ‘attribute.’ We manipulate this ‘attribute’ by implementing either ‘Methods’ or ‘Property Methods’, and these methods act as the supporting framework of an interface.
Here’s how you can easily define an interface.
public interface IAudio
{
void AdjustVolume( int value );
}
Implementing an Interface
Once we have created an interface, we still need to implement it properly in a program or application. Generally, interfaces are implemented within classes. When implementing an interface, it should always be remembered that all the interface methods will be implemented as well.
To implement an interface, simply specify the class you want it to be in. The following block of code shows us how we can implement an interface within a class:
public interface IAudio
{
void AdjustVolume(int value );
}
public class Radio : IAudio
{
private int volume = 0;
void IAudio.AdjustVolume(int value)
{
volume += value;
}
}
In this code, the interface we are implementing is ‘IAudio,
’ and the class in which we are implementing it is ‘Radio
.’ The process is simple. First, we write the access modifier of the concerned class, then type its name, then place a colon after the class’s name (:) and finally, specify the interface's name. This has been demonstrated in the 3rd
line of the code block.
Inheritance
The concept of inheritance is almost universal, be it in biology or computers. Inheritance is basically when a class passes on its
features and certain characteristics to another class, but the result is not going to be a completely identical copy of the original class. The inheritance relationship usually involves two or more than two classes. The class whose features are being inherited is known as the ‘superclass,
’ and the class which is inheriting those features is known as the ‘subclass
.’ Think of it as the relationship of a parent and a child, in this case, the first one (superclass) would be the parent class and the second one (subclass) would be the child class.
Like we discussed before, we are not simply making an identical copy of the original class. Instead, the subclass has its own unique features, and it simply inherits the corresponding fields, properties, and methods
belonging to the original superclass.
However, to make the inheritance work, we must also know how to denote it in our code properly. Let’s say that we are dealing with two classes, ‘Class X’ and ‘Class Y.’ If we say that class Y
inherits the members of class X
, then we would denote this inheritance relationship in the following syntax.
Here is a list of some important inheritance concepts that you always need to remember.
-
The class from which the features are inherited is the parent
class, and the class which inherits those said features is the child
class. For example, If ‘Class Y
’ inherits the members of ‘Class X,’
then ‘X
’ is the Parent and ‘Y
’ is the Child.
-
If class Y
inherits the members of class X
, then class X
is referred to as the ‘superclass,
’ and class Y
is referred to as the ‘subclass
.’
-
The process of ‘Inheritance
’ is sometimes also referred to as ‘generalizing
.’
-
If the inheritance relationship has multiple children, then the relationship of each child with each other would be termed as ‘siblings
.’ So, multiple classes that inherit their members from the same superclass are termed as ‘siblings
.’
Here’s an example of using the Inheritance feature, where multiple classes are inheriting the members of the ‘Radio Class
’, which, in this case, would be known as the parent class.
public interface IAudio
{
void AdjustVolume(int value );
}
public class Radio : IAudio
{
private int volume = 0;
void IAudio.AdjustVolume(int value)
{
volume += value;
}
public int Volume
{
get
{
return volume;
}
set
{
volume = value;
}
}
private double station = 94.1;
public double Station
{
get
{
return station;
}
set
{
station = value;
}
}
public void Receive()
{
}
}
public enum RadioBand
{
AM, FM
}
public class AMFMRadio : Radio
{
This might be a little confusing for you because there are multiple instances of inheritance going on, but the core concept remains the same. In this example, we have a parent class (superclass), ‘Radio
,’ and two child classes (subclasses), ‘CommunicationsRadio
’ and ‘AMFMRadio
.’ These sibling classes inherit the important members of their parent class in order to perform their own unique functions. For the ‘CommunicationsRadio
’ class, it would be to enable the functionality of transmitting and receiving radio signals, and for the ‘AMFMRadio
’ class, it would be to support different Radio Bands, i.e., Amplitude Modular Bands (AM) and Frequency Modular Bands (FM).
Encapsulation and Aggregation
Both ‘Encapsulation’ and ‘Aggregation’ indicate the affinity of a class (or any data structure) to be stuffed with members, but both these terms are not the same. While encapsulation refers to the affinity of a class to withhold members within itself, aggregation
includes those members that are classes themselves (or data structures). If the concept of encapsulation is still confusing, then consider an analogy. Think of the small leaflet that has small compartments holding medicine tablets. The medicine is ‘encapsulated’ in the leaflet. In this analogy, the ‘medicine’ is actually the ‘class,’ which has the methods, functions, and objects, and the leaflet represents the ‘encapsulation’ method. Through the use of encapsulation and aggregation, we can essentially put data in a class while controlling the authorization to access it. With encapsulation, we can add simple data types and structures. With aggregation, we can add more complex data types and structures inside a class.
However, we cannot just throw data randomly inside classes. We need to think about which class is the best container for our data. One way of going about this is to look through the list of classes available to you and determine which is the most suitable contender, i.e., which class is inherently responsible for holding a specific type of data. For example, if we consider the human lungs as ‘data,’ then it would make more sense to put them inside a ‘human
body (class)’ rather than in a plant (another class).
Let’s use the ‘Radio
’ class to explore how we can implement ‘Encapsulation’ and ‘Aggregation.’
public class BoomBox
{
private AMFMRadio radio;
public AMFMRadio Radio
{
get
{
return radio;
}
}
BoomBox()
{
radio = new AMFMRadio();
}
}
In this code block, we are working with a new class that we haven’t previously used called ‘BoomBox
.’ The interesting part is that this class actually contains the ‘AMFMRadio
’ class. As such, the ‘AMFMRadio’ class is representing the process of encapsulation as well as aggregation.
Polymorphism
The concept of ‘Polymorphism’ in C sharp is actually not that complicated. Polymorphism is basically involved when a programmer encounters a problem that can be handled by any general ‘provider.’ However, the catch here is that the provider must be part of a bigger set of providers. This means that our problem can be solved regardless of whichever provider we choose from this collection. This is known as ‘Polymorphism, but just understanding polymorphism from this perspective might not do you any good so let’s take a more technical approach.
First, let’s take a class and declare it as a general type. When we generalize a class, it basically inherits the type of its parent class (the superclass). If we want to take this class and create several instances and want each instance of the class to have a type, we specify and not a general type, this is our ‘problem.’ The notion of this being a ‘problem’ might seem silly, but it's to help you understand the concept of ‘polymorphism.’ We can solve this problem by choosing a type from a selection of different ‘types.’ Choosing any one type will solve the problem, but we still have a wide selection we can choose from. This is ‘polymorphism’ where we first declare a class of a ‘general type’ and then declare instances with specific ‘types.’ This phenomenon can be easily observed in the working of the ‘EventHandler
delegate
.’ The delegate is instructed in a way such that its initial parameter will be an object. Since this is the first parameter, the class harboring the object will be considered as a ‘root’ for all the upcoming classes that will be used. So, this means that the delegate can virtually take any object as the first parameter to satisfy the need to specify a root class.
Access, Class, and Member Modifiers
Let’s first talk about ‘Access Modifiers
.’ To put it simply, access
modifiers define what the users of a class can see and access. If the access modifier of a class is set to ‘private
,’ then the consumer will not be able even to see the class, much less try to access it. If the access modifier is set to ‘public
,’ then the consumer will be able to see the class as well as access its contents and make changes to it.
The practical use of access modifiers is allowing for guiding a user during their programming session. If someone is using your class in their code, then keeping those classes ‘private’ that do not require any attention from the consumer will focus the concentration primarily on the classes that have been purposefully kept ‘public’ by the producer. In this way, the producer ensures that the consumer only tinkers with those classes that need interaction in order to use them.
In C sharp, there are a total of five access modifiers that you can use. These access modifiers have been listed below, accompanied by brief explanations.
-
Public Access Modifier
: this modifier provides the end-user with the freedom to access the members of the corresponding class (this also includes the ‘types’ in the class as well).
-
Protected Access Modifier
: this access modifier is generally used with classes that are nested (a class within a class). As such, the subclasses (child classes) will be able to access the members of the superclass (parent class) and other classes within the nest, but the same level of access is not given to consumers. Instead, they will be restricted from accessing the members of the nested classes.
-
Private Access Modifier
: any members of a class that have a private access modifier cannot be accessed by any subclass (child class) or any other user except for the one who created the class.
-
Internal Access Modifier
: a class whose members and types have their access modifier specified to ‘internal
’ have their access restricted only to the assembly in which they are present. In this way, any external will not be able to access these classes, or members and the code will be able to communicate with the members and types of classes.
-
Protected Internal Modifier
: this access modifier is basically the result of slapping the protected modifier on top of
the internal modifier. Just as how a protected access modifier would generally be used in nested classes, the protected internal modifier is mostly used with nested types as well. Only the assembly has unrestricted access to the members of the nested classes in a protected internal modifier.
However, there are some rules you need to follow when using access modifiers in order to avoid generating errors.
-
Whenever you are defining a high-tier type, its access modifier must always be specified to ‘Public.’ Otherwise, it will surely cause complications when other types need to communicate with the high-tier type. If you do not want to use the ‘Public’ access modifier, then the only other option you have is to use the ‘Internal’ access modifier.
-
Whenever you are dealing with nested classes or types (in a nested class, a class contains another class. Similarly, a nested type is a type that holds the definition of another type), you have to choose between either using the ‘Private’ access modifier or the ‘Protected’ access modifier.
-
Even though ‘Protected Internal’ is a combination of two access modifiers (protected and internal), it is highly advised to avoid combining any other access modifiers in this way.
-
If a class or a type is not specified with any access modifier, then a ‘default access authorization’ will be given to the corresponding members, but it is not recommended to rely on this. Producers should always specify the appropriate access modifier.
The concept of using modifiers with Classes and Members has already been discussed in one way or the other when we talked about access modifiers. Regardless, if you find that the class you have defined is enclosed within a namespace, it is best to set its access modifier to either ‘Public’ or ‘Internal.’ When working with nested classes, your options are limited as to which access modifiers you can use to define them. These options include ‘protected, protected internal or private’
access modifiers.
Members give the producer the freedom of assigning any access modifier to them. If you do not specify any access modifier, then it will be set to private
by default.
Reflection
This is basically a functionality that is largely used in the .’NET Framework
.’ By using ‘reflection,’ a user can explore a program’s assembly to extract data in the code, which can include.
-
Namespaces
-
Interfaces
-
Classes
-
Methods
-
Properties
-
Fields
Apart from that, reflection is an extremely useful object-oriented function that allows users to:
-
Execute ‘IL
’ (Intermediate Language) code during a program’s run-time.
-
Use special methods that allow for the viewing of metadata values recorded in attributes.
-
Do some detective work, for instance, exploring the types defined in the corresponding assembly and uncovering the members.