The program-level Preferences and the Color Settings flavor all your work in Photoshop. The options that you choose in Photoshop’s Preferences (or simply the Prefs) control many facets of the program’s basic behavior. Choices made in the Color Settings dialog box determine how your work looks, both on-screen and in print. And when you get down to brass tacks, that’s what it’s all about — the appearance of your artwork.
Standing orders: Setting the Preferences
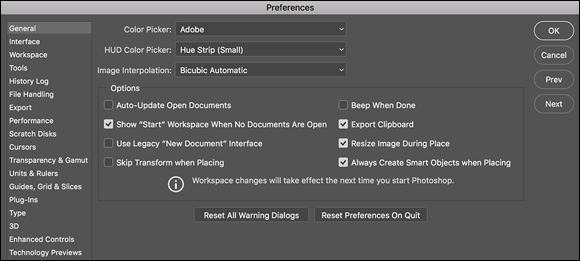
Photoshop’s Preferences file stores a whole lot of information about how you use the program. Whether you prefer to measure in inches or pixels, how you like the grid and guides displayed, what size thumbnails you prefer in your panels, which font you used last — all sorts of data is maintained in the Prefs. Much of the info in the Preferences is picked up automatically as you work (such as the size and color mode of the last new document you created, whether the Character panel was visible when you last shut down the program, and which tool options were selected in the Options bar), but you must actively select a number of options in the Preferences dialog box, as shown in Figure 3-10.
 Many of Photoshop’s handy reminder messages include a Don’t Show Again option. If you someday decide that you do indeed need to start seeing one or more of those reminders again, open the Preferences and click the Resent All Warning Dialogs button at the bottom of the General pane.
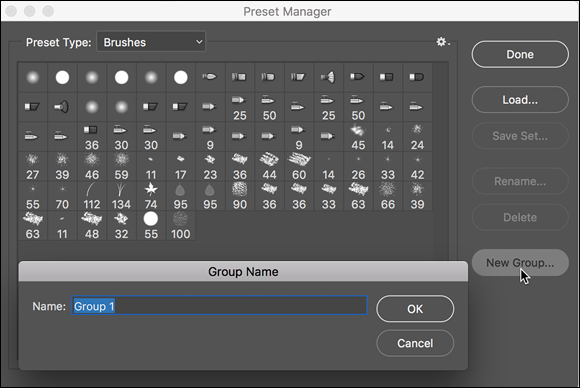
 Your custom styles, brushes, Actions, and the like are recorded only in Photoshop’s Preferences until you actually save them to your hard drive. That makes them vulnerable to accidental loss. Use the Actions panel menu command Save Action to save sets of Actions (not individual Actions) and use the Preset Manager (under the Edit ⇒ Presets menu) to save sets of your other bits and pieces. And make sure to save them in a safe location outside the Photoshop folder — you wouldn’t want to accidentally delete your custom items if you should ever have to (oh, no!) reinstall Photoshop, would you?
Open the Preferences on a Mac with the keyboard shortcut ⌘ +K or choose Photoshop ⇒ Preferences to select one of the 17 specific subsets of Preferences to change. The shortcut for Windows users is Ctrl+K, and the Preferences submenu is under the Edit menu. The default settings are perfectly acceptable (after all, they are the defaults for a reason), but the following sections cover some changes to the Preferences to consider, listed by the section of the Preferences dialog box in which you find them.
Some of the changes you make in Photoshop’s Preferences are applied as soon as you click OK. Other changes don’t take effect until you restart the program. (You’ll get a reminder about that.)
Preferences ⇒ History Log
The History Log maintains a record of what you’ve done to a specific image. You can record when you opened and saved a file with the Sessions option, see a summary of what you did with the Concise option, or keep track of every command, every feature, and every setting you used with the Detailed option! And the log can be recorded to a text file or stored in an image’s metadata for retrieval by choosing File ⇒ File Info.
Preferences ⇒ Tools
One option not selected by default that you may find very handy is Zoom Clicked Point to Center. When you click with the Zoom tool, this option automatically centers the view on the point where you clicked.
When using the transform commands, Photoshop shows you numerically precisely what you’re doing. A small display shows the new dimensions (when scaling) or the angle (when rotating or shearing). You may find that to the upper right of the cursor isn’t a good location (perhaps while using the stylus in your right hand on a Wacom Cintiq tablet). Change the location — or select Never to hide the info completely.
If you’re working with a machine that offers Gestures (pinching to zoom, three-finger swipe, and so on) and you like using Gestures, you can use them in Photoshop.
Preferences ⇒ Interface and Preferences ⇒ Workspace
The Interface and Workspace panels of the Preferences offers several options of note:
- Appearance: You may find that Photoshop’s “dark interface” is not to your taste. (Try it for a while — it’ll likely grow on you.) You can select from among two lighter (and one even darker) interface appearances.
- Screen Modes: You can easily customize the look of Photoshop’s three screen modes.
- UI Font Size: If you find yourself squinting to read panel names and such, change the UI Font Size to Large and restart Photoshop. If you still have problems reading the screen, reduce the monitor’s resolution. (See Chapter 2 for details.)
- Show Channels in Color: When only one channel is active in the Channels panel, it normally shows a grayscale representation of the image. If you prefer to have the active channel appear in its own color, select this option. Keep in mind, however, that after you get comfortable working with individual channels, the default grayscale is easier to see.
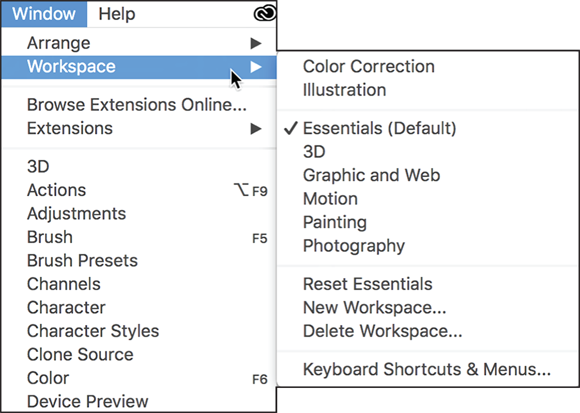
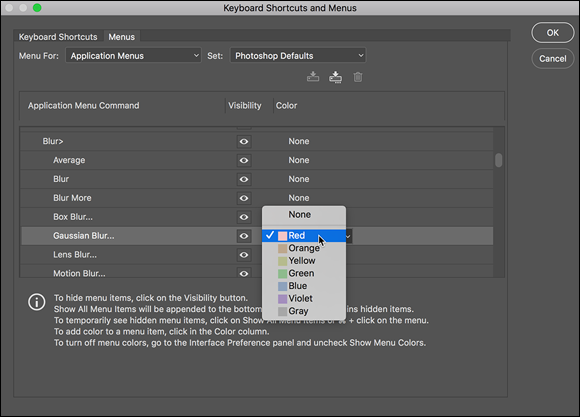
- Show Menu Colors: As I discuss earlier in this chapter, you can assign colors to specific commands in the Photoshop menus. That might make it easier for you to quickly spot and select often-used commands. Use this option to disable the color coding without having to deselect each assigned color.
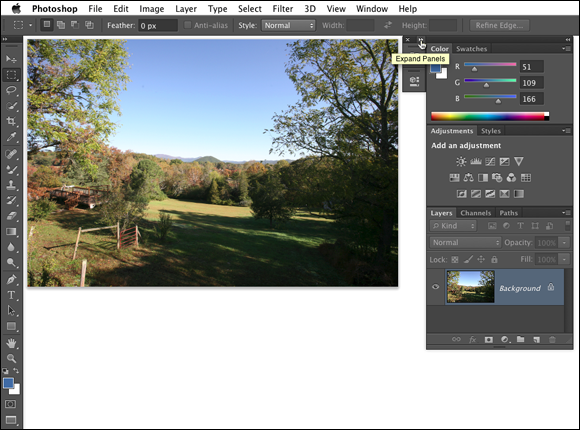
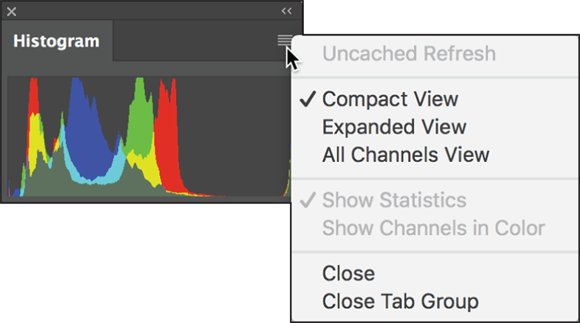
- Auto-Collapse Iconic Panels: If you prefer an uncluttered workplace, here’s a great option for you! When selected, panels in icon mode (click the upper bar of a group of panels) collapse to buttons. To open a panel, click its button. When Auto-Collapse is selected, the selected panel automatically closes when you click elsewhere in Photoshop. If you need to keep a specific panel open while you work (perhaps Histogram or Info), drag it out of its group and away from the edge of the screen, and it will stay open until you close it.
- Auto-Show Hidden Panels: Position the cursor over a collapsed panel and it springs open.
- Open Documents as Tabs: Photoshop, by default, opens each document as a tab across the top of the work area. You click a tab to bring that image to the front. If you find that you’re constantly dragging tabs off to create floating windows, deselect this option in the Preferences. And if you disable tabbed image windows, you’ll likely also want to disable the Enable Floating Document Window Docking option. This prevents image windows from docking as you drag them around on-screen.
Preferences ⇒ File Handling
Image previews add a little to the file size, but in most cases, you want to include the preview. On Macs, you have the option of including a file extension or not (or having Photoshop ask you each and every time). Even if you don’t plan on sharing files with a Windows machine, I strongly recommend that you always include the file extension in the filename by selecting the Always option. Likewise, I suggest that you always maximize PSD and PSB file compatibility. This ensures that your Photoshop files can be opened (with as many features intact as possible) in earlier versions of the program and that they’ll function properly with other programs in the Creative Cloud. Maximizing compatibility can be critical if you also work with Adobe’s Lightroom CC.
Photoshop includes an auto-recovery feature, one that doesn’t compromise the creative process. If, as with some programs, your open file was simply saved to your hard drive at specific intervals, overwriting the original, your artistic experimentation could be limited to that specified time frame. Say, for example, that you tried a specific artistic filter, took an important phone call, and later found out that the program had rewritten the file on your hard drive and that experimental filter has become a permanent part of your artwork. But you decided you don’t like it after all. Bummer! (Or simply Undo, of course.) Rather than taking such risks with your creativity, Photoshop now can save recovery information, which doesn’t affect the original file in any way, at intervals specified in the Preferences. Or you can disable the feature by deselecting the check box.
Preferences ⇒ Performance
The Performance panel contains options related to how Photoshop runs on your computer:
- Memory Usage: Try bumping the memory allocation to 100%. If things seem slower rather than faster, back off the memory allocation to perhaps 85%. In a 64-bit environment, Photoshop can take advantage of all the RAM you can cram (into the computer).
- History States: This field determines how many entries (up to 1,000) appear in the History panel. Storing more history states provides more flexibility, but at a cost — storing too many history states uses up all your available memory and slows Photoshop to a crawl. Generally speaking, 20 or 30 is a good number. If, however, you do a lot of operations that use what I call “little clicks,” such as painting or dodging/burning with short strokes, that History panel fills quickly. For such operations, a setting of perhaps 50 or even 60 is more appropriate.
- Cache Levels: The image cache stores low-resolution copies of your image to speed on-screen display at various zoom levels. Although this process speeds up screen redraw, the price is accuracy. Unless your video card has trouble driving your monitor at your selected resolution and color depth, you might be better served by Cache Levels: 1. That gives the most accurate picture of your work. (But remember to make critical decisions at 100% zoom, where one image pixel equals one screen pixel.)
- Graphics Processor Settings: This area displays information about your computer’s video card. If your system has the capability, you’ll see a check box for Use Graphics Processor. This provides smoother, more accurate views at all zoom levels and other enhancements, including the capability to rotate the image on-screen — not rotate the canvas, but rotate just the on-screen image. And that’s too cool for words when painting a complex layer mask!
Preferences ⇒ Scratch Disks
 Photoshop’s scratch disks are hard drive space used to support the memory. Use only internal hard drives as scratch disks — never an external drive, a network drive, or removable media! If you have multiple internal hard drives, consider a dedicated partition (perhaps 15–50GB) on the second drive — not the drive on which the operating system is installed. Name the partition Scratch and use it exclusively as a scratch disk for Photoshop (and perhaps Adobe Illustrator). If you have a couple of extra internal drives, each can have a scratch partition. (On a Windows computer, you might see a message warning you that the scratch disk and the Windows paging file, which serves the same basic purpose at the system level, are on the same drive. If you have only one internal hard drive, ignore the message.) To re-order the scratch disks, click the scratch disk in the list and then, rather than dragging, use the arrows keys to the right.
Preferences ⇒ Cursors
Photoshop offers you a couple of ways to display cursors for painting tools. You can show the tool icon (Standard), a small crosshair (Precise), or a representation of the tool’s brush tip, indicating the size and shape of the brush (Brush Size). With soft-edged brushes, the brush size cursor shows where the tool will be applied at 50% strength or higher. Alternatively, select the Full Size Brush Tip option, which always shows the full extent of the brush tip, regardless of the Hardness setting.
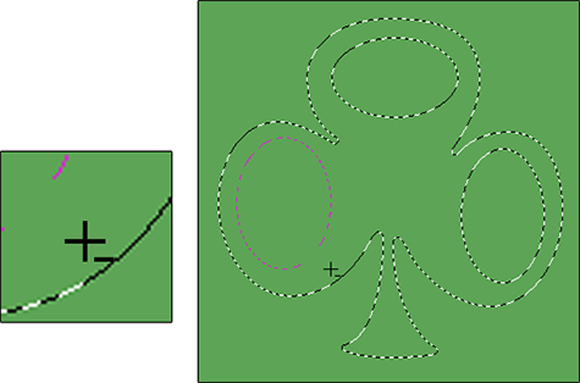
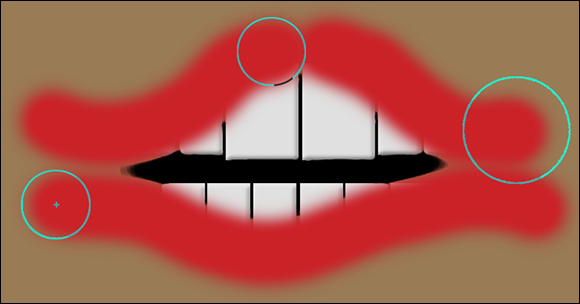
You also have the option of adding a crosshair in the middle of either brush-size cursor. The crosshair option is great for keeping a brush centered along an edge or path, and it just about eliminates the need for the Precise cursor option. As you can see in Figure 3-11 when working with a soft brush, showing all the pixels that are changed even a little (to the right) might not give you an accurate view of your work. (The Normal Brush Tip cursor is shown at the top center and the Show Crosshair in Brush Tip option can be seen at the lower left.)
When the Show Only Crosshair While Painting option is selected in Preferences, the brush cursor appears at the selected diameter display (Full Size or Normal) until you press the mouse button (or press the stylus to the tablet). It then automatically switches to the crosshair and remains as a precise cursor until you release the mouse button (or lift the stylus). Experienced brush-tool-using Photoshoppers might want to experiment with this option — if you know the diameter, you might want to better focus on the center of the brush when you are, for example, painting or dodging or burning along a distinct edge.
When you’re sure that you have a brush-size cursor selected in the Preferences but Photoshop shows you the precise cursor, check the Caps Lock key. Pressing Caps Lock toggles the painting cursors between Precise and Brush Size.
Also found in the Cursors panel is the Brush Preview color. Click the color swatch to open the Color Picker and assign a color to use when dynamically resizing your brushes. (If you don’t have OpenCL drawing capability, the brushes can still be resized, but the color preview will not be visible.) With a brush-using tool active, press and hold down the Option+Control keys on a Mac and drag left or right; on a Windows machine, Alt-right-click and drag left or right to resize the brush — on the fly! Want to change the brush hardness? Hold down those same keys and drag up or down rather than left or right.
Preferences ⇒ Transparency & Gamut
If you work in grayscale regularly, you might want to change the color of the transparency grid to something that contrasts with your image; perhaps pale blue and pale yellow. If you find the gray-and-white checkerboard pattern distracting in images with transparency, you can set Grid Size to None, which gives you a plain white background in transparent areas of your artwork.
Preferences ⇒ Units & Rulers
If you create web graphics rather than print images, you probably want to change the unit of measure from Inches to Pixels. Keep in mind that you can change the unit of measure on the fly by right-clicking the rulers in your image (which you show and hide with the shortcut ⌘ +R/Ctrl+R). If you regularly print at a resolution other than 300 ppi, you might also want to adjust the default resolution for print-size new documents.
Preferences ⇒ Guides, Grid & Slices
Photoshop offers Smart Guides, which appear and disappear automatically as you drag the content of one layer into and out of alignment with the content of other layers. Smart Guides (magenta in color by default) show when the content of the layer you’re dragging aligns perfectly with the edges or center of other layers’ content. See Figure 3-12. (Show/hide Smart Guides through the View ⇒ Show menu. They are active by default now.)
Preferences ⇒ Plug-Ins
Extensions are panels created outside of the Adobe Photoshop development process that you can download or purchase. Allowing them to connect to the Internet to search for new content may or may not be a good idea, depending on your level of network security. I’m not suggesting that a panel could steal your passwords or anything like that, but unless you trust the source of the panel …
The creative filters of the Filter Gallery are not listed individually in the Filter menu. You open the Filter Gallery, and then select the filter you need. If you would rather have the Filter Gallery open directly to the filter you need, select Show All Filter Gallery Groups and Names option and restart Photoshop.
Preferences ⇒ Technology Previews
One of the several new Preferences panes is Technology Preview. Depending on which platform you use, your choices vary. Take a couple of moments (when you have time) to click the Learn More button to find out what the new technologies are all about.
Photoshop’s Preferences menu also provides you with direct access to the Camera Raw plug-in’s Preferences. In Camera Raw’s Preferences you can, among other things, determine whether JPEG and TIFF files open into Camera Raw. (Camera Raw is discussed in Chapter 7.)
Ensuring consistency: Color Settings
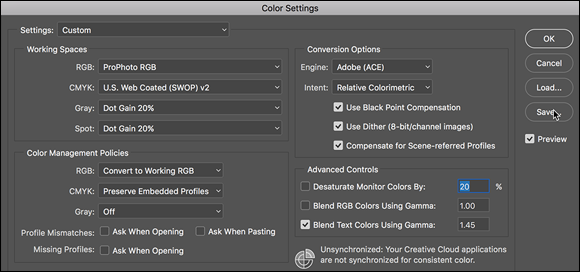
If one term strikes fear deep in the heart of a typical Photoshop user, it’s color management. Few aspects of the program are so misunderstood. Yet without wise color management decisions, your images won’t print accurately. For most Photoshop users, color management can be implemented with a few key choices in the Edit ⇒ Color Settings dialog box (shown in Figure 3-13), which can then be saved for future use:
- Select an RGB working space. Open the Color Settings dialog box (under the Edit menu) and select your RGB working space, the color space in which you edit and create. If you primarily create web graphics, shoot in the JPEG format, send your images to a photo lab for printing, or print with an inkjet printer that uses only four ink colors (cyan, magenta, yellow, and black), choose sRGB as your color space. If you shoot Raw and print to an inkjet printer that uses six or more inks, or if you prepare artwork that will be converted to a CMYK color space, choose Adobe RGB. (If you have hardware and software to create a custom profile for your computer’s monitor, use that profile at the system level so that it’s available to all programs.)
- Elect to convert images to your working space. In the Color Management Policies area of the Color Settings dialog box, choose RGB: Convert to Working RGB. This ensures that the images you see onscreen actually use your working profile.
- Turn off the mismatch warnings. Clear the check boxes for those annoying and time-wasting warnings that pop up on-screen any time you open an image with a profile other than your working space. You’re intentionally converting to your working space — you don’t need to reaffirm the decision every time.
- CMYK and Grayscale settings: CMYK (cyan/magenta/yellow/black) color mode is used exclusively with images intended for output on commercial printing presses and some color laser printers. (Don’t be fooled by the inks you purchase for your inkjet printer — the printer’s driver expects to convert from RGB, so sending CMYK color to an inkjet will produce substandard output.) Likewise, you’ll use Grayscale very rarely. If, in fact, you have an inkjet printer that is capable of printing grayscale (such as the magnificent Epson Stylus Pro 7900), you may still want to have an RGB image and let the printer’s print driver handle the grayscale conversion. If, however, you are preparing an image for output on a commercial press (in CMYK or Grayscale color mode), speak directly with the person who will place the image into the page layout or with the print shop to find out what settings to use for that particular job.
The preceding guidelines are appropriate for most, but not all, Photoshop users. You might fall into a special category. If you exclusively create web graphics, set the RGB color management policy to Off. In the Save for Web & Devices dialog box, when saving images in the JPEG file format, don’t embed ICC profiles. (ICC profiles make specific adjustments to the appearance of your images to compensate for vagaries of the hardware. I discuss color profiles in Chapter 4.) When you eliminate color profiles from the equation, you’re creating web graphics that any web browser can show properly (or, more accurately, “as properly as the viewer’s uncalibrated monitor can display”).
When it’s time to print, you’ll get the most accurate and pleasing color prints when you let Photoshop (rather than the printer) control color. In the Print dialog box’s Options area, choose Color Handling: Photoshop Manages Colors and select the printer’s own profile for the specific paper on which you’re printing as the Printer Profile. Use Relative Colorimetric as the rending intent and leave the Black Point Compensation check box selected. (Note: If your prints are too dark, try deselecting Black Point Compensation.) Click the Print Settings button to open the printer’s own options. Make sure to deactivate the printer’s built-in color management and select the same paper you chose to the right in Photoshop’s Print dialog box.
If you send your image files to an outside source for prints, they will likely require JPEG files using the sRGB color profile. Check the company’s website (or give them a call) and see if, instead, you can send TIFF files in Adobe RGB. That avoids the image degradation produced by JPEG’s compression and extends the color range for the images.
If color in your images needs to be absolutely perfect because merely accurate won’t do, consider purchasing hardware and software to calibrate and profile all the devices in your workflow. X-Rite (www.xrite.com), Datacolor (www.datacolor.com), and PANTONE (www.pantone.com) are three sources to explore.
 Understanding the general guidelines for working in Photoshop
 If you’re upgrading from an earlier version of Photoshop, you may notice the ellipse near the bottom of the Toolbox. Click that and you can customize the Toolbox to optimize it for your workflow.