Importing and Enhancing Video Clips
The heart of Photoshop’s video capabilities is the Timeline panel. You also have the 12 commands of the Layer ⇒ Video Layers menu, a special Motion workspace, and even a set of Actions named, appropriately, Video Actions, all designed to make your work with video both easier and more precise.
Getting video into Photoshop
Getting ready to work with video in Photoshop is as easy as opening any file into Photoshop. Choose File ⇒ Open, select the video file, click OK, and you’re on your way! (An open video in the Timeline panel is visible in Figure 17-1.) If you want to restrict the list of files in a folder to only video (or only audio) formats, select Video (or Audio) in the Enable menu at the bottom of the Open dialog box. You can also create a video project starting with one of Photoshop’s video presets in the File ⇒ New dialog box. Photoshop supports dozens of video, audio, and still image file formats with which you can create your cinematic masterpieces.
After you have your project started, whether from an existing video file or a new document, you have a couple of options for adding additional clips, tracks, and images:
- Click the plus button at the right end of the existing video (or audio) track in the Timeline panel. You’ll add an additional segment to the end of that track. (The plus button is visible at the right end of each track in Figure 17-2.) You’ll navigate to and select the file in the Add Media dialog box, comparable to the Open dialog box, and it will be added at the end of the existing segment. (You can easily add transitions between the segments, as described later in this chapter.)
- Click the button to the right of the video group name and select Add Media. This button also opens the Add Media dialog box.
- Create a new video layer. Choose Layer ⇒ Video Layers ⇒ New Video Layer from File, which also opens the Add Video Layer dialog box.
- Copy/paste from another open file. If you have several segments on a track, the pasted media will be added after the highlighted segment, rather than at the end of the track.
- Place a file. Use the File ⇒ Place command to add media as a Smart Object to the selected track. If no track is selected, the Smart Object is added outside the existing video group.
Using either of the first two techniques or the Place command to add a new segment automatically assigns the added file’s name to the segment in the Timeline panel and to the layer in the Layers panel. Creating or pasting media uses the next sequential layer number in both the Layers panel and the Timeline panel.
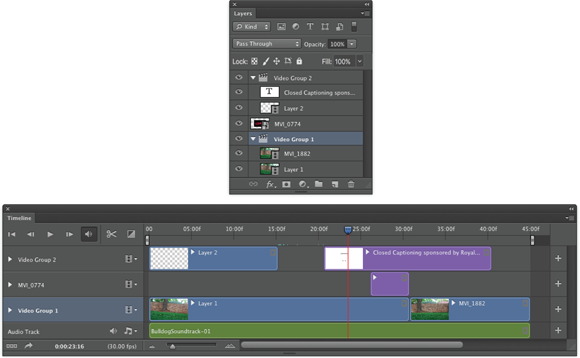
When you open a video file, Photoshop automatically creates Video Group 1 in both the Layers panel and the Timeline panel, as you can see in Figure 17-2. Video groups not only help keep the content of the panels manageable, they also enable you to work with multiple tracks simultaneously. When you create a new document and paste or place media, you can manually create video groups through the button to the left of a track in the Timeline panel.
As you can see in Figure 17-2, segments in different video groups and layers outside of groups can overlap in the timeline. Much like creating an inanimate image using layers in Photoshop, the position on canvas, along with the layer opacity and blending mode, determine how the elements in the Timeline panel interact. The playhead, the blue slider at the top of the timeline whose position is also indicated by the vertical red line, shows what frame of the video is visible on-screen at any given moment.
 You can scale the timeline in the Timeline panel using the slider in the middle at the bottom of the Timeline panel. Drag to the left to see more of the timeline; drag to the right to zoom in and work with precision.
Adjusting the length of video and audio clips
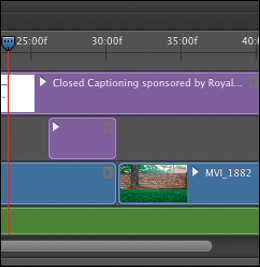
After clips are added to the Timeline panel, you can change each segment’s length, start point, end point, and the order of play by dragging. Position the cursor in the middle of a clip and drag to rearrange the order of segments on a track. You can also change the order in which segments play within a video group by changing the stacking order in the Layers panel. Click the start or end of a segment and drag to “trim,” changing what part of the segment plays. The cursor changes to a square bracket with a two-headed arrow when positioned over either end of a segment, as shown in Figure 17-3 on the upper video segment. (The video within the segment to the left of the new start point or, in this example, to the right of the new end point is not deleted — you can later drag the start and end points to change what part of that segment that plays.) For precision, you can also drag the playhead to a specific point on the timeline and right-click the playhead or use the Timeline panel’s menu commands to trim or assign the start or end point for a segment.
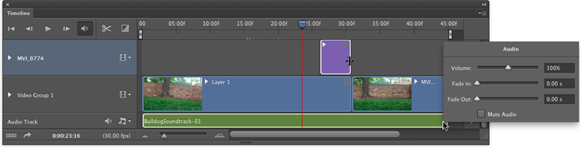
Likewise, you can adjust the start and end points of audio tracks and audio segments. Use the Plus button at the right end of the audio track to add another audio segment to that track, or click the musical note button to the left of the track to add another audio track. You can add music and other audio in a variety of formats to Photoshop’s Timeline panel. (I don’t need to remind you that recorded music, just like your own photographs, is copyrighted material, right?) Click the gray arrow button at the right end of the audio segment to open the Audio fly-out panel (visible in Figure 17-3), in which you can elect to have the audio fade in and/or out, as well as set the volume for that audio segment.
The start and end of the work area, which determine what part of the entire video will play, can also be set by right-clicking the playhead or through the panel’s menu. Alternatively, set the work area by dragging the sliders to the left and right ends of the timeline, visible in Figure 17-3 at the ends of the timeline at 00 and 45:00.
Adding adjustment layers and painting on video layers
Adjustment layers, not surprisingly, can be added to a video production through the Layers panel or the Layer menu. As with regular layers, an adjustment layer is applied to all video layers below the adjustment layer and within the video group. An adjustment layer can be clipped to a single video layer by Option/Alt+clicking in the Layers panel on the line between the adjustment layer and the video layer immediately below. You might, for example, want one segment of a track to appear as grayscale by adding a Black & White adjustment layer in the Layers panel and clipping it to the video layer below it.
You can use many of Photoshop’s painting tools when working with video, including the Brush tool and the Clone Stamp tool. Unless you have a problem on one specific frame of video, you’ll want to consider working on a new layer. Keep in mind that there’s a major difference between adding a regular layer (choose Layer ⇒ New ⇒ Layer) and adding a new video layer (choose Layer ⇒ Video Layers ⇒ New Blank Video Layer). A video layer has frames, just like a video captured by a camera, whereas a regular layer is static — its appearance remains the same for whatever duration you specify in the Timeline panel.
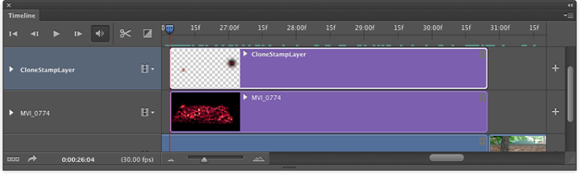
Say, for example, that you had a dust speck or a water spot on your lens when capturing video (not that that ever happens). Working with a still image in Photoshop, you might simply use the Clone Stamp to cover that unsightly set of pixels with other nearby pixels. Say also that you captured, oh, maybe three minutes of high-definition video. At 30 frames per second. For a total of 5,400 frames. That’s a lot of cloning.
 If you clone on the video layer itself or on a new video layer, you’ll need to do each frame individually. Instead, if the area is rather similar in each frame, you can add a new regular layer above the problematic video segment and, on the Options bar, set the Clone Stamp tool to sample the current layer and the layer immediately below. Clone once, covering the despicable speck or spot on the new layer, and then in the Timeline panel, drag the “start” and “end” points for that layer to match those of the video segment. (See Figure 17-4.) When played back or rendered, the cloned area covers the flaw on the video layer — every frame fixed with a single clone! (Remember to set the playhead at the beginning of the video segment that needs fixing before Option/Alt+clicking with the Clone Stamp tool to set the source point.)
Transitioning, titling, and adding special effects
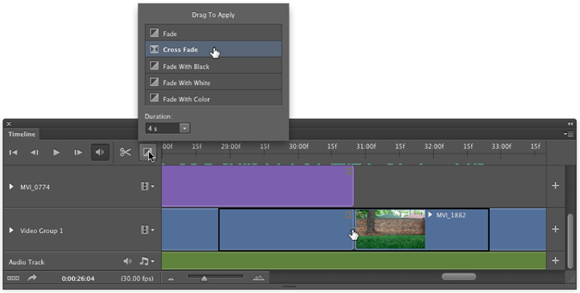
When working with multiple video segments, you’ll generally want your movie to smoothly blend from one clip to another with a transition. Photoshop’s Timeline panel offers a number of built-in transitions that you can drag between segments on a single track. Click the button immediately to the left of the timeline in the Timeline panel, select the transition, specify the duration for the transition, and then drag the transition onto the track between the two video segments. (See Figure 17-5.) When played back or rendered, the two video segments blend into each other using the selected transition for the specified duration.
Adding a title to the beginning of your cinematic extravaganza (and, of course, your name in the Director and Producer credits at the end) is as easy as adding a type layer and specifying the layer’s duration in the Timeline panel. You can also add shapes to a video with the various shape tools, just as you would in any other artwork.
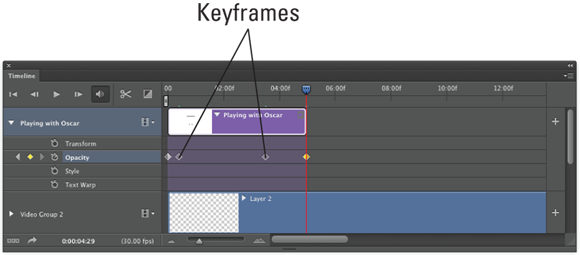
To add some spice to your titles and shapes, consider using keyframes to control the opacity, position, and even size of the type layer. A keyframe is a marker in the timeline that specifies when a specific event begins and ends. You might, for instance, want the title of your movie to fade in quickly, remain on-screen while the first frames of the video play in the background, and then slowly fade away. (To get such an effect, you’d set your keyframes as shown in Figure 17-6.)
Visible in the timeline in Figure 17-6 are the diamonds that represent keyframes, which I created using these steps:
-
Add the type layer. Select the Type tool, specify the font, size, and other attributes on the Options bar or Character panel; click in the image window and type your text. End the text editing session by clicking the check mark at the right end of the Options bar, by changing tools, or by pressing ⌘ +Return or Ctrl+Enter.
In the Layers panel, make sure that the type layer is above your video layers and outside any video group.
-
Position the type layer. Drag the type layer into the position in the image window where you want it to first appear.
You’ll also want to drag the left edge of the layer in the Timeline panel to the position along the timeline where you first want it to appear.
- Specify the duration. Click the right edge of the type layer segment in the Timeline panel and drag to the point where you want the title completely gone from the screen.
-
Expand the options for that track. Click the triangle to the left of the type layer’s name in the left column of the Timeline panel.
The options are expanded in Figure 17-6.
-
Add the first opacity keyframe. Position the playhead at the beginning of the title segment, and then click the stopwatch button to the left of the word Opacity.
That adds the first keyframe at the playhead position.
-
Set the opacity in the Layers panel.
In this example, because we want the title to fade in, set the layer’s Opacity to 0%.
-
Set the second keyframe. Move the playhead to the point in the timeline where you want the title to be completely visible. Click the diamond-shaped button between the arrows to the left of Opacity in the left column of the Timeline panel.
Keep in mind that you can switch the Timeline Unit between Frame Number and Timecode in the Timeline panel’s options, which you access through the panel’s menu.
- Set the opacity in the Layers panel. So that the type layer is completely visible, set the Opacity to 100%.
- Add the next keyframe. Drag the playhead to the point in the timeline where you want the title to start fading out, and then click the diamond-shaped button to add the keyframe.
-
Set the Opacity. Well, okay, we want the opacity still set to 100% at this point, so you don’t need to change the Opacity in the Layers panel after all.
If, however, you want a different opacity value at this keyframe, you can set the opacity as desired in the Layers panel.
- Add the last keyframe. Move the playhead to the right end of the title segment and click the diamond-shaped button to add the last keyframe.
- Reduce the opacity. In the Layers panel, set the Opacity field back to zero.
Drag the playhead to the beginning (or click the button in the upper-left corner of the Timeline panel), and then click the Play button to preview. Your title will fade in between the first pair of keyframes, remain at 100% opacity between the second and third keyframes, and then fade out between the third and fourth keyframes. Whatever other tracks you have in the Timeline continue to play.
Notice that you have several other keyframe-controlled options for the type layer in the left column of the Timeline panel. You could, perhaps, use keyframes to control a text warp, perhaps an arc or bulge. You could also use keyframes in conjunction with Photoshop’s Edit ⇒ Transform commands to control the appearance of the type layer. You might, for example, use the Scale command to make your type layer go from a size of two or three points to filling the entire image window, making it appear to zoom in from a distance. Using keyframes to control the Transform ⇒ Rotate command can make the type layer spin over time. And, of course, these effects can be used in conjunction with each other, so the title could zoom in from a distance, while spinning and fading in to 100% opacity. (Click the triangle to the left of a video group in the left column of the Timeline panel and you’ll see the keyframe-controlled options for video tracks.)
Transforming video layers
So, how about transforming video clips, scaling or rotating a video segment for special effects? Simply convert a video group or video layer to a Smart Object by selecting it in the Layers panel and choosing Layer ⇒ Smart Objects ⇒ Convert to Smart Object.
Keep in mind, too, that after converting a video group or video layer to a Smart Object, you can work with Smart Filters. Consider, if you will, a video clip captured under low-light conditions at high ISO. After adding your Curves or Levels adjustment layer to lighten up the video segment, you may find an unacceptable amount of digital noise. You could use the Reduce Noise filter, click the Next Frame button, use the Reduce Noise filter, click the Next Frame button, and use the — well, you get the idea. Instead, convert the video layer to a Smart Object and apply the Reduce Noise filter as a Smart Filter, reducing noise in all frames of the video segment. (Reduce Noise is just one example of Smart Filters that can be effectively used with video clips.)
The Timeline panel also has some nifty effects built right in, including Pan, Zoom, Rotate, and the combinations Pan & Zoom and Rotate & Zoom. These effects are applied to any video or other layer through the Motion fly-out panel, which you open by clicking the small gray arrow at the right end of a segment in the Timeline panel.
But what if you want to apply the effect to only a portion of a video segment? Position the playhead at the point where you want to make a change and click the Split at Playhead button (to the left of the Transitions button in the left column of the Timeline panel) or use the panel’s menu command of the same name. The segment is divided at that point. If the video layer is within a video group in the Layers panel, it’s simply divided into two segments. If the video layer is outside a video group, the portion to the right of the playhead is cut to a separate video track. If you split a Smart Object, you’ll create a pair of Smart Objects, both with any Smart Filters that had already been applied.
Rendering and exporting video
You’ve added all of the video tracks, dragged transitions between segments, created a title with keyframe-controlled special effects, and adjusted your audio to perfection. Now what? Save the file in the PSD file format to preserve all of your editing options, of course. But to actually use the video in any other program, or to share it with others, you’ll need to use Photoshop’s File ⇒ Export ⇒ Render Video command.
You select a filename and location in the top section of the Render Video dialog box. In the middle section, elect to use Adobe Media Encoder to create a video. (You also have the Photoshop Image Sequence option to create a still image from each frame of the video.) Your video file format options include QuickTime (great for video on a variety of platforms), H.264 (a standard for high-definition video), and DPX (digital picture exchange, often used for video that will be further processed in another program). Each format offers a variety of presets. QuickTime, for example, lets you select a compression scheme and enables you to change the dimensions and frame rate of the final video. With H.264 selected, the Presets menu includes device-specific output settings for iPads, iPhones, Android phones and tablets, a variety of high-definition TV standards, NTSC, PAL, and even YouTube.
Near the bottom of the Render Video dialog box, you’ll have the option of specifying a range of frames, if you don’t want to render the entire video. If your masterpiece includes an alpha channel (QuickTime only) or 3D objects, you’ll also be able to specify how those elements are rendered.
After clicking the Render button, Photoshop will export the video in the selected format, with the selected presets, using the selected filename and location. How long it takes to export the video depends on a number of things, including your hardware, the length of the video, and the preset selected.
Creating Animations in Photoshop
In addition to timeline video, Photoshop provides everything you need to create frame-based animation for use on web pages and in presentations.
Building frame-based animations
Although it is certainly possible to start with a video clip or even a photo when creating a frame-based animation, you may find such projects are better suited to shapes and text. You can certainly export a frame-based animation as a QuickTime video, but to post on your website, you’re more likely to use Save for Web to generate an animated GIF. (Remember that the GIF file format uses a color table limited to no more than 256 colors, so it’s not generally appropriate for photographic or other continuous-tone images.)
Prior to generating the individual frames of your animation, you’ll usually want to create all of the elements from which those frames will be created. Keeping each element on a separate layer makes frame creation a very simple process. After you have all of the elements you’ll need, open the Timeline panel through Photoshop’s Window menu and take a look at the lower-left corner of the panel. If you see the word Once or Forever with a downward-pointing arrow to the right, you’re ready to get started. If you see a button with three little boxes lined up horizontally like (ready for it?) frames in a movie, click the button to switch the panel from video timeline to frame animation. (If, for another project, you need to reconfigure the Timeline panel for video timeline, click the button in the lower-left corner.)
In a nutshell, here’s how you create a frame-based animation in Photoshop:
-
Show/hide layers in the Layers panel. Set the Layer panel content to show those elements you want visible in the first frame of the animation.
If you want the animation to start with an empty screen, hide all the layers.
-
Click the New Frame button.
Below the frames in the Timeline panel are a number of buttons. The New Frame button is second from the right, next to the Trash icon (which is used, naturally enough, to delete frames).
-
Rearrange the content of the Layers panel.
Show/hide layers, move layer content, and otherwise rearrange the image window to set it the way you want for the second frame.
-
Repeat as desired.
Click the New Frame button, rearrange the items, click the New Frame button, rearrange, and so on until you have all of the frames you want for your animation.
-
Use Save for Web to create an animated GIF or export as a QuickTime movie.
And you’re done! (Make sure to save the layered document in the PSD file format, just in case you want to make changes or use some of the elements in another animation down the road.)
Creating frame content
If each frame of the animation was identical, there would be no reason to create an animation — it would appear to be a still image. So, from frame to frame, something is usually different to provide the change-over-time that’s the basis for animation. Among the changes you can make in the Layers panel to change the appearance of the animation from frame to frame are
- Layer visibility: You can show or hide the content of a layer.
- Layer opacity: By changing a layer’s opacity from frame to frame, you can make the content of the layer fade in or fade out as the animation plays.
- Change position: You can use the Move tool to drag items around on a layer, making them seem to move from frame to frame.
- Change blending mode: Changing a layer’s blending mode changes the way that layer’s content interacts with the content of layers below from frame to frame.
- Add, remove, or change a layer style: Consider, for example, a round shape with a Bevel layer style that changes, making the object appear to inflate and deflate from frame to frame.
In the Timeline panel shown in Figure 17-7, you can see how a simple animation can be created by adding a frame, moving the content of the two layers, adding another frame, dragging the objects again, and so on.
Tweening to create intermediary frames
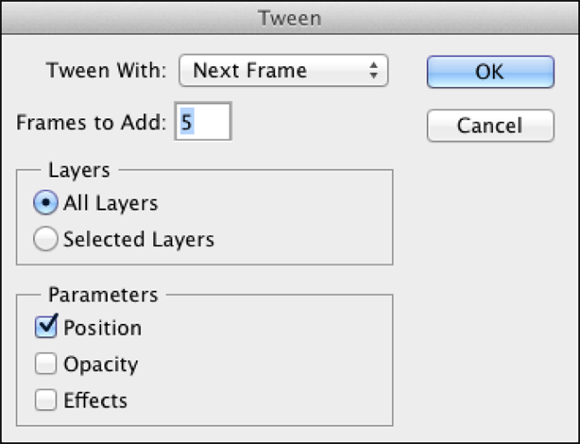
To create the animation in Figure 17-7, I actually only created 3 of the 13 frames. I let Photoshop do the other 10 frames, saving me time and ensuring that the animation would play smoothly and precisely. I created the first frame, with the red circle in the upper-left corner and the blue square in the lower-right. I then clicked the New Frame button and dragged the red circle to the lower-left and the blue square to the upper-right. After clicking the New Frame button again, I dragged the red circle to the lower-right (where the blue square started) and dragged the blue square to the upper-left (where the red circle started).
After creating my three frames, Photoshop tweened pairs of frames to create the intermediary frames. Tweening creates the frames in between two frames in the Timeline panel. I clicked the first frame, and then opened the Timeline panel menu and selected the Tween command. In the Tween dialog box (see Figure 17-8), you can specify how many frames to generate (I choose five), what aspects of the frames you want to blend (I only needed to tween for position because there were no changes to opacity or layer styles), and whether to tween between the selected frame and the next frame or the last frame (I chose Next Frame). I then clicked the second frame I created (frame number 7 at that point, second from last) and repeated the Tween process.
Say that, on your home page, you want a logo to fade out and fade in repeatedly, and you want each fade to be extremely smooth. You could create the logo, set the layer opacity to 100%, add a new frame, reduce the opacity to 99%, add a new frame, reduce the opacity to 98%, and repeat over and over again until you reached 0% opacity. Or you could create the logo at 100% opacity, click the New Frame button, reduce the opacity to 0%, click the first frame, and use the Tween command to generate 99 more frames, tweening for opacity. Add another frame, return the opacity to 99% (your original first frame is at 100%), and then tween 98 new frames between the second-to-last frame and the newly-created last frame. Your choice…
Specifying frame rate
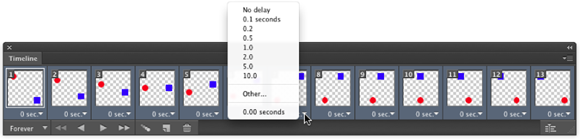
You control how fast (or slowly) your animation plays by specifying a frame rate. Generally, each frame plays for the same amount of time, so you can click the first frame, Shift+click the last, and select the frame rate of your choice from the menu below any one of the frames. (See Figure 17-9.) If you select No Delay (0.00 seconds), the animation plays as fast as possible. Don’t overlook the Other option! You’re not restricted to the time delays listed in the menu.
Keep in mind that not all frames need to have the same playback rate. Consider, if you will, the example of the logo that fades in and out on your home page in the previous section of this chapter. There’s no reason why the 100% opacity frame couldn’t be set to a five or ten second delay, with all of the other frames set to  of a second.
In the lower-left corner of the Timeline panel, you’ll also want to select the repeat for the animation. You can elect to have the animation play once and then stop, to continuously loop (Forever), or you can choose any other number of times for the animation to play in a loop by selecting Other.
Optimizing and saving your animation
If you’ll be adding your animation to a web page or a presentation created in Keynote or PowerPoint, you’ll want to generate an animated GIF. (Keep in mind that if there’s no layer named Background in the Layers panel, your animated GIF can support transparency.) After generating all of the frames, open the Timeline panel menu and select the Optimize Animation command. The default settings — with Bounding Box and Redundant Pixel Removal both selected — will generate the smallest file, ensuring the smoothest playback. Save the layered and animated file in the PSD file format for future use, and then choose File ⇒ Save for Web to create the animated GIF. (Remember to select the Transparency option in Save for Web if you don’t have a background layer.)
If you want to use your animation with devices that don’t play animated GIFs — a smartphone, for example — choose File ⇒ Export ⇒ Render Video to generate a QuickTime movie.
 Working with Photoshop’s video capabilities