FINISHED BLOCK: 14˝ × 14˝
FINISHED QUILT: 50˝ × 50˝
Overlapping triangles create a quirky take on a traditional star pattern in this quilt. Emphasize the overall shape of the stars by making the spokes all the same color, or emphasize the way the star is created by using different fabrics for each spoke.
Materials
I used Kona Bleach White PFD and Melody Sketch by Nani Iro for this quilt. Melody Sketch is a double gauze fabric, which has much more stretch and shift to it than a normal quilting cotton. Paper piecing is a great way to work with these fabrics since the foundation papers act as a stabilizer. A heavy use of starch provides even more stability.
TIP
This print is spotted less densely along the selvages. When working with a print that does not stretch a full 40˝ as you desire, be sure to order extra yardage. I ended up needing an additional yard.
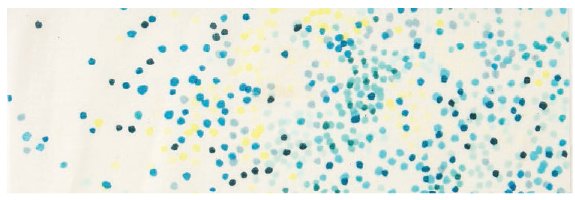
Dots: 3⅝ yards (for background)
White: 2 yards (for stars)
Backing: 58˝ × 58˝
Batting: 58˝ × 58˝
Binding: ½ yard (for 2½˝-wide binding strips)
Fabric labels or your favorite fabric-marking pen
Patterns: Make 36 copies of the Apple Stars pattern on your favorite 8½˝ × 11˝ paper-piecing paper.

Cutting Directions
WOF = width of fabric
All the fabric pieces are assigned a number (to coordinate with the order in which they are used on the pattern piece). As you cut out the fabric pieces, label each piece with the number indicated. Keep them in piles organized by their labels.
DOTS (BACKGROUND):
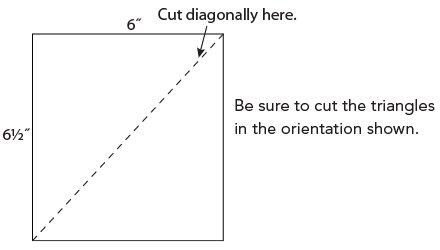
•Cut 3 strips 6˝ × WOF. Subcut each strip into 6 rectangles 6˝ × 6½˝; then subcut each rectangle into 2 triangles by cutting them in half diagonally, corner to corner (Piece 1).
•Cut 5 strips 8½˝ × WOF. Subcut each strip into 7 rectangles 8½˝ × 5½˝ (Piece 3).
•Cut 6 strips 4¾˝ × WOF. Subcut each strip into 6 rectangles 4¾˝ × 6½˝ (Piece 5).
•Cut 8 strips 2½˝ × WOF. Subcut each strip into 1 rectangle 2½˝ × 14½˝ (Piece 7) and 1 rectangle 2½˝ × 25½˝ (Piece 8).
•Cut 1 strip 5½˝ × WOF. Subcut into 1 rectangle 5½˝ × 8½˝ (Piece 3).
•From the remaining fabric, cut 2 strips 2½˝ × 29˝. Subcut each strip into 2 rectangles 2½˝ × 14½˝ to have 4 rectangles 2½˝ × 14½˝ (Piece 7).
WHITE (STARS):
•Cut 2 strips 7¼˝ × WOF. Subcut each strip into 17 rectangles 7¼˝ × 2¼˝ (Piece 2).
•Cut 7 strips 2¼˝ × WOF. Subcut each strip into 5 rectangles 2¼˝ × 8˝ (Piece 4).
•Cut 9 strips 3½˝ × WOF. Subcut each strip into 4 rectangles 3½˝ × 9½˝ (Piece 6).
•Cut 1 strip 2¼˝ × WOF. Subcut into 2 rectangles 2¼˝ × 7¼˝ (Piece 2) and 1 rectangle 2¼˝ × 8˝ (Piece 4).
Quilt Top Construction
PAPER-PIECING ASSEMBLY
Sew each printed paper-piecing pattern. Begin with Piece 1 and work your way through Piece 6 on each pattern. Refer to Paper-Piecing Basics as needed.
Tricky Pattern Pieces
Pieces 2 and 3 on the paper-pieced patterns have jutting corners. Follow the directions in Jutting Corners to place your fabric correctly.
BLOCK ASSEMBLY
Piece the blocks by sewing 2 completed paper-pieced patterns together. Piece together groups of 2 blocks. Be sure to pay attention to the orientation of your pieces as you go.


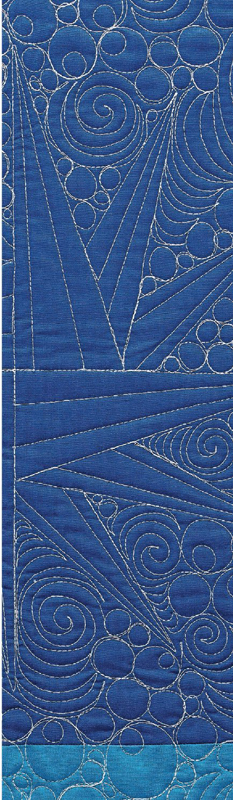
Apple Stars, 50˝ × 50˝, pieced by Amy Garro; quilted by Emily Sessions
LAYOUT AND FINAL ASSEMBLY
1. Sew a Piece 7 between a line of 3 blocks to create a row. Sew a Piece 7 to each end of the row. Repeat to create 3 rows.

2. Sew together 2 Pieces 8 to create a 50½˝ strip. Make 4. Sew the 50½˝ strips between the 3 rows. Sew a 50½˝ strip to the 2 remaining sides of the quilt top.

TIP
Be careful not to blunt the corners of the stars that touch the sashing. Avoid this by using a scant ¼˝ for the sashing seams.
Finishing the Quilt
Baste, quilt, and bind using your favorite methods. Refer to Finishing Your Quilts as needed.
SUGGESTED QUILTING OPTIONS
Emily quilted straight lines in the stars, and bubbles and spirals in the background, which went well with the dotted background fabric I used. It also provides a fun feeling of a nighttime sky to the quilting pattern.
Other quilting options:
•Use a swirly Spiro graph–style quilting design in each star and a free-motion filler for the background.
•Quilt straight lines in the background, radiating out from the center of each star. Stitch in-the-ditch along the seams within the star to keep the focus on the radiating lines, while still stabilizing the rest of the block.