FINISHED BLOCK: 12˝ × 12˝
FINISHED QUILT: 80˝ × 101˝
This manly quilt is great for the bachelor in your life—perhaps a son or brother, or even a husband who might like his own quilt. Its large size accommodates a snooze on the couch for even the tallest of men. Modified Log Cabin blocks with ⅛˝ details are surrounded by simple strip piecing, making this a quick quilt to pull together.
Materials
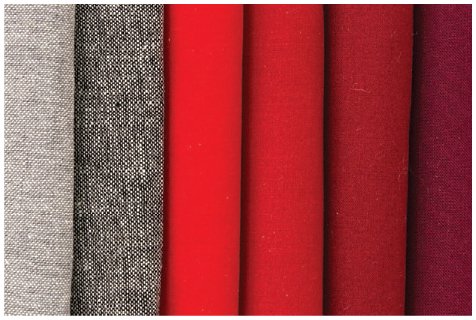
For this quilt, I chose Essex Yarn Dyed Linen in Steel and Black, Kona Poppy, Michael Miller Couture Cranberry, Kona Ruby, and Kona Crimson fabrics. I used Essex Yarn Dyed Linen for its masculine feel; it also provides some texture and subtle patterning to an area of large negative space, giving it more interest than regular quilting cotton solids. Because Essex Linen is more prone to raveling than quilting cottons, I suggest using a ½˝ seam allowance and reinforcing all seams with an overlock or zigzag stitch in the seam allowance. For the paper-pieced block itself, I chose to use a ¼˝ seam allowance to reduce bulk and reinforced the block by ironing fusible interfacing onto the back. If you would prefer to use ½˝ seam allowances in the block, I suggest adding ½˝ to each dimension of the reds included in the block. Instead of using an Add-A-Quarter ruler, use a regular Omnigrid acrylic ruler to add the ½˝.
Light gray solid: Essex Yarn Dyed Linen in Steel, 1 yard
Dark gray solid: Essex Yarn Dyed Linen in Black, 7¼ yards
Light red: 1 yard
Medium red I: ⅝ yard
Medium red II: ¾ yard
Dark red: ½ yard
Backing: 88˝ × 109˝
Batting: 88˝ × 109˝
Binding: 1 yard (for 2½˝-wide binding strips)
Lightweight fusible interfacing: 2 yards
Fabric labels or your favorite fabric-marking pen
Patterns: Make 5 copies of The Bachelor pattern on 5 pieces of 11˝ × 17˝ copy paper or on 10 pieces of your favorite 8½˝ × 11˝ paper-piecing paper. Tape together with painter’s or masking tape if using 8½˝ × 11˝ paper. Trim as necessary.
Cutting Directions
WOF = width of fabric
All the fabric pieces are assigned a number (to coordinate with the order in which they are used on the pattern piece). As you cut out the fabric pieces, label each piece with the number indicated. Keep them in piles organized by their labels.
LIGHT GRAY:
•Cut 4 strips 3½˝ × WOF. Trim to 40˝ in length.
•Cut 3 strips 5˝ × WOF. Trim to 40˝ in length.
DARK GRAY:
•Cut 2 strips 47˝ × WOF. Subcut each strip into 3 rectangles 47˝ × 12˝.
•Cut 7 strips 6˝ × WOF. Trim to 40˝ in length.
•Cut 2 strips 6½˝ × WOF. Trim to 40˝ in length.
•Cut 2 strips 23˝ × WOF. Subcut each strip into 3 rectangles 23˝ × 12˝.
•Cut 1 strip 7˝ × WOF. Subcut into 3 rectangles 7˝ × 13˝.
•Cut 1 strip 9½˝ × WOF.
Subcut 2 rectangles 9½˝ × 13˝.
From the remaining fabric, cut 1 rectangle 7˝ × 13˝.
•Cut 25 strips 1˝ × WOF.
•Cut 2 strips 1¼˝ × WOF.
LIGHT RED:
•Cut 1 strip 5˝ × WOF.
Subcut into 1 rectangle 5˝ × 9½˝ (Piece 44).
Trim the remaining fabric to 4˝ wide. Subcut into 4 rectangles 4˝ × 7˝ (Piece 45).
•Cut 1 strip 5˝ × WOF. Subcut into 4 rectangles 5˝ × 9½˝ (Piece 44).
•Cut 1 strip 13˝ × WOF.
Subcut into 5 rectangles 13˝ × 6½˝ (Piece 43).
•From the remaining fabric, cut 1 rectangle 4˝ × 7˝ (Piece 45) and 5 rectangles 2˝ × 3½˝ (Piece 1).
MEDIUM RED I:
•Cut 1 strip 1¾˝ × WOF. Subcut into 10 rectangles 1¾˝ × 4˝ (Pieces 6 and 7).
•Cut 1 strip 1½˝ × WOF. Subcut into 5 rectangles 1½˝ × 7½˝ (Piece 39).
•Cut 1 strip 3½˝ × WOF. Subcut into 5 rectangles 3½˝ × 1½˝ (Piece 8) and 5 rectangles 3½˝ × 2¾˝ (Piece 9).
•Cut 4 strips 2¼˝ × WOF.
Subcut 1 strip into 3 rectangles 2¼˝ × 13˝ (Piece 37).
Subcut 1 strip into 2 rectangles 2¼˝ × 13˝ (Piece 37) and 1 rectangle 2¼˝ × 11½˝ (Piece 38).
Subcut 1 strip into 3 rectangles 2¼˝ × 11½˝ (Piece 38).
Subcut 1 strip into 1 rectangle 2¼˝ × 11½˝ (Piece 38).
MEDIUM RED II:
•Cut 1 strip 4¼˝ × WOF. Subcut into 5 squares 4¼˝ × 4¼˝ (Piece 17) and 5 rectangles 4½˝ × 1¼˝ (Piece 16).
•Cut 1 strip 14˝ × WOF.
Subcut into 10 rectangles 14˝ × 2˝ (Pieces 30 and 31).
From the remaining fabric, cut 1 section 6¼˝ × 17½˝. Subcut into 10 rectangles 6¼˝ × 1¾˝ (Pieces 14 and 15).
From the remaining fabric, cut 1 section 6¾˝ × 7½˝. Subcut into 5 rectangles 6¾˝ × 1½˝ (Piece 32).
•From the remaining fabric, cut 5 rectangles 1½˝ × 2½˝ (Piece 33).
DARK RED:
•Cut 1 strip 6½˝ × WOF. Subcut into 5 rectangles 6½˝ × 6˝ (Piece 25) and 5 rectangles 6½˝ × 1½˝ (Piece 24).
•Cut 3 strips 2˝ × WOF. Subcut into 10 rectangles 2˝ × 10˝ (Pieces 22 and 23).
FEATHERWEIGHT FUSIBLE INTERFACING:
•Cut 5 squares 13˝ × 13˝.

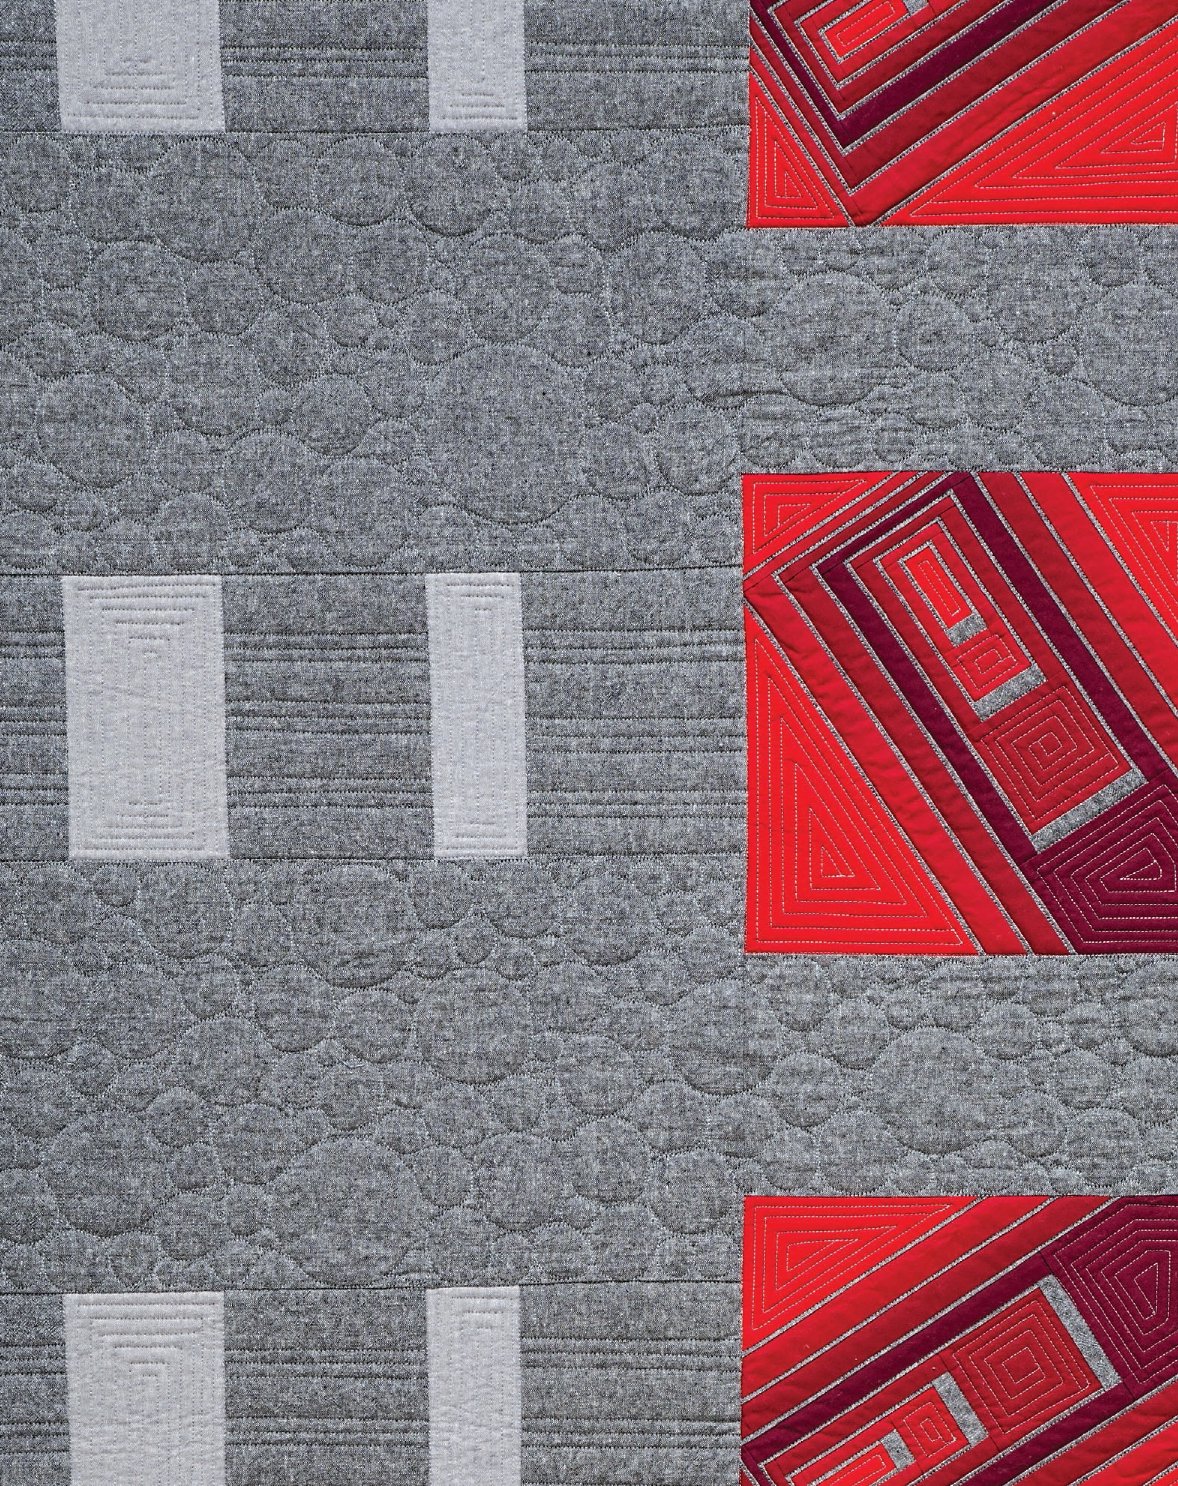
The Bachelor, 80˝ × 101˝, pieced by Amy Garro; quilted by Emily Sessions
Quilt Top Construction
Use a ½˝ seam allowance for all piecing. Reinforce seams with an overlock or zigzag stitch.
IMPORTANT NOTE: If you use a ¼˝ seam, your measurements will be off!
PAPER-PIECING ASSEMBLY
Sew each printed paper-piecing pattern. Begin with Piece 1 and work your way through Piece 45 on each pattern. Press each seam open after piecing. Refer to Paper-Piecing Basics as needed.
NOTE
As you piece the blocks, you need to cut the 1˝- and 1½˝-wide gray strips to length. Simply trim off sections to the desired length as you work through piecing the blocks. When you reach the end of a fabric strip, set it aside to use for future, smaller pieces. Cut more gray strips if necessary.
If desired, iron fusible interfacing to the back of the paper-pieced blocks. Follow the manufacturer’s instructions for your interfacing product. I did this to further strengthen the lines, but it isn’t necessary with regular quilting cottons.
LAYOUT AND FINAL ASSEMBLY
Use a ½˝ seam allowance for all piecing. Reinforce seams with an overlock or zigzag stitch.
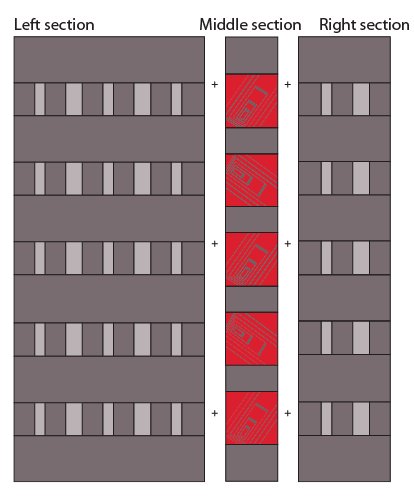
Left Section
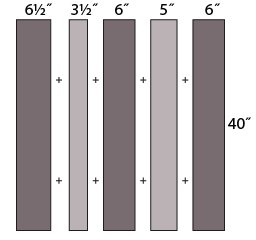
1. Piece 5 dark gray rectangles 6˝ × 40˝, 3 light gray rectangles 3½˝ × 40˝, 2 light gray rectangles 5˝ × 40˝, and 1 dark gray rectangle 6½˝ × 40˝ together, following the diagram. Press all seams toward the dark gray fabric.
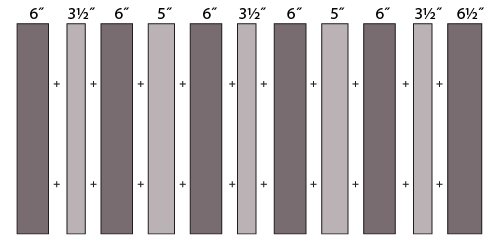
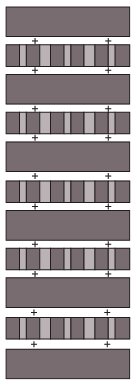
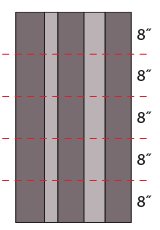
2. Subcut each section into 5 pieced strips 8˝ in height.

TIP
You have a few options for cutting such a large piece of fabric. You can carefully fold the fabric in half multiple times until you can rotary cut as usual, making sure that the edges all match up and the fabric is not distorted, or you can use an extra-large ruler to carefully mark a line parallel to the edge of the fabric at 8˝. Omnigrid makes an 8½˝ × 24˝ ruler that would help you accomplish this task easily. Then cut with scissors.
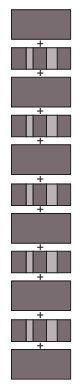
3. Sew your strip-pieced sections from Step 2 between the 12˝ × 47˝ sections. Press toward the unpieced, dark gray fabric sections.
Right Section
1. Piece 2 dark gray rectangles 6˝ × 40˝, 1 light gray rectangle 3½˝ × 40˝, 1 light gray rectangle 5˝ × 40˝, and 1 dark gray rectangle 6½˝ × 40˝ as shown in the diagram. Press toward the dark gray fabric.
2. Subcut each section into 5 pieced strips 8˝ in height.
3. Sew your strip-pieced sections from Step 2 between the 12˝ × 23˝ sections. Press toward the unpieced, dark gray fabric sections.
Middle Section
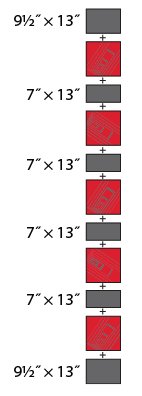
Piece together the paper-pieced blocks, 2 dark gray rectangles 9½˝ × 13˝, and 4 dark gray rectangles 7˝ × 13˝ as shown. Press toward the dark gray fabric.
Section Assembly
Sew together the left section, middle section, and right section as shown in the diagram below. Press the fabric away from the middle section.
Finishing the Quilt
Baste, quilt, and bind using your favorite methods. Refer to Finishing Your Quilts as needed.
SUGGESTED QUILTING OPTIONS
Emily quilted straight-line rectangles inside the light gray fabric pieces, echoing the edges of the rectangles and moving these lines horizontally along the row of rectangles. To break up the angular feel to the quilt and its quilting, she then quilted large-scale bubbles in the dark gray background of the quilt. Stitching in-the-ditch in the paper-pieced blocks, along with some additional decorative straight-line stitching, provided extra reinforcement for the linen fabric. This quilting approach kept the quilt looking masculine—no roses needed for this bachelor.
Looking for something else?
•Quilt organic straight lines at random widths vertically down the quilt. Use a variety of thread colors and thicknesses to add interest.
•If you use a light-colored solid fabric for the background that easily shows quilting patterns, you can showcase your beautiful quilting skills, shifting from one free-motion quilting design to another. This option provides a wonderful amount of texture and additional interest to the simple background of the quilt.
