HOW TO MAKE A WANDERING NOTEBOOK
There is a long tradition of wanderers making their own notebooks. Many great writers like Mary Oliver, Kim Stafford, and Walt Whitman preferred to make their own small hand-sewn versions rather than use something store-bought. These compact books fit into a pouch or pocket for easy access while wandering.
Almost all [of Whitman’s] writing was done with a pencil in a sort of loose book that he carried in his breast pocket. The book consisted of a few sheets of good white paper, folded and fastened with a pin or two. He said he had tried all sorts of note-books and he liked that kind best.
—RICHARD BUCKE, COSMIC CONSCIOUSNESS


You will need:
- Knife or scissors
- 3 sheets of 8½-by-11-inch paper for a 24-page book*
- 1 piece of heavy paper at least 6-by-4¼ inches for the cover
- Pencil
- Ruler
- 2 large paper clips or binding clips (optional)
- Push pin or awl
- Heavy-weight thread or yarn or embroidery floss or string or dental floss for binding (at least 12 inches long)
- Sewing needle with an eye large enough to accommodate the thread/string you are using
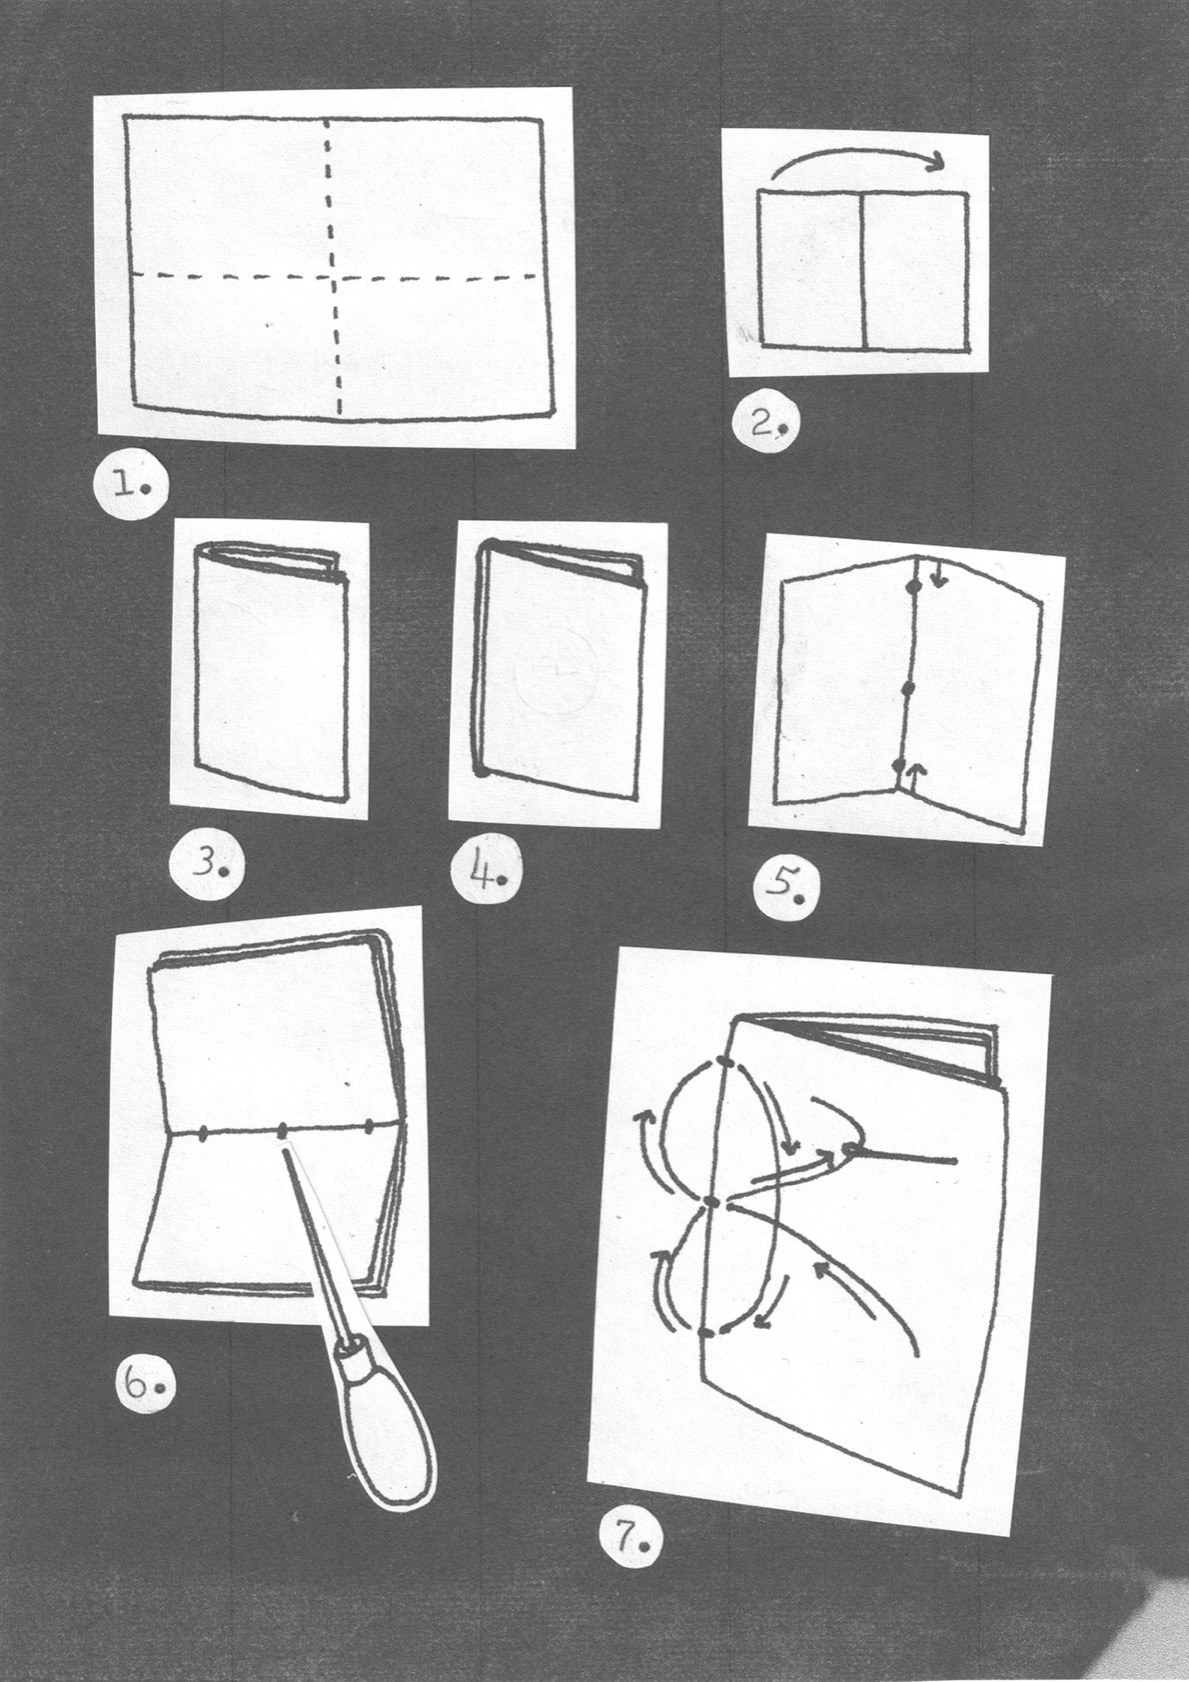
1. Cut or tear each sheet of paper in half into 4¼-by-11-inch pieces of paper. Cut or tear each of those pieces in half into 4¼-by-5½-inch pieces (figure 1). Fold each of those pieces of paper in half to create the pages of the notebook; they should measure 2¾ inches wide by 4¼ inches tall (figure 2).
2. Sandwich all pages inside of each other like a book (figure 3).
3. Cut a piece of heavy paper for the cover that measures 6-by-4¼ inches. Fold in half into a 3-inch wide by 4¼-inch tall cover. Place the cover around the outside of the pages. (figure 4).
4. Remove the center page and fold it in half lengthwise to crease-mark the center of the spine. With a pencil, make a dot at this crease. Measure ¾ inch down on the spine from the top of the book and make a pencil dot; measure ¾ inch up on the spine from the bottom of the book and make another pencil dot (figure 5). Place this page back in the center of your book; this will be your binding template.
5. Line up all pages and cover (tap book against a hard surface—like a table—to align the pages, if needed) and use paper clips or binding clips to hold pages and cover together (optional). Using the push pin or awl, push holes through all pages and cover on the spine at the three spots marked with a pencil from step 5 (figure 6).
6. Thread the needle and double the thread if it is thin—no need to make a knot. Decide if you want to tie off your notebook on the outside or inside.
Sewing Instructions for Tying Off Notebook on Outside
Begin on the outside of the notebook and go into the center hole, leaving a 2- to 3-inch tail of thread on the outside of the notebook. Come back to the outside of the spine through either hole near the top or bottom of the notebook, go back into the notebook at the other hole that hasn’t been used yet, and come back out the center hole. With two square knots, tie off the thread and trim it to desired length.

Sewing Instructions for Tying Off Notebook on Inside
Begin on the inside of the notebook and go out the center hole, leaving a 2- to 3-inch tail of thread on the inside of the notebook. Come back to the inside of the spine through either hole near the top or bottom of the notebook, go back to the outside of the notebook at the other hole that hasn’t been used yet, and come back in using the center hole. With two square knots, tie off thread and trim to desired length (figure 7).
*Minimal Notebook
To make a minimal notebook, follow the first two steps here, using a rubber band around the spine to hold the pages together.
- 2 sheets of 8½-by-11-inch paper for a 16-page book
- Rubber band

