KNITTING PATTERNS

Shy Anarchist Socks
For timid activists
Let’s face it, we all have days when we want to play it down a bit, when our yang is… Well you get the message. If you find yourself in a situation where you don’t feel like shouting about your beliefs but still want to do your bit, then these socks are just for you. You can walk around all day in a seemingly innocent pair of stripy footwear until you hitch up your trouser leg, et voila! Your true feelings are miraculously revealed.
Knitted in the round, using short rows for the heel shaping and stranded colourwork for the anarchist motif, these socks knit up pretty quickly.

DIFFICULTY LEVEL: HARD
whitespace

whitespace

INSTRUCTIONS
Socks (Make 2)
With 2.75 mm dpns and A, cast on 64 sts. Distribute the sts as follows: 22/22/20. Join in to work in the rnd, ensuring there are no twists and PM. Work 3.75cm (1½") in (k1, p1) rib. Do not break yarn. Change to 3mm dpns. Change to B, work 2 rows in St-st, then work as follows: Next 15 rnds: Using A and B, work Chart to end of rnd (four reps around). Change to B, k 2 rnds, then work in striped St-st patt below as follows until sock measures 17.5cm (7") from cast-on edge or desired length. Next 5 rnds: K in C. Next 5 rnds: K in B.
Divide for Heel and Instep
Change to A, k32 sts. Sl these 32 sts onto same dpn and cont in A on these sts only for heel.
Heel
Row 1 (WS): Sl1, p to end of row, turn. Row 2: Sl1, k30, w&t. Row 3: Sl1, p29, w&t. Row 4 (RS): Sl1, k to 1 st before last w&t, w&t. Row 5 (WS): Sl1, p to 1 st before last w&t, w&t. Rep these two rows until you have 12 sts between the w&ts. Row 22 (RS): Sl1, k12, pick and work wrap with its companion st, turn. Row 23: Sl1, p12, pick up and work wrap with its companion st, turn. Cont to work 1 further st on each row (remembering to work wraps with their companion st to prevent holes) until you have worked across all 32 sts.
You will now be working around all sts again. Distribute sts over 3 dpns (22/22/20). Cont in stripe patt until foot measures approx 3.75cm (1½") less than desired sock foot length.
Shape Toe
Break off B and C and cont in A. Rnd 1: (K32, PM) twice. Rnd 2: (K1, skpo, k to 3 sts before marker, k2tog, k1, sm) twice. (4 sts dec) Rnd 3: (K to marker, sm) twice.
Rnds 4-13: Rep Rnds 2-3 five more times. (40 sts) Rnd 14-17: Rep Rnd 2 four times. (24 sts) Sl first 12 sts onto one needle and rem 12 sts onto a second needle. Break yarn, leaving a 38cm (15") tail. Graft sts together using Kitchener st.
FINISHING
Darn in ends.
whitespace

MATERIALS
Regia 4-ply (75% Wool/25% Nylon, 50g/210m/229yds) as follows:
 1 x 50g balls in shade #2054 (Red) (A)
 1 x 50g balls in shade #2080 (Super White) (B)
 1 x 50g ball in shade #1980 (Greyblue) (C)
4 x 2.75mm (US 2) dpns
4 x 3mm (US 3) dpns
TENSION/GAUGE
30 sts and 40 rows = 10cm (4") over St-st
SIZE
Cuff to heel: 23cm (9")
Foot circumference: 21.5cm (8.5")
Foot length: adapt according to instructions
whitespace

Question authority
Knitted Womb
A womb with a view
Problem: too many men having a say in what women do with their own bodies. Be part of the solution: get busy and send this quick-to-knit uterus to those unenlightened lawmakers. If you get enough of your friends to knit and send, those guys will soon get the idea that women mean business. Alternatively, sew a brooch fitting to the back and wear it with pride.
The womb is very quick and easy to knit up in the round – we’ve given ours a happy face, but you could make yours angry or sad, depending on your own mood.
DIFFICULTY LEVEL: EASY
INSTRUCTIONS
Cast on 8 sts and distribute over 3 dpns as follows: 3/2/3. Rnds 1-2: K 2 rnds. Rnd3: (K2tog, k2) twice. (6 sts) Rnds 4-5: K. Rnd 6: (K2tog, k1) twice. (4 sts) Rnd 7: K. Rnd 8: Kfb; rep to end. (8 sts)
Rnd 9: K. Rnd 10: (K1, kfb); rep to end. (12 sts) Rnd 11: K. Rnd 12: (Kfb twice, k1); rep to end. (20 sts) Rnds 13-14: K. Rnd 15: (Kfb twice, k3); rep to end. (28 sts) Rnds 16-18: K. Rnd 19: (Kfb twice, k5); rep to end. (36 sts) Rnds 20-22: K. Rnd 23: (K2tog twice, k5); rep to end. (28 sts) Rnd 24: (K2tog twice, k3); rep to end. (20 sts) Rnd 25: (K2tog twice, k1); rep to end. (12 sts) Stuff. Rnd 26: (K2tog); rep to end. (6 sts) Rnd 27: (K2tog); rep to end. (3 sts) Break yarn leaving a long tail. Thread tail through rem sts, draw tight and secure on inside.
Fallopian Tubes (Make 2)
Using 2 dpns, cast on 4 sts. Work as for i-cord (see here) until piece measures 7.5cm (3"). Next rnd: (K2tog) twice, break yarn leaving a long tail (approx 24cm (10")) and thread tail through rem sts using a darning needle. Secure, then make approx 5 or 6 small loops at the end of the tube. Secure and darn in ends.
FINISHING
Position and pin the tubes at each side of the Womb near the top, using the pictures as a guide. Sew in place.
To embroider face (optional)
Using black yarn and a darning needle, work two French knots for eyes, then make a loop next to the eye for the eyelashes and secure yarn. Cut the loops in half to make eyelashes. Work a mouth using backstitch.
MATERIALS
 1 x 50g ball King Cole Merino Blend DK (100% Wool, 50g/112m/122 yds) in shade #787 (Fuchsia)
Small amount of black yarn to embroider face
Small amount of toy stuffing
4 x 4mm (US 6) dpns
1 x 3cm (1¼") metal brooch back
Darning needle (for embroidering face)
TENSION/GAUGE
21 sts and 26 rows = 10cm (4") over St-st
SIZE
6.5cm (2½") (w) x 7.5cm (3") (h)
whitespace

whitespace

Balaclava & Beard
Good for bad hair days
Some protesters are wary of the powers that be tracking them down but those plastic Guy Fawkes masks can be a bit chilly. For a warmer anonymous protest try this chic balaclava (beard optional, naturally). They’ll be all the rage in Hoxton. Added bonus: the combo keeps you ridiculously warm on cold days and is also great for bad hair days. Or bad beard days.
This is a quick, fairly easy knit in 2x2 rib and St-st. The optional beard is attached using press studs.
DIFFICULTY LEVEL: MEDIUM
Be the change
whitespace

INSTRUCTIONS
Balaclava
Using 4mm circular needle and MC, cast on 120 sts. Join to work in the rnd, ensuring there are no twists and PM. Work in (k2, p2) rib until work measures 12cm (4¾"). Turn at end of last rnd; piece will now be worked back and forth in rows instead of rnds.
Row 1 (WS): P86, slip rem 34 sts onto a st-holder for chin, turn. Rows 2-61: Work 60 rows in St-st, always slipping first st of every row purl-wise. Row 62: K58, sl1, k1, psso, turn. (57 sts) Row 63: P31, p2tog, turn. (56 sts) Row 64: K31, sl1, k1, psso, turn. (55 sts) Row 65: P31, p2tog, turn. (54 sts) Rep last 2 rows until 32sts rem. Next row: (K2tog) twice, (k1, k2tog) 7 times, k1, (k2tog) 3 times. (20 sts) Work rib edging as follows: pick up and k31 sts down side of balaclava, work 34 chin sts from st-holder in (k2, p2) rib, pick up and k 31 sts up the other side of balaclava, then k7 sts from beginning of needle. PM. Work 9 rnds in (k2, p2) rib. Cast off in rib.
Beard
Using 4mm needles and CC, cast on 3 sts. Row 1 (RS): Kfb, moss-st to last st, kfb. (5 sts) Rep Row 1 until 17 sts. Next row: Work in moss-st. Next row: Kfb, moss-st to last st, kfb. (19 sts) Rep last two rows to 33 sts. Next row: Cont in patt as set, moss-st 9 sts, cast off 15 sts, moss-st 9 sts. Place last 9 sts onto st-holder and return to first set of 9 sts. Work 3 rows in moss-st and break yarn. With WS facing, re-join yarn to 9 sts on st-holder and work 3 rows in moss-st. Next row (RS): Cont in patt as set, moss-st 9 sts, cast on 15 sts, moss-st 9 sts. (33 sts) Work 6 rows in moss-st as set. Next 2 rows: Cast off 1 st at each end. (29 sts) Cast off.
Moustache
Using 4mm needles and CC, cast on 1 st.
Row 1 (RS): Kfbf. (3 sts). Row 2: Work in moss-st. Row 3: Kfb, moss-st to last st, kfb. (5 sts) Rep last 2 rows until 11 sts. Cont in moss-st until piece measures 6.5cm (2½"). Next row: K2tog twice, moss-st 3 sts, k2tog twice. (7 sts) Next row: K2tog, moss-st 3 sts, k2tog. (5 sts) Next row: K2tog, moss-st 1 st, k2tog. (3 sts) Next row: Kfb, moss-st 1 st, kfb.
(5 sts) Next row: Kfb, moss-st 3 sts, kfb. (7 sts) Next row: Kfb twice, moss-st 3 sts, kfb twice. (11 sts) Cont in moss-st until piece measures 13cm (5") from cast-on edge. Next row: K2tog, moss-st to last 2 sts, k2tog. (9 sts) Next row: Work in moss-st. Rep last 2 rows until 3 sts rem. K3tog. Break yarn, draw yarn through st.
FINISHING
Turn hat inside out so that WS is facing. Press lightly using a warm iron over a damp cloth. Press WS of Beard and Moustache in the same way. Place the Moustache centrally over the top edge of the Beard and sew into place. Darn in ends. Sew press studs to either side of the balaclava opening, and sew matching press stud halves on the WS of beard so that it lines up with your nose and mouth. Rock the look.
MATERIALS
Adriafil Regina (100% wool/50g/125m/136 yds) as follows:
 3 x 50g balls in shade #16 (Brown) (MC)
 1 x 50g ball in shade #92 (Camel) (CC)
4mm (US 6) circular needle (40cm (16") long)
1 pair 4mm (US 6) needles
St-holder
2 x press studs
TENSION/GAUGE
21 sts and 26 rows = 10cm (4") over St-st
SIZE
To fit medium-size head: 53.5cm–56cm (21"–22") with 5cm (2") positive ease after blocking
whitespace

Smart is the new pretty
Pussy Hat
Reclaim the pussy!
Reclaim the pussy! It’s hard to imagine a time when the pussy hat wasn’t a thing, but grudge-thanks to a hot mic throwaway comment by Agent Orange himself and hell, we’ve turned the pussy on its head (so to speak) … The insult is now a word of feminine power, and what better way to show it? If you can’t make it to a protest, show your solidarity by pulling on one of these feline numbers and turn the streets into a sea of pink.
This simple pattern knits up nice and quick in DK on circular needles, making it easy to knit more than one for your non-knitting pussy pals.
DIFFICULTY LEVEL: EASY
INSTRUCTIONS
With circular needle and A, cast on 110 sts. Join to work in the rnd, ensuring there are no twists and PM. Work in (k1, p1) rib until piece measures 5cm (2"). Now work in St-st (k all sts) as follows: Work 6 rnds in A. Change to B, work 6 rnds. Break B and cont to work in A until piece measures 18cm (7"). Cast off.
FINISHING
Turn work inside out so that WS is facing. Press lightly using a warm iron over a damp cloth. Sew the top seam.
Ears (rep for each corner): With RS facing, measure 7.5cm (3") away from the corner along both the top and side of the hat and mark with pins, then seam along the diagonal line between the pins. This forms the triangle for the ear. Darn in ends.
MATERIALS
King Cole Merino Blend DK (100% Wool, 50g/112m/122yds) as follows:
 2 x 50g balls in shade #907 (Raspberry) (A)
 1 x 50g ball in shade #1532 (Pale Pink) (B)
4mm (US 6) circular needle (40cm (16") long)
TENSION/GAUGE
21 sts and 26 rows = 10cm (4") over St-st after blocking
SIZE
To fit medium-size head: 53.5cm–56cm (21"–22") with 2.5cm (1") negative ease
whitespace

Our pussies are not up for grabs
whitespace

Button Badges
Right on the button
Ah, the button badge; old friend to many a seasoned protester wanting to make a statement. Back in the 60s, you couldn’t move without bumping into a longhair sporting a peace badge, and what did the punk movement turn to during the 70s? You guessed it… The history of the badge goes back further still to the 19th century, so keep it up to date with these knitted symbols of resistance… Long live the button badge!
Simple, quick knitting at its best.
DIFFICULTY LEVEL: EASY
Don’t hate, appreciate
whitespace

whitespace
CHART 1

whitespace
CHART 2

INSTRUCTIONS
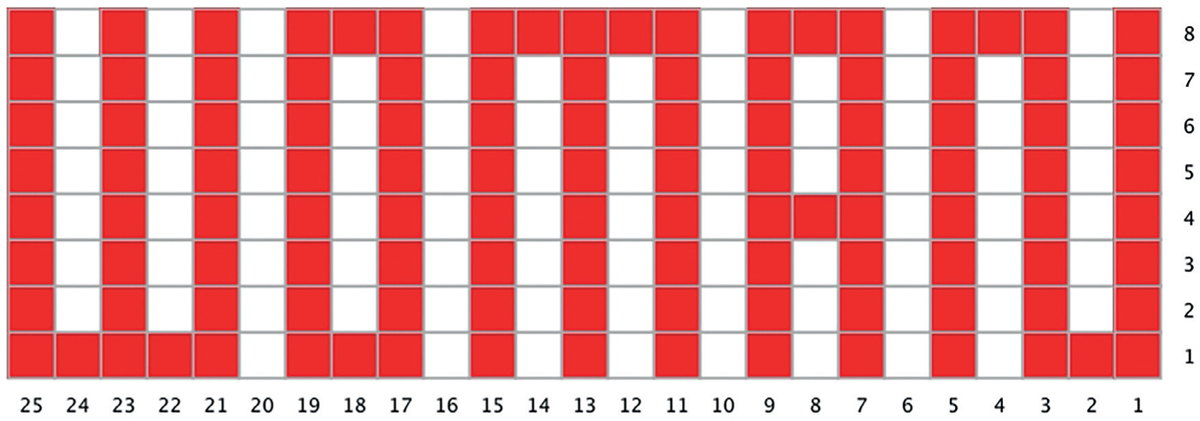
Vote Badge
With A, cast on 7 sts and proceed in St-st. Row 1 (RS): K. Rows 2-3: Cast on 2 sts, work to end. (11 sts) Rows 4-5: Inc 1 st at each end of row. (15 sts) Rows 6-7: Cast on 2 sts, work to end. (19 sts) Row 8: Inc 1 st at each end of row. (21 sts) Row 9: K. Row 10: Inc 1 st at each end of row. (23 sts) Rows 11-12: Work even in St-st without increasing. Row 13: Inc 1 st at each end of row. (25 sts) Row 14: P. Row 15: Inc 1 st at each end of row. (27 sts) Row 16: P. Rows 17-25: Using A and B, work Chart 1 to end. Row 26: Dec 1 st at each end of row. (25 sts) Row 27: Work even in St-st without decreasing. Row 28: Dec 1 st at each end of row. (23 sts) Rows 29-30: Work even in St-st without decreasing. Rows 31: Dec 1 st at each end of row. (21 sts) Row 32: Work even without decreasing. Row 33: Dec 1 st at each end of row. (19 sts) Rows 34-35: Cast off 2 sts, work to end. (15 sts) Rows 36-37: Dec 1 st at each end of row. (11 sts) Rows 38-39: Cast off 2 sts at beg of row, work to end. (7 sts) Row 40: P. Cast off, leaving a long tail measuring approx 20cm (8").
Power Fist Badge
With B, work exactly as for Vote Badge to Row 10, then cont to work shaping, with A and B work Chart 2 over Rows 11 – 27. Cont to work Rows 28-40 as per Vote Badge.
FINISHING
For the Power Fist Badge only:
Create the outline of the fingers and the fist with A using back stitch.
For both badges:
Sew a running stitch around the outside of the knitted badge but do not gather. With knitted work WS facing up, place a small amount of flattened toy stuffing over the surface, then place the cardboard circle on top of this, followed by the plastic button badge (face down). Gather the running thread so that it encompasses all the layers and forms an edge around the back of the badge. Secure the yarn and darn in ends.
MATERIALS
Patons Fairytale Fab 4-ply (100% Acrylic, 50g/184m/201yds) as follows:
 1 x 50g ball in shade #1001 (White) (A)
 1 x 50g ball in shade #1099 (Black) (B)
1 pair 3.25mm (US 3) needles
Small amount of toy stuffing
7.5cm (3") blank button badge
Darning needle (for Power Fist detail)
2 x 8.25cm (3¼") diameter
circles cut out of thick card
TENSION/GAUGE
30 sts and 40 rows = 10cm (4") over St-st
SIZE
9cm (3½") (d)
whitespace

whitespace

Love peace, hate pieces
Brain Hat
Use your head, dummy
Fake news this and fake news that … you need all your wits about you to suss out the difference between truth and lies. There are a lot of wild statements being thrown around – some taking on science itself; what with climate change denial on the up and funding for scientific research on the down, get yourself along to an Earth Day Science March and join the brainiac brigade!
The hat itself is very simple, knitted in the round with coiled i-cord stitched to the surface.
DIFFICULTY LEVEL: EASY
NOTES
When shaping crown, switch to dpns when sts no longer fit around circular needle.
INSTRUCTIONS
Using 4mm circular needle, cast on 110 sts. Join to work in the rnd, ensuring there are no twists and PM. Work 5cm (2") in (k1, p1) rib. Now cont in St-st (knit all sts) until piece measures 14cm (5½") from cast-on edge.
Shape Crown: Next row: (K3, k2tog); rep to end. (88 sts) Next row: K. Next row: (K2, k2tog); rep to end. (66 sts) Next row: K. Next row: (K1, k2tog); rep to end. (44 sts) Next row: K. Next row: K2tog to end. (22 sts) Next row: K2tog to end. (11 sts) Break yarn leaving a long tail, and thread tail through rem sts. Secure.
Brain Cord (Make 2): Using two 5mm dpns, cast on 4 sts. Work as for i-cord (see Basic Techniques) until piece measures approx 381cm (150").
FINISHING
Turn main hat inside out so that WS is facing. Press lightly using a warm iron over a damp cloth. Mark the hat into two halves (left and right hemispheres) with pins or tacking, then arrange and pin the i-cords separately over each half, looping each one back on itself in an appropriate pattern to mimic the cerebral cortex. Sew i-cord onto hat to secure. Darn in ends.
MATERIALS
 3 x 50g balls King Cole Merino Blend DK (100% Wool, 50g/112m/122yds) in shade #1532 (Pale Pink)
4 x 4mm (US 6) dpns
2 x 5mm (US 8) dpns
4mm (US 6) circular needle (40cm (16") long)
TENSION/GAUGE
21 sts and 26 rows = 10cm (4") over St-st after blocking
SIZE
To fit medium-size head: 53.5cm–56cm (21"–22") with 2.5cm (1") negative ease
whitespace

whitespace

Nasty Woman Mitts
Sugar and spice…
Sugar and spice and all things nice, right? Any woman who’s had it up to here with the endless attempts to put her firmly back in the kitchen – instead of the voting booth (or in Hilary Clinton’s case, the race for presidency) – will do everything she can to shake off those stereotypes. If that means landing up on the Cheeto-in-Chief’s “nasty woman” list, then why not shout about it? Mansplainers, beware.
These mitts are knitted in the round using stranded colourwork for the main gloves with duplicate stitch lettering (added after knitting). You could even get creative and make your own message.
DIFFICULTY LEVEL: HARD
whitespace

whitespace
CHART 1: RIGHT GLOVE

whitespace
CHART 2: LEFT GLOVE
INSTRUCTIONS
Fingerless Mitts (make 2)
Using B, cast on 60 sts. Distribute sts evenly across 3 dpns (20 sts each). Join to work in the rnd, ensuring there are no twists and PM. Rnds 1-3 (RS): K. Rnd 4: Work the number of sts specified in the colour indicated as follows: (K2B, k2A) twice, k2B, k2C, (k2B, k2A) 7 times, k2B, k2C, (k2B, k2A) 4 times to end of rnd. Rep Rnd 4 until work measures 7.5cm (3") from cast-on edge. Break C. Next rnd: Using B, k to last st, kfb. (61 sts) Next rnd: Using B, k to end of rnd.
Start Thumb Gusset
Next rnd: Using B, k29 sts, PM, m1R, k3, m1L, k to end. (63 sts) Next rnd: Using B, k to end of rnd. Next rnd: (K1B, k1A) to marker (29 sts), sm, m1R using B, (k1A, k1B) twice, K1A, m1L using B, (k1A, k1B) to end. (65 sts) Next rnd: (K1A, k1B) to last st, k1A. Next rnd: (K1B, k1A) to last st, k1B. Next rnd: (K1A, k1B) to last st, k1A. Next rnd: Using A, k to marker, sm, m1R, k7, m1L, k to end. (67 sts) Next rnd: (K1B, k1A) to last st, k1B. Next rnd: Using A, k to end of rnd. Next rnd: (K1A, k1B) to last st, k1A. Next rnd: Using A, k to marker, sm, m1R, k9, m1L, k to end. (69 sts) Next rnd: Using A, k to end of rnd. Next rnd: (K1B, k1A) to last st, k1B. Next rnd: Using A, k to end of rnd. Next rnd: Using A, k to marker, sm, m1R, k11, m1L, k to end. (71 sts) Next rnd: (K1A, k1B) to last st, k1A. Next 2 rnds: Using A, k to end of rnd. Next rnd: Using A, k to marker, sm, m1R, k13, m1L, k to end. (73 sts) Next rnd: (K1b, k3A); rep to last st, k1A. Next 2 rnds: Using A, k to end of rnd. Next rnd: Using A, k to marker, sm, m1R, k15, m1L, k to end. (75 sts) Next rnd: Using A, k to end of rnd. Next rnd: (K1B, k5A) to last 3 sts, k3A. Break B. Next rnd: Using A, k to end of rnd. Next rnd: Using A, k to marker, sm, m1R, k17, m1L, k to end. (77 sts) Next rnd: Using A, k to end of rnd. Next rnd: Using A, k to marker, rm, place next 19 sts on st-holder for Thumb, cast on 2 sts across base of Thumb, k to end of rnd. (60 sts) Next 14 rnds: Using A, k to end of rnd.
Right-Hand Mitten Only
Using locking st marker, PM into st at beginning of next rnd and leave in (this will give you a marker to count in for the lettering chart).
Left-Hand Mitten Only
K30, using locking st marker, PM into st and leave in (this will give you a marker to count in for the lettering chart).
Both Mittens:
Next 4 rnds: Using A, k to end. Next 5 rnds: (K1B, K1A) to end of rnd. Using B, cast off in rib patt.
Thumb
Transfer 19 sts from st-holder and distribute onto 3 dpns (7/7/5). Pick up and k3 sts across cast-off edge at base of Thumb. (22 sts) PM and join to work in the rnd. Next 2 rnds: Using A, k to end of rnd. Next 5 rnds: (K1B, K1A) to end of rnd. Using B, cast off in rib patt.
FINISHING
Lettering
Place mittens so that the base of the fingers are pointing towards you. The thumbs should both be facing inwards.
Right-Hand Mitten Only
Count in 4 sts from marker and place a pin. With C and darning needle, work duplicate st lettering from Chart 1.
Left-Hand Mitten Only
Count in 3 sts from marker and place a pin. With C and darning needle, work duplicate st lettering from Chart 2. Turn mittens inside out so that WS is facing. Press lightly using a warm iron over a damp cloth. Darn in ends.
MATERIALS
King Cole Merino Blend 4-ply (100% Wool, 50g/180m/197yds) as follows:
 1 x 50g ball in shade #046 (Aran) (A)
 1 x 50g ball in shade #048 (Black) (B)
 1 x 50g ball in shade #009 (Scarlet) (C)
4 x 3mm (US 3) dpns
St-holder
Locking st-marker (to mark chart placement)
Darning needle (for duplicate st lettering)
TENSION/GAUGE
32 sts and 42 rows = 10cm (4") over St-st (after blocking)
SIZE
20cm (8") circumference (measured around palm) / 23cm (9½") cast-on edge to top ribbing at base of fingers.
whitespace

Nasty women keep fighting
Armband
Don’t sit on the fence
Wear your heart on your sleeve and speak up! This is not a time for silence and fence-sitting; the world can only be changed by people who care enough. Armbands are a great way to send a message and can be slipped on and off with no fuss. Wear this armband with attitude and tell the world everyone needs to give a damn.
The band itself is easy to knit and gives plenty of room for adjustment over bulky clothes.
DIFFICULTY LEVEL: EASY
NOTES
The lettering on the Armband is not intended to be centered – this allows for size adjustment when attaching the velcro.
whitespace

INSTRUCTIONS
Using A, cast on 100 sts. K 4 rows. Row 5 (RS): K. Row 6: K4, p to last 4 sts, k4. Row 7: K24, using A and B work Row 1 from chart, k to end. Row 8: K4, p13, work Row 2 from chart, p to last 4 sts, k4. Rows 9-29: Cont as set, using A and B to work chart to end. Row 30 (WS): Rep Row 6. Rows 31-32: Rep Rows 5-6. Rows 33-36: K. Cast off.
FINISHING
Press lightly using a warm iron over a damp cloth. Darn in ends. Fit the armband around your arm so that the left-hand side overlaps (remembering to make allowances for clothing) and pin to secure. Attach velcro to each side of the armband, according to fit.
MATERIALS
Patons Fairytale Fab 4-ply (100% Acrylic, 50g/184m/201yds) as follows:
 1 x 50g ball in shade #1099 (Black) (A)
 1 x 50g ball in shade #1022 (Sundance) (B)
1 pair 3.25mm (US 3) needles
10cm (4") strip of velcro
TENSION/GAUGE
30 sts and 40 rows = 10cm (4") over St-st (after blocking)
SIZE
49cm (19") (w) x 12cm (4½") (h) after blocking
whitespace

Give peace a chance
whitespace

Flask Holder
Pass the tea, vicar
Want to remove the stress from a long, tricky protest situation and keep rehydrated at the same time? Passing round a hot, sugary drink should do the trick. When you’re on the move and want to travel light, this handy flask holder will not only send a message, but also easily hold a half-litre thermos flask or cold bottle of water (Bonus: the insulating properties of wool mean it will even stay cooler for longer.).
A quick knit, mostly using moss-st for the main cylinder with garter-st pinwheel circles at the end (knitted on two needles).
DIFFICULTY LEVEL: MEDIUM
whitespace

whitespace

INSTRUCTIONS
Main Cylinder
Using A, cast on 66 sts. Work in moss-st until piece measures 14cm (5½"). Next row: Work 5 sts moss-st, k56, work 5 sts moss-st. Next row: Work 5 sts moss-st, p56, work 5 sts moss-st. Next row (RS): Using A, work 5 sts moss-st, k5, using A and B k46 sts following Row 1 of chart, using A, k5, work 5 sts moss-st. Next row: Using A, work 5 sts moss-st, p5, p46 sts following Row 2 of chart, using A, p5, work 5 sts moss-st. Cont in this way until all 16 rows of chart are complete. Next row: Work 5 sts moss-st, k56, work 5 sts moss-st. Next row: Work 5 sts moss-st, p56, work 5 sts moss-st. Work in moss-st until piece measures 33cm (13") from cast-on edge. Cast off.
Round Ends (make 2)
With A, cast on 10 sts. Row 1 (WS): K8, w&t. Row 2 (and all RS rows): K. Row 3: K6, w&t. Row 5: K4, w&t. Row 7: K2, w&t. Row 9: K across all sts, picking up and working wraps with their companion sts as you come to them. Change to B (but don’t break A). Rows 10-19 below form a segment. **Row 10: Using B, sl1, k to end. Rows 11-19: Rep Rows 1 – 9.** Change to A (but don’t break B). Rep from segment pattern (Rows 10-19) 12 more times, alternating between A and B for each segment. (There should be a total of 14 segments in alternating colours.) Change to A, cast off.
FINISHING
For each Round Side: Sew the cast-off and cast-on edges together. Sew a running st around the centre and gather slightly to close the centre hole. Press all pieces lightly on WS using a warm iron over a damp cloth. Darn in ends. With WS facing, pin and sew the sides of Main Cylinder to the Round Ends, overlapping the cast-on and cast-off edges of the Main Cylinder to form the opening. Turn inside out so RS is facing. Attach the corresponding parts of the velcro to the cast-on and cast-off edges.
Strap
Sew a D ring to each side of the Round End near the top edge, so that the lettering motif faces outwards when you sling the holder over your shoulder. Cut the canvas webbing in half and sew a 1.25cm (½") hem at each end of both pieces to prevent fraying. Fold the end of one of the lengths around the D ring and sew to secure. Rep for the second length on the other D ring. Thread the slider onto one of the lengths and thread the other through. Adjust to preferred length. Drink to victory!
MATERIALS
Patons Wool DK (100% Wool, 50g/125m/136yds) as follows:
 1 x 50g ball in shade #171 (Olive) (A)
 1 x 50g ball in shade #174 (Mustard) (B)
4mm (US 6) needles
22.5cm (9") strip of velcro
76cm (30") x 2.5cm (1") wide canvas webbing (for strap)
2 x 2.5cm (1") D rings (to attach strap to holder)
1 x 2.5cm (1") slider (to adjust strap)
TENSION/GAUGE
31 sts and 38 rows = 10cm (4") over moss-st (after blocking)
SIZE
11cm (4½") (d) x 30cm (12") (l)
whitespace

We’re not nasty, we’re revolting
Resist Scarf
Raise it high!
Strike a pose and hold your scarf with pride. Well, if this humble piece of neckwear is good enough for football supporters to declare passion for their team, why shouldn’t it be put to good use by ardent protestors? Yes, it might get a bit hot if you’re wearing it en route on a hot day, so just stuff it in your bag and surprise everyone by hoisting it at the last minute.
Knitted back and forth using stranded colourwork, the scarf is pretty straightforward if you know your way around a colour chart, and is a great one to get your teeth into.
DIFFICULTY LEVEL: DIFFICULT
NOTES
Although this scarf is worked flat (back and forth) a circular needle is recommended due to the large number of stitches.
whitespace

whitespace

INSTRUCTIONS
Using 4mm circular needle and A, cast on 329 sts. Work in moss-st until piece measures 5cm (2") from cast-on edge. The middle section of the scarf is worked in St-st with 11 sts worked in moss-st at beginning and end (as set in next two rows): Next row (RS): Work 11 sts moss-st, k to last 11 sts, moss-st to end. Next row: Work 11 sts moss-st, p to last 11 sts, moss-st to end. Next row: Work 11 sts moss-st, k71, using A, B, C and D as indicated, work Row 1 from chart, k71, work 11 sts moss-st. Next row: Work 11 sts moss-st, p71, work Row 2 from chart, p71, work 11 sts moss-st. Cont as set until all 37 rows of chart are complete. Break yarns B, C and D. Next row (WS): Continuing in A, work 11 sts moss-st, p to last 11 sts, work moss-st to end. Next row: Using A, work 11 sts moss-st, k to last 11 sts, work moss-st to end. Work in moss-st for 5cm (2"). Cast off loosely, taking care to match tension of scarf.
FINISHING
Press lightly using a warm iron over a damp cloth. Darn in ends. Take to the streets.
MATERIALS
Adriafil Regina (100% Wool, 50g/124m/136yds) as follows:
 6 x 50g balls in shade #39 (Avio Blue) (A)
 2 x 50g balls in shade #35 (Dark Orange) (B)
 1 x 50g ball in shade #02 (White) (C)
 1 x 50g ball in shade # 48 (Night) (D)
4mm (US 6) circular needle (150cm (60") long)
TENSION/GAUGE
22 sts and 32 rows = 10cm (4") over St-st (after blocking)
SIZE
150cm (50") (w) x 30cm (11¾") (h)
whitespace

You are not the boss of me
Open-Top Mittens
Bad news day
Sometimes you want a gentler type of protest, a polite, understated way of saying the situation just isn’t working for you. These Mittens serve just that purpose and, aside from protests, can cover a multitude of bad news days. Plus they’re really handy when you’re on the move and need your fingers to make a gesture, which will express your feelings… er… more explicitly.
Knitted in the round in contrast colours, with duplicate stitch lettering.
DIFFICULTY LEVEL: MEDIUM
Keep your filthy laws off my silky drawers
whitespace
CHART 1: RIGHT MITTEN

whitespace
CHART 2: LEFT MITTEN

INSTRUCTIONS
Right-hand Mitten
Using A, cast on 42 sts and distribute evenly over 3 dpns (14 sts on each). Join to work in the rnd, ensuring there are no twists and PM. Work 9cm (3½") in (k1, p1) rib. Next rnd: (K2, kfb) 4 times, k18, (k2, kfb) 4 times. (50 sts) Next 5 rnds: K to end of rnd. Start thumb gusset. Rnd 1: Kfb, k1, kfb, PM, k to end of rnd. (52 sts) Rnd 2 (and every even-numbered rnd): K to end of rnd. Rnd 3: Kfb, k to 1 st before marker, kfb, sm, k to end of rnd. (2 sts inc) Rnds 5-17: Rep Rnds 2-3 seven more times. (68 sts) Rnds 18-23: K to end of rnd. Rnd 24: K1, sl next 19 sts on st-holder for Thumb, cast on 2 sts across base of Thumb, k to end of rnd. (51 sts) Divide evenly over 3 dpns (17 sts on each.) Rnds 25-35: K to end of rnd.* Rnd 36: K1, work 25 sts in (k1, p1) rib, turn. Working back and forth only on the last 25 sts, work 2 rows in (k1, p1) rib. Cast off for palm opening. Break yarn and re-join to rem Mitten sts, k to end of rnd. (26 sts) Put the Mitten to one side, keeping rem sts on 2 dpns.
Flap: Using 2 x 4mm dpns and B, cast on 25 sts. Work 8 rows in (k1, p1) rib. Place sts onto a st-holder. ** Return to Mitten and, using B and dpns, work as follows: with 1st needle, k1, then with same needle k15 Flap sts from st-holder; with 2nd needle, k rem 10 Flap sts from st-holder, k8 sts from Mitten; with 3rd needle, k rem 17 sts from Mitten, PM. (51 sts) K2tog at beginning of next rnd, then work in St-st (k every rnd) until Flap measures 7.5cm (3") measured from Flap cast-on rib edge. (50 sts)
Shape Top: Rnd 1: (K8, k2tog) to end of rnd. (45 sts) Rnd 2 (and every even-numbered rnd): K to end of rnd. Rnd 3: (K7, k2tog) to end of rnd. (40 sts) Rnd 5: (K6, k2tog) to end of rnd. (35 sts) Rnd 7: (K5, k2tog) to end of rnd. (30 sts) Rnd 9: (K4, k2tog) to end of rnd. (25 sts) Rnd 11: (K3, k2tog) to end of rnd. (20 sts) Rnd 13: (K2, k2tog) to end of rnd. (15 sts) Rnd 15: (K1, k2tog) to end of rnd. (10 sts)
Break yarn, leaving a long tail. Thread tail through rem 10 sts and draw up tight. Secure yarn.
Thumb: Transfer thumb sts from st-holder to dpns. Join in B, k19 thumb sts, then pick up 3 sts over base of thumb on main mitten, PM. (22 sts) Arrange sts over 3 dpns (7/8/7). Work on St-st until thumb measures 5cm (2") or desired length measured from base of thumb. Next rnd: (K1, k2tog) to last st, k1. (15 sts) Next rnd: K. Next rnd: (K1, k2tog) to end of rnd. (10 sts) Break off yarn, leaving a long tail. Thread tail through rem 10 sts and draw up tight. Secure yarn.
Left-hand Mitten
Follow instructions for Right-Hand Mitten to * (ending on Rnd 35), then work as follows: Rnd 36: K26, work 25 sts in (k1, p1) rib, turn. Now follow instructions for Flap until **. Return to Mitten and using B and dpns, work as follows: with 1st needle, k17 sts from Mitten; with 2nd needle, k rem 8 sts from Mitten, k10 Flap sts from st-holder; with 3rd needle, k rem 15 Flap sts from st-holder, k 1 st from Mitten, PM. (51 sts) K2tog at beginning of next rnd, then work in St-st (k every rnd) until Flap measures 7.5cm (3") measured from Flap cast-on rib edge. (50 sts) Shape Flap top and work Thumb following instructions for Right-Hand Mitten.
FINISHING
Lettering
For both Mittens: Working from RS on top of mittens (hand side), with flap facing towards you, count in 5 sts from Thumb, and 14 rows up from colour change, place a pin. Using C and darning needle, work duplicate st lettering from Chart 1 (Right-Hand Mitten) and Chart 2 (Left-Hand Mitten). Turn mittens inside out so that WS is facing. Press lightly using a warm iron over a damp cloth. Darn in ends.
MATERIALS
Cascade Longwood Sport (100% Merino Wool, 100g/250m/273yds) as follows:
 1 x 100g ball in shade #30 (Silver Heather) (A)
 1 x 100g ball in shade #45 (Orange) (B)
 1 x 100g ball in shade #21 (Blue) (C)
4 x 3.75mm (US 5) dpns
4 x press studs
2 x St-holders
Darning needle (for duplicate st lettering)
TENSION/GAUGE
24 sts and 32 rows = 10cm (4") over St-st (after blocking)
SIZE
20cm (8") circumference (measured around palm) / 30cm (11") cast-on edge to tip
whitespace

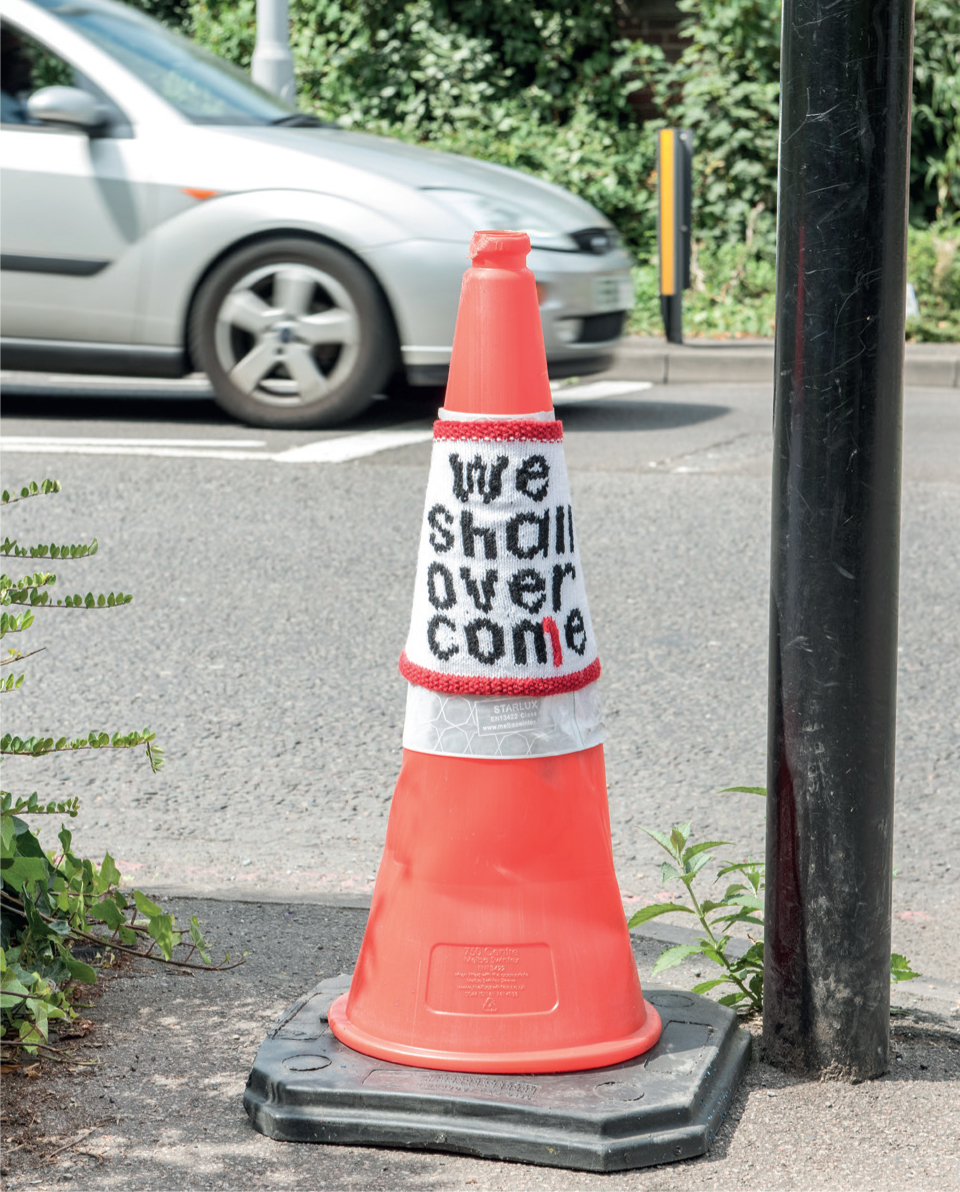
Traffic Cone Sleeve
We shall overcone!
The joy of a graffiti knit is the element of surprise, so it needs to be quick to install and easy to remove (ensuring no long-term damage or hazards). Enter the ubiquitous traffic cone. It’s not the most beautiful of things; fancy giving one a makeover? As students long ago discovered, they’re just crying out to be messed with… This project gives them a pun-tastic twist with a deeper message.
This cone sleeve is straightforward to knit on two needles with a bit of colourwork and velcro sides to fit.
DIFFICULTY LEVEL: MEDIUM
NOTES
The sleeve is worked mainly in St-st with 5 moss-sts at beginning and end of each row, and 5 rows of moss-st at cast-on and cast-off edges. The shaping is worked every 8th row.
whitespace

whitespace

INSTRUCTIONS
Using 3.25mm circular needle and B, cast on 107 sts. Rows 1-5: Work 5 rows in moss-st. Break B. Row 6 (RS): Using A, work 5 sts in moss-st, k to last 5 sts, work 5 sts in moss-st. Row 7: Work 5 sts in moss-st, p to last 5 sts, work 5 sts in moss-st. Row 8 (dec row): Work 5 sts in moss-st, k21, k2tog, k1, k2tog, k45, k2tog, k1, k2tog, k21, work 5 sts in moss-st. (103 sts) Row 9: Work 5 sts in moss-st, p to last 5 sts, work 5 sts in moss-st. Row 10: Work 5 sts in moss-st, k to last 5 sts, work 5 sts in moss-st. Row 11: Work 5 sts in moss-st, p24, using A, B and C, work 45 sts from chart, p to last 5 sts, work 5 sts in moss-st. Row 12: Work 5 sts in moss-st, k24, work 45 sts from chart, k to last 5 sts, work 5 sts in moss-st. Rows 13-14: Rep Rows 11-12. Row 15: Rep Row 11. Row 16 (dec row): Work 5 sts in moss-st, k20, k2tog, k1, k2tog, k 43 sts from chart, k2tog, k1, k2tog, k20, work 5 sts in moss-st. (99 sts) Rows 17-23: Work even in patt as set, continuing to work chart. Row 24 (dec row): Work 5 sts in moss-st, k19, k2tog, k1, k2tog, k 41 from chart, k2tog, k1, k2tog, k19, work 5 sts in moss-st. (95 sts) Rows 25-31: Work even in patt as set, continuing to work chart. Row 32 (dec row): Work 5 sts in moss-st, k18, k2tog, k1, k2tog, k39 sts from chart, k2tog, k1, k2tog, k18, work 5 sts in moss-st. (91 sts) Rows 33-39: Work even in patt as set, continuing to work chart. Row 40 (dec row): Work 5 sts in moss-st, k17, k2tog, k1, k2tog, k37 sts from chart, k2tog, k1, k2tog, k17, work 5 sts in moss-st. (87 sts) Rows 41-47: Work even in patt as set, continuing to work chart. Row 48 (dec row): Work 5 sts in moss-st, k16, k2tog, k1, k2tog, k35 sts from chart, k2tog, k1, k2tog, k16, work 5 sts in moss-st. (83 sts) Rows 49-55: Work even in patt as set, continuing to work chart. Row 56 (dec row): Work 5 sts in moss-st, k15, k2tog, k1, k2tog, k33 sts from chart, k2tog, k1, k2tog, k15, work 5 sts in moss-st. (79 sts) Rows 57-63: Work even in patt as set, continuing to work chart. Row 64 (dec row): Work 5 sts in moss-st, k14, k2tog, k1, k2tog, k31 sts from chart, k2tog, k1, k2tog, k14, work 5 sts in moss-st. (75 sts) Rows 65-67: Work even in patt as set, continuing to work chart. Rows 68-71: Work even in patt as set. Break C. Using A, cont as follows: Rows 68-71: Work 5 sts in moss-st, work to last 5 sts in St-st, work 5 sts in moss-st. Row 72 (dec row): Work 5 sts in moss-st, k13, k2tog, k1, k2tog, k29, k2tog, k1, k2tog, k13, work 5 sts in moss-st. (71 sts). Rows 73-74: Work even in patt as set. Break A. Rows 75-79: Using B, work 5 rows in moss-st. Cast off.
FINISHING
Press lightly using a warm iron over a damp cloth on WS. Darn in ends. Attach velcro to each side of the sleeve. Place on convenient traffic cone and run.
whitespace
MATERIALS
Patons Fairytale Fab 4-ply (100% Acrylic, 50g/184m/201yds) as follows:
 1 x 50g ball in shade #1001 (White) (A)
 1 x 50g ball in shade #1030 (Red) (B)
 1 x 50g ball in shade #1099 (Black) (C)
3.25mm (US 3) needles
18cm (7") strip of velcro
TENSION/GAUGE
30 sts and 40 rows = 10cm (4") over St-st (after blocking)
SIZE
20cm (8") (h) x 35.5cm (14") (w) (measured at base) / 24cm (9½") (w) (measured at top)
whitespace

The oceans are rising and so are we
whitespace
