CHAPTER 2
How It Works
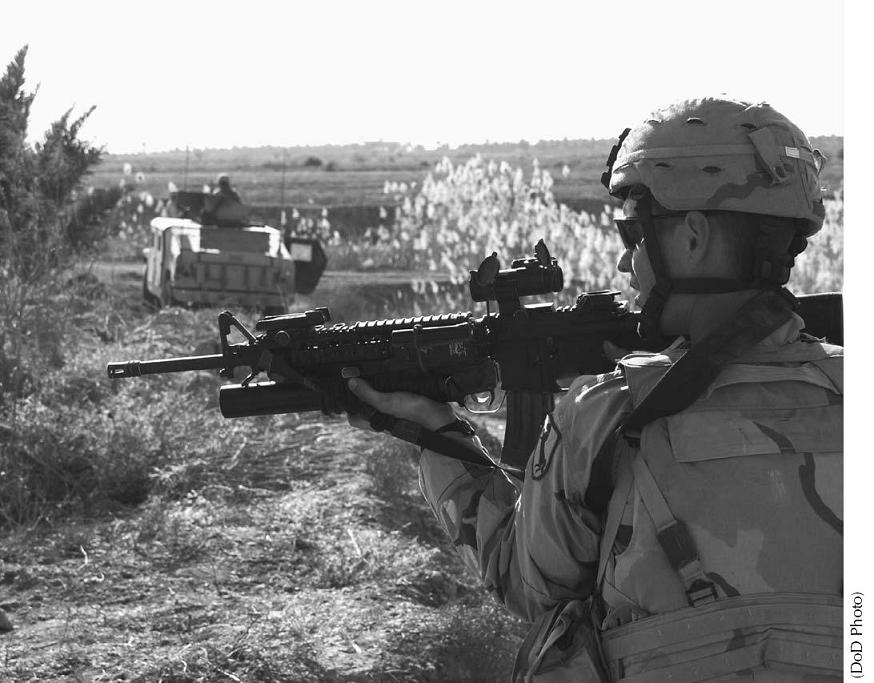
The basic AR-15/M-16 platform has worked so well for so long that the firearm has become the weapon of choice for most of the free world’s armed forces. The same flexibility of the design allows units and soldiers to optimize performance.
Many books and manuals explain in sketchy detail how the AR-15/M-16 works. Some include charts showing which malfunctions are caused by what problems, and potential solutions. All are short, skimpy on mechanics and background, and only a minimal guide. If all you do is read this chapter, pay close attention to the information, and stop now and then to mentally construct a three-dimensional model that you then move through its steps, you’ll be far ahead of many courses you could pay good money for. To cover completely the intricacies, dimensions, tools and techniques for working on the AR-15/M-16 would require this entire volume. (And will probably come to pass in the future.) What I’ll do here is give you a thorough explanation of what happens, so you can understand the rifles I’m testing in Volume 1. And then when we go into more detail of working on modifications and accessories in Volume 2, you’ll know exactly what’s going on.
As far as explaining how the AR-15 works, we can break it down into two areas: The Gas System, Bolt, Carrier and Buffer, and The Fire Control Mechanism. The two parts are perceived differently by many shooters: For the most part the gas system is mysterious and complicated, while the fire control system is viewed as a simple thing. Ahem. In fact, the gas system is simplicity itself (at least in concept and function) while the fire control system can be a snakepit of small, mysterious functions that have to be tuned by knowledge and experience of the AR-15, and not by previous experience with other firearms. So, we’ll take the mystery out of the gas system first.
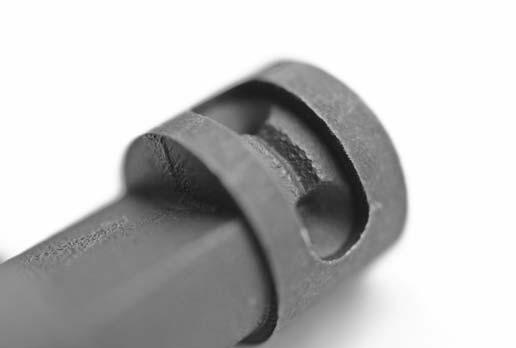
The direct-impingement gas system was not invented by Stoner. As mentioned earlier, it was in relatively wide use prior to the AR system, in the Ljungman rifles and the French MAS 44 and 49. In function, it is quite simple: instead of the gas port in the barrel directing gas to the head of the operating rod, as in the M-1 Garand, or a short piston, as in the M-1 Carbine or M-14, the gas in the AR-15 is directed straight back to the bolt carrier. There is nothing in the tube you see on top of your barrel except empty tube. No pistons, no valves, nothing. The end of the gas tube inside the front sight housing is sealed. There is a hole short of the end of the gas tube that lines up with the clearance hole through the front sight housing, where it rests snugly around the barrel and the gas port. At the other end, the gas tube has a small raised lip. That lip rides inside the key on the carrier.
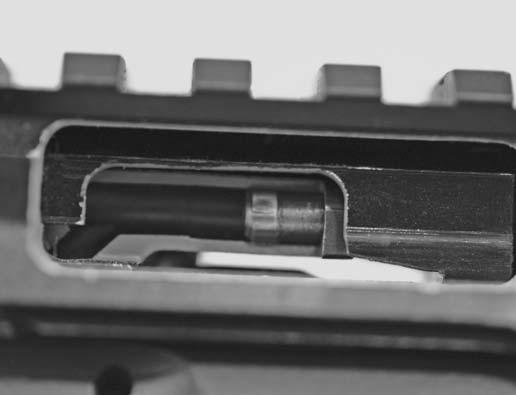
The carrier key rides over the gas tube, where the tube sticks into the upper receiver.
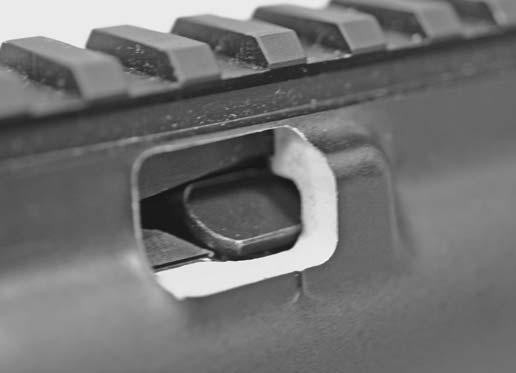
The cam pin pivots to the side, turning the bolt. That’s why that square lump is there, on the left side of your upper.
The bolt rides inside and on the centerline of, the carrier. There is a hole through it, and the cam pin sticks through the hole. (The firing pin passes through a hole in the cam pin, in the hole in the bolt. Sort of like a Chinese puzzle.) The carrier has a slot in it that the cam pin sticks through. The carrier slot is crooked. Behind the carrier are the buffer and the buffer spring.
Lets start the sequence from firing. The firing pin strikes the primer and the powder burns. The bullet is pushed forward through the barrel (and this is the entire reason for the existence of all these parts) and out of the muzzle. When the bullet passes the gas port, the gas expands into the gas tube. (That is what gas does; expand into the available volume.) The gas tube is almost instantly pressurized to the same level as the bore, and remains at the same pressure as the bore until the bullet leaves the muzzle. The name for this time period is “gas dwell time.” The pressurized gas exerts force on all the walls containing it. The only one that can move is the carrier, pressurized by way of the carrier key, with the gases expanding into the key, rear of the bolt and interior of the carrier. Movement of the carrier is not instantaneous, as the gas must first overcome the inertia of the carrier and buffer weight. Then it must begin working against the power of the buffer spring. The bolt has not moved by the time the bullet has left the muzzle, and only begins to move once the carrier inertia has been overcome. The term for the time gap here is “mechanical dwell time.”
Once the carrier begins to move, it does not stop until it either has delivered all of its recently-acquired energy into compressing the buffer spring, or the entire assembly bottoms out in the rear of the buffer tube.
The moving carrier pulls off of the bolt. The crooked cam pin slot forces the cam pin to move from the side (where it rests at closing) to the center of the carrier. In so doing it rotates the bolt. The seven lugs of the bolt (the eighth lug would be where the extractor rests) are turned out of engagement with their corresponding locking lugs in the barrel extension. The mechanical dwell time has allowed the case pressure to vent through the bore. And the mechanical spring of the flexing case under pressure has had time to work, partially or completely breaking the frictional bond between case and chamber wall. Rotation of the case (even partially) completes breaking of the frictional bond between case and chamber wall. All rotating bolt mechanisms perform the partial rotation of the case to one degree or another. The rotation aids in extraction, as the case friction to the chamber is diminished. H-K firearms do not have this “primary extraction” that breaks the frictional bond. They must therefore depend on a fluted chamber to diminish frictional forces prior to bolt extraction. The lack of primary extraction is the root cause of the family of H-K rifles having fluted chambers, extreme ejection distances, and severe recoil. (The recoil and ejection distance both come from the high bolt velocity needed to ensure absolute reliably when dealing with a lack of primary extraction.)
Once unlocked, the bolt is not done. It is dragged back by the carrier, and will retain (hopefully) the fired case as it moves. The bolt extractor has the case rim hooked on the right side (from the shooter’s viewpoint, left side in a Stag Arms lefty rifle) while the ejector maintains continual pressure on the left side of the case head, via its spring. Once the case clears the chamber, the ejector spring pivots it out of the way.
A brief aside to consider the path of the brass. The brass pivots out of the bolt face, into the open air. It takes a considerable amount of heat with it, something firearms engineers plan for. One of the problems the German Army and H-K had with the caseless G-11 they were working on when the Berlin Wall fell was just that: what to do with the heat generated by the burning powder, if there is no case to remove much of it in the cycling stroke? But back to the AR-15/M-16. The case flips out into the air, hopefully to fall unobstructed to the ground. Left-handed shooters know that it is entirely likely that if they shoot a “slickside” AR, one of the original M-16s or M-16A1s, a Colt SP1, or something built to resemble them, they could be in trouble. You see, the typical ejection path of brass from a 20-inch slickside rifle is back at a sharp angle. A left-handed shooter quite often gets pelted with hot brass. The later models incorporated a brass deflector, or lump, on the side of the upper receiver. It is possible to do some diagnosing of an ARs problems by observing which direction, and how far, the brass goes.
On deflector-equipped rifles, the case has only enough time to exit the port before it (still traveling rearwards, due to inertia) it strikes the deflector. The result in a 20-inch rifle is to direct the brass 90 degrees to the side. On shorter-barreled rifles, the brass goes forward at a 45-degree angle.
In all cases it bounces off the exterior of the rifle, leaving brass marks. The brass marks aren’t too bad, but the hot brass on your arm or shoulder is.
Back to the bolt and carrier. The brass ejected, the carrier continues its travel until all of its energy has been converted into either potential energy stored in the spring, or potential energy and heat produced by the impact as the column of parts bottoms out in the end of the buffer tube.
If there is no more ammunition in the magazine (and the magazine is in good repair) the rear of the follower lifts up, pressing on the bolt hold-open, and blocks the bolts forward progress. The bolt “locks back” and you are thus signaled that you are out of ammunition. (Which, by the way, is Farnam’s First law of Gunfights: the number-one malfunction encountered in shootouts is running out of bullets.) If the magazine is not empty, as soon as the carrier uncovers the magazine the top round is pressed upwards and to the feed lip by the magazine spring.
The carrier, having delivered all of its energy to the buffer and spring, now receives it again, converting that potential energy back into kinetic energy. The spring drives the buffer and carrier forward. One of the two bottom lugs of the bolt engage the rear of a cartridge, and drive it forward. The round strips out of the magazine and up the ramp to the chamber. The cartridge rides forward of the bolt until it is centered in the chamber (but not fully seated) and only at that point does the cartridge base line up with the recessed bolt face. The bolt, pushing the cartridge ahead of it, continues forward until the cartridge bottoms out in the chamber. The bolt stops, and as its last function of chambering the extractor snaps over the cartridge rim.
With the bolt stopped, the carrier continues forward, pushed by the buffer and spring. The carrier now shoves the cam pin, via the cam pin slot, rotating the bolt. The bolt lugs slide under the locking lugs of the barrel extension. Once the carrier is completely forward, the action is closed but not quite ready to fire. You may have noticed when handling the buffer that there is something moving inside of it. When the carrier crashes against the barrel extension on closing, it will bounce. Steel striking steel will always bounce, the collision is (in the technical sense) completely elastic. The free-sliding weights in the buffer act as a dead-blow hammer. In a dead-blow hammer used for construction, the weight inside the hammer moves back during the acceleration, and then when the hammer stops, hurls forward inside the hammer to strike the inside front face just as the hammer would otherwise be bouncing off the struck object. The bouncing carrier proved to be problematic in full-auto fire. If the hammer happened to fall just as the carrier was bouncing away from the barrel extension, the hammer could not strike the firing pin properly. You’d be in mid-burst and have the hammer suddenly down on an unfired cartridge. Most embarrassing. By adding the dead-blow weights to the buffer, the designers dampened the bounces of the carrier on closing. Once the buffer weights have crashed forward, the rifle is ready to fire.
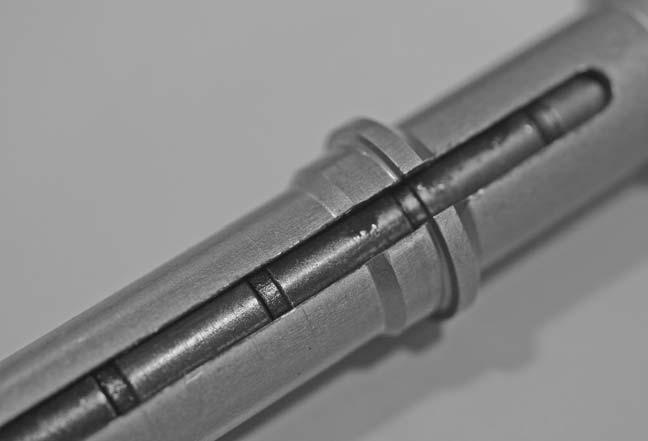
The buffer has free-sliding weights, to act as a dead-blow hammer when closing.
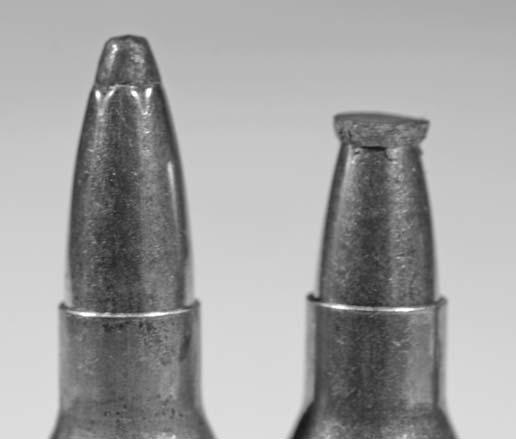
Only bullets in good condition will feed and chamber. Don’t expect dented softpoints to find their way.
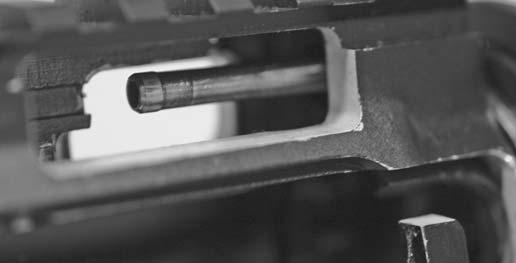
When the bolt and carrier are back, the gas tube is all by itself in the upper. It must be correctly aligned, or the wear of firing will eventually cause a loss of gas pressure seal.
The carrier key is hollow, and the gas builds up in the carrier behind the bolt.
The front sight is part of the gas system, holding the gas tube and lining it up with the barrel port.

Adjustable gas blocks allow you to throttle down the gas flow, restricting pressure and volume.
With the basics of the mechanism laid out, now let us look into the intricacies of, and occasional problems in, the upper and gas system.
Gas Tube High Points
The gas tube is merely a conduit for the gas, from the barrel gas port to the carrier key. Your only control over gas flow comes from either the load selected, or a variable gas port gas block. High-end custom guns will often have an adjustable gas port. The adjustment screw acts to block excess gas from entering the tube. Load selection comes from the selection of one or another powder. The burn rate of the powder the case is loaded with can have an affect on gas port pressure.
A fast-burning powder will have entirely combusted before the bullet moves from the case. The time/pressure curve of the powder will have a sharp peak, then taper off as the bullet moves down the bore. To consider the gas port, think of the curve chart as having a “window” at the distance of the gas port. The window is the acceptable high and low gas port pressure. The curve of the powder being used has to pass through the window. A fast-burning powder may have the tail of the curve taper off too fast, the curve comes under the window, and the port pressure is too low to cycle the action. Why not use more powder? Because the cartridge and rifle have an acceptable chamber peak pressure. The fast-burning powder reaches that peak before the tail of the curve has risen enough to pass through the window.
With low port pressure, the gas tube cannot deliver enough gas to the carrier to both overcome its inertia, and deliver enough additional energy to the carrier to fully cycle the rifle. And the rifle ends up short-stroking, either closing up on an empty chamber, or moving back just far enough to let the top round tip up but not lift up.
Slow-burning powders have the opposite problem. Slow burning powders (also known as “progressive” or “magnum”) have a burn curve that does not taper off as quickly as a fast-burning powder. They continue burning longer (relatively speaking) than fast powders, continuing to accelerate the bullet. The curve has its peak later than the fast-burning powder, and the tail does not taper off as quickly. In mechanics and statistics, we learned very early that “work is the area under the curve.” The more you can stretch the curve out, the more work is done. In this case, accelerate the bullet. Thus, progressive or magnum powders deliver more velocity. As with everything else in life, the velocity gain is not free. You gain velocity by using more powder, which has to funnel through the case neck and chamber throat, increasing barrel wear in the throat. You also have a louder muzzle blast. Your bullet arrives at the muzzle with a column of powder gases behind it that are at a higher pressure than it would have with the fast-burning powder all that powder creates more noise when released to the air.
And similarly, it arrives at the gas port with a column of gases at a higher pressure. In some cases, higher than the window you are aiming for. Using a slow-burning powder can over-pressure the gas tube. Why is this a problem? Remember the gas dwell time? While the bullet is continuing to the muzzle, the gases are acting on the carrier. If the pressure is too high, the gas tube delivers too much gas to the carrier. The carrier inertia is overcome sooner and faster, and the higher unlocking speed shortens the mechanical dwell time. Thus the carrier moves, and attempts to turn the bolt and extract the empty, much earlier than it otherwise would and with greater force. The case is still stuck firmly to the chamber wall. The extractor either slips off the case, or rips through the rim.
An adjustable gas block allows you to restrict the opening, slowing the rate of gas flow, and offsetting the too-great gas port pressure. However, if you use a slow powder and adjust the gas port to allow normal function, the rifle will short-stroke when fed ammunition loaded with the typical powder used in .223 Remington/5.56 NATO ammunition.
All of the explanation is simply preface to the nearly universal admonition: There is no problem you can solve by drilling out the gas port. Do not drill the gas port! If your rifle is malfunctioning, find the problem, do not mask it by delivering more gas to the system and over-riding the problem.
Can gas tubes get clogged? Some say yes, but I’ve never seen it. After all, you’re pressurizing that tube with 14,000 psi of hot abrasive gases every time you fire it. What will stick? Can they wear out? Yes. If the spigot in the upper is misaligned, the key will bang into it and flex it straight each time the action closes. The tube seals when it is centered in the key, pressurizing the carrier. With a non-straight tube you’ll have higher friction on one side, which can wear the tube. Once the tube wears down enough, the tube stops flexing, and you do not have a gas seal. To check a new rifle, remove the bolt assembly from the upper and remove the bolt from the carrier. Then gently slide the carrier (with the operating handle in the upper) into the upper and over the tube. If the tube is misaligned you’ll feel the carrier drag, and flex the tube, before coming to rest. How can tubes be bent? If the barrel nut is not perfectly timed when tightened, the tube has to snake past the top notch and into the upper. It is then tilted as seen by the carrier key. Use a large screwdriver to bend the gas tube end until it lines up and slides into the key without binding.
Carrier Essentials
The carrier key must be tight. While most rifles have keys that are tight and will stay tight, some will come loose. A loose key allows gas to blow out of the interior, causing short stroking. The problem is not insufficient gas, but gas leakage.
Remove the key, scrub everything clean (even run a tap down in the threads if you have one) and then Loctite and re-stake.
Occasionally, I see keys where the screw head has been broken. The key can stay on and tight with only one screw, but consider it only an emergency-use situation. The trick is to remove the screw that is left, and once the stub of the broken screw is uncovered you can usually remove it with a pair of vise grips as your wrench. When you replace the key, use new screws. The existing one may have been taking the entire brunt of the gas flow for some time, and may be ready to break.
Keep the carbon scrubbed out of the interior with the Mark Brown tool.
Lubricate the entire carrier to keep the carbon soft. The only bearing surfaces are the “rails” you see on either side of the key, and the ones down near the bottom. They ride on the interior of the upper. Periodically, check your carrier for cracks. While rare, the usual place is in the upper front, from the front face to the cam slot for the cam pin. Less common are cracks on the sides, where the carrier is thinnest for the hammer clearance area. If you have an M-16 carrier that has been ground or machined to something approximating the AR-15 configuration, check the ground area now and then. The grinding may have overheated the area, or created sharp edges that could act as stress risers. If your carrier is cracked, the only thing you can do is replace it.
Bolt Essentials
Your bolt must be kept clean and free of carbon. You must have three gas rings, and they should be in good condition.
To check, work one out. To remove a gas ring, get the tip of a knife or a safety pin into the gas ring slot and hook one ring near its gap. Lift the end out, and then run the tip around the bolt, lifting the ring out. (Yes, just like you’d treat a tire.) If you try to pull it out at once you’ll over-flex it, damage it, and make it useless. Check the thickness of the ring at the hooked end. If the ring is half or less thick at the narrowest part, compared to a new ring, replace them. Gas rings are cheap. If you have to replace one, do them all.
Check the extractor. The hook must be sharp and complete. Worn, chipped or damaged extractors must be replaced. If the spring lacks a buffer, install one. If up to that point the rifle has been extracting and ejecting just fine, re-use the old spring. If not, put in a new spring along with the little buffer. The extractor spring rests in a lipped hole drilled into the extractor. You cannot simply lift it out. Again use your knife point and hook the spring at one point. Then lift and turn to work the spring out. Replace the spring by starting one side under the lip, and then running the knifepoint around the edge to compress the base coil into the recess.
Extractors on the AR are weak. There just isn’t a lot of room in there, so you can only get so much extractor lip and spring to work with. Thus, the internal buffer thingies. The older ones will be weaker, and be tan, green or red. The newer ones will be blue or black. If your extractor lacks one, install one. Additionally, you can add an external booster. The first one I learned of, and found it worked well enough to not bother experimenting further, is the “D-Fender” from Mack Gwinn. Shaped like a “D” it slips over the extractor spring with the flat toward the chamber. It adds extractor tension to the assembly, and increases the likelihood that the brass will be extracted as it is supposed to be. Since then, others have come out with similar products. You can’t just use a small rubber “O” ring, for the environment of lubricants, solvents and abrasive powder residue may dissolve polymers not formulated to take the work. But if an AR maker offers one, it is probably made of tough enough stuff.
The ejector is spring-loaded. To remove it you should use the Sinclair bolt tool. Compress the ejector, drift the pin out, then unscrew the tool. Often, the ejector spring will be stuck in the tunnel by a combination of carbon and old oil. You may have to tap it against a table or the vise to move it. If that doesn’t work, a pin or needle can be used as a pry bar to lever it out. Don’t get the bright idea of using compressed air to move it. The spring will travel quite a distance, probably not to be found. (The record so far, at least of found springs, is 32 feet.) Sometimes the ejector and spring will come out along with a pile of brass shavings. Always a bad sign, it usually means that you’re either using ammunition with soft cases, or you are reloading your ammo too hot. The shearing mechanism works this way: when the round is fired, the case expands in all directions. The case head expands back against the ejector. Since the ejector is spring-loaded, it can allow the case head to expand past the surface level of the breechface. Then, when the bolt turns, the now-raised brass at the ejector is either burnished flat (leaving a bright spot) or burnished and some of it is shorn off. That little bit of brass shaving has to go somewhere. Often it simply clings to the bolt. It can easily get sucked into the ejector tunnel as the ejector cycles. When enough build up, the ejector binds and fails to eject the empty just fired. Other times it builds up enough to bind chambering, preventing the bolt from closing, or constricting headspace enough to cause function problems.
Rarely, the brass-shaving problem is caused by the ejector not having been beveled on the top. The sharp edge can shave brass more efficiently, leading to a quick stoppage. A sharp-edged ejector used in combination with soft brass can bring a rifle to a stop in a couple of magazines of firing.
Headspace
Headspace is this mysterious property that all firearms have. Mysterious in that no one ever explains it properly. Here goes: headspace is the chamber room. Too little and the bolt can’t compress the case enough to close. Too much and the case will stretch when firing. (Remember, the case expands when fired, and given enough room it will stretch until it breaks) Some stretch reduces useful case life. Too much stretch breaks the case on firing.
Cartridges are made to maximum and minimum dimensions. The minimum is the shortest length and diameter that will allow for a useful case life and good accuracy. (American ammunition makers long ago realized their customers would be reloading, so useful case life is an important part of dimensioning a production lot.) The maximum case dimensions are still less than the minimum chamber dimensions. The minimum chamber dimensions are large enough to safely chamber the largest case allowed by the cartridge specifications. And the maximum chamber dimension is the largest size that the smallest case can be fired in, be safe, and have a useful case life.
The important thing to remember is that all things are relative. As an example, a benchrest shooter will have his chamber neck cut to a size barely a thousandth of an inch larger than his case neck. Since he is hand-turning his case necks, he measures each one, and he’ll have 20 or 30 cases (total!) that he uses, his max/min dimensions are different than yours. He does not have to have a rifle that can use any factory ammo, or surplus that he gets at a bargain. His rifle is safe with his ammo, as the two are tuned to each other. You cannot have the chamber on your AR cut to his dimensions, and still be able to safely use factory or surplus ammo. Some will have necks too thick for your tight-neck chamber.
Headspace can be adjusted in some rifles. Those with chrome-plated chambers and bores cannot have the headspace adjusted by reaming the chamber. They can be adjusted only by fitting a new bolt, one with the lugs and breechface cut to fit that particular chamber. A mil-spec rifle will have all the parts held to very close tolerances, where the bolt can be exchanged between rifles, because they will all fall within the limits of proper headspace. Rifles with carbon or stainless steel barrels can have headspace increased by reaming the chamber. All rifles can have the headspace decreased only by replacing the bolt with one that closes to a smaller headspace. Theoretically, you could decrease headspace by removing the barrel from the barrel extension, lathe-turning its shoulder back a thread, re-installing it, and thus take up excess headspace. I say “theoretical” because there are now going to be all kinds of problems since the front sight housing sits a thread farther back, the gas tube does as well, and then there is the little matter of getting the handguards to fit in the shortened space. At first glance, this traditional gunsmithing method of shortening excess headspace seems like it will work. But the more you think about it, the less attractive it becomes.
The Lower:
What Goes On In There?
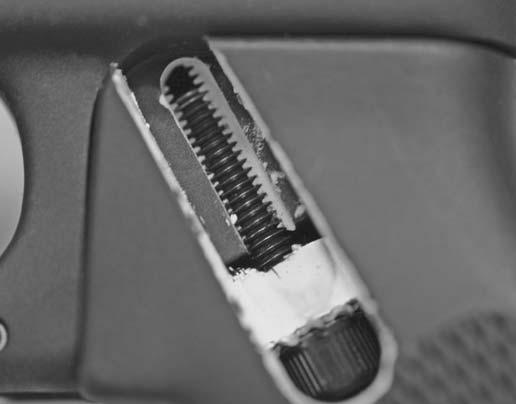
The easy part of the lower is the buffer tube and its spring and weight. The tube simply holds the buffer and spring, and is the attachment point for the stock. I’ve seen a bunch of rifles assembled by people who were guessing about assembly, and the main problems seen are the use of a thread locker, and not getting the tube in the right position. There is one place you need use a threadlocker, and that is holding the carrier key to the carrier. Otherwise, using goo to hold stuff together is a clue the assembler either didn’t know his stuff, or was taking shortcuts. Screwing the standard tube on is simple: it has a stop shoulder. Just make sure you hold the buffer retainer down against its spring while you tighten the tube. Wring it on hand-tight. For those installing a tele-stock, you have no shoulder to stop you. You must tighten the tube enough to retain the buffer retainer plunger, but not so much that you cause the buffer tube to bind against the upper when it hinges down to close.
The standard tube stays tight because the stock screw stays tight. The tele-stock tube stays tight from tightening the lock ring, and staking the lock ring and retaining plate.
Use a long buffer in a standard tube, and a short buffer in a tele-stock tube. You can’t use a long in a tele-stock, there isn’t enough room for the mechanism to fully cycle. Conversely, you mustn’t use a shorty buffer in a standard tube. The carrier will over-cycle, or travel too far, and the key will impact the upper ring of the lower tube threads. If you’re lucky you’ll simply shear one or both of the key screws. If you’re unlucky, you’ll crack the lower, and have to buy a new one.
The Colt M-4 uses a new buffer, the “H” or the “H2” buffer. They have one or two, respectively of the internal weights of steel replaced with tungsten. The extra weight slows down the cyclic rate of the M-4 in full auto fire, and relieves the stress of any firing.
Shorty tubes should use recoil springs of 37 to 39 coils, while full-size rifles use springs of 41 to 43 coils. You can use an extra-power spring if you want, but like the 1911, if you have to in order to make the rifle work properly, that is a clue that something else is wrong and should be addressed.
Fire Control Parts
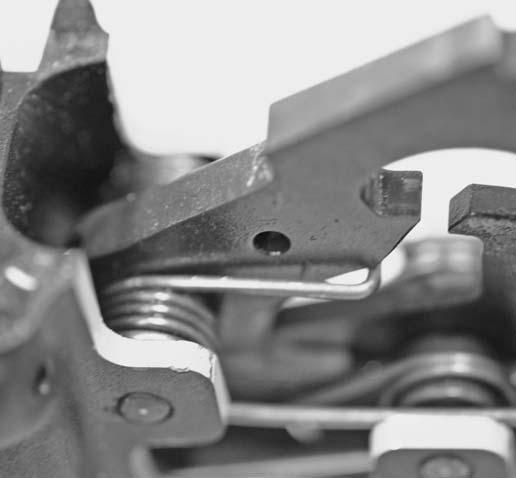
The trigger mechanism of the AR is relatively simple. The hammer has a hook on the bottom, the sear. The trigger tip rests in that notch. When you pull the trigger, you are pulling the tip of the trigger nose directly out of the hammer hook, and when they part company the hammer falls and the rifle fires. The trick is in getting the rifle to fire once, and only once. To do that, all semi-automatic rifles have a part that is called the “disconnector.” It catches the hammer on the rebound, and holds it until you release the trigger to re-set the mechanism.
In the AR, the disconnector is a flat plate that rides in the middle of the trigger. When the carrier cycles, it launches the hammer back and re-cocks it. The small hook underneath the big tail of the hammer is the disconnector hook. When the carrier cycles, your finger is still holding the trigger down. The disconnector, operating on its own spring, hooks and stops the hammer. When the bolt crashes forward, the hammer is held back. Now, the tricky part: if the disconnector lets go of the hammer before the trigger rises high enough (as you release it) to catch the hammer, the hammer will swing forward and fire the chambered round. This is called “early release” or “early timing” and is bad news. What it means is you will fire two rounds, one when you pull the trigger, and one when you release. Technically, you have a machinegun. In the non technical/legal, real world, it means you have an unsafe and/ or badly gunsmithed rifle.
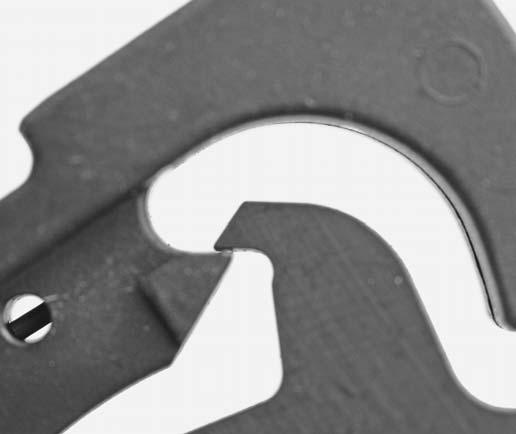
The disconnector holds the hammer back while the action cycles. If not correctly timed, the disconnector can be the cause of many headaches and much trouble.
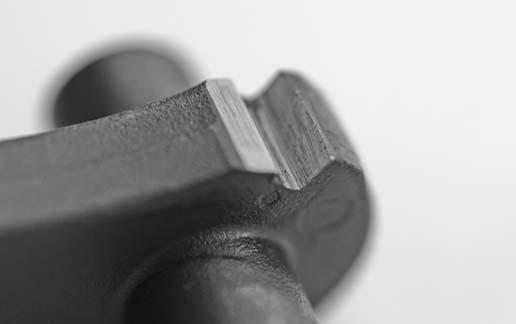
The hammer sear hook. Lube it, keep it clean, but do not stone it.
The disconnector rides in the middle of the trigger.
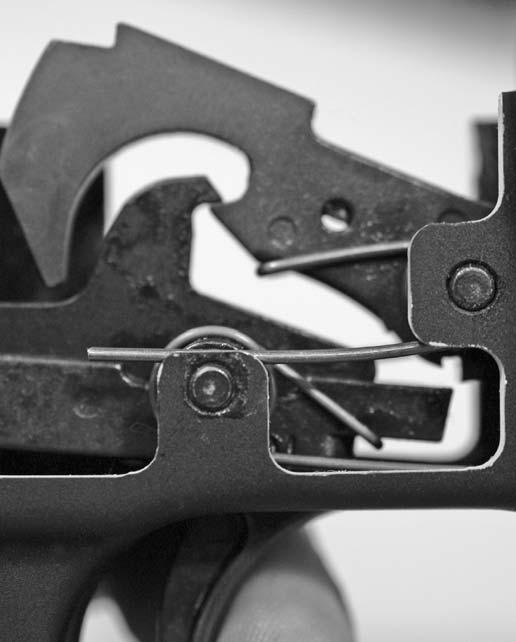
As your finger goes forward, releasing the trigger, the trigger nose rises into the path of the hammer sear.
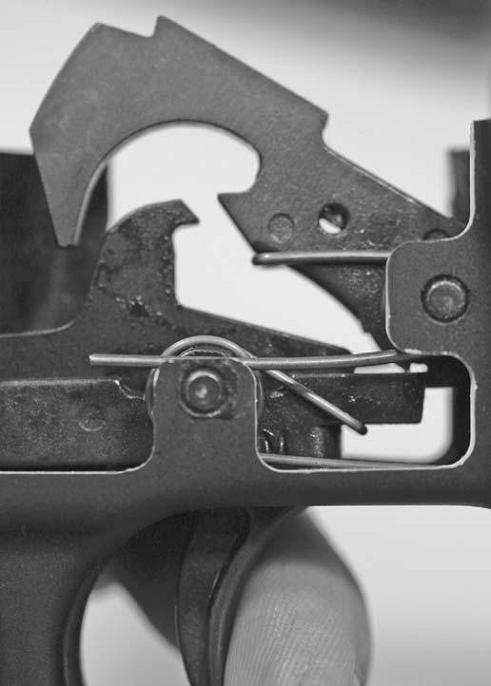
As the disconnector rides off the hammer hook,
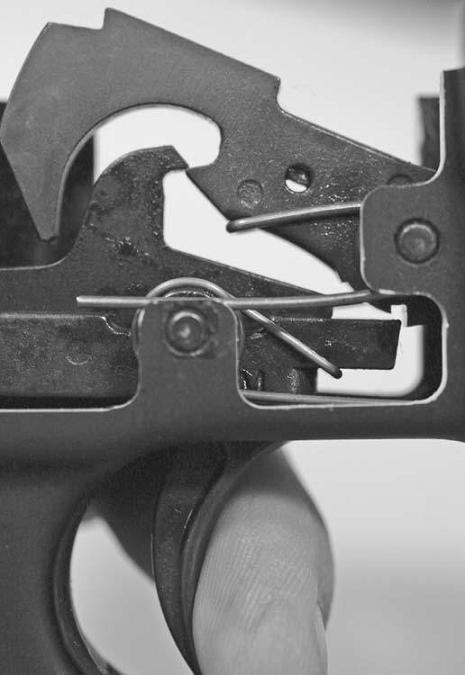
And if correctly timed, the trigger catches the hammer as the disconnector lets go. If the trigger does not catch the hammer, the rifle will fire again. It is dangerous to have a rifle timed early enough to fire on release. Get it fixed!
What you want is a disconnector that releases the hammer only after the trigger rises enough to catch the hammer. It is possible to have a disconnector timed so late that it does not let go of the hammer. If the disconnector is still hooked after the trigger has risen all it will rise, the rifle won’t fire. You want a disconnector timed as late as possible, while still providing 100 percent release of the hammer.
The safety is a rotating bar with a shelf cut in it. The shelf provides clearance for the tail of the trigger to rise when you pull it to shoot. Rotated so the shelf is gone and the bar blocks the trigger, the safety prevents firing. In select-fire rifles, the safety also allows the disconnector on the M-16 or M-4 to pivot up to engage the autosear. There, the trigger is held down by your trigger finger. The disconnector hooks the hammer and holds it cocked. Then, as the carrier closes the last bit, it trips the autosear, which pivots the disconnector, and the hammer gets released. As mentioned in the “Legalities” chapter, the M-16 carrier in and of itself is no big deal. It doesn’t do anything by itself. But the other parts, they can get you in trouble. And they are easy to modify. So, do not keep unmodified M-16 fire control parts on hand.
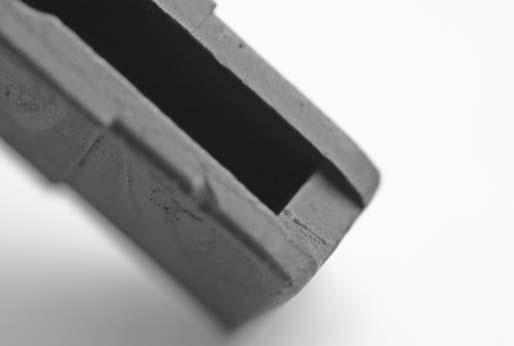
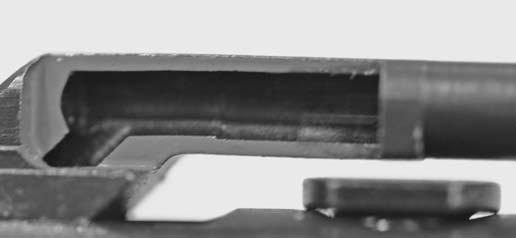
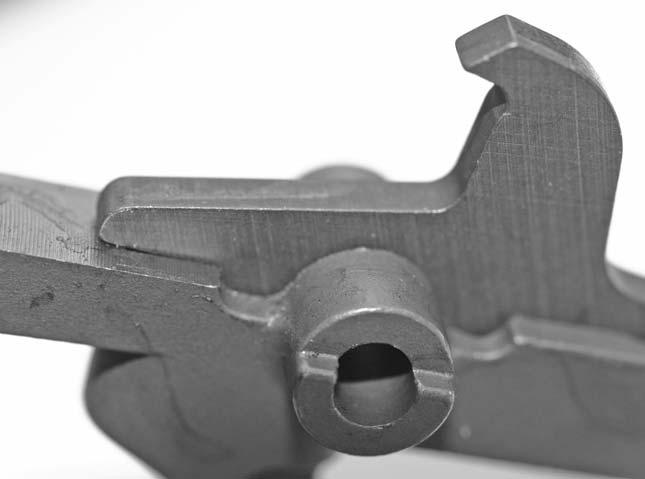
The rear of an AR-15 trigger is enclosed, to prevent the use of an M-16 disconnector.
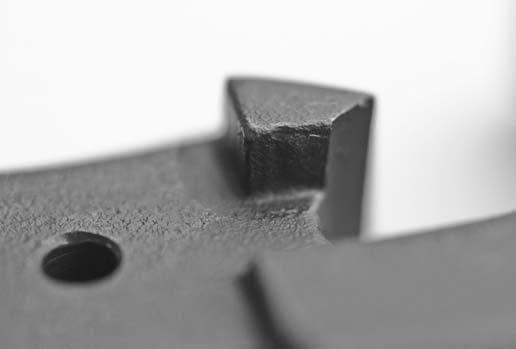
The hook you see on the side of some hammers is the burst-selector autosear. It means nothing, don’t worry about it as long as the top of the hammer is “slick.”
Trigger Pull
In many other firearms, you improve the trigger pull by stoning the engagement surfaces of the hammer and sear. No so in the AR. The hammer and trigger are often (at least in good parts) case-hardened. That is, the surface is hardened but the internal portion of the parts are left relatively soft. Casehardening allows a manufacturer to make parts of relatively soft steel for lower cost and greater ease of manufacture, but use the hardening process to produce parts that will last a long time and resist wear and corrosion.
AR safety levers have two detents, and the middle is solid. M-16 selectors have three detents, and the middle is radically slotted.
The pistol grip holds the detent and spring that hold the safety in each position.
The hammer spring legs must ride on top of the trigger pins, and outside of the trigger spring.
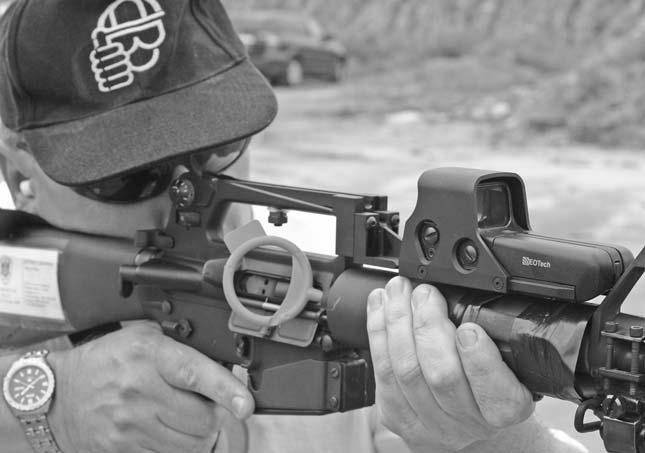
The Chambersafe allows gunhandling in a training environment secure in the knowledge that the chamber cannot hold a round.
If you stone the surfaces, you risk breaking through the hardened surface and subjecting softer steel to the wear of firing. More importantly, as the trigger bears directly on the hammer, if you change the engagement surface angles you risk creating an engagement that is mechanically unable to stand the load. The angles of the trigger and hammer act to keep them together. If you change the angles, you may create a situation where the hammer cams the trigger out of the way. If it wears a bit (soft internals, remember?) the rifle could get to the point that pushing the safety to “Fire” causes it to fire without touching the trigger.
Springs
The hammer and trigger springs have to go together in a particular order. See the photo for the proper way, as in this case a picture is worth a thousand words. When you assemble the lower, pay particular care that the legs of the hammer spring go to the outside of the trigger, and rest in the notches of the trigger pivot pin. If you do not, the trigger pin can work lose, fall out of one side, tipping the trigger and leading to malfunctions.
Safety Pivot
The safety is retained and held to position by a plunger and spring held in place by the pistol grip. The pistol grip screw is sometimes an allen-head screw and not a slot-head. My friend Jeff Chudwin likes to simply cut the allen head with a hacksaw to make a dual screw that works with both. Me, I just swap the allen for a slot screw. If you do have the allen head screw, it takes a 7/64 wrench, and one long enough to reach. Standard ones won’t do it. Some safety parts can be removed without loosening the pistol grip. But not all, and you can’t find out which one you have without removing the pistol grip first.
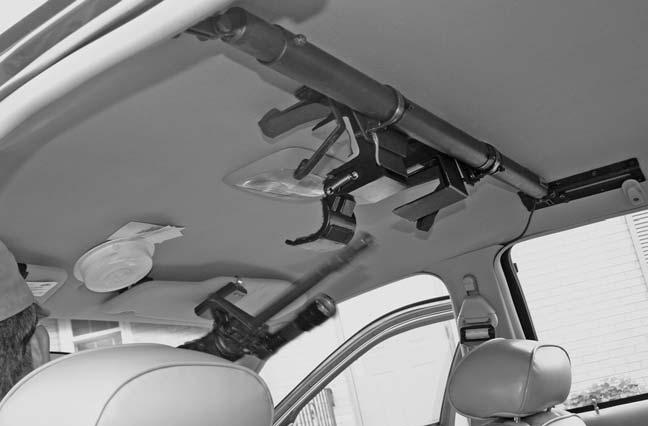
The Chambersafe allows a rifle to be stored in a rack, with the chamber empty and a loaded magazine in place. It is a quick and easy thing to get it loaded, but not something that can be done inadvertently.
Ready Conditions
The whole point of a firearm is that you think you will be needing an emergency tool (which is what a firearm is for most of us) and need it badly. By “badly” I mean you are contemplating the need to use it against another human being to defend you live or the lives of others. If you are not morally and psychologically ready for that, you shouldn’t be carrying one. If you haven’t prepared for the legal consequences, you definitely shouldn’t be packing. If you have made the necessary preparations, then here goes:
Empty
An empty firearm is kind of like a seat belt that you plan to snap on when you see an accident coming. If you see the accident coming, your time is better spent avoiding it, rather than scrambling for the seatbelt you should already have on. But a rifle should be stored empty. Do not confuse “stored” with a ready rack you have nearby. Stored means empty, and in a safe. To store empty, remove the magazine. Retract the operating handle and look into the chamber. Look intently, and with good light. Once you know the chamber is empty, close the bolt. Point the rifle in a safe direction. Dry fire it. Check the safety. It should not move from “Fire” to “Safe.” That it doesn’t lets you know the hammer is down. Now put it in the safe and leave it alone. If at any time you pick up that rifle, try to move the safety. If the safety doesn’t move from “Fire” then the hammer is down, the action is uncocked. You don’t have to pull the trigger to see if it is loaded or cocked.
Is there any time other than in the gun safe that you need a rifle unloaded? While transporting it to and from the range or a competition. And again, you pull it out of the safe, check the safety, insert it in the case, and go. If you want to check the bore, then work the action to cock it, put the selector in “Safe” and then press the action pins to disassemble the rifle.
When you put it back together, check the action, dry fire and put it in the safe or case.
Cruiser Ready
Cruiser Ready comes from the police method of rack-storing a loaded pump shotgun in a police squad car. It starts out the same as “Empty” for storage: Remove the magazine, if present. Work the action and inspect the chamber. Once empty, close and dry fire. Here, however, things get different. For Cruiser Ready, leave the hammer down, and the safety off. Insert a loaded magazine. Stick the rifle in a secure rack, and it is ready. The rack must be secure, because anyone can snatch the rifle out of the rack at a moment’s notice, operate the charging handle, and have a loaded rifle. A loaded rifle with the safety off. Where rifles must be ready, and the response to charging the chamber is almost always firing, Cruiser Ready works. In a military context, it can work. In a civilian defensive or law enforcement setting, I’m not so comfortable with it. After all, police officers point firearms at suspect and offenders a whole lot more often than they fire on those same individuals. The response to heightened tension is not always to fire (nor would I want to live in a city where the police department held that view). But, it does work. My friend John Farnam is a big proponent of Cruiser Ready. One of the advantages Empty and Cruiser Ready have, is that the ejection port cover can be kept closed, to block the entry of dust, dirt and grit.
An additional option with Cruiser Ready is to leave the hammer cocked, and have the safety to the “Safe” position. Then, chambering a round does not leave you with a hot rifle and the safety off.
The problem with both Empty and Cruiser Safe is that there is no positive way to know there isn’t a round in the chamber. So the rifle resting in the rack may have a chambered round.
Chambersafe
A different step to that same end is to use some kind of a chamber block to keep the loaded magazine separate from the chamber. Some methods use a dummy cartridge, or a spring-loaded chamber flag. The problem (or advantage, if you desire such) with these methods is that removing the block also chambers a round. If you’re using a dummy round, for example, you can’t get the dummy out without getting a loaded round into the chamber. Working the action to extract the dummy introduces a live round. The Chambersafe is different. It sticks into the chamber, keeping a round out. If the Chambersafe can’t fit in the chamber, there is something wrong. If you try to chamber a round with the Chambersafe installed, the round won’t fit. The big ring on the outside is easy to grasp, and pulling it out does not chamber a round. You can keep the rifle in a rack, knowing there cannot possibly be a round in the chamber. The method of use is to first select a safety mode: safety to “Fire” as in Cruiser Ready, or safety to “Safe.” Then check the chamber, and set the rifle up as you want it. (Getting the bolt back enough to introduce the Chambersafe while in Cruiser Ready can be hard to manage.) I use mine with the action cocked and the safety set on “Safe.” Then, pull the bolt back part way, insert the Chambersafe into the chamber, and ease the bolt forward. Now, insert a loaded magazine. Rack and lock (or whatever you do) and you’re ready.
When you need the rifle, snatch it out of the rack. Grab the Chambersafe and snatch it free. You can drop it, let it fly, pocket it or throw it at the bad guy. It has served its purpose. Work the charging handle to chamber a round. Proceed to solve your problem.
In a training environment, the Chambersafe is a godsend. Instead of actions open, or lengths of yellow nylon rope hanging out, we just insert Chambersafes and we’re all ready to talk. When it is time to shoot again, insert a magazine, yank out the Chambersafe, and chamber a round. The beauty of it is that the handling in training replicates the duty environment, and what you do in training is most likely what you’ll do in an altercation. In a duty setting, the Chambersafes can be marked with the rifle serial number, officers initials or badge number, or whatever. In the car the rifles are safe. Out of the car the Chambersafe marks the general area where the officer took the first step of using deadly force. Being bright orange, it also reminds the officer what condition the rifle is in: there isn’t a round in the chamber, and he’d better get one in there if he’s going to deal with the problem.
If there is a shortcoming to the Chambersafe, it is that the action is slightly open, and the dust cover down, to allow entry for debris. But, since most rifles in patrol cars are on the ceiling, there isn’t a whole lot of lint that can get in there. The Chambersafe isn’t a “Fallujah” kind of tool: it is for training and police duty carry, not hot weapons on patrol in a military environment. But in a military training environment, it can ensure that chambers are empty, even if a magazine is inserted.
Lock And Load
Simple: insert a loaded magazine. Work the charging handle. Put the safety on Safe if it wasn’t already there. Retract the charging handle just enough to see and feel that there actually is a round in the chamber. Close the action, close the dust cover, put it in the rack or sling it. Definitely a “Fallujah” kind of approach. Also, the condition of your rifle in a match, after the Range or Safety Officer gives you the command: “Load and make ready.” You’re carrying a loaded rifle, so you’d better be absolutely sure of where you’re pointing it each and every microsecond.