

| |

Each time you see this password and network name in the guide, you have to change them to the password and network name for your local network. If you have to find the name of your local network, simply run the command below in your raspberry terminal:
sudo iwlist wlan0 scan
By doing so, you will get a list of all networks around you, and some important information for each network. You can however look for something that looks like ESSID: Test Wifi Network to find your network name.
Configure your network
You have to edit a file labeled wpa_supplicant.conf. to inform Pi to connect to your Wi-Fi network automatically. To open the file in nano, just type the command below:
![]()
Scroll up to the end of the file, and then include the codes below to the file so that you are able to configure the network:
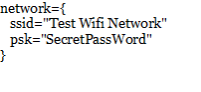
Do not forget to replace it with your personal network name and password.
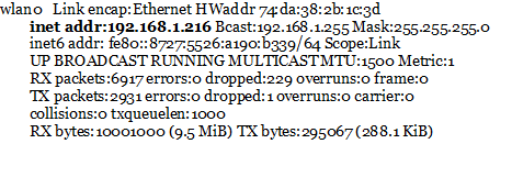
Press Ctrl+X followed by Y to save and close the file. Your device should now be able to connect to your network automatically. You can run the following command to check your network connection:
![]()
You will know you are connected when the output looks something like this:
In some instances, the device will not automatically connect; this means that you have to reboot to be able to do so. If it fails to connect after waiting 2-3 minutes, you could try rebooting the device using the command below:
![]()

