

| |
Samba is a program that is important to install because you will need to share files with other computers on your local network. Using Pi as a samba file server is easy and with it, you’ll also be able store backups from other computers.
Samba is basically the Linux implementation of CIFS (common internet file system) /SMB (server message block) file sharing standard used by windows computers and apple computers, and supported by games consoles, media streamers and mobile applications.
In this tutorial, I am assuming you have connected a keyboard, monitor and mouse to your Pi to set up your file server. I also assume you are using an SD card that offers a reasonable storage space without needing any additional steps to make it accessible. Nonetheless, if you require more storage, you can easily mount a large external USB drive and make a Samba entry for it.
Even though we’ve already set up the Wi-Fi, I would still recommend you use a wired Ethernet connection for fast transfer speeds and stability –especially if you are copying over large files (but the project will still work if you use the Wi-Fi).
Setting up Samba
Samba is basically available in the standard software repositories of Raspbian. We are now going to update the repository index, ensure the operating system is fully updated and install Samba with apt-get. Open the terminal and type the following:

Create your directory
We are now going to make a dedicated shared directory on the micro SD hard disk. Even though you can put it anywhere, we’ll put ours at the upper level of the root file system.
![]()
The command sets the sticky part to assist in preventing the directory from getting deleted accidentally and offers everyone the permissions to write/read/execute on it.
Configure Samba to share your directory
Configure Samba to share your new directory
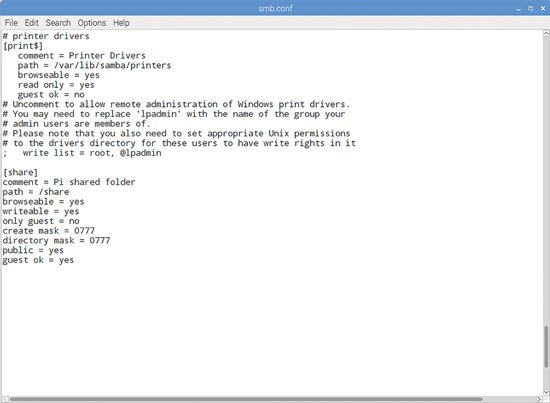
Now edit the config files of Samba to make the file share visible to the PCs on the network.
![]()
In this tutorial’s example, you’ll have to add the entry below:

This simply means that anyone will be able to read, write and execute files in the share by either logging in as a Samba user (we’ll set up that one below) or as a guest. If you don’t want to allow guest users, you can omit the line ‘guest ok=yes’.
You can also use Samba to share a the home directory of a user so that they are able to access it from somewhere else on the network, or share a bigger external hard disk which lives at a fixed mount point. Simply create an entry ‘smb.conf’ for any path that you want to share, and it will be availed across your network upon restarting Samba.
Creating a user and starting Samba
Before you start the server, you will have to set the Samba password, which is different from your standard default raspberry password. There’s however no harm in wanting to use the same, because this is just a low-security, local network project.
![]()
As prompted, now set a password. Lastly, try to restart Samba:
![]()
From this point henceforth, Samba will automatically start each time you power on your Pi. Disconnect the monitor, mouse and keyboard safely after making sure that you can locate the shared network folder. Let the Pi run as a headless file server.
You will also be able to locate the Raspberry Pi file server (which is by default named RASPBERRYPI) from any device on your local network. If you left the ![]() default settings as they are, it will show in a Windows network group known as WORKGROUP.
default settings as they are, it will show in a Windows network group known as WORKGROUP.
The next obligation we have before downloading the Ham programs is setting up the printer. Let’s do that now.

