

| |

GNU Radio is basically a free software development toolkit that essentially offers blocks to implement software radios. You can use it with readily available cheap external RF hardware to build software defined radios or in an environment resembling a simulation without any hardware. This software is mainly used by commercial and academic environments, and hobbyists as well to support real-world radio systems and wireless communications research.
The applications of GNU radio are mainly written with Python programming language, and the supplied performance-critical path of signal processing is usually implemented in C++ with, where available, processor floating point extensions. This means that the developer is capable of implementing radio systems, which are real time and high throughput in a rapid-application development environment that is simple to use.
Even though GNU is not primarily a simulation tool, it supports development of signal processing algorithms with pre-recorded or generated data- which avoids the necessity of having actual RF hardware. The package also contains a graphical tool known as gnuradio-companion, which creates signal flow graphs and generates flow-graph source code as well. We also have many different tools and a utility program included.
Why do you need GNU?
GNU Radio does all the signal processing; you can write applications with it to get data out or even push data into the digital streams, which is then transmitted via hardware. A GNU radio contains channel codes, filters, synchronization elements, vocoders, demodulators, equalizers and other elements (we usually refer to these as blocks in the GNU jargon) that are usually located in radio systems. More importantly, it also has a way of connecting blocks and can manage the way data usually passes from one block to another. It is actually very easy to extend a GNU Radio: if you get a particular missing block, you can create it and add it quickly.
Moving on;
GRC (GNU Radio companion) is a graphical user interface that is used in the development of GNU Radio applications. As you can see in the images above, you can use some inexpensive SDR USB dongles (>$20) such as the NooElec R820T SDR & DVB-T NESDR Mini (more on this later).
You can use the process below to install it using the command line interface:
Update the raspberry Pi repository index using:
![]()
Now make a search in the Raspberry Pi repository index for Gpredict programs with:
![]()
Install gnuradio with:
![]()
Next, install gr-osmosdr with:
![]()
Install gr-air-modes with:
![]()
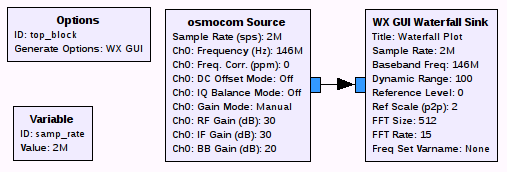
Now start GRC- In your desktop’s GUI, select programing, GRC (after opening the top left application). Make a ![]() with a SDR.
with a SDR.
Plug in the device below to the Pi: (you can find more details about it from NooElec).
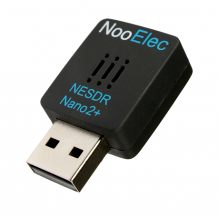
I personally used a USB hub for the device because it is too large and would thus block the rest of the USB ports.
Now drag the ![]() (in sources) to the left work window. Drag the WX GUI Waterfall sink (in instruments, WX) to the left work window.
(in sources) to the left work window. Drag the WX GUI Waterfall sink (in instruments, WX) to the left work window.
Now wire the source output of osmacom to WX GUI Waterfall Sink.
In the variable and ID same_rate, alter the value to 2 MS/s
In the source output of osmacom to the WX GUI Waterfall sink, alter the frequency to the values: 146E6.
In the top icon menu, choose ‘generate the flow graph.’
Save the file in the file menu.
Finally, choose execute the flow graph in the top icon menu.
The set up

It always seems quite amazing to me what a humble USB TV dongle can do- considering you can pick up one for about £10 together with the open source SDR software. As you can see in the picture above, it is very simple to plug one of them in one of the USB ports, with the supplied antenna fixed. Please visit this page for more information about RTL-SDR.
Now that we are re-purposing a TV tuner which the Linux kernel supports, and which it would otherwise claim and for television reception, we have to first of all make the kernel to stop doing so. We will edit the ‘![]() ’ file and proceed to add the following line below:
’ file and proceed to add the following line below:
![]()
Install Software (RTL-SDR)and the GNU Radio support as follows:
![]()
You will also require setting up a new udev rule so that you are able to access the device as a non-root user- you however first have to ascertain the USB ID. Make sure the tuner is plugged in and then type the following:
$ lsusb
This should give you the following:
![]()
Now you need to create the ![]() file with the following line:
file with the following line:

At this point, you can restart Udev; nonetheless, since you also had a kernel module blacklisted, you probably should consider rebooting as the easiest way.
The test
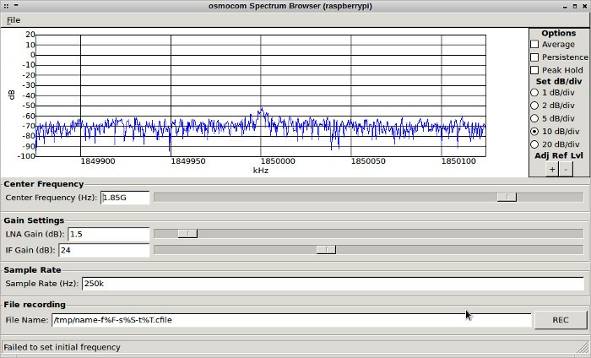
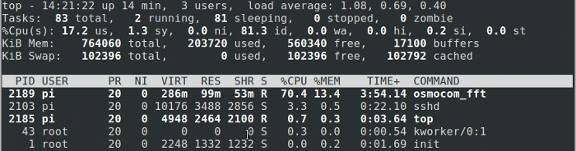
You can run the FTT application to get a modest spectrum display, which is offered as part of the gr-osmocom software.
![]()
If you then look at the CPU load, you can see that you’ve got a lot of capacity to spare, with just a single core at about 70% utilization.
The gr-air-modes
Over the recent past, so much has been written about how to use the RTL-SDR hardware along with the ![]() software, to get position and the heading information from the
software, to get position and the heading information from the ![]() . While many writers state that they tried using a Raspberry Pi Model B (and a laptop)- this hasn’t proven to have enough processing power and the result is usually buffer underruns.
. While many writers state that they tried using a Raspberry Pi Model B (and a laptop)- this hasn’t proven to have enough processing power and the result is usually buffer underruns.
A couple more dependencies are needed, in order to build gr-air-modes.
![]()
Having installed these ones, the sources can be cloned from GitHub as follows:
$ git clone Github
To then create and install:

You can now use the following to run the application:
![]()
And with only a small antenna and a significant number of miles from the closest airport, you will still manage to receive no shortage of output.
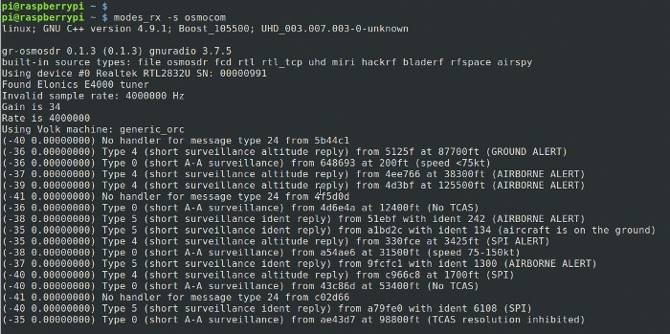
Once again, not to mention, with a lot of headroom to spare:


