

| |
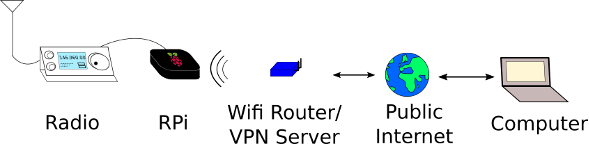
In this project, you’ll learn how to use your Raspberry Pi to set up a remote operation on your ham radio. In this case, you will use your Wi-Fi network, and VPN to make this possible.
Why this is important
If you are a person who travels a lot and want to still continue using your rig even when you are away, this will prove important. Also, if you are a person who wants to set up your radio as well as the antenna away from where you live e.g. you are an apartment dweller and have parents or friends who stay in the boonies and would allow you to erect an antenna.
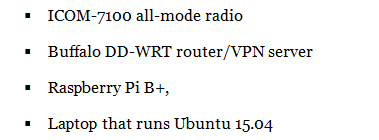
You will require the following to complete this project:
NOTE: In this post, we’ll focus on radio control and networked audio but not so much about setting up the VPN.
The basics
For this project, we want our raspberry to remain a ‘headless’ remote server. This means we don’t need a keyboard or screen. You thus have to be able to SSH from your client into it. This is simple. You can set up private/public keys so that you don’t have to type a password each time you log in. Just follow the link to set that up.
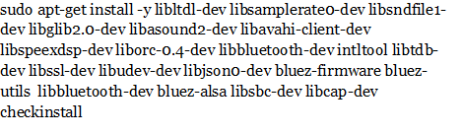
Build a PulseAudio 6.0 on your Pi
You have to use the ![]() in order to pipe the audio over the network. PulseAudio 2.0 occurs in the Raspberry Pi repositories. You first need to install some build dependencies:
in order to pipe the audio over the network. PulseAudio 2.0 occurs in the Raspberry Pi repositories. You first need to install some build dependencies:
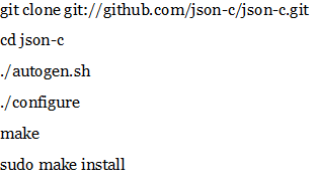
There is a libjson-c dependency you can build yourself:
The clean pulse files that you may need to install:
(You need to note that this may break the other installed packages such as pygame).
![]()
Next, acquire the PulseAudio source code; compile it. You can use checkinstall so that you can remove the built package easily later on.
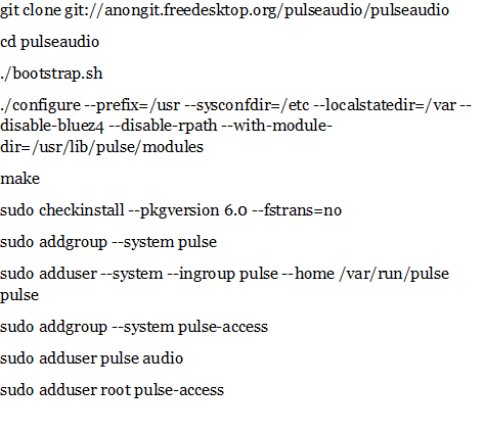
After that, you have to build the init.d script in order to get pulseaudio to start automatically in system mode- while this is not recommended, it makes a lot of sense on Pi. Proceed to Reboot to start PulseAudio or simply enter:
![]()
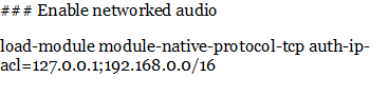
The configuration of PulseAudio to pass sound through the network
On Pi, simply edit the file /etc/pulse/system.pa, uncomment or include a line in order to turn on the module-native-protocol-tcp, to allow the local network to communicate with it.
You may also find it great to ![]() in it because it produced 10 seconds lags at first. Simply plug in the radio into your Pi and then proceed to restart PulseAudio with the following:
in it because it produced 10 seconds lags at first. Simply plug in the radio into your Pi and then proceed to restart PulseAudio with the following:
![]()
Configure PulseAudio on the client
PulseAudio runs on a basis of ‘per-user’ on Ubuntu; not in system mode. In this case therefore, we can turn off and on the modules with scripts and that’s what you’ll do. Create a script and put in it commands like so:
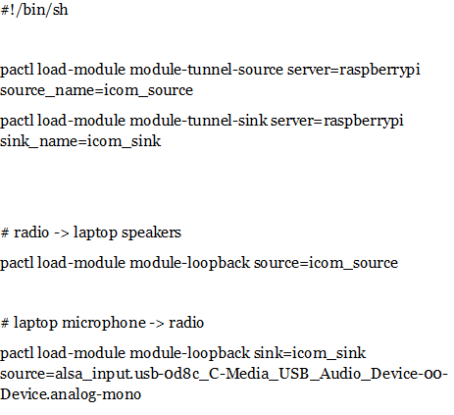
You need to adjust your Pi’s hostname (or simply directly type its IP address in). You also have to adjust the second loopback module source. It is set to the USB microphone; but the microphone of your laptop will certainly be different. Now use the command below to obtain a list of sources on your computer and pick the name of the one you desire.
![]()
Make your script executable by keying in the following:
![]()
In this script, you can also enable networking, but you might also find it very convenient to apply the paperfs program and select the option below:
![]()
Lastly, you’ve got to set up authentication. PulseAudio makes use of a shared secret that’s referred to as cookie for authentication. Simply copy the cookie from the Pi at ![]() in the home directory. It will now authenticate.
in the home directory. It will now authenticate.
On your client, restart PulseAudio using:
![]()
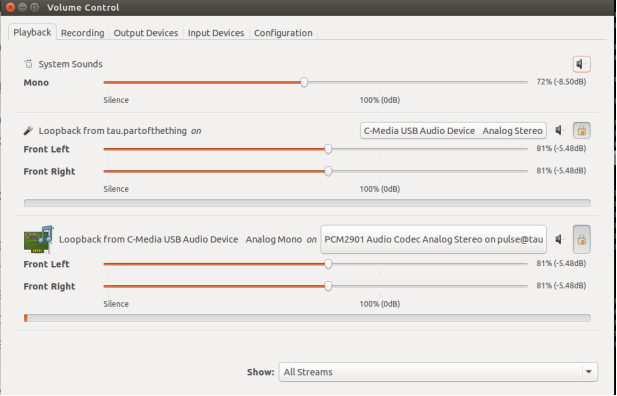
Now run the above script; if everything goes on well, you will now hear the sound from your laptop’s radio. You also have to make a couple of adjustments within the pavucontrol program. Make sure to turn the radio down squelch so that there is something that comes through. Next, click on the playback tab and then click show all streams and ensure the loopback from Pi is playing on gadget you want it to play on. This is what it should look like:
You can run pavucontrol for the Raspberry Pi as well from your client as follows:
![]()
You can then adjust the Pi connections if you find it necessary.
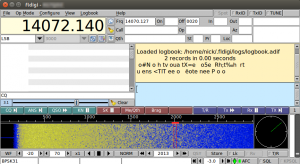
You should ensure you set your device to DATA mode (or FM-D) if you are using an IC- 7100, or in a way that your USB audio gets into the transmitter. You can now do digital modes and voice through your network- how cool is that! Take a look at the image below that shows running fldigi on a laptop that is receiving audio in this setup:
Remember that at this point, you are on a local network and so you’ll have to create the VPN to go outside your house via the internet.

Control the radio from far
If you only want to conduct digital modes through fldigi, you probably are good to go at this point. You can run flrig on Pi and fldigi on the client, and they’ll be able to connect and key up the radio and things like that. But what if you want to do voice as well, what do you do?
If you are a programming nerd, you can write your own small controller for IC-7100 in a language like Python. You’ll find it simple, and will allow you to switch the radio on and off, switch the DATA mode on and off, access the different memory channels and key up the radio. This is a good start but you can make it a lot more sophisticated with time. You will particularly need to be able to key in the frequency you want or scan down or up the bands for HF; something that should not be too difficult to add. You can feel free to use it if you want but do not expect a lot; if you want to improve it, go ahead!
We have other programs out there offering the ability to control a radio via the network.
Troubleshooting
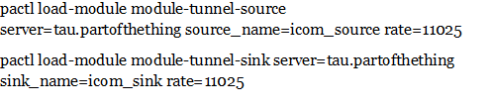
I personally went through quite a number of iterations and found numerous problems as I tried to figure it all out. I conducted the PulseRadio configurations on Pi at first but eventually realized that it was more flexible to perform it on a laptop. I tried so much to get downsampling to work to reduce the needed bandwidth. This is crucial for the slow Wi-Fi networks but particularly important when accessing your local network remotely via VPN through the internet. I did play a lot with resampling methods and reduced it to 11025 sample rate. It worked well and sounded fine for some time even though kept fading out after every two minutes. You can change your tunnel source to be the following (to downsample):
This basically uses around 60KiB/s over the network and 200 KiB/s at default. You can change the sampling methods ![]() on Pi and adjust the
on Pi and adjust the ![]() .
.
In some resampling conditions, it is possible for PulseAudio to use the Pi’s CPU excessively. The main problem however, is that there are a few delay seconds as the audio moves across the internet.
You can then unload each of the PA modules onto your PC using the following command (this is applicable if you are playing around with different settings).
![]()
You can use the pacmd list-modules to make a list of all the loaded modules where 32 is the module’s index to upload. You can do this a bunch as you tweak your script and rerun it.
Connect to the LAN securely with a VPN
A VPN enables you to connect to your local network over the internet remotely. And you can configure your Pi to make this connection possible.
You can conveniently set up a ‘road warrior’ OpenVPN on your WRT-based router. This in turn will allow you to connect to you home LAN anytime securely from anywhere. You will find this useful especially if you want to print things from far away, avoid surveillance while on public or other untrusted networks or talk to your internal devices. This step usually entails securing your WRT-compatible router, then using ROM that has OpenVPN server such as OpenWRT or DDWRT to flash it then creating some private or public keys and then proceeding to configure the clients and server. This is not entirely difficult, but can take you quite some time to get it working as a result of the numerous instructions that are a bit different -which are present online. The GUI-based config in current DDWRT builds makes it very simple. To know more about building some RSA Keys and flash your router, please visit this guide and perhaps also this guide as well.
Congratulations! I hope this project works for you as it was very incredible for me to figure out.

