When you switch the Selector tool into rotate mode, you will see a cross mark in the center of the selected object or objects. This is the center of rotation. This point is remembered for each object and is one of its permanent properties; moving any object’s center is an undoable action, and when you save the document, the rotation centers of all objects are saved with it. Scaling, rotation, or skewing are performed around this point not only with the Selector tool but in most other places as well (such as in the Transform dialog or when transforming by keyboard shortcuts).
By default, the rotation center is in the geometric center of the bounding box of an object. With the Selector tool, you can freely drag it to any point (inside or outside the object itself). While being dragged, the center snaps to the edges of the object’s bounding box, to the geometric center (its original location), and to the horizontal and vertical axes going through the geometric center. This makes it easy to quickly snap the rotation center back into the default position or to a corner of the bounding box. Drag it with  to suppress snapping; drag it with
  to limit its movement to horizontal/vertical.
If you move the object (by any means, not only by dragging with the Selector tool), its center of rotation moves along with it, so it always stays in the same relative position to the object. Unfortunately, there’s currently no way to move an object’s center of rotation using the keyboard—you can only manipulate it by dragging it with the mouse.
When more than one object is selected, the selection as a whole also has a rotation center, which is that of the object which was selected first (if you selected objects one by one, by adding to the selection with -clicks) or the one which is closest to the bottom in z-order (if you selected by rubber band or by  ). If that first or bottommost object ever had its rotation center moved away from the default position, the entire selection will have the same rotation center as that object; otherwise the selection’s rotation center will be in the default position—in the geometric center of the selection bounding box.
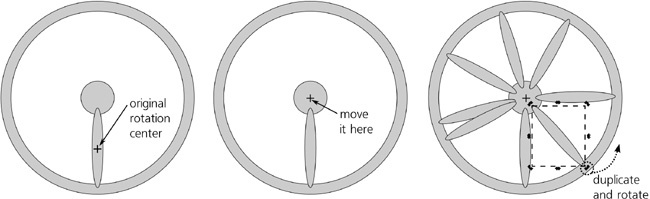
Moreover, if, with multiple objects selected, you drag the selection’s rotation center, this applies to all selected objects: Each of them will have this new rotation center position. For example, if you draw a wheel with multiple spokes, you can select all the spokes and move the rotation center to the center of the wheel just once. After that, even if you select a single spoke, it will conveniently rotate around the center of the wheel.
Also, the rotation center is inherited when you duplicate or clone (16.1 Creating a Clone) the object. For example, you can draw a single spoke, move its rotation center to the center of the wheel, then duplicate (or clone) that spoke and simply rotate the copies by any method (by dragging corner handles with the Selector tool, by keyboard shortcuts, or by the Transform dialog). The new spokes will remain firmly set inside the wheel: