The simplest way to assign a color to the fill or stroke of the selected objects is by clicking one of the swatches in the palette, usually located at the bottom of the editing window, above the status bar (see Figure 5 on the color insert). Simply clicking assigns fill color to the selected objects;  -clicking assigns stroke color. The leftmost button on the palette removes fill or (with
  ) stroke.
Apart from clicking, you can drag and drop colors from the palette onto objects. This is one of the very few ways to change objects without selecting them; if you drop a color on some object, that object will change, even if it is not selected and even if some other object is selected. Dropping also works for changing stroke color, for which you need to drop the color swatch precisely onto the outline of a path or shape.
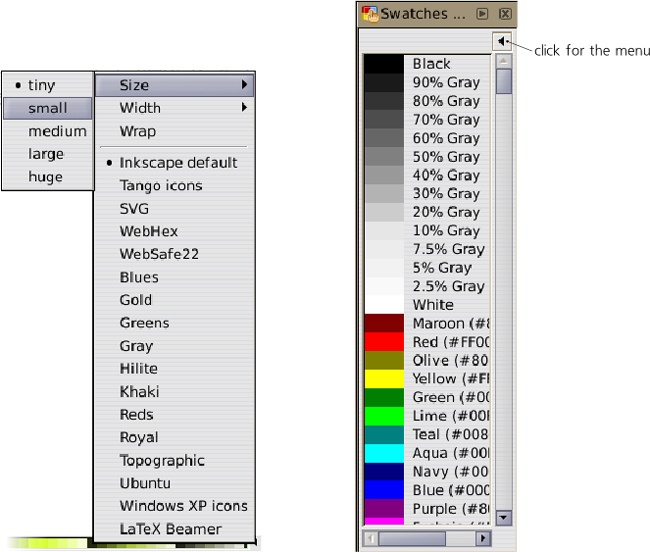
Inkscape does not yet allow you to edit the color swatches or add new swatches to the palette via the UI. However, you can choose one of the many different palettes that are included with Inkscape. On the right end of the palette, there’s a button with a triangle mark; clicking it opens a menu listing available palettes, such as a web-safe palette, palettes used by Ubuntu and Windows for their UI, and various monochrome palettes (greens, golds, and so on). Inkscape will remember your choice of palette.
In the same menu, you can choose one of the standard sizes of the swatches, their width (narrow swatches are harder to click but may get rid of the palette’s scrollbar by fitting the entire palette into your screen width), as well as enable the palette to wrap around (this makes it taller but also gets rid of the scrollbar).
Along with the docked horizontal palette, Inkscape has the Swatches dialog ( ). It can show all the same palettes and has all the same size options, except that it has an additional List option where it lists all the colors along with their names. You might prefer it to the palette because as a dialog, it can be placed in the dock on the right and squeezed there into a narrow vertical strip.
Figure 8-5. The Palette menu (left) and the Swatches dialog (right) in the List format showing colors with their names
You can edit your Inkscape palettes as well as add new ones. Each palette is a text file that can be edited by hand. On Unix, the palettes which ship with Inkscape are located relative to Inkscape’s installation prefix, in the palettes directory (often /usr/share/inkscape/palettes, or /usr/local/share/inkscape/palettes if you compiled Inkscape yourself). Custom palettes can be placed in ~/.config/inkscape/palettes; you will need to create this directory if it does not exist. On Windows, palettes are located in share\palettes inside the Inkscape installation directory (usually under Program Files\Inkscape).
Inkscape borrowed the format of its palette files from the GIMP raster editor, so you can drop any palettes from a GIMP distribution into that directory to use them in Inkscape. Here’s the beginning of the default palette file, inkscape.gpl; the color components (R, G, B) are in the 0..255 format:
GIMP Palette
Name: Inkscape default
Columns: 3
# generated by PaletteGen.py
  0   0   0  Black
 26  26  26  90% Gray
 51  51  51  80% Gray
 77  77  77  70% Gray
...
