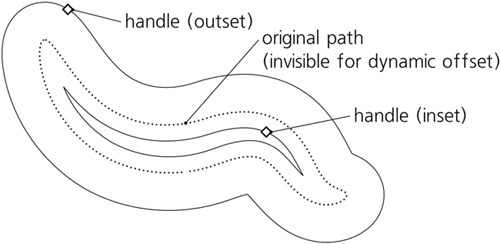
We’ve already seen the regular offset commands (12.4 Offsetting) that expand (outset) or contract (inset) a path perpendicular to its direction at each point. Those commands are destructive—once you offset a path, you lose the original. There exist, however, nondestructive versions of the same commands: dynamic offsets and linked offsets.
Note
Dynamic offsets and linked offsets are conceptually very similar to path effects—they, too, have an invisible original path, the visible offset path, and the parameter specifying how much to offset. However, for historical reasons, offsets are not implemented as path effects and therefore are not available in the Path Effect Editor dialog. It appears likely, however, that in a future version offsets will be reimplemented as path effects.
With a dynamic offset, the original path is not visible anywhere on canvas—it is stored inside the dynamic offset object, which displays only the offset path. To create such an object, select a path and press  or choose Path ▸ Dynamic Offset. A linked offset is different only in that it links to an existing path as its source. In this way, you can create multiple offsets from a single source path, and all of them will be updated when the source path is edited. To create a linked offset, select the source path and press
  , choose Path ▸ Linked Offset, or simply duplicate (
 ) an existing linked offset of the same original.
Both kinds of offsets display a single, diamond-shaped handle on the offset path. You can drag that handle anywhere; its distance from the original path determines how much the path is inset or outset, but you can also move it along the path to where it’s most convenient for you:
As with path effects, to convert a dynamic or linked offset to a regular path, choose Path ▸ Object to Path ( ).
).
