Many of these left-handed techniques also apply to right-handed calligraphers writing in Hebrew, Arabic, and other languages written from right to left. These languages pose similar challenges for right-handed calligraphers, like learning how to avoid smearing the ink with your hand as you write.
You may have heard a rumor that calligraphy and lefties are like oil and water, but I’m here to tell you that is totally unfounded. In fact, some of the world’s most accomplished calligraphers are lefties! While left-handed calligraphers do face some unique challenges when they’re learning pointed pen calligraphy, all these challenges can be overcome with slightly altered practice methods. It’s important that as a lefty you don’t let yourself fall into the trap of trying to mirror the writing movements of a righty, or even that of another lefty whose style is very different from yours. This will only lead to endless frustration. Just as you had to develop your own method for ordinary handwriting, you will have to experiment until you find the most comfortable arm position for your calligraphy.
For the lefty, there is a big difference between broad tip and pointed pen calligraphy, so don’t lose heart if you read about left-handed broad tip calligraphers’ struggles. While there are left hand–specific challenges associated with pointed pen calligraphy, a lot of the frustrations with calligraphy stem from the fact that most broad tip nibs simply can’t be used by lefties. Since broad tip nibs are angled, they don’t work when they’re held in the opposite hand than the one they were made for—the angle slants in the “wrong” direction—so lefties have to purchase special broad tip nibs made just for them.
This is not the case with pointed nibs, though, since pointed nibs’ tines are perfectly symmetrical, not angled with one tine longer than the other. This is good news for the left-handed calligrapher. The great, diverse world of pointed nibs on the market is as available to you as it is to the rest of us. (Pointed nibs can wear down unevenly, so eventually the right tine of a right-handed calligrapher’s nib may become slightly more ground down than the left one, and the left tine more worn down on the lefty’s nibs.)
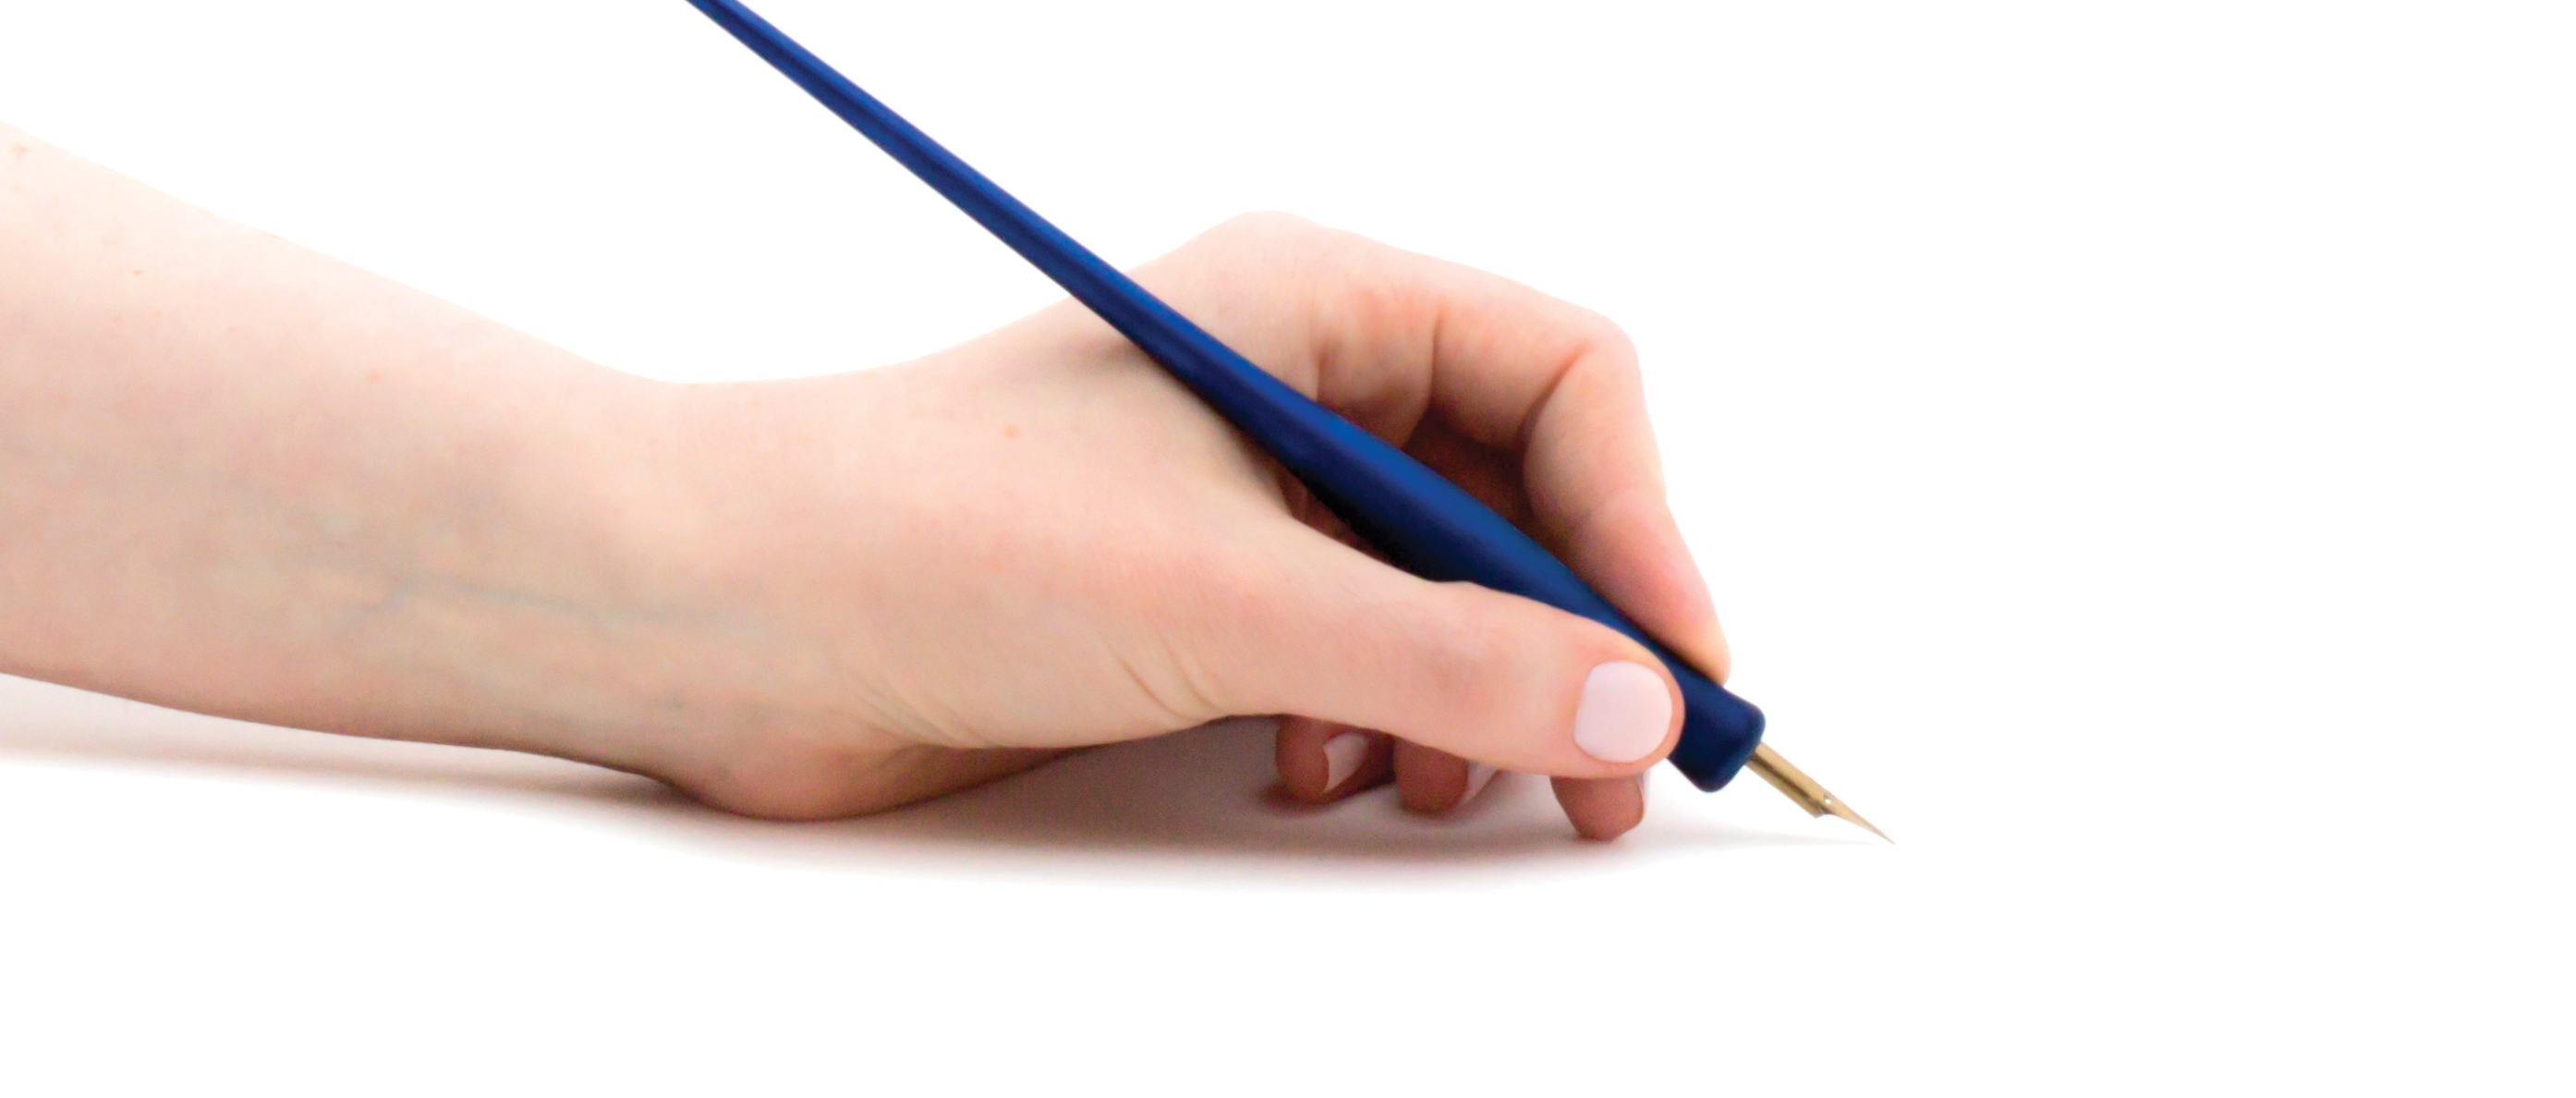
This is the correct hand position for left-handed underwriters–those who keep their wrist straight and position their hand under the baseline of the text.
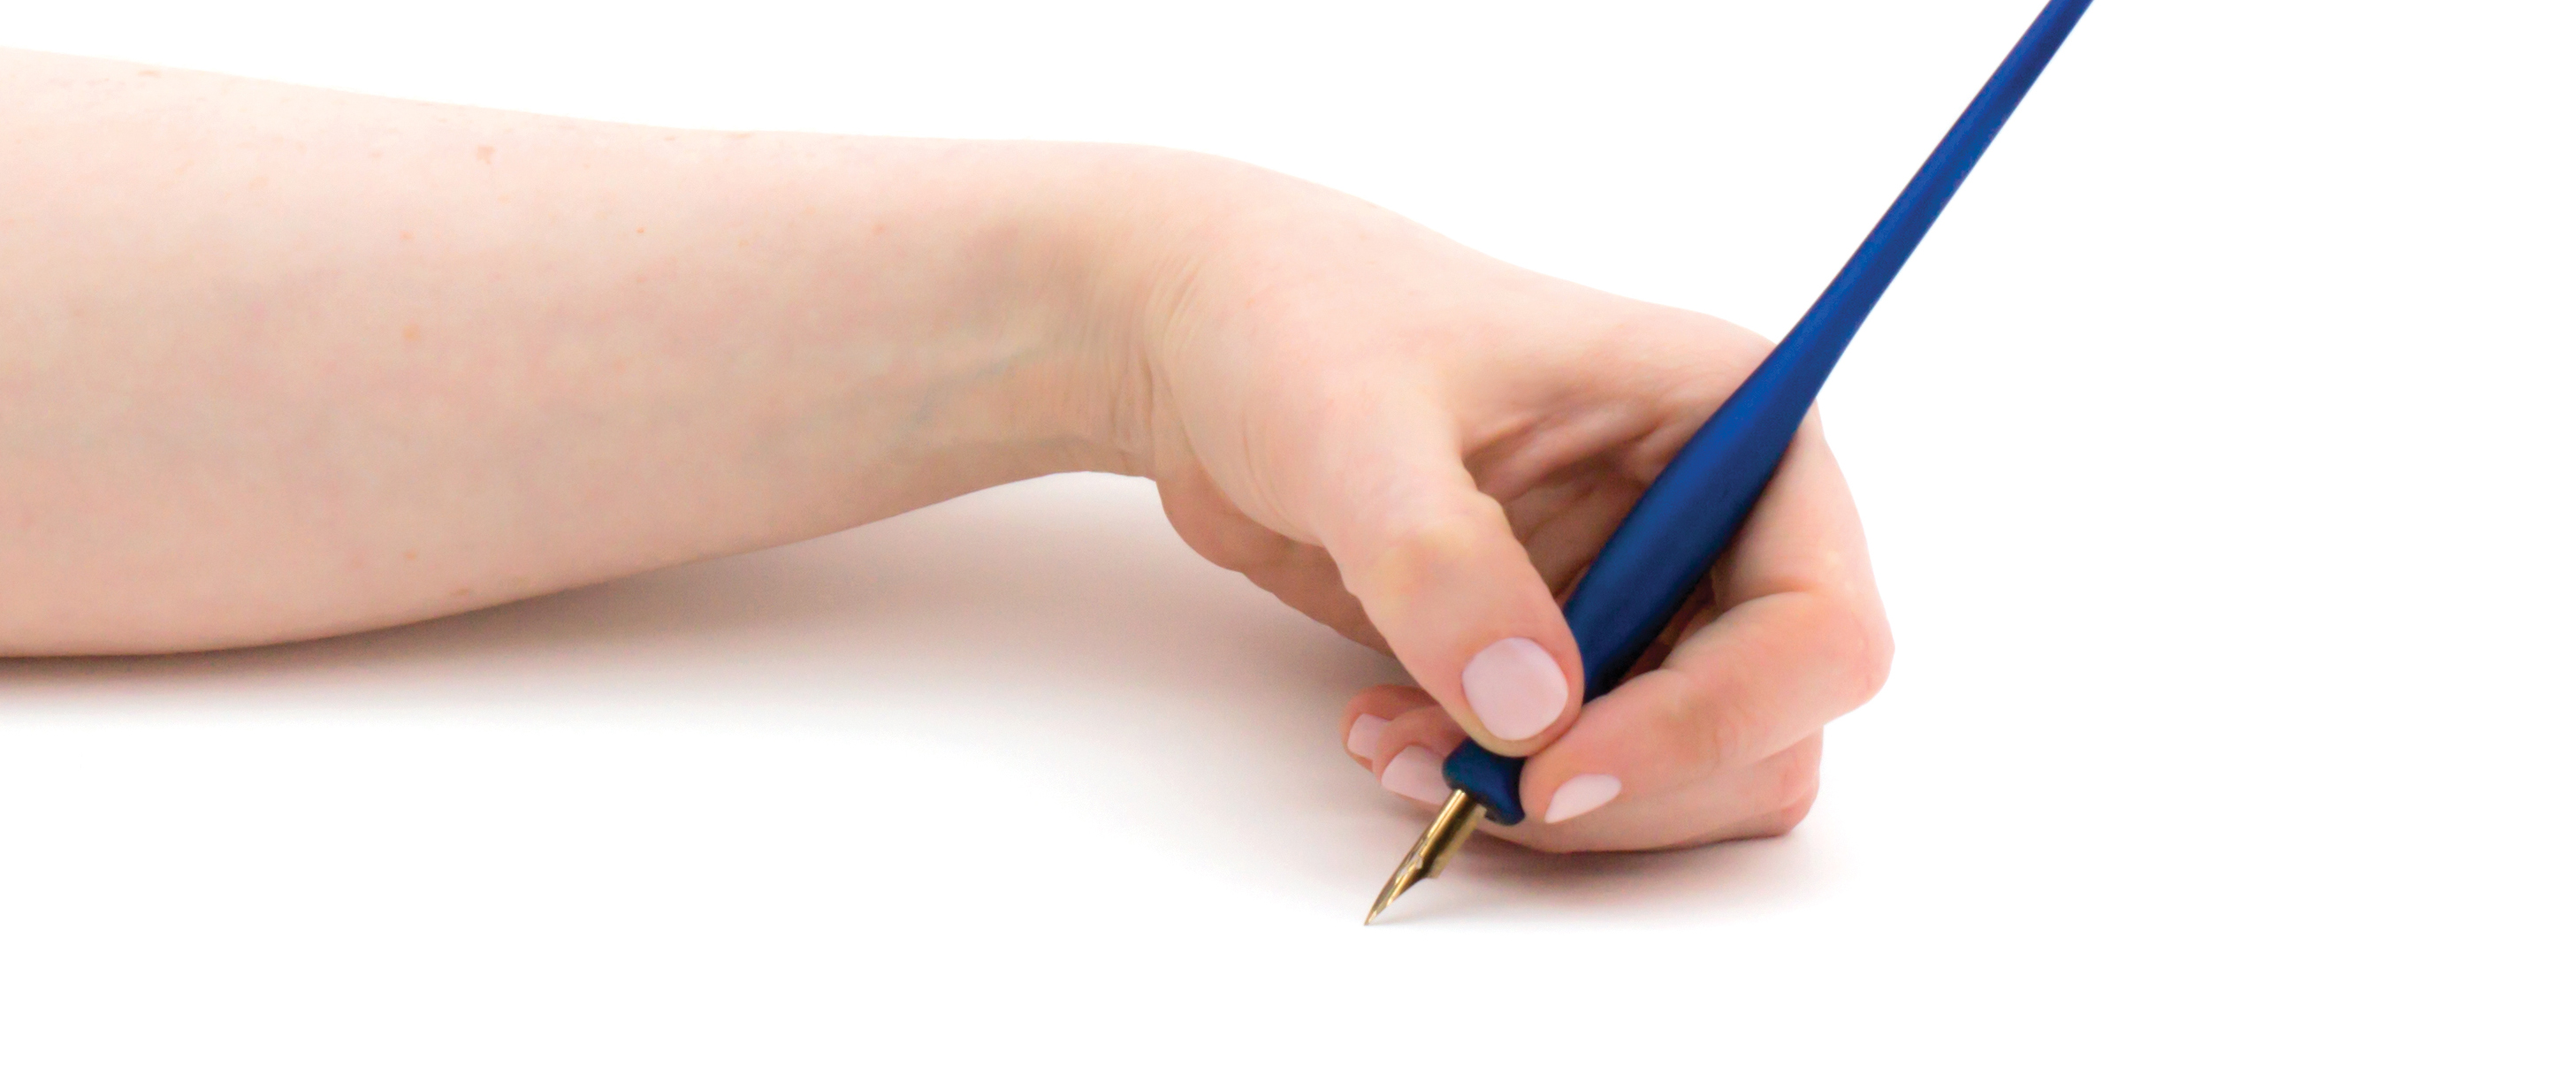
This is the hand position for left-handed overwriters–those who bend their wrists over the paper at a nearly 90-degree angle so that the nib is facing them and the nib holder is pointing away.
Lefties can be grouped into two categories: underwriters and overwriters. These classifications apply to ordinary handwriting as well as to calligraphy; generally speaking, left-handed writers should do calligraphy using the techniques they’re already comfortable using for their handwriting—whatever is most comfortable and achieves the best results!
Underwriters are lefties who keep their wrist straight and position their hand under the baseline of their text. This method looks a lot like a mirror image of most right-handed calligraphers’ hands when they write. Underwriters tilt their paper anywhere from 25 degrees clockwise—requiring very little movement from the shoulder—all the way up to 90 degrees clockwise, which means they are writing vertically. Underwriters need to use straight nib holders.
Overwriters (sometimes called “curlers”) are lefties who bend their wrist over the paper at a nearly 90-degree angle so that the nib is facing them and the nib holder is pointing away. Overwriters also tilt their paper the same direction as righties: counterclockwise. As with underwriters, the paper tilt can vary considerably, from just a few degrees all the way to 90. Overwriters can use either straight nib holders or inverted oblique holders, meaning that the nib gets inserted into the oblique holder so that the barrel—when viewed from above—is on the right. (Not all oblique holders can be flipped upside down like this, so be sure to buy one with a 360-degree nib insertion groove.)
Underwriters should practice the same stiffening of wrist and forearm, and same movements of the elbow and shoulder as righties (covered in step 6 of the previous section). Difficulty arises because our language is written left to right, so movement across the page can make underwriters’ upper arms and elbows run into their torsos. This is why many underwriters choose to tilt their paper at a severe angle—so that their elbow is quite extended and their upper arm is far from their torso at the beginning of a line, and by the time they reach the line’s end their arm at the shoulder is still not touching their body.
Because their wrist is curled, overwriters tend to move their wrist up and down as they write and keep their forearm still. However, just as for underwriters and righties, it’s important to keep wrist movement minimal—the forearm and wrist should move as a single unit. Up-and-down movements should originate from the elbow, not the wrist, and movements back and forth across the page should come from the shoulder.
Since a pointed nib’s tines only open (flex) when pressure is exerted and the nib is drawn toward the writing hand’s wrist, this means that for overwriters, “downstrokes” are actually drawn up, and “upstrokes” are drawn down. (Don’t worry if you don’t completely understand this yet—all the different kinds of strokes are covered in the next section. So as to avoid any confusion, from here on when referring to calligraphy by overwriters, I will say “thick stroke” instead of “downstroke” and “thin stroke” instead of “upstroke.”)
For the most part, the tricky thing about over-writing comes not in making thick strokes but in making thin ones. Nibs don’t like to be pushed down across the paper—it tends to make the tines snag. If you find this is the case for you, try practicing with a stiff nib that has a smooth point (as opposed to a sharp one). Good ones to try are the Hiro 111EF, Nikko G, or Gillott 404. The less flexible the nib, the less the tines separate. Also be conscious of the amount of pressure you’re exerting on the nib in making thin strokes. You should barely be pressing down at all (in other words, the tines should not be separating in the least). At first, practice this with ink—the thicker your color medium, the slower the flow and the harder it is to make thin strokes (no matter which hand you’re using).
The main challenge overwriters face is how to avoid smearing the wet ink as they move across the page, so overwriters must learn to keep their hands slightly raised off the paper. Calligrapher Jodi Christiansen, an overwriter, uses a small arm rest she made from a piece of clear plexiglass elevated on four tiny feet. With this technique, she can rest her arm over the still wet calligraphy without smudging it.
Lefties: you’re a rare breed and should be proud of it! If your lettering comes out slanted backward instead of forward, or some of your upstrokes are thick and your downstrokes thin, don’t torture yourself—it’s okay if your calligraphy looks different from a right-handed calligrapher’s. No one can say that it’s “wrong,” per se, and if you like it, embrace it!
