
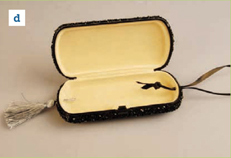
1 Open the eyeglass case. Drill a hole in the center of both sides of the bottom of your case, as shown in the photo. The holes should be just big enough for a ribbon to fit through.

2 Cut your copied image so it fits nicely in the center of the top of the case. Add a few drops of water to some Elmer’s glue so it’s easy to spread, and use it to glue the image in place.
3 Cover the rest of the top of the eyeglass case with Elmer’s glue—full strength, not diluted!—and carefully dip it into a pile of beads. Sprinkle more beads on top to cover any empty spots, and let the glue dry.
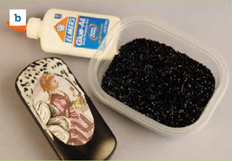
4 Turn the case over and cover the other side in glue, then dip it in beads, sprinkling more beads on where necessary. Let the glue dry.
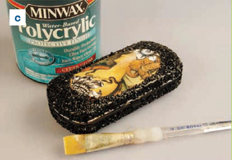
5 Cover the entire case with clear coat and let dry, then add at least one more layer of clear coat to make sure that the beads are going to stay in place, and let dry.
6 Poke both ends of the ribbon through the hole at the top of your clutch so the ends are inside the case. Tie the ribbon ends in a double knot so they can’t slip through the hole.
7 Poke the loop of the tassel through the bottom hole into the clutch and tie a knot in the loop big enough so that it can’t slip through the hole.
1 To make your pattern, measure the width of your laptop and add 2 inches to that measurement (so if your laptop is 14 inches wide, your pattern would be 16 inches wide).
2 Measure the depth of your laptop, double that number, and add 6 inches (so if your laptop is 10 inches deep, your pattern would be 26 inches deep).
3 Draw a slight curve on one of the short ends of the pattern for the flap. (Try using a dinner plate as a stencil.)

4 Trace your pattern onto the fabric and cut it out.
5 Cut across the noncurved short end with pinking shears to give it a cool edge.
6 Cut out the image you plan to use as a patch from the fabric. Be sure to give the outline a fun shape.
7 Center your image 6½ inches from the edge of the curved flap. Or, if you’re unsure about the placement, wrap the vinyl around your laptop to see how the finished envelope will look and mark with a pen where you want the patch to go.
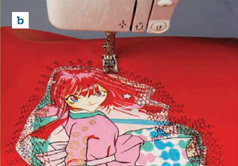
8 Pin the patch in place, and zigzag-stitch all the way around it. Make it look funky!
9 Fold your vinyl to create the envelope shape, leaving the 6-inch flap open. Stitch up the sides with a straight stitch, using a ½-inch seam allowance and making sure to backtack.
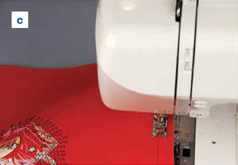
10 With pinking shears, cut around the raw edges of your case outside the stitches.
11 Slip your computer into the case and figure out where to put your Velcro dots on the inside of the flap and where it folds over. Stick your Velcro on, and you’re ready to go!

1 Enlarge and trace the pattern provided onto the heavy-duty canvas twice. Cut out the shapes.

2 Put one piece on top of the other, and with your sewing machine, zigzag-stitch all the way around the pieces.
3 Fold the bottom of the piece toward the pointy top to form the clutch shape.
4 Figure out where you need to place the Velcro closure, then peel and stick the Velcro pieces on the bag and stitch them in place.
5 Stitch the sides of the bag together about ⅜ inch from each edge.

OPTIONAL
6 Place masking tape over the Velcro to protect it from the paint.
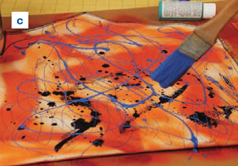
7 Go outside, set the clutch on some newspaper, and spray-paint both sides with your 2 colors, creating a funky, swirly pattern.
8 Get a big blob of latex paint on a paintbrush and splatter it on the clutch. Keep splattering and dripping different paint colors until you’re satisfied, then let dry overnight.
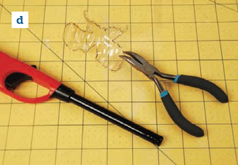
9 Cut out 2 or 3 flower shapes from your plastic bottle, 1 about 3 inches in diameter and the other about 2½ inches in diameter.
10 Holding a flower with your pliers, melt the edges of the plastic with the lighter to give the petals a cool, wavy shape. Repeat for the remaining flowers.
11 Spray-paint the flowers and let dry.
12 Put the smaller flower on top of the bigger flowers, and then stitch them all to the flap of the bag with needle and thread.
13 Glue the button in the middle of your flower with E-6000.
1 Prep your case for action by wiping off any dirt and grime and toweling it dry. Then, cover the parts of your case that you don’t want painted with newspaper, and tape the paper in place.
2 Take the case outside, spray-paint it thoroughly, and let dry.

3 Cut out the fabric images and figure out how you want to arrange them.

4 Apply Elmer’s spray adhesive to the back of each fabric piece and stick them to the suitcase.
5 When the entire case is decorated, generously apply 2 coats of clear coat, letting the first coat dry before adding the next.

1 Cut a 23-inch-long tube from 1 pant leg and remove the lining if there is one.
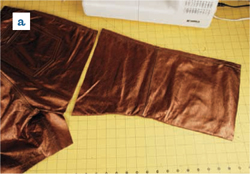
2 Stitch across the leg 7 inches from 1 end of the tube. This will be the base of your satchel.
3 Cut the material below the satchel base into ¼-inch-wide strips for a fringe.

4 Measure 5 inches down from the top of your bag, then cut off the 5-inch section from 1 side of the tube, leaving the other side intact to turn into your flap.
5 Cut the remaining 5-inch section into a semicircle with pinking shears.
6 Cut a buttonhole in the flap, fold the flap down, position the button on the bag, and stitch the button in place.
7 With pinking shears, cut a long 1½-inch-wide strip from the remnants of your leather pants for your strap. Determine how long you want your strap to be and trim the strip accordingly.
8 Insert the ends of your strap into the mouth of the satchel and stitch them in place with your sewing machine, making sure to backtack.

1 Cut your fabric into a rectangle 16 inches by 21 inches.
2 With fabric right side down, fold over one of the 21-inch sides ½ inch and press with your iron.
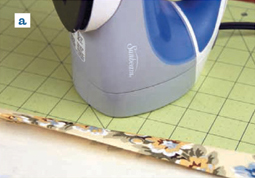
3 With the ½-inch fold still in place, fold over again 1 inch and press. You’re creating a tunnel for your ribbon, which is in the mouth of your bag.
4 With the pressed side unfolded, fold right sides together widthwise along a 16-inch side, and using a ½-inch seam allowance, stitch down ¾ inch from the top (where the mouth of your bag will be), and backtack. Leave a ½-inch gap—this will be the opening for your ribbon—then resume sewing, making sure to backtack, all the way down the side and across the bottom of the bag.
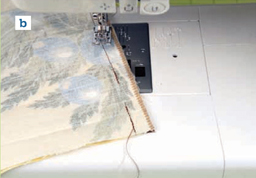
5 Turn the bag right side out and fold down where you pressed your bag to form your tunnel.
6 Stitch all the way around the mouth of the bag.
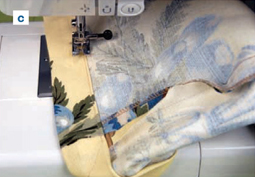
7 Put your safety pin on one end of the ribbon and push it through the tunnel.

8 Cut your ribbon at a slant, tie a knot at each end, and press the bag flat.
1 In even zigzag stitches, sew the 1-inch ribbon side by side onto the satin rectangle.
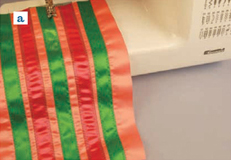
2 Lay your zipper facedown on the ribbons, so the zipper pull is against the ribbons, and stitch 1 side of the zipper to a 9-inch edge of ribbons.

3 Fold the piece in half, with right sides together, so the 9-inch edges meet, and stitch the other side of the zipper to the other 9-inch side of the ribbon piece.

4 Lay your ribbon piece on your sewing machine so both sides of the zipper are visible. Place your lining piece on top so that one 9-inch edge matches up with one of the zipper’s edges, and stitch along the edge.
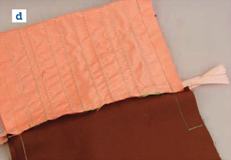
5 Repeat on the other side, sandwiching the zipper between the 9-inch edges of the lining, as shown in the photo.

6 Unzip your zipper halfway.
7 Spread lining and ribbon pieces out on either side of the zipper so they lie flat. Stitch along one side using a ½-inch seam allowance, and then clip the corners outside the seams so that when you turn the bag right side out there’s no bulk in the corners.
8 Stitch along the other side, using a ½-inch seam allowance and leaving 3 inches of the lining open. Clip the corners.

9 Clip the excess zipper on each end of the bag.
10 Pull the bag through the opening you left in the lining, then stitch closed and push the lining inside the bag.
11 Put your ¼-inch ribbon through the hole in the zipper, pull it through halfway, and tie a knot so it stays in place.
1 Cut the fabric into a rectangle that’s just a bit smaller than the rug.
SUGGESTION
2 Cut 2 pieces of ribbon that are about 4 inches longer than the dog chains, and weave 1 through each chain, letting a couple inches of ribbon hang through each loop at the ends of the chains.
3 Cut 4 pieces of ribbon, each 3 inches long, and pin 2 to each fringed side of the rug where you want your handles positioned. (I placed mine by finding the center of each side of the rug, then pinning a ribbon piece 3½ inches left of center and another piece 3½ inches right of center.)
4 Attach a handle to each side by folding the ribbon tabs over the end loops on the dog chains and pinning the excess ribbon hanging from the dog chains to the ends of the loops of ribbon.
5 Place the fabric on top of the rug, sandwiching the ribbon loops and the excess ribbon from the chains between the fabric and the rug. Pin the fabric in place.
6 Stitch all the way around the edges of the fabric, zigzagging over the ribbons twice so the handles are secure.

7 Fold up the bag with right sides facing, and sew up the sides using a ½-inch seam allowance.
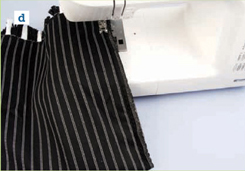
8 Turn the bag right side out and you’re done!
1 Cut out a rectangle from your fabric, 20 inches by 60 inches.
2 Cut out a strip from your fabric, 10 inches wide and 60 inches long.
3 Fold the 10-inch strip in half down the length and press the fold with your iron.
4 Fold the now 5-inch-wide strip in half down the length again and press. You have an ironed and folded piece of fabric 2½ inches wide and 60 inches long for your strap.
5 Stitch along all sides of the strap, about ¼ inch from the edges.

6 Fold the 20-inch by 60-inch piece of fabric in half lengthwise to form a rectangle 20 inches by 30 inches.
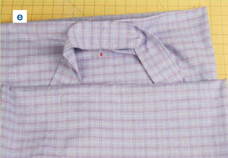
7 Sandwich each end of the strap between the layers of folded fabric 3½ inches from the fold and pin in place. (In the photo, I left an end peeking out a bit so you can see where the strap goes, but you should make sure to match up the edges of fabric before you pin.)

8 Fold down 3½ inches of both layers of fabric at the mouth of the case, and pin all the way up the sides of your case.
9 Stitch up the sides, using a ½-inch seam allowance.

10 Turn the case inside out. You’ll notice that by sewing your case this way you have finished the inside side edges of the-pillowcase around the mouth.

11 Stitch all the way around the mouth of the pillowcase 3 inches from the edge to finish it.
12 Find the center of each side of the case right inside the mouth, and apply Velcro strips. Stitch the Velcro in place.
13 Pin the center of the strap to the exact center of one side of the mouth on the outside of your pillowcase.
14 Carefully try your backpack pillowcase on for size and make sure the strap is pinned on correctly before you sew it. (It can easily get twisted leading up to this step.)
15 Stitch the center of your strap in place, put a pillow in your backpack pillowcase, and you’re off!
SUGGESTION