IMPORTANT
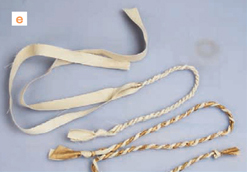
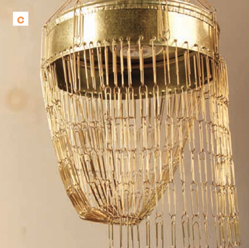
1 Cut 14 strips of each fabric, 2 inches wide, along the width of the fabric. (Most fabric is either 45 inches or 60 inches wide, so your strips will probably be 2” × 45” or 2” × 60”, but it doesn’t matter if they’re longer or shorter.)
2 Take 1 strip of each piece of fabric and braid them together. Secure the ends by either stitching across the 3 pieces or hot-gluing them together. Repeat until you’ve made 13 braids.
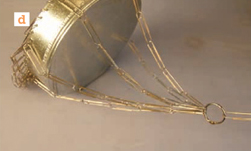
3 With the wire basket’s mouth down on your workspace, crisscross your 3 leftover fabric strips on top so they lie flat, and hot-glue them to the wires, as shown in the photo. Be sure to glue the ends of the strips securely to the mouth of the basket.
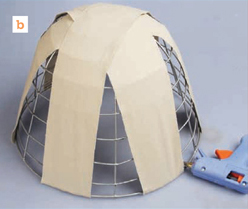
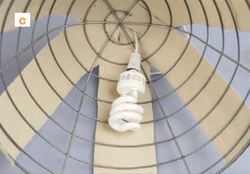
4 Cut a hole in the strips at the center of the top of the lamp. Place your socket inside the top of the basket, and thread the cord through the top. Secure the socket in place with a nylon zip tie.
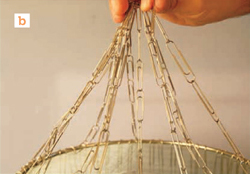
5 With your basket’s mouth down on the table, twist your braids in a spiral pattern starting in the center of the top, and glue them in place. Continue working around and down the basket toward the mouth, adding braids as you go, until the entire basket is covered.

6 Cut 8 strips of fabric from each of your 3 fabrics, each ½ inch wide.
7 Tie the ends of 2 pieces together, and trap the tied ends in a drawer or under something very heavy.
8 Twist each of the pieces clockwise while simultaneously twisting each color counter-clockwise to form a ropelike strand, and then tie a knot on the end to finish it. Repeat until you have 8 twisted strands.
9 Glue the end of 1 of your twisted strands to the mouth of your lamp. Let it hang down about 4 inches, then loop it back up and tack the loop in place. Continue creating a 4-inch looped fringe with your strands until it goes all the way around the mouth. Make additional twisted strands if you need them.
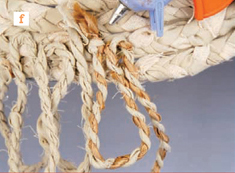
10 Make some more twisted strands and glue them around the lamp in between the braids to cover up any gaps and to add texture.
11 Make another twisted strand and glue 1 end to the top of your lamp in the middle of the spiral so you can poke a hanging hook through it later.
12 Attach your energy-saving cool bulb to the socket, and hang your light.
1 Cut the tops off your beer cans about 1 inch down from the lid so that you have a “beer cup” about 3½ inches high.
2 Cut the sides of the cans into ½-inch-wide vertical strips.
3 Bend the strips outward so each can looks like a starburst.

4 Fold each strip under and slightly sideways, so that the top of the strip is hidden under the base of the next strip.

5 Poke a hole in the center of each can with your large nail, and then work it open with the screwdriver until it’s big enough for a lightbulb to fit through.
6 Spray the cans all over with silver spray paint and let them dry.
7 Paint Elmer’s glue on the edges of your cans, sprinkle glitter on top, and let dry.

8 Slip your starbursts over the lightbulbs and add a dab of E-6000 to keep them in place.

9 Invite Betty over to help you party it up a little.
1 Place the edge of your duct cap on the scrap wood, and working from the inside, tap 66 holes around the edge of the cap using a large nail and hammer. The holes should be about ⅜ of an inch apart.

2 Make 66 strands of paper clips, each consisting of 5 small clips hanging from 1 large clip.
3 Add the strands to the cap by poking the end of the large clips through the holes.

4 Stick the battery-operated light inside the duct cap, right in the center.
5 String the end clip on each paper clip strand through 1 of the binder rings and clasp the ring shut.
6 Make 6 strands of 6 large paper clips each, and evenly attach them around the duct cap, connecting each to the top of 1 of the large paper clips you put there earlier.
7 Attach the ends of the 8 strands you just added to another binder ring and clasp the ring shut.
8 Hang your lamp from the ring and enjoy the glow.
1 Open your umbrella.
2 With heavy-duty wire cutters, cut the shaft of the umbrella about 6 inches above the runner. Make sure not to cut too near the top spring (this is what keeps the umbrella locked open).

HINT
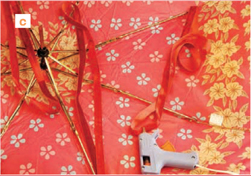
3 Hot-glue a layer of fringe all the way around the outer edge of the umbrella.
4 Hot-glue another ring of trim evenly all the way around the umbrella, about 4 inches closer to the center than your first.

5 Continue adding layers of trim until you are satisfied.
6 Cut 4 pieces of ribbon, each 1 yard long.
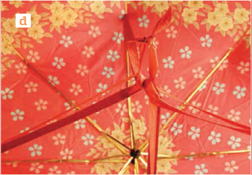
7 Inside the top of your umbrella there are 8 stretchers that extend when you open it. String 1 yard of ribbon through the outermost piece of every other stretcher, and hot-glue the opposite ends together in the center of your umbrella so you’ve formed 4 big loops.
8 Thread the extra ¼-yard-long piece of ribbon through the loops and tie the ends in a knot to form a loop from which you can hang your umbrella cover.
9 Hot-glue a tassel in the center of the outside of the umbrella cover. Let the glue dry.
10 Hang your umbrella cover from a hook on a high ceiling.
1 Cut a 3-inch piece of wire and create a small loop at the end with needle-nose pliers.
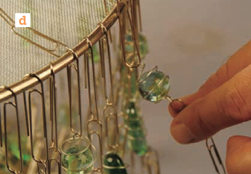
2 Wrap the wire around a small marble 3 times, and then create another small loop at the other end of your wire. This will probably take you a few tries, but you’ll get the hang of it.

3 Repeat the previous two steps for all but 1 small marble, then use the same technique with 5-inch pieces of wire to wrap all of your glass chips.
4 To make the strands that will go on the top part of your chandelier (which the body hangs from), make 8 strands of 5 large paper clips and 8 strands of 8 small paper clips.
5 Remove the handle of the splatter lid. (These are usually screwed on with a Phillips head screw.)
6 Clip the strands of large paper clips evenly around the edge of the splatter lid by hooking the ends of the paper clip strands around the rim and through the screen.
7 Attach all of the other ends of the strands to an office clip. Hang your partially finished chandelier to continue work on the next stages.
8 For the outer body of the chandelier, make 16 strands following this pattern: 1 large paperclip + 1 wrapped marble + 3 small paperclips + 1 wrapped marble + 3 paperclips + 1 wrapped marble + 3 small paperclips + 1 wrapped marble + 3 paperclips.
Now make 16 strands following this pattern: 1 large paperclip + 1 small paperclip + 1 wrapped glass chip + 3 small paperclips + 1 wrapped chip + 3 small paperclips + 1 wrapped chip + 4 small paper clips.

9 For the inner body of the chandelier, make 32 strands following this pattern: 1 large paper clip + 8 small paper clips.
10 Hang your strands evenly all the way around the rim of the splatter lid. Alternate hanging the marble and glass chip strands, and a paper clip strand goes in between each.
11 Gather the ends of the 32 paper clip strands and attach them to a binder ring. This will create the inner body of your chandelier.
12 Gather the ends of the glass chip and marble strands, and attach them to a binder ring to create the outer body of your chandelier.
13 Take the remaining 8 strands of 8 small paper clips and drape them between the large clips that you used to hang your chandelier, then attach one end to the top binder ring and the other end to the large clips around the edge that create the body of your chandelier.
14 Wire your cord and socket set in the hole in the middle of the splatter lid where the handle of the lid used to be.
15 To make the bobble at the bottom of the chandelier, wrap 6 inches of wire around your large marble and 1 remaining small marble, and attach them to a binder ring with 3 evenly spaced paper clips.
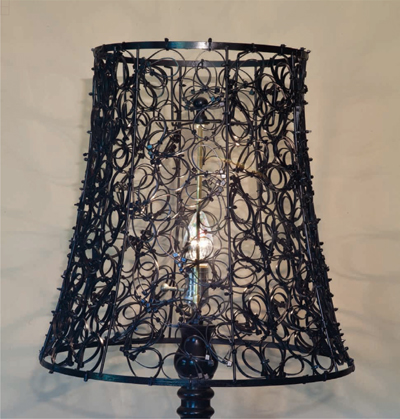
1 Cut off the ends of 3 large zip ties, keeping them as long as you can.
2 Cut off about 3 inches of 3 more large zip ties.
3 Fasten these 6 ties into teardrop shapes by inserting the ends into the mouths.
4 Place a small teardrop in the center of each large teardrop and arrange the large teardrops so they connect at their points, as shown in the photo.
5 Using 2 small ties, connect the teardrops together so every teardrop—large and small—is held in place.
6 Using small ties, connect the teardrop cluster to a wire on your lampshade.

7 Repeat the above steps until you’ve covered the entire lampshade.
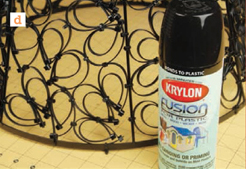
8 Spray the shade with Krylon Fusion spray paint, making sure to hit all angles.
DON’T WORRY
1 Bend the handles of the strainer spoons backward 3 inches from the tip, almost all the way to the rest of the handle.
2 Bend the handles of the large serving spoons backward 4 inches from the tip, almost all the way to the rest of the handle.

3 Hang the spoons and strainers from their bent handles on the outer wire of the wire trivet, and note how far you’ll have to bend each spoon to form a horizontal surface on which to rest your candles. Remove the spoons and strainers and bend accordingly.
4 Attach 1 end of each of the 4 chain dog collars to the large 2½-inch binder ring. This will be the top of your candelier.
5 Attach the other ends of the chain dog collars evenly around the metal trivet, 90 degrees apart, using the 4 small office clips.

6 Hang the partially finished candelier before you continue to work.
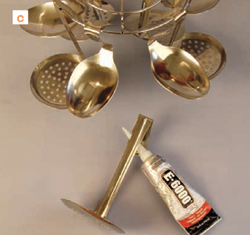
7 Arrange the spoons around the outer wire of the trivet. Once your spoons are in place, add a gob of E-6000 under the bent handles where they touch the trivet to keep them from moving. Let the glue dry.
8 Hang the Christmas ornament from the center of the trivet in between all of the hanging spoons, using your silver chain and a jump ring or a piece of wire.
9 Hang your candelier in its final location, place a tealight on each spoon, and light the candles.
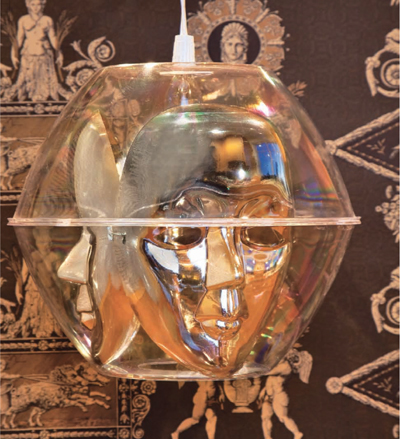
1 Measure the diameter of your socket. Carefully drill a hole in the bottom of 1 of the plastic bowls the same size as the socket measurement so that the socket will fit comfortably in the hole.
2 With the Dremel, cut a larger hole in the bottom of the second clear bowl, big enough for you to fit your hand through to change the bulb.
3 With your knife, cut small holes in the temples of each mask.
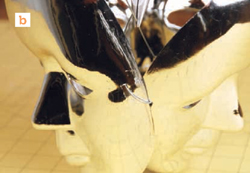
4 Cut 3 pieces of wire, each 3 inches long, and maneuver your needle-nose pliers to wire the masks together, using the wire pieces like twist ties.

5 Place the masks inside the bowl with the larger hole.
6 Glue the second bowl on top of the first, trapping the masks in place.
7 Slip your socket in the hole at the top and glue it into place with E-6000. Let the glue dry.
8 Reach your hand in through the bottom bowl and put your bulb in the socket.

9 Hang your lamp from a hook in the ceiling. Spooky!
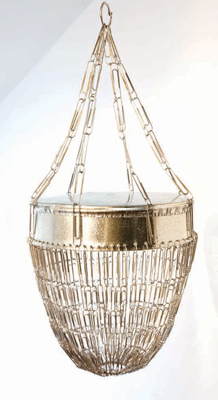
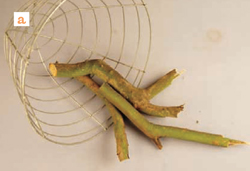
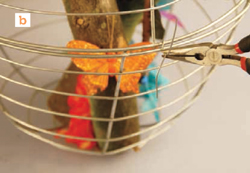
1 Place your baskets mouth-to-mouth and note the dimensions of the space inside. Then cut your branches accordingly, bearing in mind that you’ll want to bundle them in an artistic way.
2 Create your branch arrangement, and wire the branches together so that they stay put.
3 Using your hot glue gun, add faux butterflies, leaves, and flowers to the branches. Let the glue dry, then place the arrangement inside one plant basket and place the other on top.
4 Cut about 10 pieces of small-gauge wire, 5 inches long. Wire the mouths of the baskets together with the wire, using pliers to bend them like twist ties.
5 With your pliers, loosen the link on one end of your chain and hook it onto the top of the chandelier where the wires intersect. Close the link back up.

6 Hang your chandelier from the chain and enjoy!
1 Form a cross with the dowels by crisscrossing them in the exact center of each and tying them together with string.
2 Tie a knot around one end of one dowel, and then connect the ends of each of the dowels with string. When you reach the first dowel, cut the string and tie a knot. This is your chandelier base. (This is the same process used for making the kite base earlier in the book.)
3 Tie a 42-inch piece of twine on each end of the long dowel, and a 30-inch piece of twine to each end of the shorter dowel so that you will be able to hang your chandelier while you’re working and when it’s finished.
4 Fold 47 paper cranes, using the photos below as your guide.


5 Thread your large needle with 1 yard of embroidery thread and tie a knot at the end.
6 Poke your needle through the bottom of the crane through the hole in the middle created by the folds. Pull the needle and thread up through the top point of the crane until your knot is inside the crane, holding it in place.
7 Tie a knot in the thread 4½ to 5 inches up from the tip of the crane you just threaded, and slip on another crane.
8 Repeat steps 6 and 7 until you have 5 cranes on your thread.
9 Make 8 strands of 5 cranes. Cut a piece of thread 40 inches long and make 1 strand of 7 cranes.
10 Tie a string of 5 cranes on the tip of each dowel, and the rest in between the dowel tips on the heavy-duty twine. Tie the string of 7 cranes in the center.