
Here’s a thought for you. When does a puddle get so big it becomes a pond? Well, I guess the answer is that a puddle dries up and loses all its water at some time. So a pond could be any body of still water that is always there. But, then, when does a pond become a lake? And what might you find in these masses of water?

There are many bugs in freshwater habitats. They can be vegetarian – plant sap-sucking little fellas like the greenfly – or they can be predators feeding on the juices of other creatures. The one thing they have in common is a sharp, dagger-like mouthpart that they use a little like a sharp straw.
Some of my favourite bugs are found flipping and skidding across the surface of the water in the summer. These animals include the pond skaters, water crickets (not crickets at all but a shorter, bent-legged pond skater) and water measurers. They live their life on the fragile surface film of the water and they prey on other insects unfortunate enough to get trapped on it.
Thanks to a few neat inventions, these animals stay on top and don’t sink. They have bent feet that curl up at the ends so they don’t pierce the surface tension. (What is surface tension, do I hear you ask? To find out more, turn over the page.) They also have claws further up the leg than you would expect, to stop them punching a hole. Then there is a collection of waterproof hairs that coat the body and legs, giving the animal a greater surface area to spread its weight over.
These well-developed bugs also use the surface film to communicate to each other by setting up ripple signals. In a similar way, drowning insects also set up their own ripples of panic. The successful floating bugs are very quick to pick up on these ripples with their sensitive feet and antennae, and before long are on their way to plunder the less fortunate.

Large expanses of weedy water provide security for many birds. Ducks are obvious on most ponds and lakes, as are members of the grebe family, such as this little grebe, or dabchick.
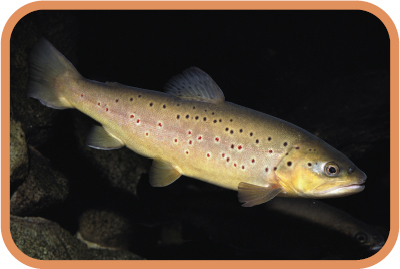
The brown trout is one of the most common of freshwater fish.
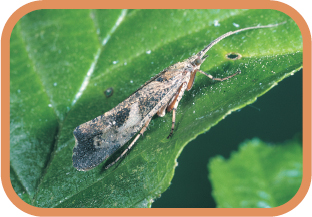
This is the larvae of an adult caddis fly. They make a protective home for themselves out of stones, shells or rocks.

The surface tension of water is a death trap to many creatures unable to fight its sticky power. But predatory bugs, such as the pond skater, use it to their advantage.
So why don’t they sink?!
We have met the pond skater and their relatives the water measurer and the water cricket, but how do they stay on the right side of the water and not end up sinking? Well I have already described the special water repellent hairs that coat much of their bodies (see page 22), but something even more important is being used and that is something that happens when water meets air. It is called surface tension and acts like a thin skin, so if you are light and can spread your weight over the surface and also tread carefully, you are pretty much doing what a pond skater is doing.
Here are two quick little demonstrations that show some more properties of the surface tension – one is my neat little trick (see below) to show how spreading the load helps get surface tension on your side, and the other (see the soap boat, opposite) shows you just how powerful surface tension can be.
You may well ask, what have either of these got to do with wildlife? Well the soap boat trick is actually a technique used by the water cricket. So that its prey cannot feel it coming, it goes into stealth mode and simply produces a kind of oily soap from it bottom and silently slides forward.

Nick’s trick
Take a paper clip, which if you were to drop it into a bowl of water, would simply sink – no surprise there, then. But place the clip on a piece of paper and gently push the paper down into the water and the pin should stay where it is, resting on the surface tension. Magic!
YOU WILL NEED
> paper
> scissors
> bar of soap
> bowl of water

1 Cut out some small pieces of paper. They can be any shape, but a triangle works well (plus it also looks more like a boat!).
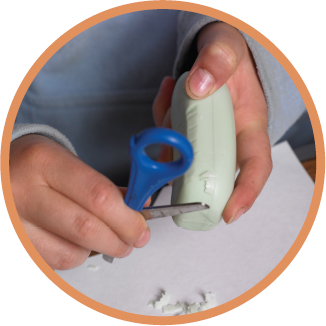
2 Shave some pieces of soap off the bar. Use one of the scissor blades, but shave away from you and be very careful.

3 Now balance a piece of the shaved soap on one edge of a paper triangle, so that it overhangs. This is your soap boat, which you should gently place on the surface of the bowl of water. Watch what happens – the boat gets pulled along by the surface tension. Behind the boat, the grip of the tension on the boat is weakened and destroyed by the soap. The piece of paper is being pulled forward by the stronger force.
Take it further
* Catch a water boatman or some other insect that hunts on the water surface and place it in a water tray. Shine a bench lamp on it from above and what do you notice about the shadow that is cast on the bottom of the tray?
* Look at the tips of the feet – why are they not sinking through the water’s surface?
Pond dragons
Dragonflies and damselflies are second only to butterflies in their attractive and bright colouring. To tell them apart can be difficult, but on the whole, a dragonfly is larger than the more delicate damselfly.
The best place to catch up with these brightly coloured examples of insect life is on a hot, still summer’s day by a body of water where they dash, dart, whiz and skip around. Some people are a little scared about getting in so close to these active animals and I guess their wildly inaccurate popular names such as horse stingers, Devil’s darning needles or Devil flies don’t help! But despite their aggressive attitude to life, the only creatures that should fear these animals are smaller flying ones.
As a group they are known as the Odonata, which means ‘toothed jaws’, and this gives away their game. They really are the winged assassins of the sky, as adults trawling the air for other small insects; even the tiniest of damselflies is a ruthless murderer of midges. So if you wish to get to know dragonflies better, how do you go about it? Well it makes sense to start with the slowest stage of their lives and that means getting to know and study the nymphs: this is what the insects are called at their larval stage. At this time they are much slower beasts, prowling or lying in ambush for smaller prey.
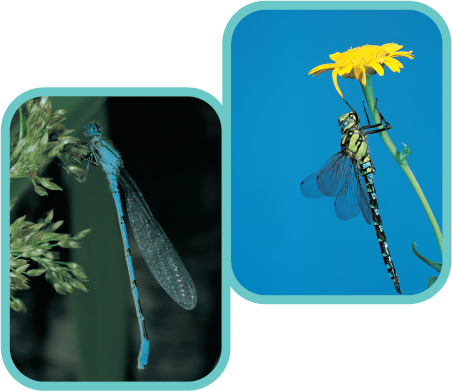
Fab facts
* Some damselfliess (left) consume up to 20% of their own body weight a day.
* Large dragonflies (far left) can reach speeds of up to 22mph.

But the activity you will notice most will be that of feeding and territory defence as a male dashes this way and that, seeing off impostors and rivals, and not just his own species either. I have seen particularly bold insects have a pop at passing birds.
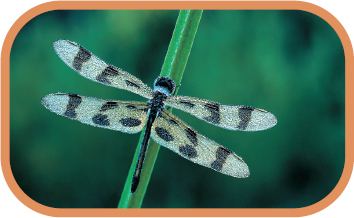
Behaviour that is very easy to witness is egg laying, which can be anything from a repeated dipping and dancing flight, spiking the surface of the water with the tip of the abdomen, each time releasing eggs. Others are more careful, settling on vegetation and cautiously positioning the eggs, either gluing or depositing them inside water plants. Some species of damselfly will submerge themselves to get their eggs in a safe place.
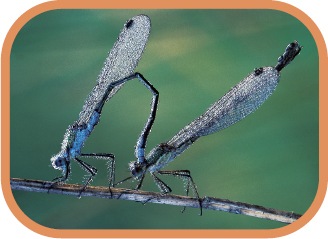
Mating is easy to see as two insects fly in tandem, with the male towing the female around, held firmly behind the neck with his claspers.
Take my advice
The avid dragon spotter and damsel watcher needs a few bits of essential equipment.
* A pair of binoculars is very handy, because a lot of the action takes place in the middle of the pond or river.
* A butterfly net can be useful for getting a closer look, but handling them without hurting them requires skill and patience and is really for those patient and expert at handling insects.
* Buy a good field guide if you want to put names to everything you find (see page 70). A few hours watching these insects is an experience in itself and you can see them doing some amazing things, even if you are not entirely sure what’s doing them!
Hatching dragons
You can rear your own dragonflies and watch a very private part of their incredible life cycle. But you first need to collect some dragonfly nymphs, and it’s best to choose those from a ‘still water’ habitat, such as a pond or lake. You are then more likely to be able to provide for the needs of the nymphs from these habitats rather than those from flowing waters.
You need to find a full-grown or nearly full-grown nymph, unless you want to spend years feeding it! To spot one of these, look for obviously large examples of dragonfly. Check the wing buds – if they are long, you have more than likely got one in its last nymphal skin. If the nymph is active near the surface of the water, its gills have stopped working. This is a sure-fire clue that it is about to emerge and start to use its adult breahing technique through little holes called spiracles.

Fab fact
If you find the elongated form of a hawker nymph, you can see nature’s original jet engine! The gills of these insects are set inside a cavity in the abdomen, which normally pumps water over it to flush it out. But this action can be turned to a rather surprising piece of predator avoidance as the insect can rapidly squirt the water out backwards, which fires them forwards! You can see this happen if you gently lift one of these insects to the surface of the water; in its agitation it will try to escape. In so doing, it will angle its abdomen tip upwards and you will see it squirt a jet of water up and through the surface.
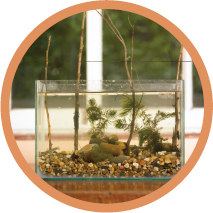
1 Set up a fish tank as for any other aquatic life (see page 17) but don’t put a lid on it. Setting up the tank outside is best so that if you miss the moment, the insect will at least be free to fly away without bashing itself to pieces indoors. Provide a selection of twigs, branches or reeds in the tank, sticking out of the top for the emerging dragons to climb up.
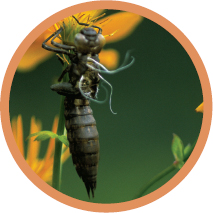
2 When you are collecting, you only want two or three large specimens for a fish tank about 50-60cm long. Choose the biggest nymphs you can find as these are likely to turn into adults the most quickly, bearing in mind some of these insects will spend several years in their nymphal stage. If you choose small ones, you may well be in for a long wait! A good tip is to look at the wing buds; they are a good indication of age. Those with longer wings are more likely to hatch during the season. Feed your nymphs on small worms from the garden.

3 Just before emerging, nymphs tend to hang around near the surface as their gills stop working and they need to start breathing like the adult insect through tiny holes in their thorax called spiracles. It is now that you should keep an eye open for the grand finale! It usually happens in the early morning or evening, so increase your vigil at these times of the day.

4 If you are lucky, you may see one of the most beautiful sights in the insect world. Following its slow crawl up a stem, the nymph splits open along a weak spot at the back of its head and a new dragonfly is born. If you miss the emergence, be patient and try again.
Collecting the empty skins
After a dragonfly has emerged from its nymph stage and flown away, it leaves its empty skin behind. Search these empty skins and mount as many different ones as possible to make a special collection that you will always enjoy.
Look around the edges of ponds and streams in the spring and summer, paying particular attention to any young vegetation. Once you have your eye in you will probably notice dry brown husks that are the old nymphal cases. They are called exuvia and look like perfect hollow nymphs – eyes, jaws and all.
Most of the empty skins will be stuck to reeds and plant stems and can be quite a stretch from the safety of the bank. This could prove a bit of a problem to the naturalist wishing to have a closer look. But worry not, this is where a large yogurt pot and bamboo cane become invaluable – see opposite.
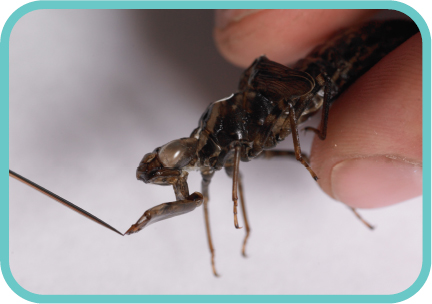
Nick’s trick
* Nymphs are totally concerned with feeding and although they may look sluggish and clumsy, they have a secret weapon – a set of extendible jaws – one of the most complex hunting gadgets in existence.
* This deadly device is hinged under the head and when the nymph sees potential dinner (a passing tadpole, fish or other nymph), it extends its arm-like lip and stabs, grabs or spears the prey so fast that the action cannot be followed with the naked eye.
* If you catch a nymph case, soak it in water to make it less brittle and then use a needle or pin to tease out that extendible jaw that was once every worm and tadpole’s worst nightmare!
YOU WILL NEED
> large yogurt pot
> bamboo cane
> scissors
> gaffer tape
> cardboard
> glue

1 Securely attach the bamboo cane to the bottom of the pot with a few strips of gaffer tape.

2 You now have the perfect device for reaching out over boggy, marshy ground or deep water to where these dry remnants of dragonfly life are often positioned.

3 Scrape the edge of the pot upwards and the old skin should drop into it. This can get a little tricky in windy weather!
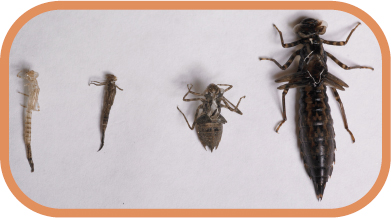
4 If the skins aren’t fresh, they can get a bit crispy, but if you are careful, you can glue or pin them to a bit of cardboard and then try to identify the different types. In this picture, a pair of damselflies are on the left and two dragonflies are on the right.
Pond snails
There are several kinds of mollusc that inhabit freshwater. First there are filter-feeding ones that live between half shells. These are members of the clam family, and trawling around in the mud or gravel may reveal several species, from tiny little freshwater cockles to the giant swan mussel, which is at least 20cm long.
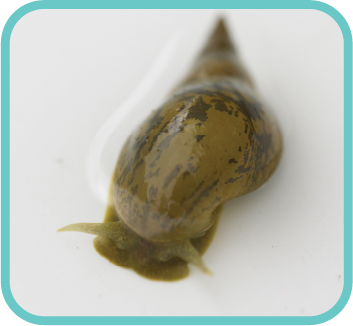
In weedy freshwater you will also find true snails. There are many different kinds that inhabit the underwater world. Collect some weed or some mud from the bottom and you will almost certainly find a few of these molluscs slowly creeping about. You know you have a snail because it usually has a shell with some kind of twist to it and it moves by gliding around on a big muscular foot.
You can further divide these into those that breathe air and have a breathing hole or pore that opens into a simple lung and those that only breathe through their skin. These also often have a ‘door’ called an operculum, which they can pull into the shell entrance, giving further protection to the snail.
Watch the snails you have collected and if some of them are active and start ‘walking’ upside down, hanging from the water’s surface, you may notice them opening their breathing hole. Snails that will best show this are also some of the most common and largest you will come across, like the great pond snail and the ramshorn.
Fab facts
The snail’s breathing hole leads to a chamber called the mantle cavity, which is used a bit like a lazy lung. Air wafts in and all the oxygen the snail wants is picked up by a network of blood vessels in the skin. Keep some great pond snails in a jam jar next to your bed at night and you can actually hear breathing, a kind of popping noise as they come to the surface and open their breathing pore. Some water snails have gills and fill their mantle cavity with water, extracting oxygen from it, while others have a combination of both.
YOU WILL NEED
> sticky labels
> pen
> two jam jars
> two pond snails
> stop watch

1 Write the letters ‘A’ and ‘B’ on two of the sticky labels. Stick the labels to the jam jars.
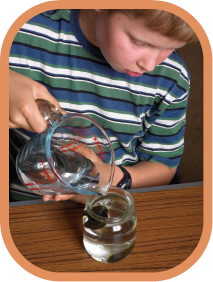
2 Fill jam jar ‘A’ with normal water from the tap. For the water in jam jar ‘B’ you need to remove most of the dissolved oxygen. Do this by boiling water and allowing it to cool to the same temperature as the other. Pour it into jar ‘B’.
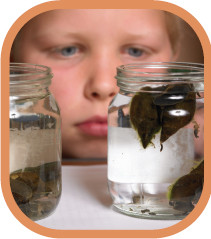
3 Place a snail of about the same size in each jar. Use the stop watch to see how long each snail spends at the surface with its breathing pore open. Also count how many times this happens during that length of time.

4 The snail in oxygen-poor water, jar ‘B’, needs to breath at the surface more than the snail in jar ‘A’. It cannot get as much oxygen from the water as it needs.
Take it further
All snails can breath to an extent through their skin as well as through their breathing pore (see Fab facts, opposite). This experiment proves that pond snails use both methods of breathing. When the dissolved oxygen level is deliberately reduced, the breathing pore comes into use more frequently.
Food file
Most pond snails graze plants stems and the water’s surface, rasping away a layer of cells or microscopic algae as they go. You can watch pond snails as they cling to the underside of the water surface and graze the film of microscopic plants; or pop one in a jam jar and watch it slide up the side of the glass. If it is feeding, you will see its radula move backwards and forwards almost like a jaw. Look through a magnifying glass and you may even see some of the hundreds of tiny teeth that give the radula a rough, file-like surface, perfect for the job.
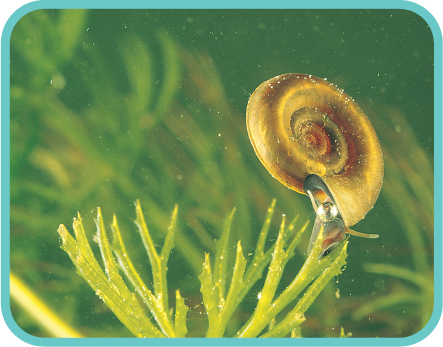
Here is a pond snail hard at work chomping its way through a particularly delicious plant stem.
Nick’s trick
* Why not collect any empty shells you find? It is common to collect shells on the beach, but how many people do you know that collect freshwater mollusc shells? They are just as interesting and are less studied than their salt water cousins.
* Simply wash them in warm, soapy water, dry them on a tea towel and rub with some baby oil or similar to make them shiny. Then try to identify what you have collected using a good field guide. Add a label to each specimen with time, date, location and a little habitat information, such as whether the water was hard or soft, clear or dirty, still or flowing, and slowly you will get to know this little-studied but fascinating bunch of water residents.
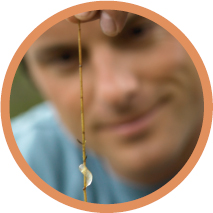
1 If you keep an observation tank or look closely at the stems of plants and particularly under the flat leaves of lily pads, you may find small, slimy blobs of clear jelly.

2 Depending on how old they are, you may notice up to several hundred tiny ‘pips’ inside. These blobs are snail egg clusters and the little dots are the individual developing embryos; the baby snails.

3 Different snails each lay slightly different egg masses, some are rounded, and others are crescent shaped and some look like little clear sausages.
Take it further
* If you collect a plant with one of these egg clusters on it and place it in a shallow dish of pond water, you can keep a snail diary. Look at them each day and keep a record and even draw their development. How long do they take to hatch?
* Once they hatch, you can release the snails back where you got them or you could rear them as part of your micro zoo (see page 18).
* Experiment with the types of food you offer them. Try pond weed or lettuce leaves and make sure you keep the water clean and fresh. As they grow, have a guess at what species they are.
A most exciting hole
If you have the space, do yourself and all your local wildlife a favour – build yourself a pond! Any permanent water acts as a wildlife magnet, not just for the things that live in water but for other creatures that hunt around its edges or simply visit to drink or have a scrub up.
There are many ways you can turn a scruffy garden corner or dull expanse of lawn into a pond, but it does depend a little on your budget and skills. The easiest way is to buy a pre-moulded pond from a garden centre. However, they tend to be a bit steep sided and also you are restricted to someone else’s design and so finding one to fit your imagination can be difficult.
The alternative is to get some plastic sheeting, but not any old plastic. Cheap plastic eventually becomes brittle and then just a badly placed rock or even the claws of an animal is all it takes to turn a watery oasis into a dry hole in the ground, full of dead and dying pond life. The best material to line your pond with is butyl rubber. This is thick, flexible and guaranteed for 20–25 years. Furthermore, you can get it from a good garden centre off the roll.
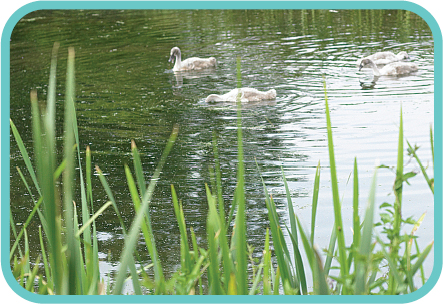
Before you start digging, draw a plan of what your pond will look like, how deep it will be and where you will plant things. Think about how wildlife will use it too. Some of the ideas you might like to incorporate into your design could be a deep bit that stays free of ice in the winter; somewhere shallow where birds can bathe and where frogs and other creatures can easily get in and out of the water; and you might want to plant some emergent plants, such as reeds or rushes, for dragonflies and other insects to rest up on.
YOU WILL NEED
> spade
> fine sand
> old newspapers
> old carpets, matting or rugs
> pond liner made of butyl rubber

1 Dig a hole to match your plan – the centre needs to be at least 50cm deep to prevent a total freeze-up in winter. Keep it reasonably shallow around the edge for plants. This is hard work on your own, even if you are only planning on a small one. I find a bit of bribery works well on family, friends and relatives, such as a good barbecue once you’ve finished.
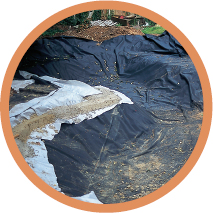
2 Get into your pond on all fours and investigate the ground very carefully to ensure you remove anything that is sharp or hard and might puncture your pond liner. Put down a 5cm thick layer of sand and then, if you have any newspapers, old carpets, matting or rugs, put them on top of this. Only now is it safe to put down your pond liner.
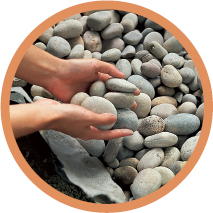
3 Gently mould the liner into the shape of your pond, carefully folding it into corners and obstacles. Bury any liner remaining at the edges in a small trench or weigh down with stones or soil.

4 Now it is time for the most satisfying job of all – sitting back and letting the hosepipe do the work, filling your pond with water. Leave the water to stand for a few days to allow the chlorine to evaporate before introducing plants and any pond life.
Take my advice
* You need to buy enough pond liner to cover the area of your pond plus enough to cover the sides and the ledges and any irregularity in the surface.
* The formula is to take the longest distance across the pond and add to this the maximum depth of the pond times two. Then add 50cm. This will give you the length of pond liner you need to buy.
Frog watch
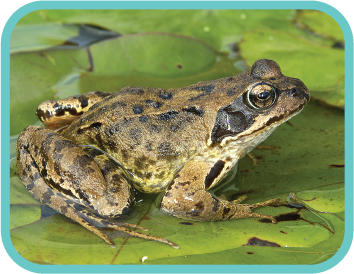
The life cycle of a frog or toad is tied to water, so they need to live in damp and dank places. This, of course, means they are hard to find. For most of the year they wander about, some lurking near the pond, others going walkies, and newts in particular can get into surprising places. I’ve even found them up trees!
All amphibians need their surroundings to be relatively moist, so the best time to look for them is at night, when they’re at their most active. It’s also the time when most of their food is on the move. Go out with a torch – a head torch is preferable as it leaves your hands free – and scour your flowerbeds, log piles and lawns and you may well turn up a hunting frog or toad.
The best and probably most exciting time to look for frogs and toads is during the breeding season, when they return to water to lay their eggs. At this time their activities are also a little more predictable. In spring, when the temperature is around 8°C, visit you local pond or lake after dark and investigate the edges for amphibian life.
Ripples and sounds tend to give away the locations of frogs and toads; even if they are fleeing, you will hear a loud ‘plop’ as they leap to the safety of the water. Be patient and you will eventually catch sight of them, either swimming below the surface or returning to the top to breathe.
Fab facts
* Listen out for the different sounds frogs and toads make when the males are calling to the females. Frogs tend to purr like quiet little motors, while it is toads that make the famous ‘croak’.
* If you find spawn that occurs in long strings, then you have found the spawn of toads, who generally prefer deeper water to common frogs. But with shallow edges and deep centres to most ponds, it can be quite confusing as both species take part in their mass spawning in the same water.

1 The best place to look for amphibian spawn is still water with lots of plant life. The bubbly masses of frogspawn are familiar to most of us. Freshly laid spawn is quite firm and tightly squashed together, which means it is only hours old and the frogs will not be far away. As soon as it is laid, the protective jelly coating starts to soak up the surrounding water and swell.
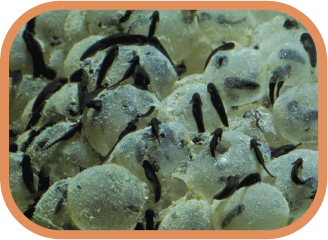
2 When the frogspawn hatches, tiny tadpoles are born. For the first few days of their lives they hardly move. They have no mouths yet and they are surviving by absorbing their yolk sac.
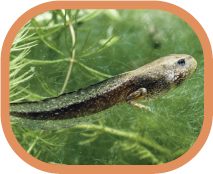
3 After about six weeks, their back legs start to grow and their appetite starts to grow too. By the time their front legs are growing, the amphibian diet becomes much more meat based.

4 And so the tadpole slowly turns into a frog, shedding its tail on the way. It has plenty to celebrate!
From ’pole to froglet
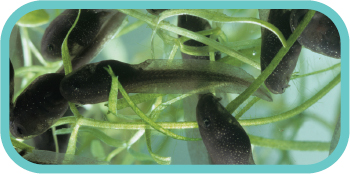
Every year and hopefully for ever more, young people will peer into a pond and get excited at the first sight of the jellied mass shimmering right there. The next instinct is to unceremoniously stuff the spawn into a bucket and take it home. Sadly, these well-meaning acts of curiosity often end in disaster. Many tadpoles perish and few make it to froghood.
There are many simple reasons for this, so here is my fool-proof, frog-rearing recipe! Remember that the more tadpoles you have, the more work you will have to do to keep the water fresh. They take more feeding, more cleaning out and they may even have detrimental effects on each other by slowing down development or becoming cannibalistic. The end result is many deaths and a higher percentage of failure.
Collect spawn from garden ponds wherever possible. It keeps your disturbance of wild populations to a minimum. Get it from just one place, too, to avoid spreading certain frog diseases. Once you have successfully bred your tadpoles, the husbandry becomes very labour intensive, so it is best now to release your froglets back to the area where you collected the spawn. Do this after dark and into long vegetation, not back into the water.
Nick’s tricks
Feeding hungry tadpoles can be hard work. Here are some ideas for you. Try to get a balance and do not overfeed or you will have to increase the number of water changes.
* When they need to eat meat, feed them flaked fish foods and small pond creatures, such as blood worms and daphnia, also called water fleas, which you can buy from any fish or pet shop. Also feed them very small hatchling crickets, aphids and other tiny terrestrial insects.
* Every few days, feed them dry pellets usually intended for herbivorous pets such as rabbits. Another bit of variety is lettuce boiled for 5 minutes. Put on the surface, a leaf at a time.
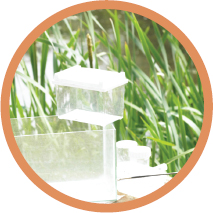
1 Choose a medium-sized tank with a vented and well-fitting lid. Always use rain or other natural water. Tap water can be used but let it stand for a couple of days so the chlorine naturally disappears. Washed gravel and pond plants will help the water quality and also provide food for hungry taddies. Set the ‘tadpolery’ in a light location but out of direct sunlight.
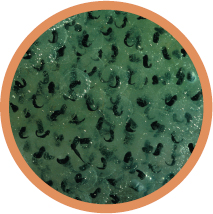
2 Collect a small quantity of newly laid fresh spawn, which, when only a couple of days old, is quite firm and easy to separate with your fingers into a manageable portion. A half cupful is perfect to achieve a ratio of three to five tadpoles for every litre of water.

3 Acclimatize your catch to the water in your tank. Put the spawn in a plastic bag and float on the surface for two hours. Then gently mix the tank water with that in the bag and tip in the spawn. For a few days the tadpoles hardly move. Do not disturb! Once they start swimming, change half the water (see left).
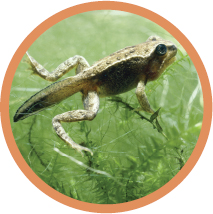
4 For the first couple of weeks your tadpoles will be content micro-grazing algae off the sides of the tank and any vegetation. But after three weeks they start needing larger quantities of more substantial salad (see Nick’s tricks, opposite).

5 As the tadpoles grow, increase their food. Then, with the arrival of front legs, reduce the water level to a few centimetres. Give them places to climb to, such as moss and stones, and soon you will have froglets. Congratulations!
Take my advice
To change the water, each week tip half the water through a net or sieve so you catch any stray tadpoles. Pop them back in the tank. Replace the water with fresh, non-chlorinated water of a similar temperature. If the water gets cloudy, make the changes more frequently or add a couple of other herbivores, such as a few pond snails, to do some cleaning for you.
Bubbles of life
If you have ever kept fish, you will know that it is a good idea to put some water plants or pond weed in the tank with them. But have you ever wondered why? Well a clue can be seen if you visit a shallow pond on a warm, sunny day.
Look closely at the submerged plants and you will notice that not only are the leaves covered with what looks like millions of little silver baubles, but also there is a stream of bubbles fizzing to the surface. What is this gas? To answer this question there is a very simple little demonstration that you can do (see opposite).
Your pond plant has produces oxygen (and all plants, not just pond weed produce it) as a result of photosynthesis. This in itself is handy as all life on earth needs this gas to survive. It is why plants are good for fish and for water life in general as they produce oxygen, some of which dissolves in the water and, in turn, is breathed through the gills of many aquatic creatures.
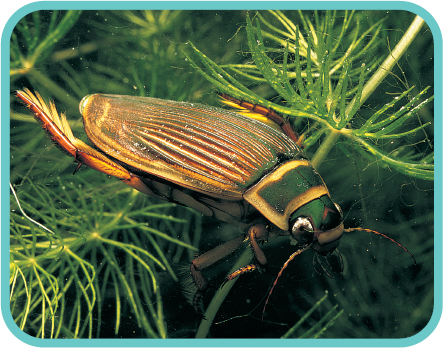
This is probably one of my favourite pond insects. The great diving beetle is a top-notch predator. Both the adult and the larvae, which are known as ‘water tigers’, are enthusiastic predators of tadpoles, fish and any other small pond animal they can overpower.
YOU WILL NEED
> jar
> pond weed (Canadian pond weed works well)
> plastic funnel
> test tube
> desk lamp or sunny window sill
> taper
> matches

1 Fill the jar with water and then put in the pond weed.
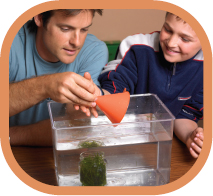
2 Put the jar in the fish tank filled with water and cover it with the plastic funnel. This main part of the funnel has to be entirely submerged and the weed must sit underneath.
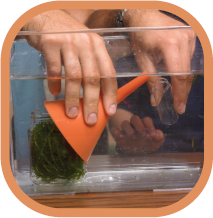
3 Then take the test tube, fill it with water in the fish tank and place over the neck of the funnel. It is important that the tube remains full of water as you put it over the funnel.

4 Place the whole set-up in a bright, sunny place, such as on a window sill or next to a table lamp, and wait and watch.
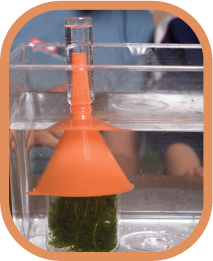
5 Little bubbles will start to form on the leaves and slowly these will stream upwards, collecting in the top of the tube.

6 One of the tests for oxygen is to light a wooden splint and then blow it out so that it still glows. Quickly remove the test tube from the tank, pour out the water and then push the taper into the tube. If the splint bursts back into flame, you have oxygen.
Feed the ducks
This book is really too small to go into all the different and fascinating kinds of bird behaviour you can see in and around water and wetlands but, having said that, there are a few pointers that can enliven the most mudane visit to the duck pond or throw a whole new perspective on the way you look at wild waterfowl and waders.
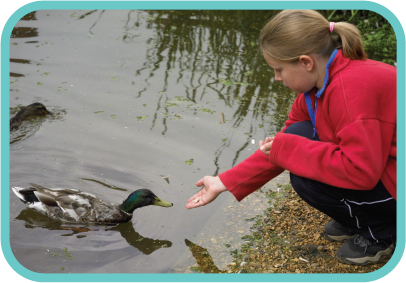
Just a simple trip to the local duck pond can give you much more than the sight of a dozen greedy mallards stuffing their beaks! It can be a brilliant way to start looking at the world through different eyes. Before you go, take some breadcrumbs and rice and soak half in water. Then, on arrival at the pond, feed a mixture of floating and sinking food to the ducks. Notice the different ways the birds eat the food (see opposite).
Take my advice
* Many freshwater birds dive, but some are better at it than others. It is mainly used for two reasons: to avoid predators and to give the birds access to food. Next time you notice a bird diving, try to time how long it spends underwater and guess at what it is doing while down there.
* Different birds have different diving techniques too. Those born to swim, like the tufted duck, pochard and grebe, dive by giving a little upward jump before slipping below the surface, without too much of a splash. Others, such as mallards, will usually make a real meal of trying to submerge.

1 The food floating on the surface, especially if it is ground up fine, is skimmed off the water with a snaffling action. This is a technique called ‘dabbling’ and is why ducks like mallards are called dabbling ducks! It is also the reason that ducks have that characteristic wide bill.

2 When the same ducks come to deal with the sinking food, well that is a different matter. This is when they have to make a little more effort and it is quite common to see ducks like mallards up-ending with their bottoms in the air, to give them a greater reach to the pond’s bottom to get the food. A mallard can reach down by up to 45cm!

3 Now you have seen this behaviour look around to see what other feeding techniques are being used. Many use variations on the dabbling theme, but because they have different body and neck lengths they can reach different depths, which means they can all live together without eating each other’s food and getting in the way. Just watch swans, for example, they can get down to depths of about a metre. Other ducks like pochard and tufted ducks dive for their food. Some birds like coot and moorhen are not ducks and do not even have totally webbed feet, they pick at their food and they dive too.
Take it further
* Look closely at a duck’s bill (binoculars might be helpful for this) and you should be able to see how it works. By pumping their bristly tongues backwards and forwards in the beak, water is sucked in at the tip and squirted out through the sides.
* Look closer still and you will see the duck’s filter, which shows up as a row of tiny little ridges or serrations, a little bit like a comb. In the same way you can take a mouthful of noodle soup and squirt the liquid from between your teeth keeping the noodles in your mouth, a duck filters small creatures, algae and even your breadcrumbs. (Incidentally, when trying the trick with the soup, do not tell your parents where you learnt your bad table manners!)