THIGH EXERCISES
Whole Body Leg Curls
Why Is This Exercise So Effective?
The Body Leg Curl places an incredible amount of tension on the hamstrings and requires a minimal amount of equipment. Exercises where your body moves instead of the weight fire more muscle fibers. This exercise is not for the faint of heart or those with high blood pressure.
How To Do It
There are several ways to do this exercise, though basically anything that will effectively hold your ankles down and support your bodyweight as you drop forward will work. When trying out a set-up for the first time, keep your hands in front you, ready to catch yourself if necessary.
Also, included at the bottom of this page is a variation that will take off as much of the stress of this exercise as you wish. It is basically a self-spotting version of the exercise that can be done by just about anybody!
Decline Board
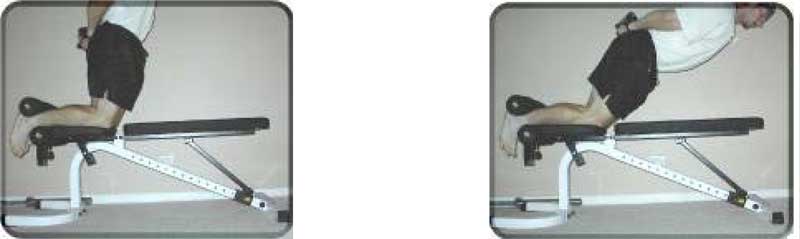
- Kneel at the top of a decline sit-up board, facing the bottom, with the backs of your ankles hooked under the pads. Set it completely flat if you can, or use the absolute smallest degree of decline that is on there.
- Clasp your hands behind your back then slowly lower your upper body down, bending only at the knees.
- Curl up with the hamstrings.
- The lower you go, the harder it gets--don’t go too far down when starting out with this exercise (this applies to all versions).
- You can increase the angle of the board as you build strength in this exercise.
Pulldown Machine
Another way to set up is in the lat pulldown machine.
- Face away from the weight stack.
- Set your shins on the seat with your knees over the edge and hook the backs of your ankles under the hip pads. Drop the hip pads down as far as they’ll go so that your ankles are firmly secured.
- Bend forward and curl up as demonstrated in the video.
Seated Calf Machine
Alternatively, you can set this up in the seated calf machine.
- Put some weight on the machine so it doesn’t come up as you execute the movement. You definitely need to counterbalance yourself or you’ll shoot forward the moment you start to lean forward.
- Kneel on the seat facing away from the weight with your ankles hooked under the kneepads (set the pads as low as they’ll go).
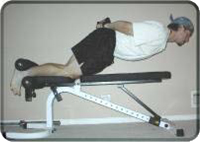
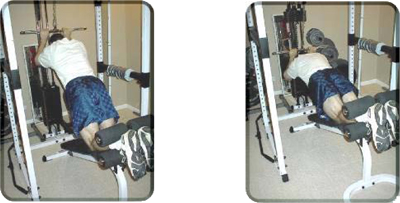
Decline Bench
You can also use a decline bench that has removable and reversible ankle pads.
- What this means is you need to be able to take the ankle pad attachment completely off the machine and insert it upside-down so that the pads are up in the air above the bench surface rather than below.
- Set the bench to the lowest possible angle you can. As you’ll find out, the greater the angle of decline, the harder the exercise will be.
- At the bottom of the page, I will discuss a few variations that can be done very effectively using the decline bench.
Other Variations
The zero equipment version of this exercise entails having a partner hold your ankles down (put a towel or pad under your knees).
- Your partner should lean down with all of his/her bodyweight in order to keep you balanced.
- If your partner is a fair bit lighter than you are, it may not work.
- If you don’t have a partner, you can hook your ankles under something solid.
If you have access to a Smith machine, set the bench in front of it and set the bar to a level just above the bench so you can brace your ankles under it. Use a foam bar pad if you have one as that will be much more comfortable on the ankles. Be sure to load the machine with enough weight to counterbalance yourself.
How to incorporate this exercise into your workouts:
This exercise is a very difficult exercise that requires a lot of strength and abdominal stability.
- It should be done early in your leg workout because of this.
- It should also be done before you do any abdominal or lower back work.
Common Errors
1. Not breathing
It is very important that you breathe during this exercise. Do not hold your breath. Release your air through pursed lips.
2. Falling forward
Be absolutely sure to control your descent or you could hurt yourself. You also won’t get nearly as much out of this exercise as a lot of the value lies in the tension you get on the descent. Have something available to grab onto if you need to catch yourself quickly.
3. Coming down too far before you’re ready to
This exercise is easily modified depending on your hamstring strength. You should be able to identify the point of no return in the movement (where you know you won’t be able to make it back up). Only go as far as you are able to (unless you are purposefully doing only negative reps).
Tricks
1. Using a bench
Don’t allow your knees to hyperextend if you fail. Just put your hands down to stop the fall. You may wish to place a bench or stool in front of you to spot yourself if you doing this exercise on an elevated apparatus such as a seated calf machine.
2. Bending at the waist
Bending at the waist will make the exercise easier as you come up by redistributing your center of gravity. Your hamstrings won’t have as much weight to pull up.
3. Pulling your butt back
If you don’t have the strength to pull yourself back up with proper form, simply keep your upper body horizontal and pull your butt back towards your ankles. Straighten up at the top. This technique works great for doing negatives and extending a set.
4. Adding resistance
To add resistance, hold a plate or dumbbell across your chest.
5. Negatives
If you wish to do negatives with weight, simply hold it on the way down, set the weight down at the bottom, push yourself back up by holding onto something, pick the weight back up then do it again.
6. Adding some padding
An excellent way to take tension off the knees is to fold up a towel and place it on the bench at a point just below where your knees will go. This makes the fulcrum (pivot point) of the movement your shin instead of your kneecap.
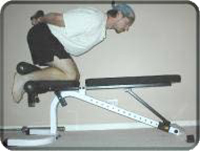
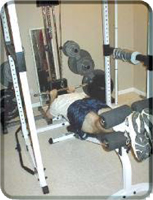
Decline Body Leg Curls
This exercise is done using either the decline board or bench setups as described above.
- Set the bench to a 10 to 20 degree angle and set it inside the power rack.
- Set the safety pins on the power rack to what would be about shoulder height when you are standing in it (around 4 feet or so).
- The safety pins are what you’re going to be grabbing onto when you start to get overwhelmed by the extreme tension placed on the hamstrings during the movement. This will only be a couple inches of movement!
- Get onto the bench and into the top position.
- Tighten up everything in your body, especially your hamstrings and abs.
- Let yourself drift forward just a tiny little bit. You should feel an incredibly intense cramping and burning sensation in your hamstrings as they struggle to keep your body vertical.
- Keep your hands ready to grab the safety rails.
- Go forward just a few inches, fighting the negative by contracting your hamstrings as hard as you can.
- Remember to keep your abs tight and body stiff while doing this.
- Move forward until your hamstrings can’t take it anymore (it should only be a couple of inches) then quickly grab the safety rails. Push on them only enough to help yourself back up to the starting position.
This exercise, even though it has a tiny range of motion, places an incredible amount of tension on the hamstrings in what is very nearly their most contracted position. It is intense!
Self-Spotting Decline Body Leg Curls
Now that you’ve experienced (or at least read about) what the decline bench can do to your hamstrings in a very short range of motion, I’m going to show you what the decline bench can do over a FULL range of motion.
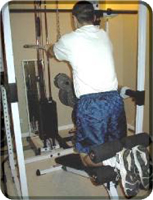
- First, set the decline bench in front of a high pulley. The low end of the bench should be directly in front of the pulley so that you are facing it as you do the exercise.
- Next, attach a bar (straight or cambered) to the pulley. If you have a length of chain, attach that on so that the bar starts at about shoulder or head level (if you were in a standing position in front of it).
- Set the weight on the stack to about 1/3 to 1/2 of your bodyweight. For example, if you weigh 180 pounds, you would set the stack to between 60 to 90 pounds.
- Start on the conservative side when you first do the movement. You can adjust the weight lower as necessary after that.
You are now ready to begin the movement.
- Set yourself on the bench with your ankles secured under the pads.
- Grasp the bar in front of you and hold it with your arms slightly bent.
- Now let your body go forward and down.
- You will notice that the weight on the stack counterbalances your bodyweight, lightening your load considerably.
- Go down as far as you can. You can go all the way down until your legs are straight if you able to.
- Raise yourself back up using only hamstring power.
This variation is very useful for several reasons:
- It allows you to do the movement with less than your bodyweight, which opens the door to this excellent exercise for trainers who aren’t strong enough to do it on their own.
- Reducing the weight allows you to get more reps over a greater range of motion.
There is also a self-spotting trick you can utilize with the cable attachment.
- As you come to a sticking point on the way up, hold the bar steady in space (don’t move it up or down).
- Push yourself up on the bar a little using your arms. The inertia and friction on the cable should allow you to raise yourself up a little.
- Let the bar come up by returning your arms to the previous position.
- This will resemble a sort stepping/ratchet type pattern where you stop, push your body up with your arms, let the bar come up a little then push yourself up again.
- It allows you to maintain tension in the hamstrings and administer forced reps on yourself.