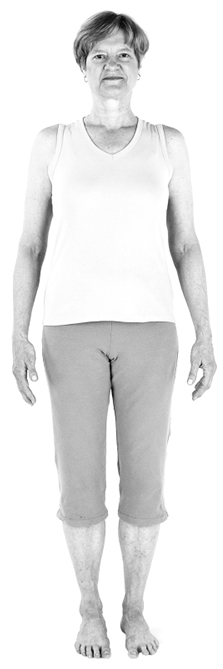
Before You Start
Chronologically speaking, the rest of this book is written backward. We begin with poses for people that already have osteoporosis, and work our way through osteopenia back to people that have neither, and don’t want them later in life. Because there are safety concerns that arise when learning yoga without a flesh-and-blood teacher, we start with the simplest and least precarious versions of all the poses, and build up from there. It would be an ironic catastrophe, but a catastrophe nonetheless, if some fastidious reader were to suffer the very fracture she or he is trying to avoid while doing what is intended to prevent it.
There are more than 15.5 million Americans practicing yoga as of this writing, and many of them have been doing it for years. Some may feel impatient when treated as a beginner. To these people we offer the following counsel: There is nothing as sophisticated as the fundamentals. Calmly read through these pages, and spend some time doing the more elementary versions of the poses, even if only to know them well enough to teach those who are less experienced or more vulnerable.
How the Poses Are Organized
Chapters 9, 10, and 11 each contain a set of yoga poses, all demonstrated at three levels of safety (except for the resting pose at the end). Each set comprises a complete array of stresses and stretches you’ll need to combat osteoporosis and keep osteoarthritis at bay. Each promotes the three essential elements to preventing osteoporotic fractures, but each set has a different emphasis: the first group promotes bone solidity, the second aims more to build muscular strength, and the third focuses on balance. All three of these elements are critical for avoiding a fracture. If your deficit lies more in one of these areas than the others, spend more time practicing the poses that will address it. Choose that set and do it every day. You could also choose two groups and alternate. Another plan would be to do each group for two successive days, covering all three sets each week.
Chapter 9 includes poses that stimulate the bones in a variety of ways. It is critical that people with osteoporosis avoid kyphosis, a convex rounding of the spine. The “forward bend” poses in this group teach safe forward motion at the hips joints, which we call “folding,” since bending of the spine is exactly what we’re trying to avoid. Done correctly, folding stimulates the anterior vertebral bodies to produce stronger bone. The pressures that are brought to bear through the legs and hips also create a safe amount of gradually increasing stimulation that will strengthen and harden those bones against fracture. This first group, then, emphasizes bone solidity.
In chapter 10, the focus is on muscular strength—stronger thigh muscles in the standing poses, stronger arms and shoulders in the poses where they are recruited to work, and stronger abdominal and trunk muscles in such poses as Staff and Boat. Strength helps prevent falls and has the added benefit of allowing you to apply stronger, more stimulating forces to the bones.
Chapter 11 emphasizes balance, a critical attribute to develop in order to avoid falls. These poses require, and thereby build, agility and a sense of equilibrium.
Inside the Chapters
In all chapters, each pose is offered in three variations. The first variation is for those who already have a diagnosis of osteoporosis. The pressure on the bones will be mild yet effective, and these variations will safely prepare you to do the more difficult variations that follow. Pay special attention to the details of the instructions; it matters how you do the poses, not just which poses you do.
The second variation is intended for people with osteopenia. There is greater stress on the bones, but not so much as to approach anything unsafe for that condition.
The third variation is for people who do not have osteoporosis or osteopenia and would like to do what they can to avoid them. These are often the classical version of a yoga pose, or close to it.
Begin an orderly progression from the least challenging group that is appropriate for you. If the pilot study reported in chapter 6 is a reliable indicator, over the course of a few years you could progress from osteoporosis through osteopenia and into the normal range of bone mineral density, and the appropriate version of each pose will shift accordingly.
You may find that even though your DEXA score is within the normal range, the osteopenia or osteoporosis variation of the pose is the most that you can handle at this point. Follow your own best judgment and do not be discouraged. After all, that version is sufficient to improve bones that are weaker than yours, so it will probably help you as well. Furthermore, just performing that pose at that level may well enable you to progress to the next level in your practice.
Savasana, Corpse Pose, is the last pose in each series. It is a position of total rest after completing any of the three series at any combination of levels. It is a critical part of integrating the gains of the session, and readying yourself for whatever comes your way next.
If you find you’re stiff the day after doing these exercises, slow down a little, but keep practicing until that stiffness disappears. Stiffness is normal and will probably fade in a day or two. If you’re having trouble doing the poses, consult a teacher or therapist who can find suitable starting postures that work well for you. You may choose to mix the levels in your regimen, with some poses at the easiest level and others at more challenging ones.
How long should you hold a pose? Since bone-forming proteins seem to synthesize quite well after 10 seconds of stimulating pressure, all poses should be held a little longer than that. Try 20 to 30 seconds at first; some may be held up to a minute unless otherwise specified.
Do not feel that if you’re at an osteoporosis or osteopenia level that you aren’t really doing yoga. Yoga is thousands of years old and has developed in that time to include a vast spectrum of practices. If yoga is that old, so is the teaching of yoga, and so are the elementary poses used to teach it! For the people with osteoporosis or osteopenia, we have excerpted essential elements of the classical poses so that the benefits are considerable there, too. We are not the first to do so; any good teacher knows how to modify poses for specific needs.
In 2007 we surveyed 33,000 yoga therapists and teachers; the results indicated that trying too hard is the main source of the few injuries that do occur in yoga.1 Remember, the purpose of yoga is to gain control, not lose it. Follow this ancient Chinese advice: “Be not afraid of going slowly, but of standing still.”
In spite of its ancient traditional origins, we are advocating yoga from the standpoint of science, not orthodoxy. We have tried to understand the effects of yoga in empirical, objective terms. We have also focused on a few poses, using MRI analyses of their muscular dynamics to relate yoga’s effects to the principles of bone growth and morphology. A modern anatomical and biochemical approach might result in more people practicing yoga as an effective medical treatment.
We recognize that there are other ways of doing many of these postures, and that there is nothing sacrosanct about the versions we present. The yoga therapists and teachers we surveyed found poor alignment to be the second greatest cause of injuries. What we advocate has stood the test of time of two major schools of yoga, Iyengar and Anusara. However, there may well be good and safe alternatives. These differences may be more of style than of substance. The vertebral alignments of the different practitioners from different schools may be almost indistinguishable, provided basic principles are observed.

Figure 24. Though taught by different schools, in different decades, on different continents, with different genders and widely varied years of practice, the substantive differences in the alignment of the lumbar spines here are not great.
But that does not mean that just any yoga will do. On the contrary, it suggests that there are something like universal guidelines to correctly do the postures. Earlier we saw that curving the spine forward, as some people might be tempted to do in forward bends, can actually cause fractures. Of all the things to watch for, two deserve special attention: resisting the urge to curve the back in this way, and avoiding falls. That is what the three stages of each pose are about: simple, safe ways of approaching the classical postures.
Special adaptations might be needed for some amputees, stroke victims, and people with particular weaknesses or disabilities. For instance, if you have cervical stenosis, arching the head backward is inadvisable (the MRIs in figure 25 illustrate possible dangers). Also, when teaching very young people, it is frequently wiser to focus on the general pose, without fine-tuning, since this may be taken as negative judgment and turn students away from the entire enterprise. It is more helpful for them to do and enjoy doing the yoga than for each refinement to be observed in its totality. A competent teacher/therapist is a valuable source of wisdom and safe practice in these cases.
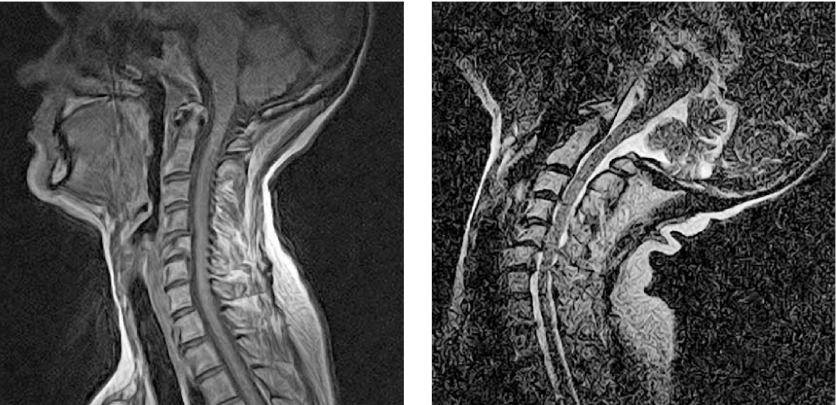
Figure 25. Neck extension reduces the diameter the already narrow intraspinal canal considerably, producing a spondylolisthesis at the fifth cervical vertebra. (The longer top vertebra is actually the second cervical.) Compare the almost normal, mildly narrowed canal in a neutral position (left) with the dangerously compressed spinal cord that occurs during extension (right). Experienced teachers use extreme caution with extreme extension.
Absolute and Relative Contraindications
Anything with effects also has side effects; yoga is no exception. For example, a woman with carpal tunnel syndrome should not attempt Downward Facing Dog, and must be careful with any pose that places much weight on the palm. Common and important precautions are listed with each pose. There are relatively few absolute contraindications—conditions that rule out the pose entirely for you. Unless specifically stated, all the contraindications are relative, meaning that taking into consideration their severity and your ability to adapt, there is probably a way for you to do the pose provided you take the necessary precautions. You need only stay away from the poses to which you have an absolute contraindication.
It may be wise to make a list of any current or recurrent problems you have and check them against the contraindications for the poses. If you find any reason for special care, arrange a suitable adaptation or at least go through the pose’s instructions with attentive caution before attempting it. Certainly, if you take a yoga class, tell the instructor about your current list before it starts.
Sometimes a distinction is made between yoga teachers and yoga therapists. There is some practical and theoretical justification for this: Teachers generally have a number of people in front of them when they teach; therapy sessions are most frequently one on one. Teachers generally aim to improve their students’ health and enhance joy, while therapists usually set themselves to rid their patients of specific pains or problems. Yoga for Osteoporosis may transcend the distinction, since the chief focus is prevention, and teaching is the therapy, practicing is the treatment.
Compliance
In spite of the technological advantage afforded by the DEXA scan and the powerful effects of available medicines, less than 35 percent of the people who are prescribed medicines are actually taking them. In yoga, the rates of continuity are very high. The comparison to medications is not entirely fair, since folks are told to take medicine, while many wander into yoga classes of their own volition. However one construes it, yoga is potent (and palatable) medicine.
Some Helpful Technical and Inspirational Points
Props are used in some of these poses, especially in the poses for people with osteoporosis and osteopenia. These props are:
• a bare wall
• a table
• a chair (ideally simple but sturdy folding chairs)
• 3 to 5 blankets
• 2 yoga mats
• 3 blocks or books
• 2 bolsters or cushions
• 2 belts
• 1 small towel
If these items are difficult for you to obtain, be creative in finding household items that serve the same purpose. For example, a strong shoebox may be able to serve as a block. As you progress in the practice, you will need fewer props.
Yoga is a practice that calls upon us to participate holistically. It is not only mechanical exercise for the muscles and joints; it invites an involvement of the intellect and the spirit. One good place to start is to tell yourself that you can do it. Yoga is for everyone, and this book is written to encourage those who might not think they can do yoga because they are unfamiliar with it or they think that they are too stiff.
Yoga practice is an acknowledgment that we are more than our material selves—that our aspirations and deep feelings are also part of what defines us as human beings. We invite you to explore this practice with careful thought and feeling, and to give yourself the solid affirmation that it will help you become stronger, happier, and more liberated. Your body will become an expression of your unique beauty and strength. With practice, your poses will improve, and the effects will carry over into other aspects of your life: better concentration, greater ability to adapt physically and mentally to whatever life brings to you, and deeper self-understanding and acceptance. Yoga offers all of these benefits and more.
Yoga poses are not static positions that we simply hold while waiting for a certain amount of time to pass. In the instructions that follow, you will see many separate actions described in sequence, each of which contributes to the effectiveness of the pose. Each action builds on the one before, and when you remain active in each step of the process, the benefits are considerable. Please read all the instructions over once before actually doing the pose, then try to follow each step as best you can.
Now we will offer some basic technical points that apply to every pose.
The Breath
Be attentive. Actually observing your breath and discovering how to breathe naturally can enhance the poses. Holding the breath blocks awareness and causes fatigue. To begin each pose, expand your body from within on each inhalation. Picture your body actually becoming fuller and lighter inside. This fullness of breath will signal your entire body and mind to be open and receptive. Softly release unnecessary tension with each exhalation. In general, inhale when lifting up or arching your back; exhale when settling into the pose or folding forward. The work of getting into the pose will be easier when supported by awareness of your breathing.
The Foundation
The foundation is the part of the body bearing weight and touching the floor or the chair; it is most often the feet, the hands, or the pelvis. It is important to spread the foundation so that it gives good support. In the feet, this involves identifying and using the four corners of each foot in a balanced way (see figure 26). Press each corner down in the order indicated, and notice how the weight is distributed on your feet. Lift your inner arches while still pressing those four corners down. In addition, stretching the toes instead of contracting them will help with stability and balance.
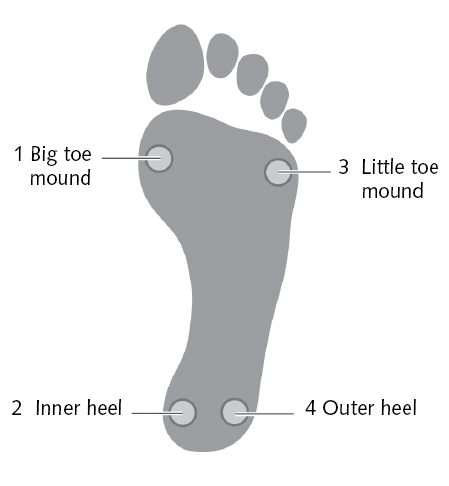
In the hands use the analogous four corners: the base of the index finger, the inner wrist, the base of the little finger, and the outer wrist.
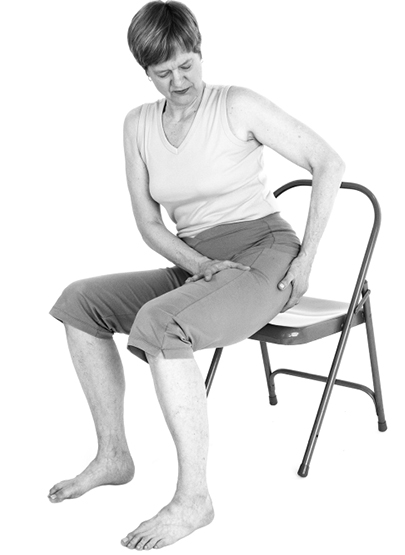
One good way to set the foundation in the pelvis is with a manual adjustment. Use both hands to adjust each leg in turn. For the left leg, hold the inner thigh with your right hand and the buttock with your left hand as pictured in figure 27. Lean to the right to reduce the weight on the left, and manually revolve the thigh so that the inner edge rolls down. At the same time pull the buttock out and back. Then sit on the left side and adjust the right side. When you are finished you will probably feel your sitting bones more clearly, and be able to lift the spine with more ease. The adjustment is useful for sitting on a chair or the floor.
Parallel Feet
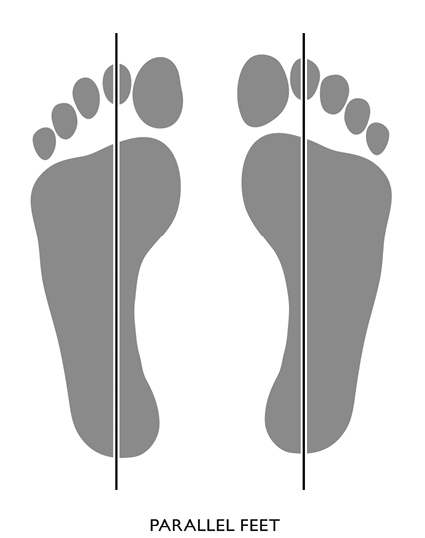
In many poses you will read the instruction to “place the feet parallel” to each other. To achieve parallel feet, draw an imaginary line from the center of your ankle through the center of your second toe. That line should run straight forward and back at all points equidistant to a similar line through the other foot.
The Natural Curves of the Spine When Standing
When observed from the side, the spine has a natural curvature that allows for resilience and freedom of movement. Although there are an infinite number of individual variations to this curvature, there are some general principles.
The lower back and neck are both designed to have a slightly concave shape, to be more hollow at the back. The chest and sacrum will naturally have a more convex, rounded shape toward the back. Ideally the curves are moderate and not exaggerated.
To adjust and stabilize the lower back, first move the tops of the thigh bones back, which creates more lumbar arch, then curl the tailbone down to lengthen the spine. Avoid pushing the thighs forward as the tailbone moves down and in.
To align the middle back, move the sides of the waistline back to prevent a swayback. Then lift the front chest up with support from the shoulder blades in back. This reduces the forward curve of the thoracic spine, typical of slumped posture.
For the neck and head, tip your chin up just a bit to create the concave curve of the neck, then reach up with the back of the head to create length in the neck. Ideally the head is neither jutting forward nor pulling excessively back, but balanced directly over the axis of the spine.
Your goal when aligning the spine is to have a balance of strength and flexibility in the back and front of the spine. Modern life is quite sedentary, encouraging a forward-bending posture of the spine—longer in the back, shorter in the front. This posture sets the stage for increased fracture risk. When practicing forward bends especially, move your whole back forward from as low down in the spine as possible. Tilt the pelvis forward from the hips, not the waist. This will minimize any rounding of the spine. Aligning your back this way may not be easy at first due to tightness in your legs, but it is crucial for the safety and effectiveness of the poses.
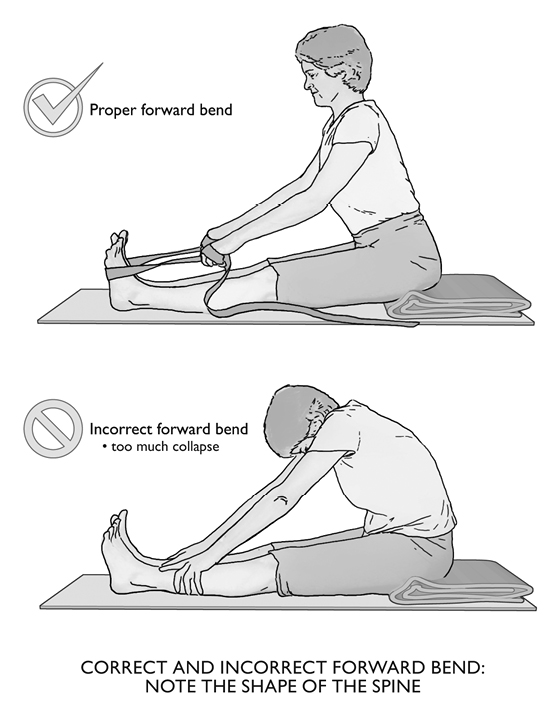
Back-bending yoga poses stimulate the vertebral bodies, lengthen the front of the spine, and balance pressure on the disks. The poses that arch your back contribute to balance in another way as well: while forward bends produce calm, backbends are exhilarating.
The Balance of Opposites
If you are doing yoga for the first time, you may wonder why the pose instructions include actions that are opposite. We may instruct you to press down and then reach up, or turn in and then turn out, for example. The goal is to create a stable and balanced pressure on the bones, which makes the poses safer and more effective. Below is an introduction to some of these pairs of opposite actions.
Pulling In and Reaching Out
The benefits of yoga for osteoporosis derive from the pull of muscle on bone. Yoga is not a relaxed practice in which the body simply folds into a shape and drapes there with great ease. We need to engage a muscular strength that contracts and brings the different parts of the body toward the center by pulling on the bones. For example, a common instruction will be to retract the arms into the shoulder sockets.
The opposite action, extending out from the center, also stimulates the bones and prevents excessive compression of the joints. In each pose we aim for a balance between contraction and expansion. Think of the opposition of forces that occurs when you put on a glove. With one hand you pull the glove in over your hand, while the other hand pushes forward into the glove. The balance of both actions, inward pull and outward push, accomplishes that task and is our goal.
Rooting Down and Extending Upward
Another example in which we employ movement in opposite directions simultaneously is when we create a strong foundation and then reach up from it. “Rooting” into the foundation means actively pressing down, a movement that will initiate a natural lift in the rest of the body. For instance, when sitting, if you reach your sitting bones down and back, your lower back will naturally arch slightly and rise up. Like the feeling of rebound when you are about to jump, the downward motion of your legs gives the needed push-off for upward momentum. When airborne in a jump the body is extending both up and down, and we do this same kind of two-directional expansion in yoga poses.
Inward and Outward Rotation of the Legs and Arms
The limbs are endowed with a wide range of motion for the myriad types of activities asked of them. We have a complex array of muscles to use for movements, and good alignment entails coordinating them so the work is properly shared. You will notice instructions to turn the legs or arms inward and then outward; doing both will secure the arm or leg in its socket for good stability and apply dynamic pressure to the bones involved.
The Knees
In most poses, align each kneecap to face the same direction as the second toe of that same leg. If this is not easy, work toward it gradually. This alignment protects the knee from dangerous torque.
How to Measure Your Stance
In many standing poses, the feet are wide apart. The distance between your feet will vary with your height, your proportions, and your flexibility. Some instructions for standing poses will ask you to start with your feet wide enough apart to situate your wrists above your ankles when you stretch your arms horizontally. If that feels too wide or unstable, adjust it until you feel right. The stance should allow for both freedom (the hips are generally more moveable with a wider stance) and stability.
Tadasana
Tadasana, Mountain Pose, is referenced occasionally in the text as a pose for transitioning or resting between the right and left sides of a pose, or between one pose and the next. In Tadasana we stand tall with inner and outer strength, with simplicity and dignity. All of the alignments described above can be learned in Tadasana, making it a foundational pose. Use it whenever you need a moment to renew your focus and realign yourself.
Practicing with Written Instructions
To avoid the awkwardness of doing a yoga pose while holding a book in your hands, we recommend the following: Read the instructions for the pose over several times to understand the full extent of what you’ll do. Then go over it with frequent reference to the book for a few days, after which you and your body will probably remember what to do. You can also have a friend or teacher read the instructions aloud, or tape-record yourself reading them. Periodically read over the instructions to check that you have included each part of each pose. The descriptions of the alignment and actions of each pose are crucial to safety and effectiveness, so don’t rush to get to the final shape.
Every Pose Is a Full-Body Pose
Each pose will probably bring your focus to one or two areas of the body, due to the strength or stretching it requires. In a standing pose you might feel your legs more; in a sitting pose your spine or your shoulders might be the center of your attention. We invite you to open your awareness to your whole body in every pose. Maximize your work and your time by enlivening yourself fully, rather just doing the bare minimum. Your work will not go to waste, and the therapeutic effects for osteoporosis and everything else will grow. Notice the details, but also the overall dynamics, the form and feeling of the poses. Make them your own. Be confident that you will receive the therapeutic benefits of yoga practice and your skills will improve over time.
