Poses That Focus on
Muscle Strength
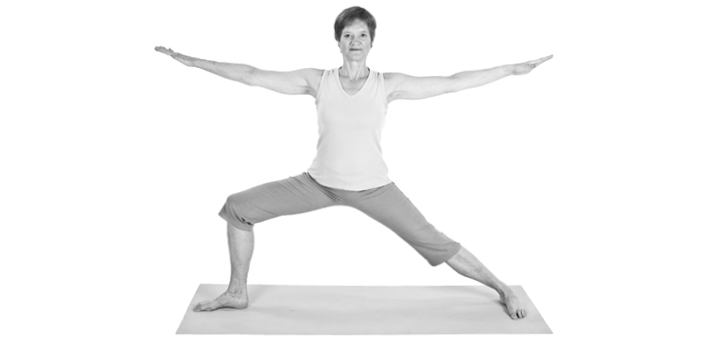
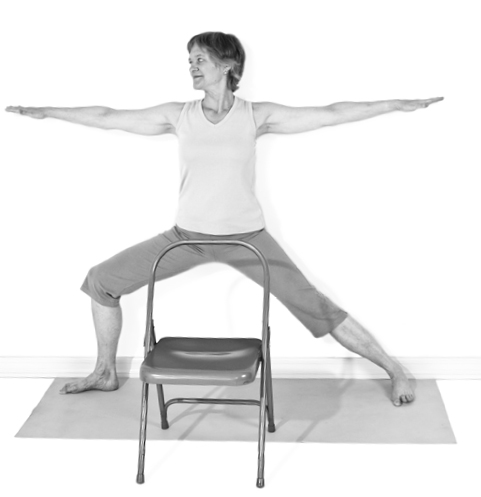
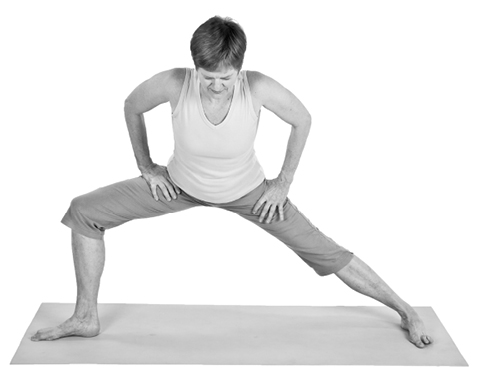
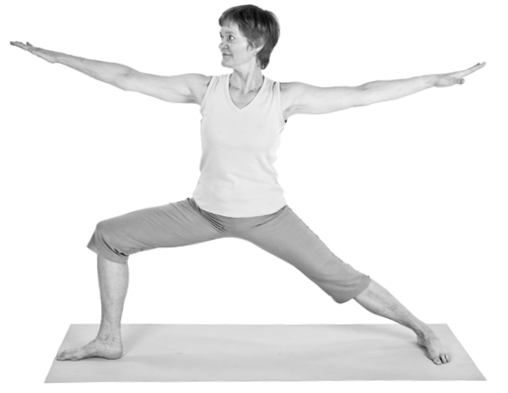
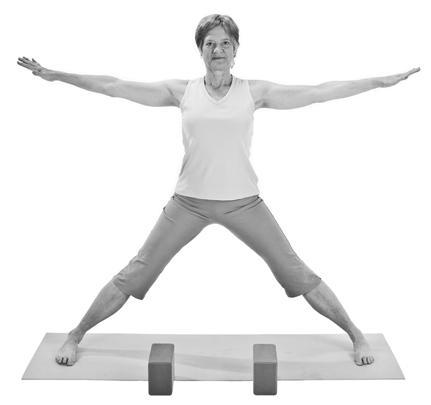
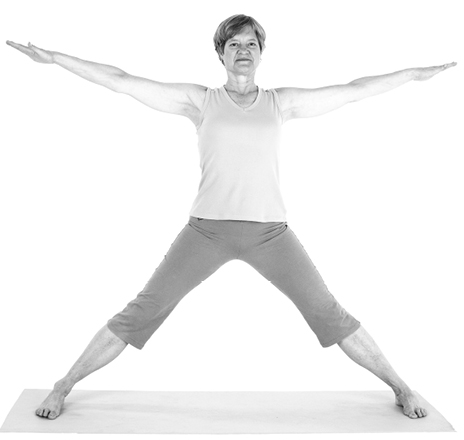
1. VIRABHADRASANA II Warrior Pose
Purpose: To safely stimulate the femur and pelvic bones using a significant mechanical advantage, improve balance, hip mobility, leg strength, and self assurance.
Contraindications: Anterior cruciate ligament injury, chondromalacia patellae, adductor tear, sacroiliac joint derangement, plantar fasciitis, Achilles tendonitis.
Props: A wall, chair, a block, and a yoga mat.
OSTEOPOROSIS VARIATION
Avoiding pitfalls: If you are tall, use a cushion or block on the chair seat to make it higher. Align the kneecap by pointing it toward the second toe.
1. Place your yoga mat perpendicular to a wall. Place a chair about 18 inches from the wall, facing it.
2. Sit down on the edge of the chair and angle your right knee and foot to the side as much as possible. Your pelvis can turn to the right slightly but attempt to face toward the wall from the waist up.
3. Stretch the left leg off the side of the chair. Turn your left foot and knees slightly in toward the right.
4. Manually adjust your buttocks and thighs back and apart (see pages 87–88).
5. Inhale, lift up from inside, and firm your leg muscles. Straighten the left leg if you can.
6. Exhale. Stay soft in your face and neck but strong in your legs and spine.
7. As you continue to breathe, root down through the pelvic bones, widen your thighs, and lift up through your spine.
8. Rest your hands on the wall and use that directional reference to bring your upper torso to fully face the wall. Pull your shoulders gently back.
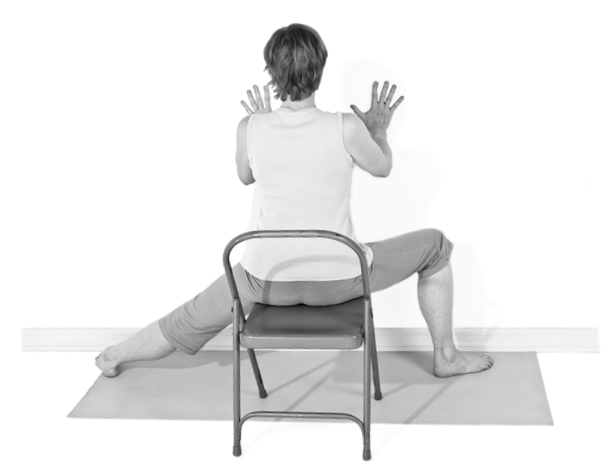
9. It may be some effort to maintain the wide position of the legs, but that effort is what will benefit your pelvic bones.
10. Stay in the pose for as long as you can steadily maintain the actions, then release.
11. Repeat on the second side.
OSTEOPENIA VARIATION
Avoiding pitfalls: Align each foot with its knee, the kneecap pointing toward the second toe. Maintain strong muscular effort in the legs. Bring your feet as wide apart as instructed below; this pose is less effective with a narrow stance.
1. Place your mat along the wall and the chair in front of the middle of the mat, facing away from you. Stand with your back to the wall, raise your arms to shoulder height, and step your feet apart until your ankles are under your outstretched wrists. Once you have established this wide stance, hold the back of chair for balance.
2. Turn your right foot and leg parallel to the wall, but don’t turn the torso. Your right hip can lightly touch the wall for reference and support. Line up your right heel with the arch of the left foot.
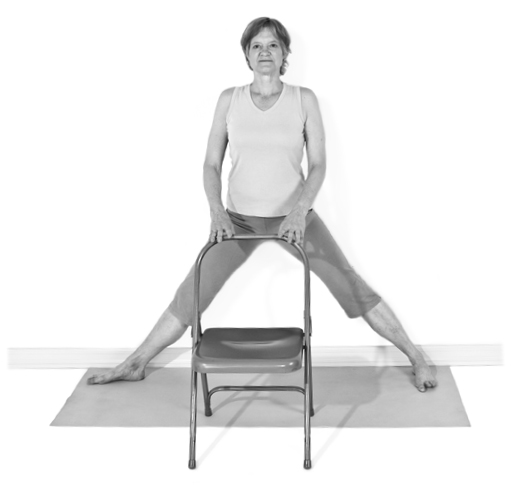
3. Inhale, firm your legs, and lengthen up through the spine. As you exhale, bend your right knee until it is over the ankle. Point the knee toward the second toe.
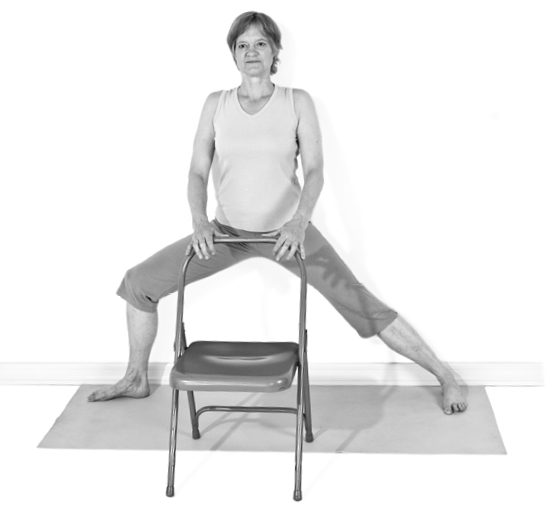
4. Using the chair for support, lean a bit forward and move both inner groins back.
5. Move the tailbone down and lift your abdomen as you move your torso back up to vertical. This tailbone action initiates an outward rotation of both thighs, but especially the right one. These actions result in the desired effect on your pelvic bones and the safest position for your knees, so be sure to perform them fully.
6. Continue to hold the chair for balance. When you feel steady, spread your arms wide along the wall, palms down. Look to the right, with your head, neck, and spine aligned straight over the center of your pelvis.
7. Hold this position for as long as you can, breathing fully yet smoothly.
8. Repeat on the second side.
PREVENTION VARIATION Using a Wall
1. Place your mat perpendicular to the wall and the block against the wall.
2. Place your right foot up on the block, toes facing the wall. Step your left foot back until your feet are wide enough apart to be under your wrists when your arms are outstretched. Align the mid-arch of your left foot with your right heel.
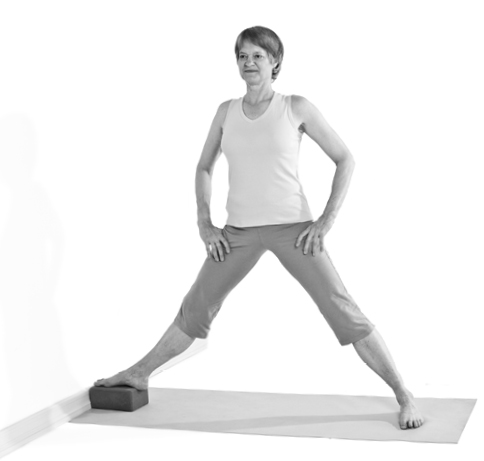
3. Inhale, firm your legs, and lengthen up through the spine. As you exhale, bend your right knee until it is over the ankle on the block. Point the knee toward the second toe.
4. Briefly put your hands on your hips. Press down into the very tops of your thighs with your hands to accentuate the bending action there. Lean a bit forward and move both inner groins back.
5. Move the tailbone down and lift your abdomen as you move your torso back up to vertical. This tailbone action initiates an outward rotation of both thighs, but especially the right one. These actions result in the desired effect on your pelvic bones and the safest position for your knees. Be sure to complete them.
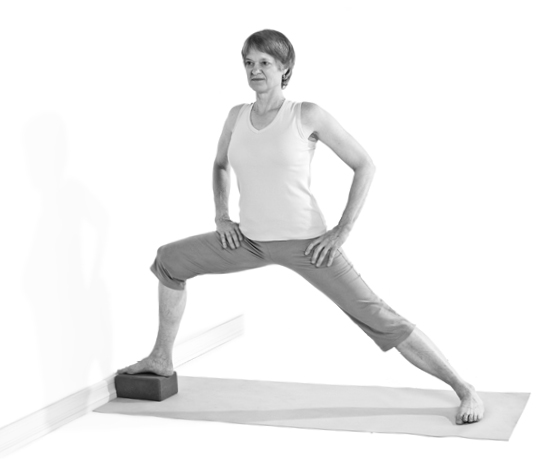
6. Notice that the block under your right foot helps to bring the pelvis level to the floor. This alignment will increase the stretch of both inner thighs considerably.
7. Check to see if the right knee is still facing toward the second toe and that your shin is vertical, knee over the ankle. You may need to step the feet farther apart and turn out the right thigh more to achieve this. In the full pose, the right thigh is parallel to the floor, requiring a very wide stance and deep flexion at the hips and knee. In this variation, the angle at the right knee may be more than 90 degrees.
8. Spread your arms wide, palms down, shoulders back. Your right arm may remain bent if it reaches the wall. Look to the right, with your head, neck, and spine aligned straight up over the center of your pelvis. Broaden your upper chest and embody the strength of a warrior, extending out in all directions from the center of your pelvis.
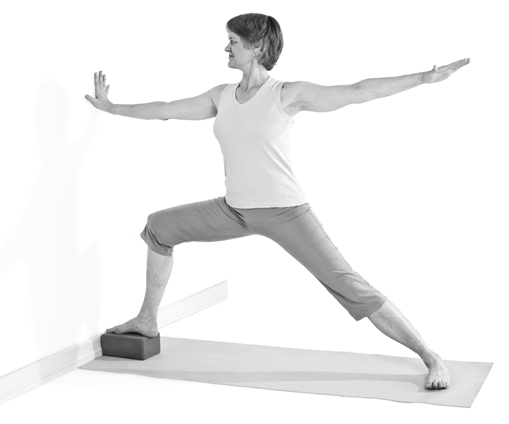
9. Hold for 20 to 30 seconds, breathing fully yet quietly.
10. Repeat on the second side.
PREVENTION VARIATION Full Pose
Avoiding pitfalls: Check your alignment in a full-length mirror if possible.
1. Stand on your mat, raise your arms to shoulder height, and step your feet apart so that your ankles line up under your wrists.
2. Turn the right foot and leg out 90 degrees, but don’t turn the torso. Align your right heel with the mid-arch of the left foot.
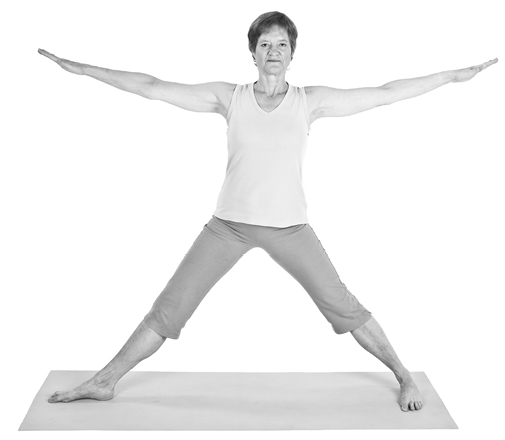
3. Inhale, firm your legs, and lengthen up through the spine. As you exhale, bend your right knee until it is over the ankle. Point the knee toward the second toe.
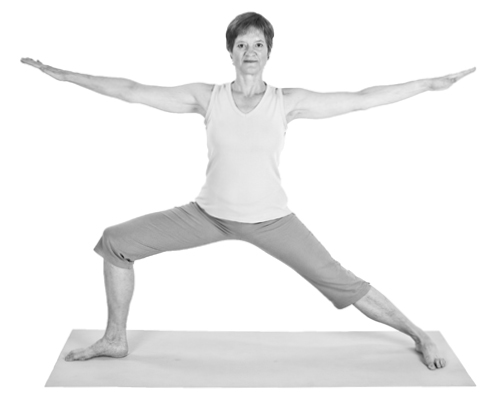
4. Check to see that your right knee is turned out sufficiently and that your shin is vertical. You may need to separate the feet farther and turn out the right thigh more to achieve this. In this full version of the pose, the right thigh should be parallel to the floor, requiring a very wide stance and deep flexion at the hips and knee.
5. Briefly put your hands on your hips. Press down into the tops of your thighs with your hands to accentuate the folding action there. Lean a bit forward and move both inner groins back.
6. Move the tailbone down and lift your abdomen as you move your torso back up to vertical. This tailbone action initiates an outward rotation of both thighs, but especially the right one. These actions increase the forces on your pelvic bones and position the knees safely, so be sure to complete them.
7. Bring your pelvis parallel to the floor; the right side will tend to be lower. This adjustment will increase the stretch of both inner thighs considerably.
8. Spread your arms wide, palms down, shoulders back. Look to the right with your head, neck, and spine aligned straight up over the center of your pelvis. Broaden your upper chest and embody the strength of a warrior, extending out in all directions from the center of your pelvis.
9. Hold for 30 to 60 seconds, breathing fully but softly.
10. Repeat on the second side.
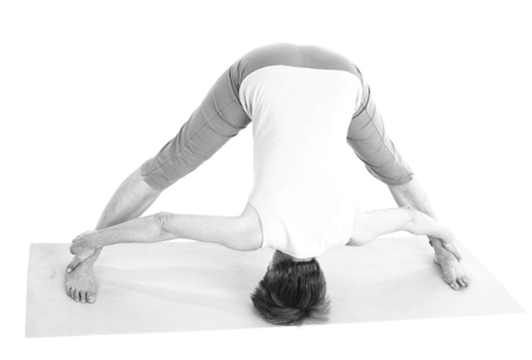
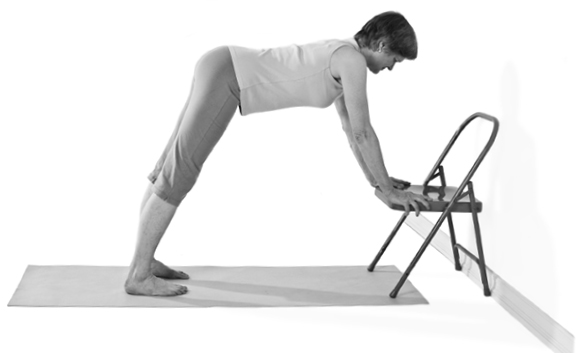
2. PRASARITA PADOTTANASANA
Wide Leg Standing Forward Fold
Purpose: To stretch the adductors, hamstrings, gluteus maximus, and spine; invert the upper body; and stimulate the pelvic and leg bones and vertebral bodies. This wide-open standing pose develops stamina and self-assurance.
Contraindications: Imbalance, ankle sprain, cerebrovascular disease, colostomy, Achilles tendonitis, plantar fasciitis.
Props: A yoga mat and a table.
OSTEOPOROSIS VARIATION
Avoiding pitfalls: Balance your weight on the four corners of your feet and avoid tipping your hips back behind your feet. If you feel strain in your shoulders or arms, place your elbows on the table, shoulder-width apart, instead of your hands. Breathe with ease and fullness, feet facing straight ahead.
1. Place your mat parallel to a table or desk. Stand facing the table and 2 to 3 feet away from it, feet 4 to 5 feet apart, hands on your hips.
2. Inhale, lifting your spine and toning your leg muscles.
3. Exhale, and hinge forward from your hips. Place your hands on the tabletop, shoulder-width apart.
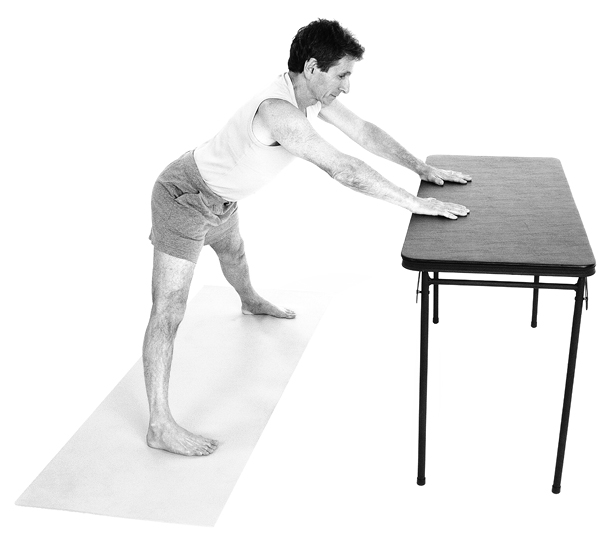
4. On your next exhalation slide your hands forward enough so that your back becomes parallel to the tabletop. Bend your knees to get the proper tilt of your pelvis; there should be one long straight line from your tailbone to the top of your head.
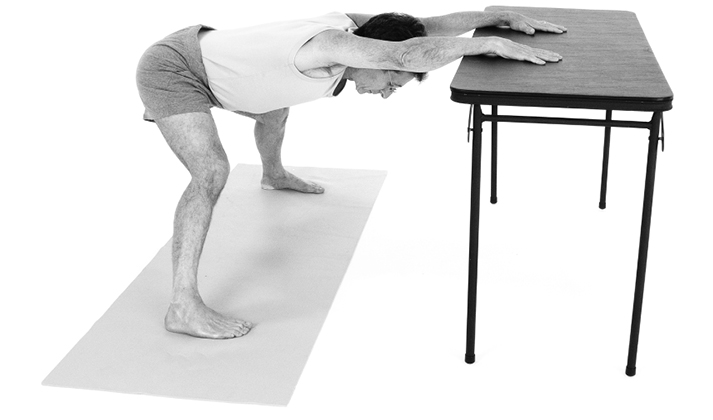
5. Lift your arms and armpits up toward the ceiling as much as possible while keeping your hands firmly on the table.
6. Stretch your sitting bones back and apart. Straighten your knees as much as possible.
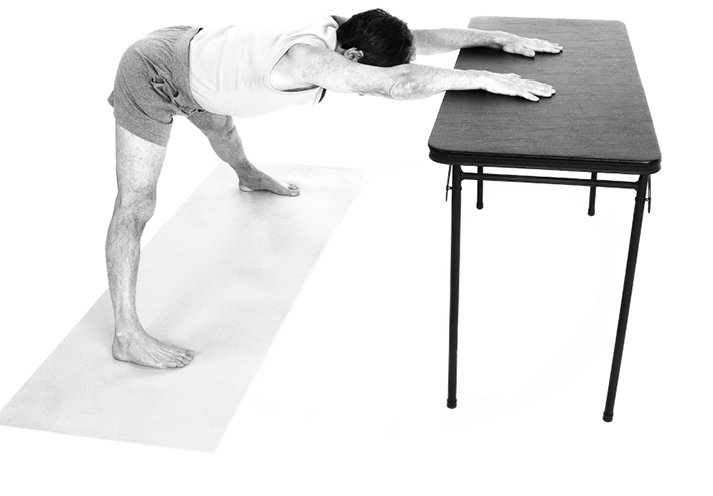
7. Firm your abdomen and let your middle back respond to the pull of gravity, softening down without strain.
8. Retain the muscular strength in your arms and legs while breathing steadily.
9. When you are ready to come up, walk toward the table. Release your arms down and stand in Tadasana (see page 93).
OSTEOPENIA VARIATION
Avoiding pitfalls: Even when the arms are reaching downward, pull them up into the shoulder sockets. Breathe with ease and fullness.
1. Place your mat perpendicular to the front of a chair. Standing in front of the chair, extend your arms to the sides, then step your feet apart so that your ankles line up under your wrists. Make sure your feet are parallel. Press the four corners of each foot down, but lift your arches.

2. Inhale, firm your legs, and stretch up through the spine. Exhale and hinge forward to touch the chair seat, retaining the long spine. You can bend your knees if your hamstrings are very tight. It’s important to tip the pelvis forward from your hips; don’t round your waist. Reach your hips back.
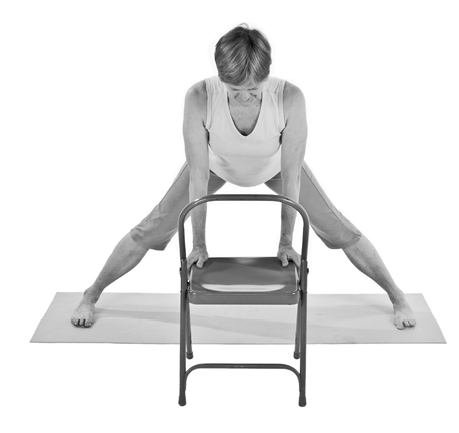
3. Once your hands are on the chair seat, inhale, extend your legs and sitting bones back, and draw your spine forward. Exhale and release your spine and neck. Repeat this breathing, extending, and releasing movement several times. Then fold your arms and place them on the chair seat. Rest your head on them if possible.

4. As you hold the pose, maintain the strong action in your leg muscles, stretching them fully from the feet up to the pelvis. Isometrically widening the thighs laterally will increase the beneficial effect on your bones.
5. Prepare to come out of the pose by stepping your feet a bit closer to each other. Bend your knees and bring your hands to your hips.
6. Inhale and root down through the legs. Stretch your head and chest forward to come up strongly; retract your shoulder blades as you do so.
7. Exhale, step your feet together into Tadasana (see page 93), and release your arms down.
PREVENTION VARIATION
Contraindications: Do not practice this version if you have glaucoma or macular degeneration.
1. Place two blocks about 16 inches in front of the middle of your mat.
2. Extend your arms to the sides, then step your feet apart so that your ankles align under your wrists. Make sure your feet are parallel. Press the four corners of each foot down, but lift your arches.
3. Inhale, firm your legs, and stretch up through the spine. Exhale and hinge forward, retaining the long spine, and touch the two blocks. You can bend your knees if your hamstrings are very tight. It’s important to tip the pelvis forward from your hips; don’t round your waist.
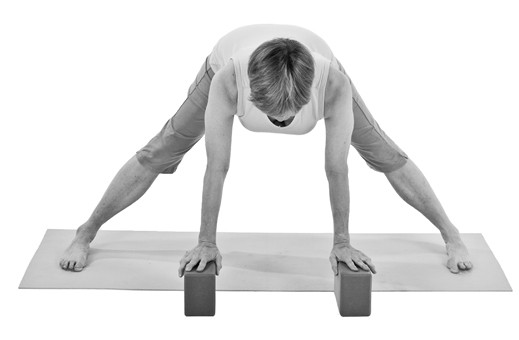
4. Once your hands are on the blocks, inhale, extend your legs and sitting bones back, and draw your spine forward. Exhale and release your spine and neck. Repeat this breathing, extending, and releasing sequence several times. Then bring your spine forward and down, totally releasing your neck and head but keeping your arms pulled up into the shoulder sockets.
5. Maintain the strong lift of your leg muscles. Extend actively from the pelvis out through your legs and up through the crown of your head. Isometrically widening your thighs toward the sides will increase the beneficial effect on your bones.
6. Prepare to come out of the pose by stepping your feet a bit closer to each other. Bend your knees and bring your hands to your hips.
7. Inhale and root down through the legs. Stretch your head and chest forward to come up strongly, retracting your shoulder blades as you do so.
8. Exhale, step your feet together into Tadasana (see page 93), and release your arms down.
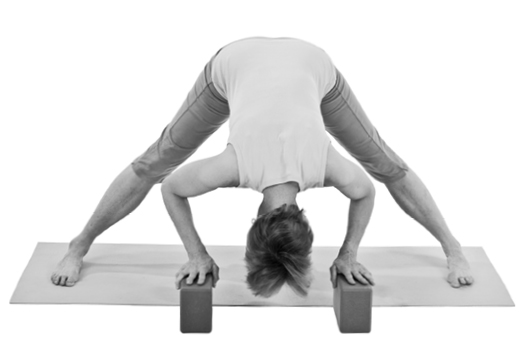
The full pose requires more flexibility in the hips. It is pictured for those who are ready for a deeper stretch and who can maintain the length of the spine.
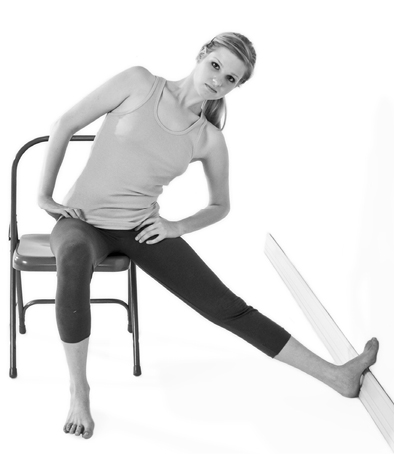
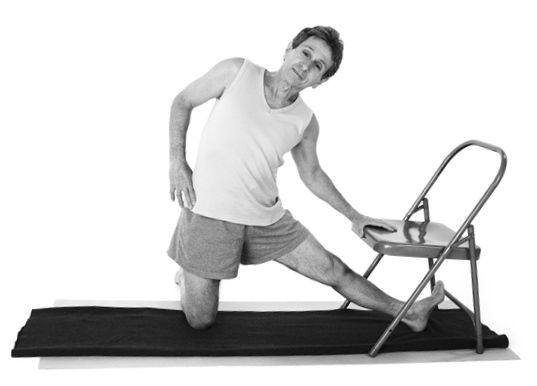
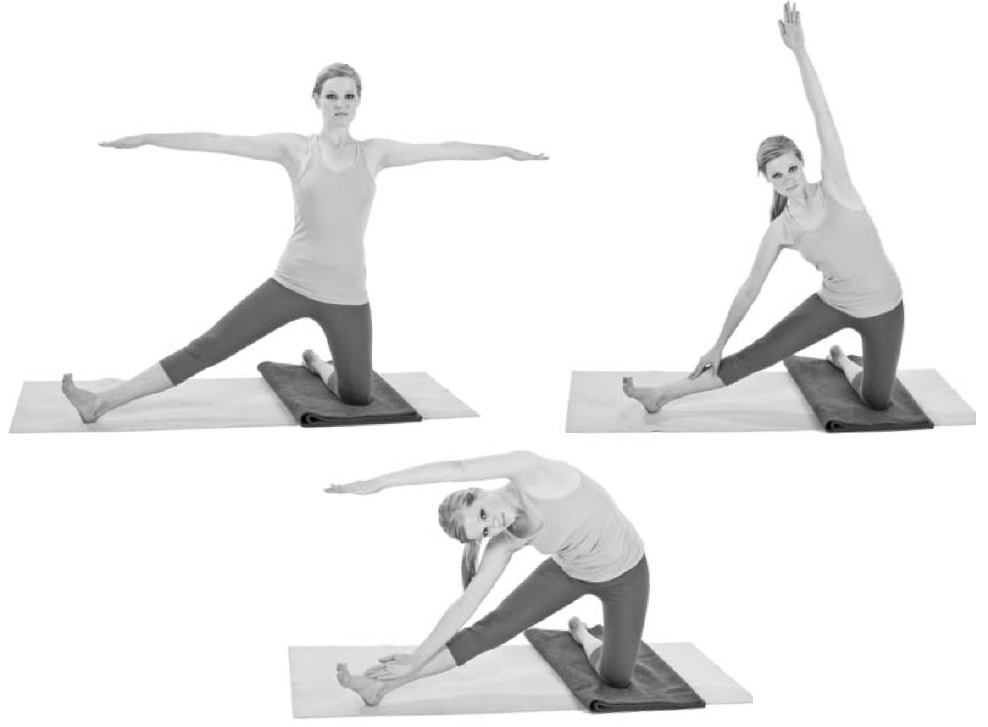
3. PARIGHASANA Gate Pose
Purpose: Lateral stretch of the torso and leg, stimulating sides of lumbar vertebrae and pelvic bones.
Contraindications: Vertebral fracture, severe lateral listhesis. With moderate or severe scoliosis, only do this pose toward the convex side.
Props: A chair, a blanket, possibly a small rolled towel, a yoga mat, and a wall
Avoiding pitfalls: Be sure to lengthen the spine before bending to the side.
OSTEOPOROSIS VARIATION
1. Place a chair leg-distance from the wall facing to the right.
2. Sit on the left front corner of the chair and extend your left leg toward the wall so that your toes and possibly the entire sole of your foot touch the wall.
3. Manually widen your buttocks and thighs to ensure that your pelvis will sit upright on the chair, not slumped backward.
4. Inhale and stretch up through your spine. Firm the leg muscles, keeping the left leg straight.
5. Firm and lift your abdominal muscles up. Lengthen the tailbone down.
6. Place your hands on the tops of your thighs.

7. As you exhale, incline your torso to the left, maintaining length through the crown of your head. As you lean more to the left, slide your hand down your left leg.
8. Widen your front chest and pull your shoulder blades together as you extend through the entire spine.
9. Hold for several breaths, then return to vertical as you inhale.
10. Repeat on the second side.
OSTEOPENIA VARIATION
1. Spread a blanket on your mat and place a chair on the left end of the mat facing in.
2. Kneel on the blanket with your legs slightly apart, feet stretching straight back. If your feet are stiff, place a small rolled towel under your right ankle (not pictured).
3. Extend your left leg out to the side, under the chair against the back rung.
4. Inhale and straighten the left leg. Stretch all the way through your toes.
5. Stretch up through the sides of your body to prepare to bend to the side.
6. On your next exhalation, bend your torso to the left. Place your left hand or forearm on the chair seat for support. Your right hand rests on your hip. Take several breaths.
7. When you are ready, swing your right arm out to the side, up and over toward the left, reach well beyond the right side of your head.
8. Remain solidly grounded through your pelvis and legs as you reach more and more.
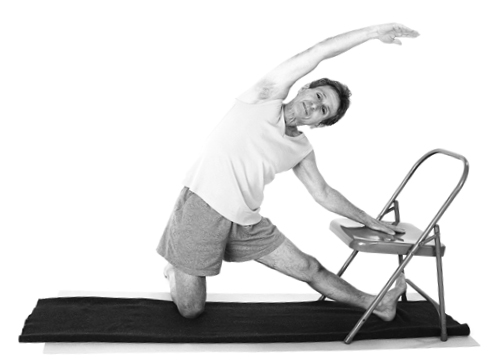
9. Hold for several breaths, then inhale to come up. Notice the increased space in your rib cage from this stretch, which will improve your breathing.
10. Repeat on the second side.
PREVENTION VARIATION
1. Place your yoga mat perpendicular to a wall, and spread a blanket on the mat. Kneel on the blanket with your legs slightly apart and your shins and feet parallel to the wall on your left.
2. Stretch your left leg out to the side without turning your pelvis; less than 90 degrees to the side is fine. Put the ball of your foot on the wall.
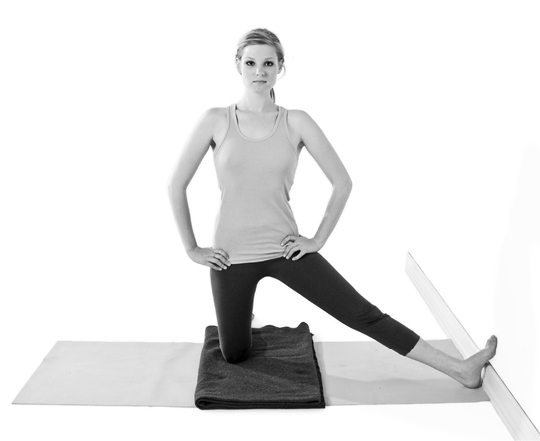
3. Inhale, stretch your left leg straight, and lengthen up through your torso.
4. Raise your arms to shoulder height and turn the right palm up.
5. Firm and lift your abdominal muscles, root the tailbone down, and lean slightly forward.
6. On your next exhalation, bend to the left. Slide your left hand down your leg. Raise your right arm up and over toward your extended leg, touching the wall if possible.
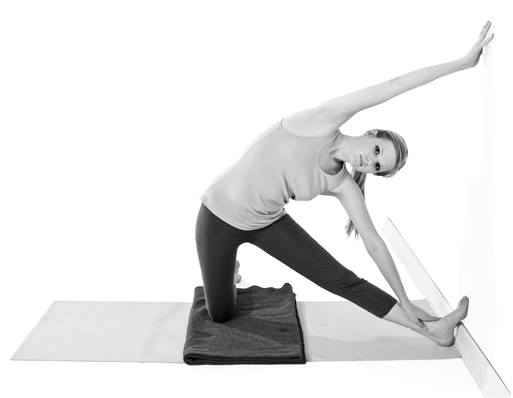
7. Avoid collapse in the upper back by pulling your shoulder blades in toward the spine. Face forward as much as possible.
8. After several breaths in the pose, use an extra measure of strength to come back up to vertical. Notice how your breathing feels after this strong stretch of your ribs.
9. Repeat on the second side.
The full version of this pose requires more strength and flexibility, and will stimulate the vertebrae and pelvic bones well.
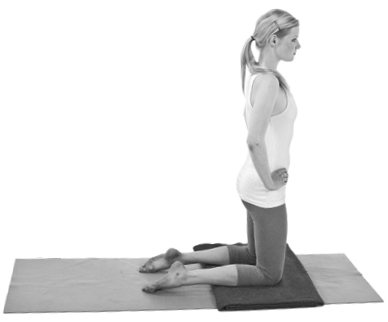
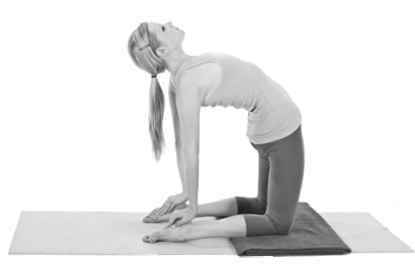
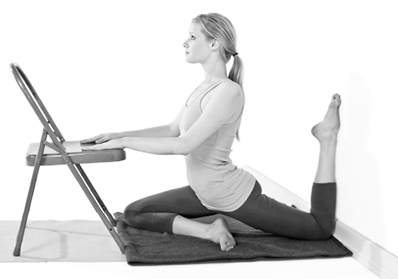
4. USTRASANA Camel Pose
Purpose: To stimulate the anterior and posterior vertebrae, anterior pelvis, femur and acetabulum; to build upper body strength and confidence.
Contraindications: (absolute) severe spondylolisthesis or spondylitis; (relative) severe ventral hernia, severe spinal stenosis, anterior cruciate ligament tear, patellofemoral arthralgia, chondromalacia patella.
Props: A yoga mat, a blanket, a bolster, and a chair.
OSTEOPOROSIS VARIATION
Avoiding pitfalls: Make sure the shoulders are back and your spine and ribs are elongated before you lift your hips off the chair. If your arms or wrists are weak, practice only steps 1–3.
1. Place a chair on your mat.
2. Sit on the front edge of the chair. Step your feet out about eighteen inches and place them hip-width apart. Place your hands on the seat, alongside or slightly behind your hips.
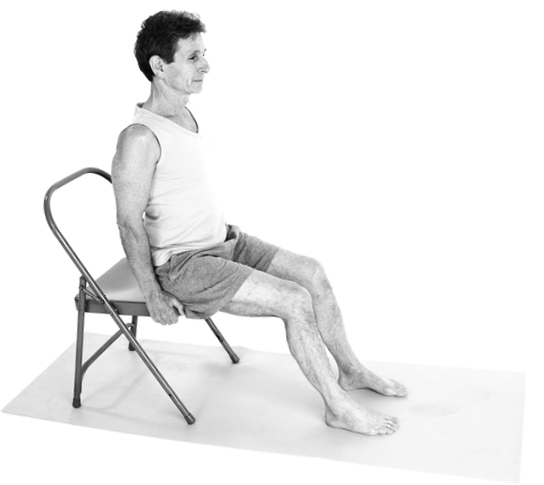
3. Inhale and lift up from inside, gradually lengthening and arching your spine. Breathe to the very top of your lungs. Your pelvis tips forward at the top near your waist as your sitting bones move back and apart.
4. Pull your shoulders back; the shoulder blades move toward the spine.
5. On your next inhalation, lift your hips off the chair, moving your knees and thighs forward.
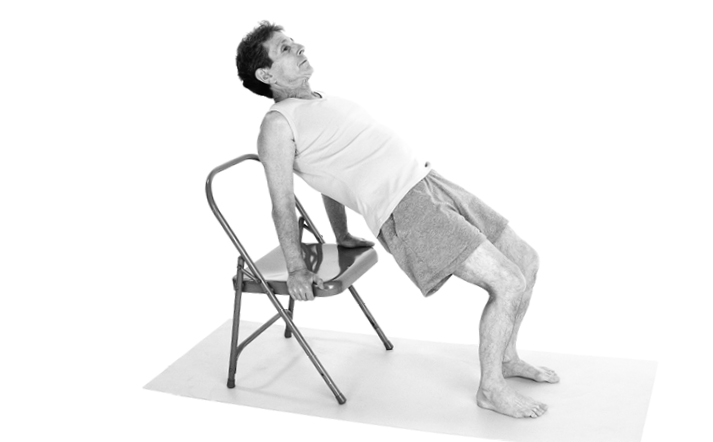
6. Look up slightly and breathe smoothly.
7. As you push down through your arms, lift your chest more. The downward thrust of your arms and the upward thrust of your hips and chest balance each other.
8. Stay in the pose for as long as you can maintain the lift of your hips and chest.
9. Sit back down on an exhalation and rest.
OSTEOPENIA VARIATION
Avoiding pitfalls: Press your foundation down to lift your spine strongly.
1. Place a chair on one end of your mat, seat facing in. Place a folded blanket on the mat, extending under the chair.
2. Kneel on the blanket with your back to the chair, legs hip-width apart, feet under the chair seat.

3. Align your calves and feet straight back and parallel. Spread your toes.
4. Lean forward slightly and isometrically push your upper thighs back and apart.
5. Come upright again and pull your tailbone down.
6. Lift up through the mid-torso and ribs to prevent compression of the lumbar vertebrae as you bend backward. Place your hands on your hips and press the pelvis down as you lift the spine up. This will accentuate the dynamic action.
7. Retract your shoulder blades toward the spine and begin reaching behind you.
8. Inhale and vigorously lift your heart and lungs.
9. Grasp the chair seat or legs. Slowly and sequentially arch your middle back, upper back, and chest.
10. Arch your head and neck, first from the base of your head, then your ears, then the top of your head.

11. These actions will support and guide you: press your lower legs into the floor and your tailbone forward, lift your heart up, and continue to breathe fully and smoothly.
12. To exit the pose, lift your head and shoulders upright, then walk your legs out from under the chair and sit down on your heels.
PREVENTION VARIATION
Avoiding pitfalls: Tilt only minimally to one side as you reach back.
1. Place a folded blanket on your mat. Kneel on the blanket, legs hip-width apart, and place a bolster over your ankles.
2. Align your calves and feet straight back and parallel. Spread your toes.
3. Lean forward slightly and isometrically push your upper thighs back and apart.
4. Come upright again and pull your tailbone down.
5. Lift up through the mid-torso and ribs to prevent compression of the lumbar vertebrae as you bend backward. Place your hands on your hips and press the pelvis down as you lift the spine up. This will accentuate the two-directional action.

6. Retract your shoulder blades toward your spine and begin to reach your arms behind you.
7. Inhale and vigorously lift your heart and lungs.
8. Reach for the bolster with your hands. Slowly and sequentially arch your middle back, upper back, and chest.
9. Arch your head and neck, first from the base of your head, then your ears, then the top of your head.

10. Continue these supportive actions as you stay in the pose: Press your lower legs into the floor and your tailbone forward, lift your heart up, and continue to breathe fully and smoothly from the lower chest to the upper chest.
11. To exit the pose, lift your head and shoulders upright, then sit down on your heels.
For the full version of this pose, your hands come onto your feet. All the actions described above apply here as well.
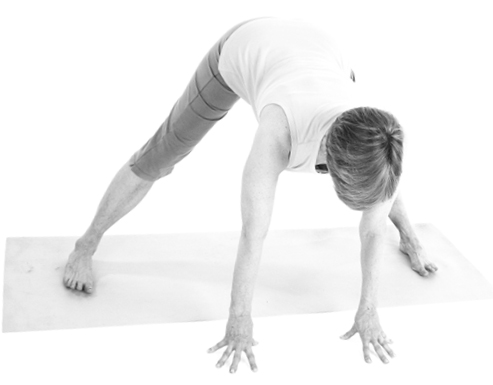
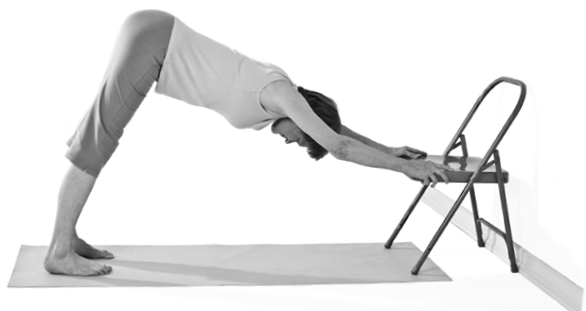
5. ADHO MUKHA SVANASANA
Downward Facing Dog
Purpose: To stress the posterior thigh and shin bones, calcaneus, inner humerus, forearm bones, wrists, shoulder blades, lower anterior ribs, and posterior elements of all vertebrae. This is a particularly invigorating pose.
Contraindications: Acromioclavicular dysfunction, rotator cuff tear, thoracic outlet syndrome, spondylolisthesis, Dupuytren’s contractures, carpal tunnel syndrome, Achilles tendon tear.
Props: A yoga mat, wall, and chair.
Avoiding pitfalls: Retract the shoulder blades firmly onto the back ribs; don’t let the upper arms sag downward. Roll the inner arms upward toward the ceiling to maintain the proper rotation of the upper arms. This will help to firm your elbows in toward the midline, providing stability in the pose. Keep the knees bent if you are stiff, in order to be able to tilt the pelvis and lengthen the spine.
OSTEOPOROSIS VARIATION
1. Place your yoga mat next to a wall. Stand 12 to 14 inches from the wall and place your hands on the wall above eye level, index fingers pointing up and the arms shoulder-width apart.
2. Place your feet hip-width apart and parallel.
3. Straighten your arms and move your chest a little toward the wall.
4. Move your upper arms more securely back into the shoulder joints.
5. Keep your elbows straight and your upper arms light but active.
6. Bend forward through your trunk until there is one long diagonal line from hands to hips. You can step back as needed. Do not round your back.

7. Stretch back with your sitting bones and separate them, which will make an arch in your lower back.
8. Draw in your belly and lengthen the tailbone back.
9. Let the thoracic spine soften downward without collapsing your arms.
10. If your hamstrings allow, do the pose with straight legs. If your hamstrings are tight, your knees can be bent slightly in order to allow the pelvis to tilt properly. Find the degree of effort in extending yourself that feels good, using your breath.
11. After several breaths, come back up as you inhale and step toward the wall.
OSTEOPENIA VARIATION
1. Place a chair against the wall, facing out toward you. Place your mat in front of the chair.
2. Hold the front outer edges of the chair seat and walk your feet back, feet remaining hip-width apart and parallel. How far you step back will vary according to your flexibility; go as far as you can without losing stability.
3. Bend your knees as you reach your hips back to stretch the spine and arms in one long line from hands to hips.
4. Breathe fully into the sides of the rib cage and maintain strength in all parts of the body. Your head stays between your arms.

5. With each inhalation, reach your sitting bones up, back and apart. Make space.
6. With each exhalation, elongate all the lines of the pose (legs, arms, spine). Expand out strongly from the inside.
7. Stretch your legs straight, if you can do so without curling the back of the pelvis down. You can step back farther, and your heels can be off the floor.
8. Hold the pose for several breaths. To come out of the pose, walk toward the chair and stand up.
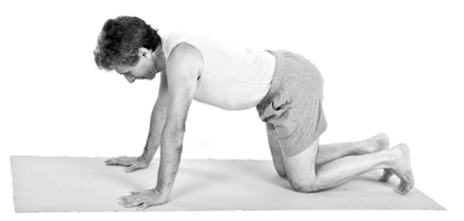
PREVENTION VARIATION
1. Come down onto your hands and knees on your mat. Walk your knees back a bit farther than your hips. Place your hands at the front of the mat, shoulder-width apart, fingers separated, index fingers pointing forward.
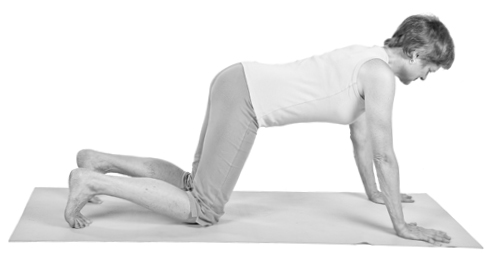
2. Firm your arm muscles, press your fingers down, and soften your chest down over the tops of the arms so that the arms connect solidly into the shoulder sockets.
3. Draw your shoulder blades in toward your spine.
4. Tuck your toes under and make space in the sides and front of your entire torso.
5. Inhale and lift up your knees and hips, elevating the sitting bones back, up and apart.
6. As you exhale, stretch fully through your arms and spine, pulling your legs back still farther. If your hamstrings are very tight, bend your knees to allow your pelvis to tilt properly. Gradually work to straighten your knees.
7. Create a slight concavity in the lumbar and thoracic spine by reaching upward with the sitting bones.
8. As you become more flexible, you will be able to pull the thighs back with straight knees, and eventually lower your heels.

9. Once you have created the full pose, sensitively extend through all parts of the body, from the core to the periphery. Charge your body with strength.
10. To release, bring your knees to the floor.
6. CHATURANGA DANDASANA
Four-Limbed Staff Pose
Purpose: To strengthen the upper back and arms; to stimulate the cervical, thoracic, and lumbar vertebrae, as well as ankles, hips, shoulders, and wrists; to build core strength.
Contraindications: Carpal tunnel syndrome, severe wrist arthritis, Dupuytren’s contracture.
Props: A wall, a chair, a yoga mat, and a blanket.
Avoiding pitfalls: Make sure to retract your shoulder blades and broaden your front chest. Shoulders should stay square across and the whole body remain in one long line. Check using a mirror or a friend. Use your abdominal muscles to maintain the alignment of the body’s midsection.
OSTEOPOROSIS VARIATION
1. Stand facing a wall, about 18 inches from it, with your hand at about mid-chest height on the wall and shoulder-width apart. Point your index fingers straight up.
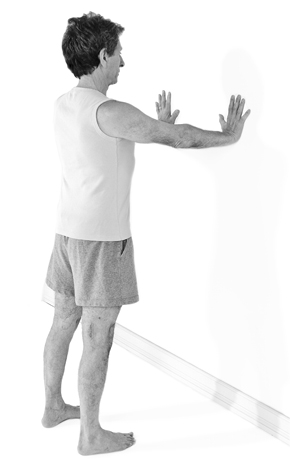
2. Draw your upper arms back and firm your shoulder blades onto the back ribs.
3. Lengthen your tailbone down. Connect the whole length of your body into one long energetic line that expands out from the pelvis, stretching downward through your feet and upward through the crown of your head.
4. Inhale to prepare.
5. Exhale and bend your elbows, inclining the whole length of your body toward the wall.
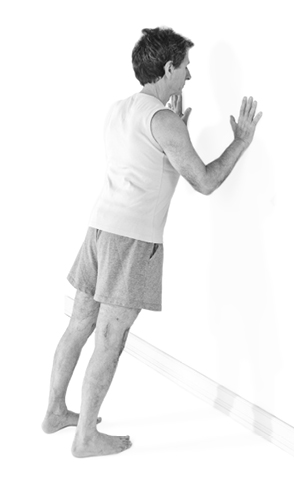
6. Check yourself: Are your shoulders staying back or did they round forward? Keep them back. Did your pelvis move toward the wall with you? Don’t allow it to hang back.
7. Move in and out several times, then hold the pose for as long as you can while you are inclined toward the wall.
8. Return to vertical and release your hands down.
OSTEOPENIA VARIATION
1. Place your yoga mat perpendicular to a wall. Place a chair with its back to the wall and a folded blanket on the floor in front of it.
2. Kneel on the blanket and place your hands on the sides of the chair.

3. Firm your abdominal muscles and pull your tailbone down. The pelvis easily becomes misaligned in this pose, and it is important to support it with firm muscular control.
4. Inhale, pull your shoulders back, and lengthen from your knees to the top of your head.
5. Exhale, bend your elbows, and incline yourself toward the chair seat, maintaining a straight line from your knees to the top of your head.
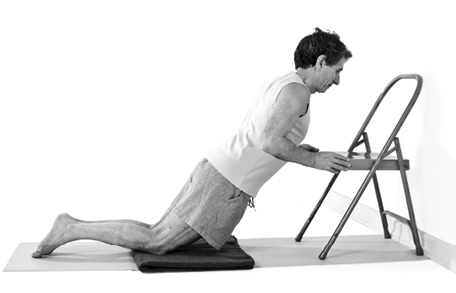
6. Check yourself: Are your shoulders staying back or did they round forward? Keep them back. Did your pelvis move toward the chair with you? Don’t let it hang back. Align your upper arms with the sides of your torso.
7. Move in and out several times, then hold the pose for as long as you can while you are inclined toward the chair, up to a full minute. Continue to breathe evenly and quietly.
8. Return to vertical and release your hands down.
PREVENTION VARIATION
1. Kneel with your hands shoulder-width apart on the mat under your shoulders. Your index fingers point forward.
2. Move your hands forward one hand’s length.
3. Tip your tailbone slightly down and firm your abdominal muscles. Move the sides of your waistline back. This supports the alignment of the body’s midsection, which tends to collapse.
4. Inhale, retract your shoulders, and lengthen from your hips to the top of your head.
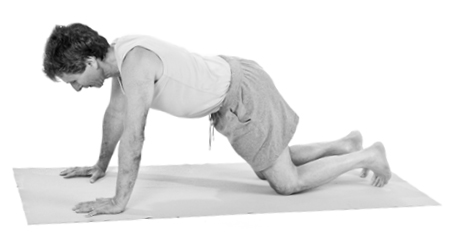
5. Exhale, bend your elbows, and incline yourself toward the floor, maintaining a straight line from your knees to the top of your head. Keep your shoulders back.
6. If possible, lower down enough to bring your upper arms alongside your ribs. Gaze toward the floor, and keep your neck long.

7. Check yourself: Are your shoulders staying back or did they round forward? Keep them back. Did your pelvis move forward with you? Don’t let it hang back.
8. Pause for a few seconds in the pose, then release to the floor and rest. Congratulate yourself: This is a very challenging pose!
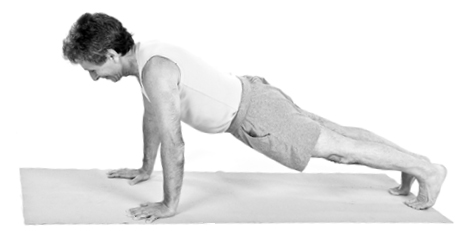
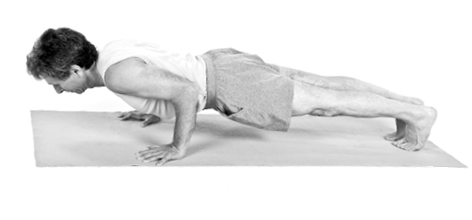
The full version of this pose, requiring more strength, begins from the same hands-and-knees position, then moves to Plank Pose. Finally the entire body is lowered until it hovers above the floor, with the shoulders remaining back and the abdomen strong. The most common misalignment is for the pelvis to be too high and the head and shoulders too low, so have a friend check your position.
7. ANANTASANA Side-Lying Balance
Purpose: To stimulate the sides of the spinal vertebrae and the iliac and femoral bones; to improve balance; and to enhance lower extremity circulation.
Contraindications: Trochanteric bursitis, tardy ulnar palsy, facet syndrome, medial epicondylitis.
Props: A wall, a yoga mat, a belt, and an optional blanket.
Avoiding pitfalls: Draw your muscles into the core of your body; when the body is integrated by this muscular action, it’s easier to find the balance. Keep as much contact with the wall as needed.
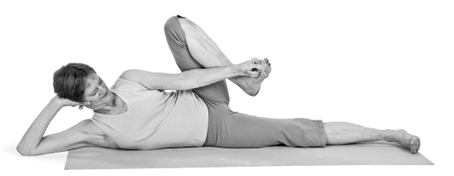
OSTEOPOROSIS VARIATION
1. Place your mat alongside a wall and spread a blanket on it if you want more padding. Lie on the floor on your right side with your back to the wall.
2. Stack your left leg on top of your right with the feet touching each other on the big-toe side.
3. Extend your right upper arm parallel to the wall, bend the elbow, and rest your head in your hand, looking out away from the wall. Your left shoulder can lean against the wall for support.
4. Place your left hand in front of you on the floor for balance.
5. Inhale and firm the muscles in your legs and torso. Continue to breathe normally. Maintain this muscular support for the entire duration of the pose.
6. Lift your left leg up away from the right leg just a few inches and hold it there. Press your right leg down into the floor. This action pulls directly on the greater trochanter, the part of the hip that commonly fractures.

7. In addition to holding your leg up and balancing your torso on its side, extend actively through both legs with a strong stretch from your pelvis all the way out through your toes. Extend the spine from the pelvis out through the crown of your head.
8. Hold the pose for as long as you can, then rest.
9. Repeat on the second side.
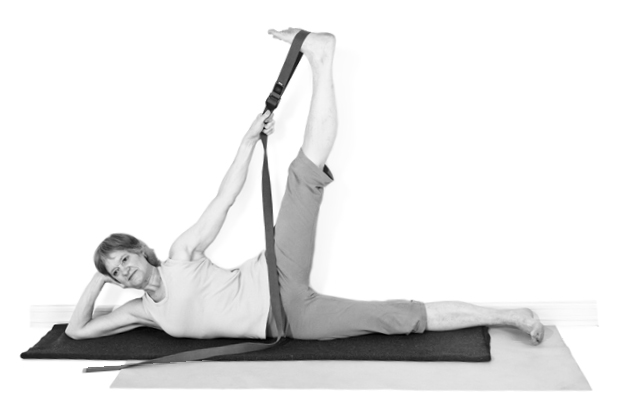
OSTEOPENIA VARIATION
1. Place your mat alongside a wall and spread a blanket on it if you want more padding. Lie on the floor on your right side with your back to the wall.
2. Bend your legs, bringing your knees slightly away from the wall, feet against the wall.
3. Extend your right upper arm parallel to the wall, bend the elbow, and rest your head in your hand, looking out away from the wall. Your left shoulder can rest on the wall for support.
4. Loop a belt around your left foot.
5. Turn your left knee up toward the ceiling and stretch the foot up, holding the belt with your left hand. Straighten the knee if possible.

6. Inhale and firm all the muscles in your legs and torso. Press the right leg into the floor to counterbalance the left leg going up. Continue to breathe normally. Maintain this muscular support for the duration of the pose.
7. Press your left thigh away from your shoulders and stretch the heel up. These actions will help to straighten the knee more and more.
8. In addition to holding your leg up and balancing your torso on its side, extend actively through your left leg with a strong stretch from your pelvis all the way out through your toes. Extend the spine from the pelvis out through the crown of your head. This expansion will help you balance.
9. Hold for as long as you can, up to one minute, breathing and remaining steady, then bring the left leg down and rest.
10. Repeat on the second side.
PREVENTION VARIATION
1. Place your mat alongside the wall and spread a blanket on it if you want more padding. Lie on the floor on your right side with your back to the wall.
2. Stack your left leg on top of your right with the feet touching each other on the big-toe side.
3. Extend your right upper arm parallel to the wall, bend the elbow, and rest your head in your hand, looking out away from the wall.
4. Place your left hand in front of you on the floor for balance.
5. Inhale and firm the muscles in your legs and torso. Continue to breathe normally. Maintain this muscular support for the entire duration of the pose.
6. Lift your left leg up away from the right leg, bend the knee, and turn it toward the ceiling. Press the right leg against the floor to counterbalance the left leg going up.
7. Hook the belt around your left foot and straighten the knee as much as possible. Turn your leg so that the knee and toes face straight toward your head.
8. Press your left thigh away from your shoulders and stretch the heel up. These actions will help to straighten the knee.
9. In addition to holding your leg up and balancing your torso on its side, extend actively through both legs with a strong stretch from your pelvis all the way out through your toes. Extend the spine from the pelvis out through the crown of your head. These actions pull directly on the greater trochanter, the part of the hip that commonly fractures.
10. Play with balancing without the support of the wall.
11. Hold for as long as you can, then rest.
12. Repeat on the second side.
The full pose is more challenging when practiced without a belt away from the wall. All the same preparatory steps apply.

8. PARIPURNA NAVASANA Boat Pose
Purpose: To stimulate the anterior lumbar vertebrae, pelvic bones, and femur; to improve strength, balance, and focus.
Contraindications: Herniated disc, piriformis syndrome, ischial bursitis, hamstring tear.
Props: A yoga mat, a chair, and a blanket.
Avoiding pitfalls: Keep your chest fully lifted; don’t round forward.
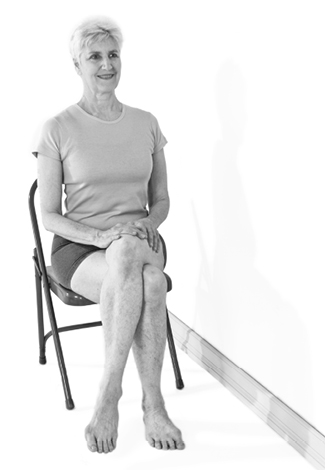
OSTEOPOROSIS VARIATION
1. Place your mat perpendicular to a wall. Place a chair back against the wall, and a blanket on the mat in front of it.
2. Sit on the blanket, your back a few inches away from the edge of the chair, your knees bent, and your feet flat.
3. Hold your legs behind the knees.
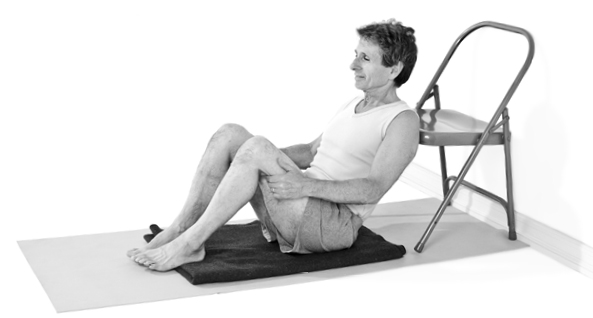
4. Inhale, pull your shoulders back, and lift up your spine and chest.
5. Tip your pelvis so the waistline comes forward toward your legs. All your lumbar and thoracic paraspinal muscles will be working.
6. Firm your abdominal muscles to support your spine from the front.
7. Exhale and lean back, touching the chair lightly with your upper back, and bring your feet off the floor. You will be balanced on your sitting bones. Take care not to slump forward. You can try it first with just one foot lifting, then add the second foot when ready.
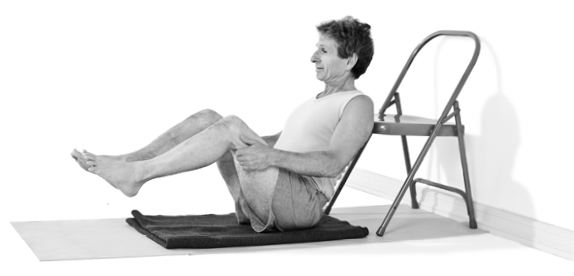
8. Lengthen your spine from the pelvis to the crown of your head and stretch your feet, spreading the toes.
9. Continue to breathe smoothly and fully as you hold the pose for about 30 seconds, then release and sit comfortably to rest.
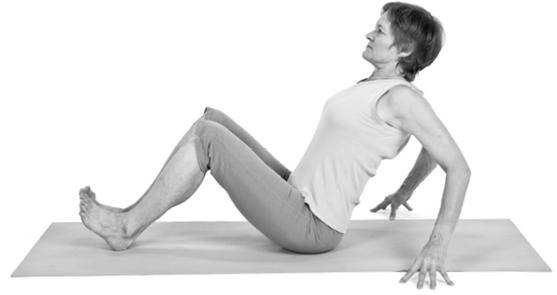
OSTEOPENIA VARIATION
1. Sit on your mat with your knees bent, heels on the floor. Place your hands behind you on the floor and lift up your spine.
2. Keep your spine lifted as you place your hands behind your knees.
3. Inhale, pull your shoulders back, and lift up your spine and chest.
4. Tip your pelvis to arch your lower back and bring your waistline forward toward your legs. All your lumbar and thoracic paraspinal muscles will be working.
5. Firm your abdominal muscles to support your spine and keep it long.
6. Exhale and lean back, bringing your feet off the floor. You will be balanced on your sitting bones.
7. Raise your lower legs until they are parallel to the floor. Flex your feet and stretch through all ten toes.
8. Lengthen your spine from the pelvis to the crown of your head.
9. If you feel steady enough, release your hands from your knees and stretch your arms horizontally. Only do this when you can keep your spine extended.
10. Continue to breathe smoothly and fully as you hold the pose for about 30 seconds, then release and sit comfortably to rest.
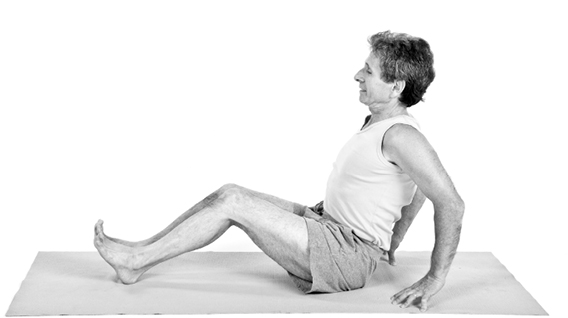
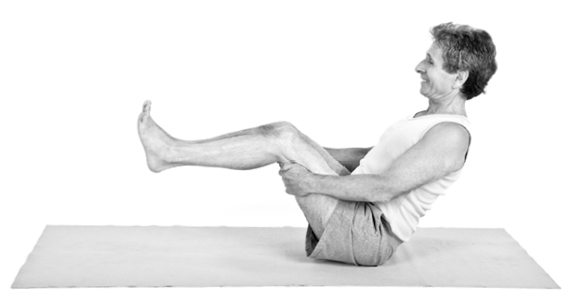
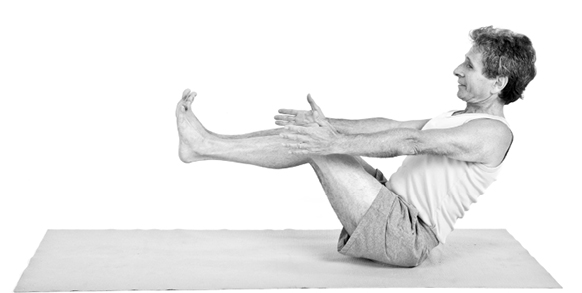
PREVENTION VARIATION
1. Sit on your mat. Manually adjust your buttocks back and apart (see pages 87–88).
2. Bend your knees up and heels on the floor, place your toes extending upward. Place your hands behind you on the floor.
3. Inhale, pull your shoulders back, and lift up your spine and chest.
4. Tip your pelvis to arch your lower back and move your waistline forward toward your legs. All your lumbar and thoracic paraspinal muscles will be working.
5. Firm your abdominal muscles to support your spine from the front.
6. Inhale and lean back, bringing your feet off the floor. You will be balanced on your sitting bones. Hold the backs of your legs.
7. Stretch your legs out to a 45-degree angle so that you are looking at the middle of your shins. Flex your feet and stretch through all ten toes.
8. Extend your arms alongside your legs, parallel to the floor. Pull the shoulders back even as you reach the hands forward.

9. Lengthen your spine from the pelvis to the crown of your head and continue to fully stretch your arms and legs.
10. Breathe smoothly and fully as you hold the pose for about 30 seconds, then release and sit comfortably to rest.
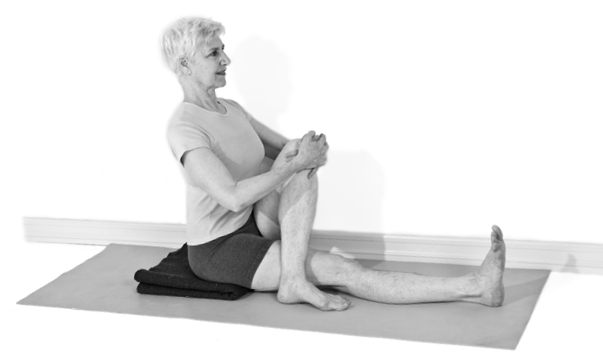
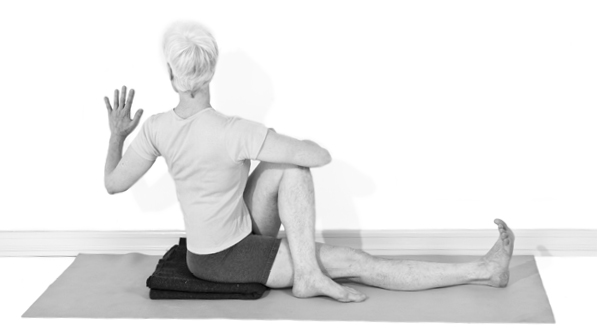
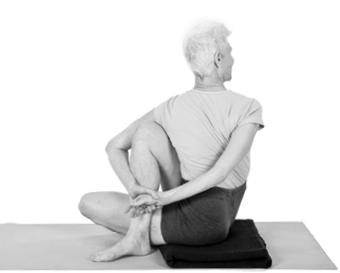
9. ARDHA MATSYENDRASANA
Classic Seated Twist
Purpose: This pose puts a resistive load on the entire skeleton, one side at a time.
Contraindications: Herniated lumbar disc, spondylolisthesis, vertebral fracture, colostomy, rotator cuff tear.
Props: A yoga mat, a chair, a wall, and a blanket.
Avoiding pitfalls: Lengthen the spine upward to free it and the rib cage for rotation. Root down through the pelvic bones. Use your abdominal muscles to help you twist.


Figure 33. Paraspinal muscles stimulate almost every imaginable aspect of the cervical vertebrae (left), yet the lumbar spine stays remarkably vertical and safe, even in a 90-degree twist like Ardha Matsyendrasana (right).
OSTEOPOROSIS VARIATION
1. Place a chair with its left side about 6 inches from a wall. Sit down and cross your left leg over your right.
2. Manually widen your buttocks and thighs (see pages 87–88). This will help avoid a slumped posture. Your sitting bones move back and apart.
3. As you inhale, lift your spine up and root down through the pelvic bones. Isometrically widen your thighs apart even though they will not move. This action will provide a base from which the spine will twist fully. It also pulls strongly on the pelvic bones.
4. As you exhale, firm your abdominal muscles, lengthen your tailbone down, and turn toward the wall. Place your right hand on your left knee and your left hand on the wall wherever it is comfortable. Push your left hand into the wall for the leverage to twist to the left. Bring the right chest forward more than the shoulder.

5. Using your arms and legs strongly, carefully create the power for a deep twist of the spine. Retain a vertically elongated spine; do not tilt your head.
6. Continue to breathe and soften internally to receive the twist. There may be a subtle inner turn still possible even when your spine and ribs seem to have reached their limit.
7. After several breaths, return to face your knees and uncross your legs.
8. Repeat on the second side.
9. After completing both sides, sit for a moment to feel the effects of this pose, which does its work in so many areas of the body.
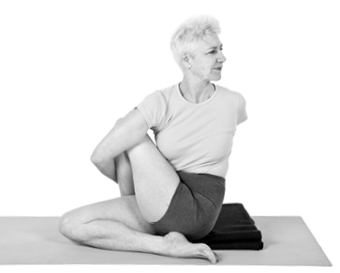
OSTEOPENIA VARIATION
1. Place your yoga mat alongside a wall, and a blanket on it about 6 inches from the wall. Sit on the blanket with your left side to the wall and extend your legs forward.
2. Manually widen your buttocks and thighs (see pages 87–88). This will help avoid a slumped posture. Your sitting bones move back and apart.
3. Bend your left knee, cross the left leg over the right, and place the left foot on the floor to the outside of your right leg.
4. As you inhale, lift your spine up and root down through your pelvic bones. Isometrically widen your thighs even though they will not move. This action will provide a base from which your spine will twist fully. It also pulls strongly on the pelvic bones.
5. As you exhale, firm your abdominal muscles, lengthen your tailbone down, and turn toward the wall. Grasp your left knee with your right hand or folded arm and place your left hand on the wall behind you. Push the left hand into the wall for the leverage to twist to the left.
6. Using your arms and legs strongly, carefully create the power for a deep twist of the spine. Look over your left shoulder. Move your right ribs, not your shoulder, toward the wall. Retain a vertically elongated spine; do not tilt your head.
7. Root down through your right sitting bone to stabilize the base of the pose while turning to the left.
8. Continue to breathe and soften internally to receive the twist. There may be a subtle inner turn still possible even when your spine and ribs seem to have reached their limit.
9. After several breaths, return to face your knees and uncross your legs.
10. Repeat all actions above on the second side.
11. After doing both sides, sit for a moment to feel the effects of this pose, which does its work in so many areas of the body.
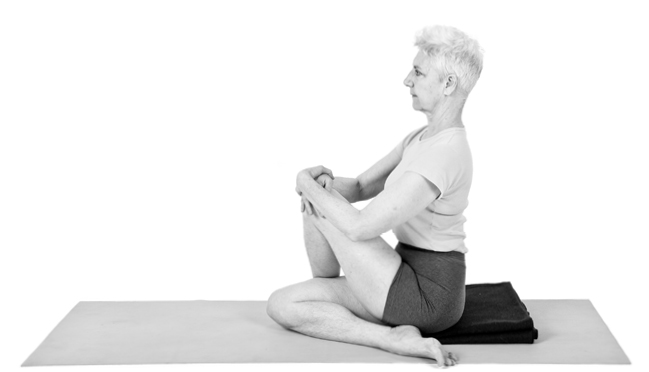
PREVENTION VARIATION
1. Place a folded blanket on your mat and sit on the blanket with your legs stretched out in front of you.
2. Manually widen your buttocks and thighs (see pages 87–88). This will help you avoid a slumped posture. Your sitting bones move back and apart.
3. Bend your right knee and bring the foot under your left leg to the outside of your left hip, the knee on the floor and pointing forward. Bend the left knee and place the left foot on the floor to the outside of your right leg, with the shin vertical. Place both hands on your left knee.
4. As you inhale, lift your spine up and root down through the pelvic bones. Isometrically widen your thighs, even though they will not move. This action will help your spine to lengthen up for the twist. It also pulls strongly on the pelvic bones and trochanters.
5. As you exhale, firm your abdominal muscles, lengthen your tailbone down, and turn toward the left. Cross your right elbow to the outside of your left knee and poi nt the hand upward.
6. Bring your left hand to the floor behind you and pause to breathe.
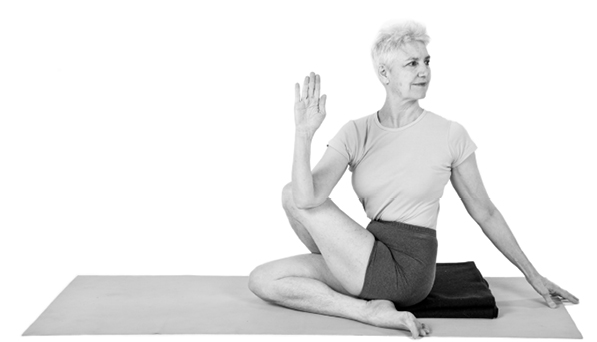
7. As you inhale, become taller. As you exhale, twist more.
8. Look over your left shoulder. Retain a vertically elongated spine; do not tilt your head.
9. Root down through both sides of the pelvis to stabilize the base of the pose.
10. Continue to breathe and soften internally to receive the twist. There may be a subtle inner turn still possible even when your spine and ribs appear to have reached their limit.
11. After several breaths, return to face your knees. Uncross your legs and stretch them straight in front of you.
12. Repeat all actions on the second side.
13. After completing both sides, sit for a moment to feel the effects of this pose, which does its work in many areas of the body.
A more intense version of this pose wraps the arms around the raised bent leg. Follow the steps above to prepare, then wrap the arms without forcing in the shoulders.
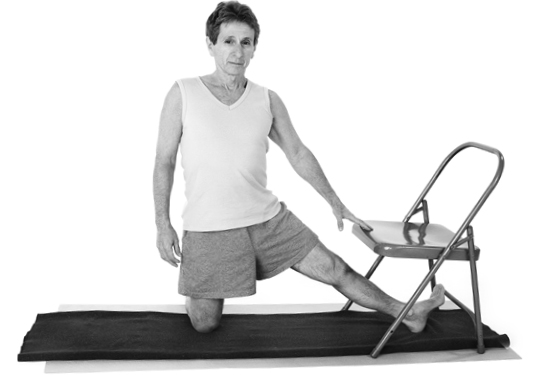
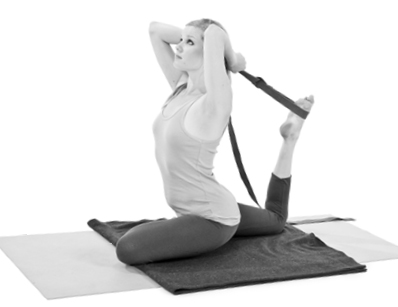
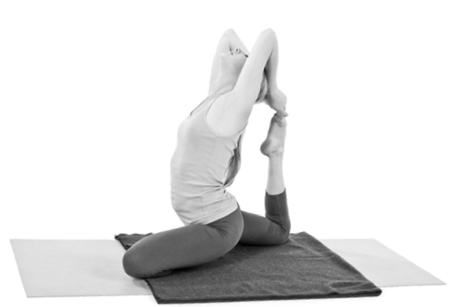
10. EKA PADA RAJAKAPOTASANA
Pigeon Pose
Purpose: Stimulates all aspects of the femur, pelvis, torso, and neck. Also improves hip extension and external rotation, which in turn improve balance.
Avoiding pitfalls: Face your hips squarely forward even though the legs are moving in separate directions in the pose. Move into the pose gradually.
OSTEOPOROSIS VARIATION
Contraindications: Total hip replacement.
Props: A chair, an optional blanket, and a table.
1. Place the chair facing the table and sit sideways on the front edge of the chair, with your left side toward the table. Rest your left forearm on the table, your right forearm on the chair back. You can sit on a blanket for comfort, or to raise the height of your pelvis.
2. Turn your right knee out to the side and place your right heel up, toes on the floor. Alternatively, if there is a rung on your chair, your foot can be up on it.
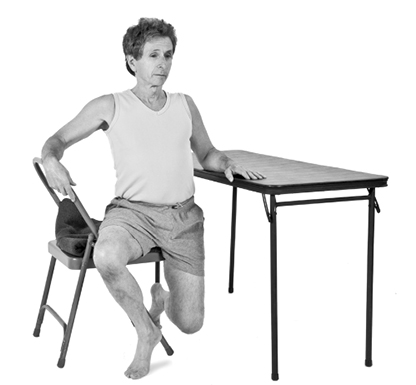
3. Keep your pelvis facing squarely forward (perpendicular to the side of the table) and carefully slide your left foot back on the floor. You can lean forward a bit to enable the leg to reach back.

4. Firm your leg muscles. Isometrically abduct your upper legs away from the midline.
5. Curl your tailbone down and lift your abdomen up.
6. Remaining steady in the pelvis, extend the left leg back. The back knee can be bent, but straighten it as much as possible. Lift up through your spine.
7. This pose creates a strong stretch in the hips when the backward action of one leg and the lift of the spine are balanced. Push into the table and chair with your arms to lift the spine more.
8. Breathe fully as you continue the actions for 30 to 60 seconds, then release.
9. Repeat on the second side.
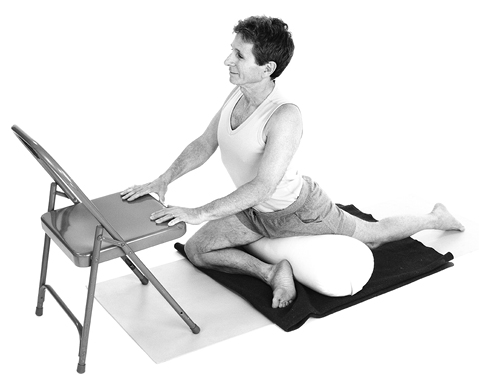
OSTEOPENIA VARIATION
Contraindications: Prepatellar bursitis, spinal stenosis, recent abdominal surgery, abdominal and ventral hernias, facet syndrome (segmental rigidity), total hip replacement, spondylolisthesis.
Props: A yoga mat, a chair, a bolster, and possibly a blanket.
1. Place a bolster 12 to 16 inches from the front of a chair on your yoga mat. Add a folded blanket under the bolster if your hips are stiff.
2. Position yourself onto the bolster, your right leg in front, left leg behind.
3. Bend your right knee out to the side.

4. Stretch your left leg straight back, kneecap and toenails facing down. Alternatively, you can tuck the back toes under.
5. Lean with your arms on the chair for support.

6. Check that your pelvis is facing straight forward. Pull your left hip forward if necessary.
7. Firm your leg muscles and isometrically abduct your upper thighs away from the midline.
8. Curl your tailbone down and lift your abdomen up.
9. Without turning your pelvis, settle it down as much as possible; slide the back leg back farther if you can.
10. Stretch out through the back leg and up through your entire spine. Continue to face the chair directly.
11. Remain poised in the midline for this asymmetrical pose during several quiet breaths, then release.
12. Repeat on the second side.
PREVENTION VARIATION
Contraindications: Prepatellar bursitis, hamstring tear, spinal stenosis, recent abdominal surgery, hernias, facet syndrome (segmental rigidity), total hip replacement, spondylolisthesis.
Props: A yoga mat and a rolled blanket.
Avoiding pitfalls: Face your hips squarely forward, your front leg open to the side, back leg straight behind you.
1. Roll up a blanket and place it on the mat. Position yourself on the rolled blanket with your right leg in front, left leg behind.
2. Bend your right knee out to the side.
3. Stretch your left leg straight back, kneecap facing down, toes tucked under.
4. Support your upper body with your hands on the floor on either side of your front knee.

5. Check that your pelvis is facing straight forward. Rotate your left hip forward if necessary.
6. Firm your leg muscles.
7. Isometrically abduct your upper thighs away from the midline.
8. Curl your tailbone down and lift your abdomen up.

9. Without turning your pelvis, settle it down as much as possible; slide the back leg back farther if you can. Leaning forward will help you to do this.
10. Stretch out through the back leg. Rise up through your entire spine with your shoulders back. Turn your lower torso to the right enough to remain facing straight forward.
11. Remain poised in the midline for this asymmetrical pose for several breaths, then release.
12. Repeat on the second side.
There are three more good ways to practice this pose for prevention. Follow all preparations in the variations above if you want to try these.
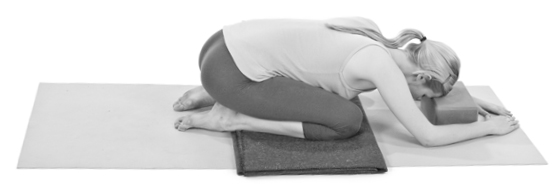
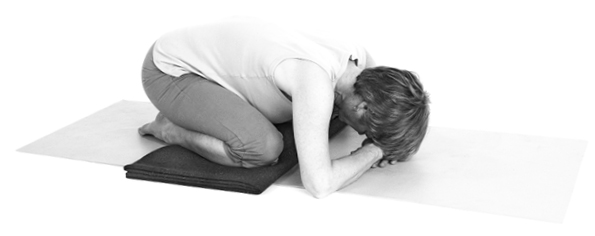
11. BALASANA Child’s Pose
Purpose: To stimulate the anterior lumbar vertebral bodies in flexion, the posterior thoracic vertebral bodies in extension, and to flex the hips as a counter-pose to backbends.
Avoiding pitfalls: Use the support of the props (if called for) to create a comfortable pose. Extend the spine forward as much as possible.
OSTEOPOROSIS VARIATION
Contraindications: (absolute) vertebral fracture; (relative) colostomy, prepatellar bursitis, meniscal tear, cruciate ligament tear, severe arthritis of the knee.
Props: A yoga mat, two or three blankets, and a chair.
1. Come onto your hands and knees on a stack of one or two folded blankets. Place the chair in front of you.
2. Position yourself with your feet half on and half off the edge of the blankets. This will moderate the stretch on your feet and ankles. Place the other folded blanket in the fold at the back of your knees to reduce possible strain there.
3. Widen your knees apart, about six inches more than hip-width.
4. Fold your hips back toward your heels.
5. Reach forward with your chest, stack one hand on the other on the chair seat, and rest your forehead on your hands.

6. Breathe deeply. Reduce effort and surrender tension in your body and mind. When you are ready, come out of the pose by lifting your head and sitting up. Use your arms for support.
OSTEOPENIA VARIATION
Contraindications: Knee pain.
Props: A yoga mat, a blanket, and a block.
Avoiding pitfalls: Extend the thoracic spine as you move into the pose.
1. Come onto your hands and knees on a folded blanket.
2. Widen your knees apart, about six inches more than hip-width.
3. Stretch and spread your toes.
4. Place the block in front of you. Fold your hips back toward your heels.
5. Reach forward with your chest and rest your forehead on the block. Place your forearms on the mat on either side of the block.
6. Breathe deeply. Reduce effort and surrender tension in your body and mind. When you are ready, come out of the pose by lifting your head and sitting up.
PREVENTION VARIATION
Contraindication: Knee pain.
Props: A yoga mat and one blanket.
Avoiding pitfalls: Be careful to extend the thoracic spine.
1. Come onto your hands and knees on a folded blanket.
2. Widen your knees apart, about six inches more than hip-width.
3. Stretch and spread your toes.
4. Fold your hips back toward your heels.
5. Reach forward with your chest and rest your forehead on your folded hands, or on the floor with your arms stretching forward.
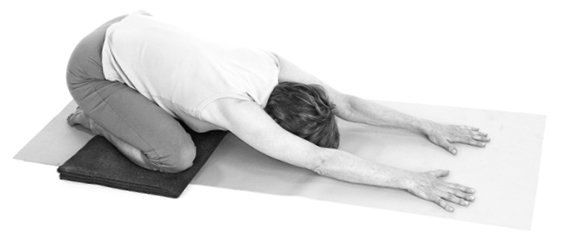
6. Breathe deeply. Reduce effort and surrender tension in your body and mind. When you are ready, come out of the pose by lifting your head and sitting up.
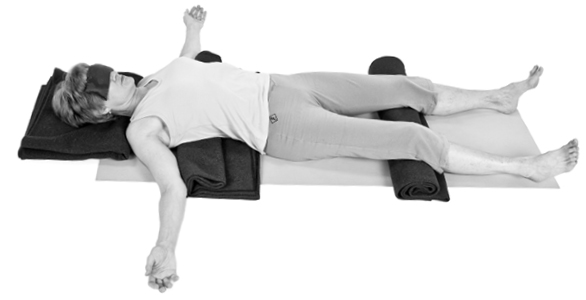
12. SAVASANA Corpse Pose
Purpose: To cease effort, relax, assimilate, and consolidate gains.
Contraindications: Late pregnancy.
Props: A yoga mat, three blankets, optional eye cover.
Avoiding pitfalls: After the initial setup, avoid fussing and fidgeting, become settled. B. K. S. Iyengar commented in Light on Yoga, “By remaining motionless for some time and keeping the mind still while you are fully conscious, you learn to relax. This conscious relaxation invigorates and refreshes both body and mind. But it is much harder to keep the mind than the body still. Therefore, this apparently easy posture is one of the most difficult to master.”
1. Make sure the space is quiet and safe from distractions.
2. Fold one blanket to support a slight arch of your thoracic spine, roll the second for under your knees, and fold the third one to support your neck and head. An eye cover may help to relax your face and allow you to retreat from all outer stimuli.

3. Lie on your back with arms at your sides, palms up. Make sure that the chest-supporting blanket allows your shoulders to be flat on the floor. Refold or adjust as necessary.
4. Adjust your hips by turning your legs inward to widen the back of the pelvis, then let the feet roll apart as you relax.
5. Lengthen your buttocks away from the waist if you feel any compression in your lower back.
6. Tuck your shoulder blades gently in toward the spine to open the front of your chest.
7. Make sure that your neck is long and your chin and forehead are level. Then guide your attention through your whole body systematically from head to toe and back again, letting each part relax thoroughly.
8. Do not fret if your mind produces thoughts; just watch them unemotionally without being drawn into the content. Be a compassionate witness. You might notice yourself reviewing an event, thinking of a person, or making a plan. Try not to follow the pull of any thoughts, but passively observe them come and go. Trust in the process of letting go.
9. After 5 to 10 minutes of quiet rest, take a few deeper breaths, stretch your arms and legs gently, bend your knees, then softly roll to the side. Take your time getting up, and respect whatever effects, changes, and benefits you may feel from your yoga practice. Remember your intention. Affirm your process of growth and healing.