The common admonition to think ahead for several steps through each decision and its consequences is nowhere more important than in the event of self-rescue. Self-rescue refers to the actions a party must take to deal with an emergency incident, typically a fall or rockfall, without relying on outside assistance. Making a cell phone call is not self-rescue. The same thinking and similar techniques apply to self-rescue on rock climbs and to self-rescue in the event of a crevasse fall. Many descriptions of self-rescue techniques imply a large, well-supplied party and, curiously, plenty of fortuitously placed trees; the reality is more likely to be a small party—one of whom is injured—who have only a small amount of climbing hardware with which to work, most of which may be with the victim. The techniques of self-rescue are among the most complex and least practiced climbing skills, and self-rescue circumstances, unlike search and rescue (SAR) operations, invariably sacrifice safety margins. I won’t pretend to cover the subject thoroughly, but I do want to present basic techniques and show how they can be applied. These techniques aren’t rocket surgery, but you can’t expect to learn technical self-rescue simply from a book. You can’t memorize setups; you must strive to learn principles that you can combine to deal with each specific incident. A group of climbers might be able to teach themselves self-rescue, but they’ll need a considerable amount of time and effort to work out and practice the skills safely. You might be able to get training from a school or guide, but unfortunately many guides are ill informed. Shop around. More important than skills, however, is judgment. I’ll discuss self-rescue just enough to augment your judgment, so that you can make the most of your existing skills and resources, should you find yourself in a self-rescue situation some day.
There are specific steps in dealing with a self-rescue situation; you’ll see slightly different versions, but the important thing is to have a structure and follow it.
![]() Don’t get yourself into a self-rescue situation in the first place. Self-rescue isn’t limited to roped rock climbing. It can occur anytime someone is injured in a precarious environment. It can arise from a rappelling mishap, or taking a fall on third-class terrain. You could even consider the possibility of becoming benighted as a self-rescue event, because it could require technical rope skills to deal with. After you read this section you’ll understand the grave consequences that arise when self-rescue skills become necessary; you’ll want to avoid such circumstances. When you’re in the mountains, turn up the volume on that little birdie who’s constantly complaining, “Hey, you know, this might turn out bad.” Don’t become paralyzed; just think ahead and carefully consider where your actions and decisions might lead and how you might have to respond if things do, indeed, go badly.
Don’t get yourself into a self-rescue situation in the first place. Self-rescue isn’t limited to roped rock climbing. It can occur anytime someone is injured in a precarious environment. It can arise from a rappelling mishap, or taking a fall on third-class terrain. You could even consider the possibility of becoming benighted as a self-rescue event, because it could require technical rope skills to deal with. After you read this section you’ll understand the grave consequences that arise when self-rescue skills become necessary; you’ll want to avoid such circumstances. When you’re in the mountains, turn up the volume on that little birdie who’s constantly complaining, “Hey, you know, this might turn out bad.” Don’t become paralyzed; just think ahead and carefully consider where your actions and decisions might lead and how you might have to respond if things do, indeed, go badly.
![]() If worse does come to worst and you realize that the game has abruptly changed from climbing to self-rescue, the first thing to do is do nothing. Clear thinking rather than prompt action is what will be required. You want to stand back from the shock and awe of what has just happened and get your mind in balance. This is particularly difficult among a group and when physical trauma is obvious. You’ll soon begin a series of linked actions, and it’s imperative that your mind be clear as you plan how you’ll deal with the situation confronting you.
If worse does come to worst and you realize that the game has abruptly changed from climbing to self-rescue, the first thing to do is do nothing. Clear thinking rather than prompt action is what will be required. You want to stand back from the shock and awe of what has just happened and get your mind in balance. This is particularly difficult among a group and when physical trauma is obvious. You’ll soon begin a series of linked actions, and it’s imperative that your mind be clear as you plan how you’ll deal with the situation confronting you.
![]() Survey the scene. This is primary to every emergency response protocol. You want to think about how many victims and rescuers there are, what resources might be available, how remote you are, what’s the most likely ultimate goal, and so on. Most importantly you want to be acutely aware of any factors, such as objective hazards, that threaten, because the first rule of rescue is not to jeopardize the rescuers.
Survey the scene. This is primary to every emergency response protocol. You want to think about how many victims and rescuers there are, what resources might be available, how remote you are, what’s the most likely ultimate goal, and so on. Most importantly you want to be acutely aware of any factors, such as objective hazards, that threaten, because the first rule of rescue is not to jeopardize the rescuers.
![]() Quickly assess the victim. You may have to do this from a distance, perhaps out of sight. In a self-rescue situation the most critical bits of information are the approximate extent of the injuries to the victim and the degree to which the victim can assist in his own rescue. The victim may be uninjured but hanging where climbing is impossible, or the victim may merely have stumbled on talus but be unresponsive. It would be rare that a victim has a life-threatening injury that requires immediate intervention of a sort that could be provided in a wilderness context. It’s likely more important to formulate an effective and comprehensive rescue plan than it is to give prompt first aid—no matter how loudly the victim may be protesting (protesting is good, because it means the victim is conscious and breathing; being unable to protest is bad). Of course, if you can easily and safely reach the victim and perform a thorough assessment (as you will learn in that wilderness first-aid course you’ve signed up for), then do so. Protect the victim from further injury.
Quickly assess the victim. You may have to do this from a distance, perhaps out of sight. In a self-rescue situation the most critical bits of information are the approximate extent of the injuries to the victim and the degree to which the victim can assist in his own rescue. The victim may be uninjured but hanging where climbing is impossible, or the victim may merely have stumbled on talus but be unresponsive. It would be rare that a victim has a life-threatening injury that requires immediate intervention of a sort that could be provided in a wilderness context. It’s likely more important to formulate an effective and comprehensive rescue plan than it is to give prompt first aid—no matter how loudly the victim may be protesting (protesting is good, because it means the victim is conscious and breathing; being unable to protest is bad). Of course, if you can easily and safely reach the victim and perform a thorough assessment (as you will learn in that wilderness first-aid course you’ve signed up for), then do so. Protect the victim from further injury.
![]() Inventory your resources. The best way to do this is for everyone to dump their gear on the ground so every item can be seen, including climbing hardware, first-aid supplies, tools, items with improvisational potential, and even food, water, and clothing. If you’re holding the victim on belay, you may have to do a mental inventory of your resources and verbally query the victim as to hers. It would be great if, before the climb, your party discussed what gear is being carried and what firstaid skills are along, but that seldom happens on casual outings.
Inventory your resources. The best way to do this is for everyone to dump their gear on the ground so every item can be seen, including climbing hardware, first-aid supplies, tools, items with improvisational potential, and even food, water, and clothing. If you’re holding the victim on belay, you may have to do a mental inventory of your resources and verbally query the victim as to hers. It would be great if, before the climb, your party discussed what gear is being carried and what firstaid skills are along, but that seldom happens on casual outings.
![]() Formulate a plan and communicate it to the other rescuers, if any, and to the victim. The plan may be designed using input from others, including the victim, but there comes a time early in a rescue scenario when a single person must assume leadership and direct the other rescuers. That person could even be the victim, but once a plan is established, there’s no room for participatory democracy. The person best qualified to lead is the one with the best management skills, not necessarily the best climbing or medical skills—those persons may contribute more effectively by focusing their skills where needed. It’s imperative that the rescue plan be well designed, because very often it will be difficult to alter a plan once it’s under way; indecision and equivocation consume valuable time and send the wrong message to all involved.
Formulate a plan and communicate it to the other rescuers, if any, and to the victim. The plan may be designed using input from others, including the victim, but there comes a time early in a rescue scenario when a single person must assume leadership and direct the other rescuers. That person could even be the victim, but once a plan is established, there’s no room for participatory democracy. The person best qualified to lead is the one with the best management skills, not necessarily the best climbing or medical skills—those persons may contribute more effectively by focusing their skills where needed. It’s imperative that the rescue plan be well designed, because very often it will be difficult to alter a plan once it’s under way; indecision and equivocation consume valuable time and send the wrong message to all involved.
![]() If your plan involves technical rope work, check and double-check every step you take. Likely these skills are seldom practiced, so you must be absolutely confident that your procedures are sound. Don’t get fancy; you’ll be under a lot of stress. And remember that the most reliable plan may be to give the victim your jacket and go for help.
If your plan involves technical rope work, check and double-check every step you take. Likely these skills are seldom practiced, so you must be absolutely confident that your procedures are sound. Don’t get fancy; you’ll be under a lot of stress. And remember that the most reliable plan may be to give the victim your jacket and go for help.
A climber fall with you as the belayer could require technical rope work. As you recover your composure, you see that only a small number of possible alternatives is available to you: stay where you are to lower or raise a climber who can participate, or join the climber to administer first aid or assist moving up or down. The following discussions focus on actions a belayer might take to respond to a leader fall, but they could also apply to a second’s fall or a crevasse fall, depending on circumstances; keep in mind the differences as you read. The scenario needn’t involve a leader fall to be serious: a second won’t take a serious fall unless it involves a pendulum or the belayer fails to keep the rope tight, but a second could find himself in a steep section of a fourth-class pitch, unable to climb up, with insufficient rope to be lowered to a safe location, and without any prusiking gear or skills—now what? Even if the leader doesn’t fall, what do you do if the rope somehow gets too stuck for the leader to advance and down-climbing isn’t an option?
Whatever the cause of the incident, if you can lower the victim to a position of security, you’re in luck. This could require cooperation of an able victim or even lassoing a nearby victim. Do whatever you can to exploit a lowering tactic; it’s well worth the effort, given that other options are odious or impossible. Taking in rope at the belay requires pulling harder than the victim’s weight. After you’ve lowered the victim, you’ll want to assist her, and you may want to keep her on belay as you do. That means you’ll have to escape the belay that you’re using to hold her, while keeping yourself secured for safety. This is also the first step in other rescue procedures.
The basic goal of escaping the belay is to gain control of the tension that’s being applied by your belay device to the main rope and smoothly transfer the tension to a separate, secure anchor point. We’re talking body weight or less here, so the emphasis on this separate anchor is security more than strength; you probably don’t have to worry about equalizing several placements, but the anchor should be backed up unless you have no option, because it’s life supporting, and because the person who builds it is under stress.
If you’re belaying off an anchor, as I recommend for belaying the second, you’ve already escaped the belay. Now you must lock off the rope at the belay device. Think ahead several steps and evaluate the consequences of your plan. You’ll certainly want to remain tied in, if you already are, but you may need some extra slack in your connection. Will your tie-off result in any forces on the climber’s anchor from unintended directions? Don’t be paranoid about putting minor jerks on the belay anchor as you work; after all, it’s just been tested by a fall.
If you’re using a tube brake, pass a bight of the rope through the HMS carabiner and tie a mule knot on the spine of the carabiner. A mule knot (strange how knots get named for animals and animal parts) is simply an overhand slip knot tied on a bight—an overhand bow knot; its value is that it locks the rope at the belay device but can be released while the rope is under tension. You’ll use a mule knot, even on paired cords, anytime you need a knot that can be released while the cords are under tension. The illustration on the following page shows how you put the mule knot to work holding the rope through the brake.
You could also tie the mule knot on the main rope, but it isn’t necessary; it’s easier to tie it on the carabiner. Tighten the mule knot before you ease off on the hand that’s holding the brake. This same method can be used to tie yourself off when rappelling or anytime you want to keep tension on the belay rope but have both hands free. The mule knot is only holding the force on the rope divided by the force magnification of the brake—less than 10 percent of body weight. Increase security by clipping the mule’s bight to some part of your harness.
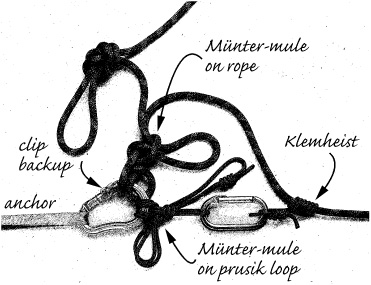
Securing a Münter hitch is very similar, but it’s easier to tie the mule knot on the main rope. This combination is so common and handy, for both ropes and prusik loops, that it’s called the Münter-mule. See the illustration.
That was easy; now you can sort things out and continue with your plan of either lowering the victim, raising the victim, or climbing to the victim to give assistance. In any rescue situation, it’s always wise to tie backup stopper knots in ropes and use to friction knot loops to prevent belay ropes from slipping away unintentionally.
If you and the belay brake are attached to the same anchor, you must establish an independent point to which you can transfer the rope tension. Hopefully you can use the anchor to which you’re attached; it was set to keep you from being pulled into the leader’s Anchor #1 (or downward toward your ascending second if you’ve unwisely elected to belay off your harness or through a redirect), so its optimum direction should still be secure. Whether the anchor point is new or part of your existing anchor, it’ll have to be within reach—you may be dangling in the air at this point if the fallen climber has pulled you upward.
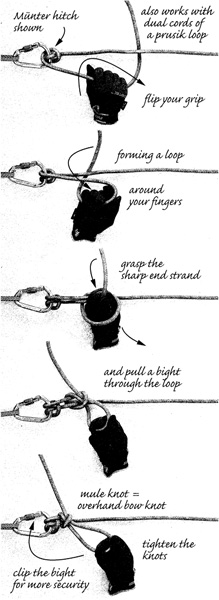
Tying a mule knot on a Münter hitch—the Münter-mule.
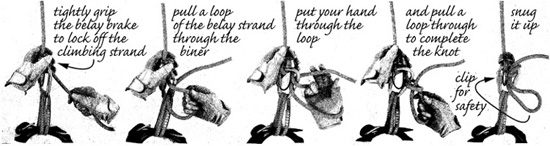
Locking off an ATC belay with a mule knot.
Start by putting a friction knot on the rope with a prusik loop and connecting that loop to a carabiner, preferably a locker, on the new anchor point with a Münter-mule, treating both strands of the prusik as one. The Klemheist is a good choice for the friction knot. Clip the free end of the Münter-mule prusik loop into its carabiner as a backup. You’ll need a longish prusik loop; 32 inches (82 cm) is about the minimum, and a 6 mm cordelette would be ideal if you use at least four wraps in your Klemheist—maybe more on a skinny rope. Avoid hassles with the damn knot on a long prusik loop (which is how you’ll refer to the loop’s double fisherman’s knot when you practice this technique) by using separate loops for the Klemheist and the Münter-mule, then clip them together with a carabiner after you get everything in place. If you need both hands while setting up the Münter-mule, wrap the belay strand of the rope around a leg a few times, or even wrap your leg with a long bight in the rope and clip it in your HMS biner; it won’t take much tension to hold the belay rope.
Let out rope from your belay brake until tension is transferred to the new anchor. Managing this rope work takes practice as well as having those prusik loops somewhere other than in the bottom of your pack. Re-anchor yourself using your small locker and daisy chain. Tie a butterfly or overhand to create a loop in the rope and clip it in to the biner that’s holding the Münter-mule, as a backup, but locate it far enough from the Münter-mule that it won’t become tensioned accidentally, which will make it impossible to release. Remove your belay brake from the rope. You’ve escaped the belay.
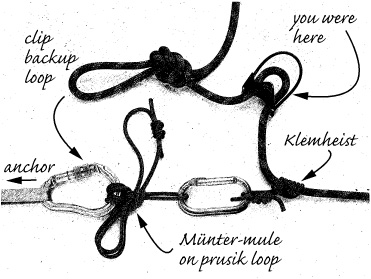
Holding the rope with a Münter-mule on prusik loops in order to escape the belay.
If you intend to lower the victim with the rope, you’ll set up an HMS biner on the anchor that holds the Münter-mule, remove the rope’s backup connection, and tie a new Münter-mule using the climbing rope. Take as much slack as possible out of this new Münter-mule and tie a new temporary backup in case it slips. Then transfer the rope tension to the new Münter-mule on the rope by releasing the one on the prusik loop. Remove the prusik loop and Klemheist. You will be able to let out rope under control of the new Münter hitch on the main rope after releasing the new mule knots on the rope and the backup knot.
If these instructions strike you as excessively complex, you’ve seen the light. Work out the details step by step with your own gear and a realistic load; you’ll see it’s pretty straightforward, once the processes come together for you.
Now that you’ve extricated yourself from the belay you can set about lowering the victim from a better vantage point or preparing to climb up. An injured victim may need first aid or assistance while being lowered, but climb up only if you absolutely must; you’ll likely be joining the victim in a precarious location—you don’t want to also end up joining the victim in a predicament. If the victim needs first aid or is hanging and immobile, you’ll need to work quickly because you have 15 minutes or less before harness hang syndrome sets in. However you do it, climbing up will consume vast amounts of time. The easiest way to climb up is simply to climb the rock as the leader did. In order to have some semblance of a belay, attach a friction knot to the rope and slide it along with you; slack in this connection encourages its failure. Passing intermediate anchors will require moving the friction knot through each clip, same as you would pass anchors on a fixed line except that the line may be held tightly by anchor carabiners or against terrain features along the way; that could force you to attach a second prusik above the impasse or to clip in with your daisy while you relocate the prusik you’re using. Be wary of loading anchors from insecure directions.
Adding a Münter hitch to let out rope after releasing the mules.
If simply climbing up rock (or ice) isn’t feasible, you must consider ascending the rope itself. This is complicated and time consuming. What you do when you reach the fallen climber is likely to be more complicated yet, so it better be absolutely necessary to go there, and you better have a clear plan for what you’re going to accomplish if you manage to pull it off. Actually, prusiking up a rope isn’t all that difficult; it’s a necessary trad climbing and glacier travel skill. But it’s awkward and slow—and miserable if you’re on a slope where you aren’t fully hanging but can’t stand on your feet. You can enjoy the full measure of fun practicing ascending a rope using friction knots by climbing up toward a pulley while the other end of the rope is being slowly belayed out by a “friend.”
The trick to efficient prusiking is working out a prusik loop setup and lengths that work for you and getting them on the rope the way you intend; remember the mnemonic “put your foot down and waist away” to remind yourself that the connection from your waist to the rope usually attaches higher on the rope than the one from your foot. Size one loop to connect from the rope at forehead level to your HMS biner and another from just below the first to your foot when it’s raised high. You might want to extend a short prusik loop with a slip-knotted runner on your foot, or maybe a 48-inch runner is all you need for the foot loop. If you’ll use your system for glacier travel, figure in the effect of a chest harness and practice with it clipped to the rope so you can be sure it doesn’t get in the way. A simple ascending setup works for me; I don’t prusik far enough or often enough to rig a special-purpose Texas or Frog setup like those cavers use.
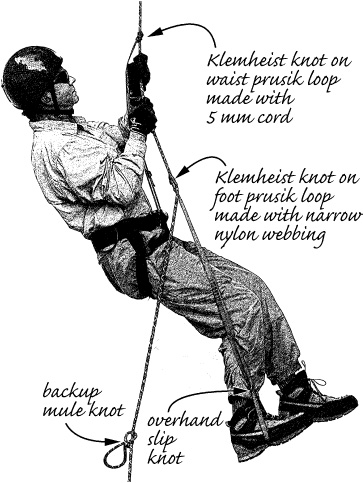
Prusiking up a rope.
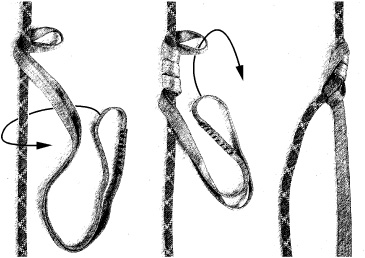
Tying a Klemheist friction knot with a nylon runner.
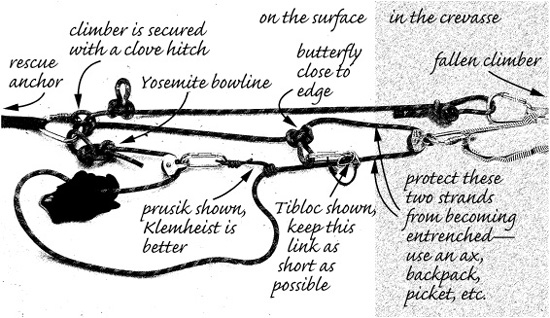
Rope-ascending technique is also used in crevasse rescue, but that doesn’t mean it’s any easier when the rope is covered with snow. Normally the rope climber will tie an overhand knot in the rope behind himself every 10 feet and possibly clip it to his harness (not to a gear loop!) for safety should his friction knot slip (in which case it may melt and fail). This is called tying in short or clipping in short, and it should be done even if you’re using mechanical ascenders, which can become unclipped inexplicably. Release and untie the previous safety knot when you connect the next if there’s any chance of hang up when the rope is retrieved; if that’s a big worry, you’ll want to retain all of the rope and safety loops, but you’ll have to thread them onto a runner loop in order to prevent a gigantic snarl at your waist. Use your daisy. If this sounds complex and time consuming, you’re correct. Moreover, in our rescue scenario of ascending a tightly anchored rope that’s holding the leader, it’ll be impossible to tie safety knots—instead, clip the rope with a locker on your daisy that you hope will stop you at lower anchors should you fall, but mainly hope that your friction knots never slip.
It only gets worse. Prusiking up a tight, angled rope is much more difficult than climbing a slack rope that drapes vertically. If the rope being climbed takes a turn at a carabiner or over a rock edge (or over the icy lip of a crevasse in another scenario), it may be impossible to slip the upper friction knot (the one attached to your waist) up and over the biner or edge. To pass this impasse you may have to step up as high as possible on the foot loop and connect a new friction knot to the rope on the other side of the biner or edge on which the rope is pressing. Attach a new waist prusik, or if you haven’t a spare, remove your waist loop and reattach it, all the while thinking pure thoughts. Don’t try to remove the anchors (they’re under tension), but reattach that safety locker on the rope above each anchor as you pass it. This whole business is a nerve-racking exercise—and, meanwhile, time marches on.
The least attractive of your alternatives is raising the victim. This might be impossible for a two-person party, even one fairly knowledgeable and well equipped. The pulling force on the rope at the belay stance will need to be about twice the weight of the fallen climber in order to lift her, more if there’s friction on the rope. This immediately calls either for a party of hearty climbers with prusik loops connected to the rope for better grip or, more likely, a force-multiplying pulley system.
Unfortunately, je crois que non—a little secret seldom brought out in climbing texts. The classic Z-pulley is supposed to have a 3:1 force multiplication. Practically, however, using ordinary climbers’ pulleys and rope, the actual advantage will be only a little north of 2:1 due to inefficiencies and friction; using carabiners instead of pulleys will reduce the realizable force multiplication even more. If you attach both your hands to the rope with prusik loops to get a good grip and have a solid stance, you can pull steadily on a rope with about a quarter of a kilonewton (60 lbf), briefly maybe twice that. If you have a really good stance with lots of room, you can apply more force by attaching the prusik loop to your harness and using leg power to pull, but that’s not something you’d want to plan on. On a small stance or one where you can’t make your boots stick, you’ll be lucky to get 25 lbf with one hand.
This means that a real-world, hand-pulled Z-pulley will deliver about twice 60 lbf to the load, maybe a bit more on a good day; that’s about 125 lbf or half a kilonewton. If you were positioned to pull directly on a climber below you might, with gonzo effort, be able to lift someone of average weight for a short distance until you became fatigued, but a short distance is seldom the requirement.
Things are less favorable in the scenario where the rope from the belay stance to the fallen climber runs through at least one additional carabiner above, which acts as a redirect. Friction through that carabiner reduces the pull on the climber from the belay location by about a third. That 125 lbf (0.5 kN) of pulling force only amounts to 80 lbf of lifting effect on the hanging victim—not enough to pull her up if she’s hanging free. In order to lift her, you’d need to apply at least 250 lbf (1.1 kN) at the belay—not possible, even using your body weight. Numbers like these will have wide variations in practice, depending on the particular hardware used, the rope, and your good or bad fortune.
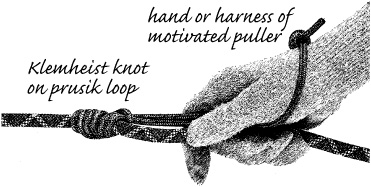
Adding pulling power.
Pulley systems are kinda like a blind date: they come highly recommended but often missing critical details. You even see examples that don’t always work on the Web sites of national guide associations, and the illustrations in texts are replete with inefficiencies. I’ll dig into what is admittedly somewhat complex and advanced for the average mountaineer, because when a hauling system becomes crucial in a rescue operation, on rock or on a glacier, you’ll avoid a serious waste of time if you have a handle on how pulley systems work in the real world. I’ll cover use on both rock and glaciers—and anywhere else you may need extra pull, even hauling your ox out of a ditch.
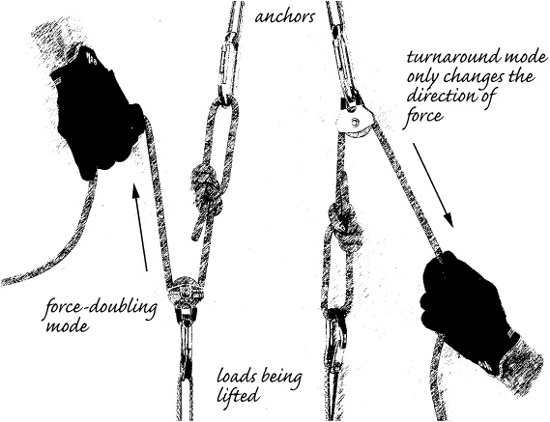
There are two modes of basic pulley operation: one that reverses the direction of force without changing its magnitude, and another that doubles the force without changing its direction. The turnaround pulley (first mode) is always anchored by its axle and has one strand of its rope connected to the load while the other is pulled. The force-doubling pulley always connects the load at its axle and usually has one side of its rope anchored and the other pulled.
Pulleys are not 100 percent efficient. Not only because of sheave-bearing friction but from the bending of the rope as it goes around the pulley. The larger the pulley diameter and the smaller the cord, the more efficient the combination will be. That’s why a carabiner with a 10 mm diameter of rope-bearing surface soaks up so much pulling force on an 11 mm rope. The amount of the inefficiency depends on relative diameters of rope and pulley, rope characteristics, rate of pull, short- and long-term rope history, and lots of other things, but some simple numbers help to illustrate the concept.
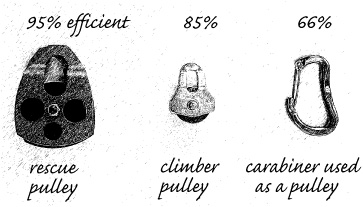
A conventional rescue pulley with a 54 mm (2 inch) diameter sheave will have an efficiency of between 91 and 96 percent when passing climbing ropes. A small climber’s pulley will have an efficiency of about 83 to 85 percent, while a carabiner used as a pulley may have an efficiency of only 50 to 70 percent. Two carabiners back to back or carabiners with narrow profiles are worse. Let’s say we pick 65 percent for the efficiency of the carabiners we happen to have along; a system built with two of them used as pulleys will have a pulley efficiency of 65 percent of 65 percent, or only 42 percent of what you’d expect. Using such carabiners to build a 3:1 pulley system will reduce the advantage to 1.3:1. If you foresee any possibility that you’ll be involved in self-rescue, carry two pulleys; those neat little Petzl Ultralegere wheels eliminate excuses based on weight or cost (and you already use oval carabiners because of their versatility, right?). Efficiency figures are based on the rope wrapping halfway around the pulley; inefficiency is less when the wrap is less, but the full force multiplying benefit of the 2:1 pulley requires the entire half wrap.
Efficiencies of pulleys.
Pulley modes.
Now let’s build a system. The simplest way to increase your pulling force is to attach a pulley to the load by its axle, anchor one end of the rope that runs through the pulley, and pull on the other end. This creates a force-doubling pulley (minus inefficiency); you’ll have to pull twice the length of rope as the distance the load is moved. This approach is frequently recommended for pulling a victim out of a crevasse, but don’t think you must set it up as normally illustrated, where a pulley is lowered to the victim. It’s easier to attach a pulley’s axle to the victim’s rope with a friction knot and work with the pulley on the surface of the glacier; the only benefit of dropping the pulley is slightly less friction at the crevasse lip because the moving strand supports half the load. In the self-rescue scenario where you’re pulling down on the rope, you could attach a pulley to the rope holding the victim and use your weight to pull. If you can get everything to line up and pull down with the force of your weight, which the pulley will increase by about 200 percent × 83 percent = 166 percent; that might be enough to raise the climber unless there’s more friction elsewhere.
If you can pull only with your hands, the pulley will increase your 60 lbf of pulling power by 166 percent to about 100 lbf. Any friction of the rope on rock or snow, or on something you put in the snow or on the rock to keep the friction from being even worse, will reduce your effective pulling force. For example, bending over an ice ax shaft will reduce force on a rope by about 25 percent, and a backpack will knock off about 30 percent. A backpack would be much better than a coarse rock edge. You can see where this is going: even with two people pulling with their hands, if you run the rope over an ice ax shaft (the best case edge), you’ll be able to generate only about 150 lbf of pulling power with a C-pulley, and that won’t lift most climbers. Either motivate the pullers, get some help from the victim, or go to plan Z.
Here’s where the Z-pulley comes in. After considering pulley inefficiencies, a Z-pulley will about double your pulling force, hopefully a little more depending on pulleys and rope. If the rope runs over an ice ax shaft you’ll reduce the effect and end up with about 100 lbf effective pulling force from one puller using his hands. If that puller is going to raise a typical climber, he’s going to have to be highly motivated or be able to pull with his harness and sound footing, or both. Two pullers, on the other hand, could produce 190 lbf of pull with their hands, and that will raise someone you’d find in a crevasse, even a person whose pack didn’t evidence the lightweight philosophy. This is one reason for the common recommendation for parties of three on active glaciers. If pullers can use body weight or pull with their harnesses, things could get even better, especially for the victim. Physics is unjust: your pulling power is reduced by inefficiencies and friction, but you still have to pull three times as much rope length as the distance you want the load to move.
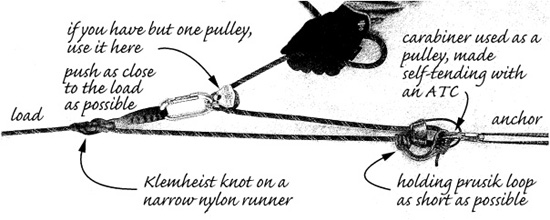
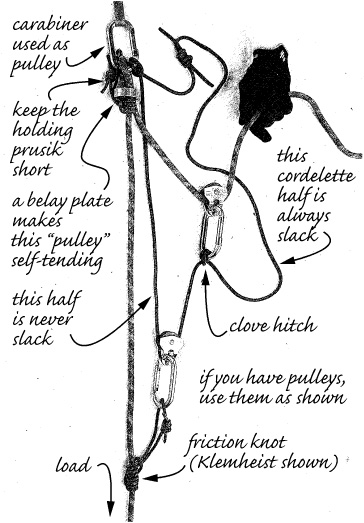
Most texts show Z-pulley rigs that are far from optimum. Here are some pointers to make yours better. The holding prusik wants to be very short, because the difference between where it holds and where it slips is lost length of lift every time you start a new pull on the rope; you might want to consider using a dedicated short prusik made with 6 mm cord if that’s what it takes to cause your pulley’s flanges to ensure that the prusik knot slips and doesn’t get sucked into the pulley absent climber intervention. Feed the rope through a belay device at the turnaround to guarantee self-tending; it’s better to have all hands on the rope than dedicate someone to tending the prusik—or use a prusik-tending pulley. If the climbing rope is 9 mm or thinner, use three prusik wraps instead of the common two (never a bad idea). A Bachmann friction knot won’t hold well on skinny ropes; a Klemheist is more reliable but may not be released automatically by your pulley as well as a traditional prusik knot. The pulling prusik loop needn’t be long; just push it as far toward the load as possible each time you begin a take-in cycle to maximize the length of rope that can be pulled in before another reset is required; use a Klemheist for the friction knot. The main benefit comes from the force-doubling pulley; if you have only one pulley, use it there and use a carabiner as the turnaround pulley. If you have no pulleys and must use carabiners, figure your force multiplication will degrade to only about 1.3:1. After running the rope over an ice ax shaft you’ll end up with no net gain, but that’s better than a 25 percent loss if you simply haul without a pulley rig. All this will make more sense when you actually set up a Z-pulley. Don’t blindly imitate illustrations in The Classic, Field Manual FM 3-97.61, or just about anywhere else.
A self-tending Z-pulley can be made without prusik loops using an autoblock brake as the “holding prusik.” This configuration will produce a real force multiplication of about 1.8:1, which drops more if made without any pulleys. This setup was described in Chapter 23, Lightweight Ropes, as a means of assisting a climber below.
I’ve already mentioned misguided claims that pulley systems put extra stress on their anchors. Pulley systems reduce the load on the puller—their raison d’être. The anchors will hold the remaining fraction of the load—considerably less than body weight while the victim is being raised. While the victim is hanging between pulls, the anchor will hold only the victim’s weight, reduced by rope friction over the ax shaft or whatever. In other words, the anchor sees no more than body weight. The anchor in our rock rescue scenario that actually does take more force is that much abused uppermost anchor—the one that has just held the leader’s fall. It will have to support the weight of the hanging victim plus almost twice that force coming from the pull at the belay stance; figure 300 percent of body weight (about 2 to 2.5 kN) while the victim is being raised—probably less than from the leader fall it just held.
Classic Z-pulley rig using one pulley.
What if you’re the only puller available? First try getting help from the victim. If the crevasse or rock rescue victim could climb up even a little, that might be enough to turn the tide. Toss down an anchored rope and suggest that the victim attach her own prusiks. If nothing looks like it’s going to work and you must haul the victim without assistance, the alternatives are substantially more complex.
A sick, inventive mind can cook up any number of complex combinations of pulleys. Practically, only three should be needed to meet every contingency that could be managed by a small team (SAR teams will have more techniques and specialized gear). The 6:1 system (sometimes called a CZ or ZC rig) is conceptually simple: just rig a Z-pulley system on the pulling rope of your C-pulley, or use a C-pulley to increase pulling power of a Z-pulley. You’ll have to pull six times as much rope as distance the victim is raised; this requires a lot of rope and implies a lot of prusik resets, which takes a lot of time. In tests I’ve done, the actual benefit is not much more than a 5:1 system, which has slightly lesser limitations. A 4:1 system can be constructed in the same way: add a C-pulley on the pulling rope of another C-pulley. This setup involves the same two pulleys and associated inefficiency losses as a Z-pulley but provides a little more mechanical advantage; however, by adding only one more carabiner you get the 6:1 system, so the CC rig hardly seems worth its additional complexity (the empty butterfly in the illustration is where the arresting climber was clipped).
A turnaround pulley added to a Z-pulley system on its pulling rope doesn’t increase leverage; if you use a turnaround carabiner instead of a pulley, its inefficiency can decrease the actual advantage almost to the point that you might as well simply haul on the rope without any rig at all. The only benefit of adding a turnaround pulley might be to allow use of body weight to pull or pulling from a direction that was otherwise physically impossible.

C-pulley added to a Z-pulley for a theoretical 6:1 advantage.
C-pulley added to another C-pulley for a theoretical 4:1 advantage.
A downside of the 5:1 system is its complexity, including the need for an extra length of cord or a long runner. A cordelette works well; attach it with clove hitches and split the length between cord that will always be tensioned and cord that will always be slack. You could also use the end of the rope. You must pull five times the length of rope as distance you hope to lift the victim, and the system will require a reset when the load has moved half the length of the extra cord. If only two pulleys are available and a carabiner must be used, make it the turnaround at the anchor. Using an autoblock belay brake doesn’t detract much from the benefit of an all-carabiner version, which is less than 3:1. To put things in perspective, a mariner haul made with carabiners will have about the same force multiplication as a Z-pulley made with climbers’ pulleys, but a mariner haul using two pulleys will have twice the benefit of a Z-pulley made with carabiners—those two pulleys are like adding another rescuer to your party. Other than those caveats and, of course, the difficulty in remembering how to set it up, the 5:1 system, called the mariner haul, is very effective, yielding a practical force multiplication around 3.6:1.
Complex pulley systems can create an irresistible force on the load. Be sure not to injure the victim by pulling when he’s stuck on rock or at the crevasse lip. An unresponsive victim should be monitored constantly during rescue operations (and his legs moved by rescuers to fend off harness hang syndrome).
If the fallen climber is injured, it may be necessary for her to be accompanied by another climber as she’s lowered. That could mean an actual lower by another member of the party or, if you’re the only rescuer, a tandem rappel. A tandem rappel, with both climbers hanging on the same rappel brake, could be done like an ordinary rappel, after tethering both climbers together, but that would mean the load of two climbers on the rappel brake. You probably wouldn’t be prepared, or practiced, for that. A better way would be for the rescuer to rappel, after tethering himself to the victim, on one strand of the rope while the victim is simultaneously lowered on the other strand as a counter-weight; there would be so much friction through the anchor carabiner that the rescuer might have to push rope into his brake. Too much friction is better than too little.
To set up a tandem rappel to rescue a fallen leader, the rescuer would tie off the belay with a Münter-mule as I’ve been describing and then ascend to the top anchor and clip in. In the best of all possible worlds, the rescuer would add components to the top anchor to increase its reliability. In real life, the fallen climber down below probably has the entire rack. Having two climbers hang on a single placement might be scary, but the anchor has already held a leader fall, so it’s been tested. Of course, it would be preferable to reach the fallen climber, recover the rack, and build a nearby multiplacement anchor to which the victim could be secured and on which a new rappel anchor would be based. Attach the victim to such an anchor with a Münter-mule on a prusik loop and back that up with an unloaded runner or the victim’s own daisy clipped to the master point of the new anchor. If you can’t reach and anchor the victim, secure the victim’s rope strand at the top anchor with a Münter-mule on a prusik loop; if you have a spare prusik, put a Münter-mule on both strands, the one to the victim and the one back to the tied-off belay. Then downclimb back to the belay, using prusiks if necessary. I’ll bet you’ve never practiced prusiking down a tight, angled rope; clipping your harness to it helps until you encounter an anchor or a sharp bend.
The 5:1 mariner haul.
When you’re back at the belay where this whole thing started, you’ll remove the backup knot and release the Münter-mule on the main rope, letting the victim’s weight come onto her Münter-mule up at the top anchor. Then you’ll take down the belay anchor and re-ascend the rope; it won’t be any easier this time because you’ll want to remove the anchors, and that won’t be easy if your climbing rope is putting outward tension on them; at least you’ll be able to tie in short this time up.
When you reach the victim’s Münter-mule at the rappel anchor (was top anchor), you have three options: clip in and lower the victim and then rappel yourself (since you now have enough rope), orchestrate a tandem rappel (which we don’t like), or conduct a counter-weight rappel (which was our original plan). Needless to say, the rappel rope must go through a carabiner, not simply a runner, or it’ll melt through the runner surprisingly quickly; a locker is best, or a fat leaver biner with the gate taped shut. Don’t use two nonlockers back to back, because that causes extra rope friction. Tie a stopper knot in your strand of rope and get yourself on rappel, remove any safety knots or runners, release the Münter-mule on the victim’s anchoring prusik loop, and rappel to the victim, whose counterweight will prevent rope slipping through the top anchor carabiner. When you reach the victim, connect yourself closely with a runner or prusik loop; you may also want to put a chest harness on the victim, to help keep her upright. The victim’s strand probably won’t run until you put downward tension on the victim, who will be pulled above you unless you’ve engineered a runner between the two of you to prevent it. You may want the victim at your shoulder height or knee height, but there will be excessive interference if the victim is at the same height.
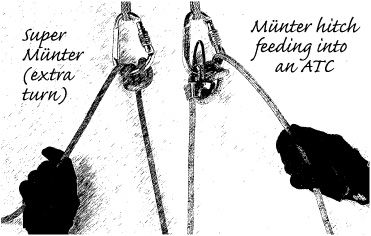
If you have enough climbers in your party and the terrain permits, lowering the victim and attendant from above is easier than rappelling. After you’ve constructed a secure anchor and protected any abrupt edges with a backpack, you face the problem of lowering the weight of two climbers on one strand of rope. Conceptually, that requires four times as much holding power as a conventional rappel. You could use two brakes in series—a Münter hitch feeding into an ATC, for example. You could also use a Super Münter hitch without needing any other hardware. Either way, use an autoblock knot on the braking strand, just in case. If possible, the person doing the lowering should connect the autoblock to an anchor instead of his harness so he can be mobile and able to address any issues that arise during the lowering.
Once the victim is safely on terra firma, conduct a complete assessment and administer treatment called for. If you’ve made it this far without running out of daylight, you’ve done an excellent job. The next step is your evacuation plan. If you’ve ever rehearsed it, you know how incredibly difficult it can be to move a disabled patient along an easy trail; it’s even more difficult over rough ground without a trail. Special training and equipment is usually required to conduct a lengthy evacuation over steep terrain. If you can’t rule out spine damage, but the accident involved a mechanism of injury for cervical spine (such as violent whipping or impact to the head), you face the decision of continuing or hoping to get SAR assistance with backboard evacuation. Tough decisions for mountaineers, and another good reason to avoid falling and experiencing a self-rescue scenario.
Adding additional control when lowering heavy loads.
There are many variations of these techniques that skilled rescuers adapt to suit circumstances. Think through your plan and its possible consequences before you begin. Be certain you have the hardware, cordage, belay brakes, and rope length your plan requires. Use the simplest techniques that will get the job done. Avoid scenarios that involve tandem rappels. Avoid scenarios that involve raising the victim. Use an autoblock anytime you’re feeding rope through a rappel brake.
Hopefully reading this section has made you feel naked without good self-rescue skills, and you’ll be motivated to get some hands-on training. If you’re serious about learning self-rescue methods, do so with a group of experienced climbers. You’re way ahead if you can find qualified instruction. These techniques are so complex that errors are likely, so practice with every participant on a separate belay. Always keep in mind that a self-rescue situation may arise in the worst of conditions; you may be called upon to put your skills to work in a storm by headlamp, and your partner may depend entirely on your skills and judgment.