Cleansing Exercises are divided in two parts. The exercises of this first part should be done right after waking in order to create the urge to have a bowel movement. When you feel the need to go, do so immediately.
Immediately after rising from bed, refresh yourself by cleansing your mouth and teeth. This should include brushing your teeth, cleansing your tongue and massaging your gums with your fingers (after having washed your hands and fingers carefully.)
Next, prepare two big glasses (10 to 12 ounces each) of clean spring water. Set them aside. Then put into a quart-sized glass container two ice cubes made from clean spring water. Now pour the two glasses of water onto the ice in the quart-sized container.
Cut in half one medium-sized lemon. Juice it and strain this juice from one half of the lemon. Pour this juice into the water. Stir the water and lemon mixture until the ice melts.
Now pour some of this mixture into one of the two (10 to 12 ounce) glasses until the glass is almost full. Next pour this lemon water from the one glass into the other glass. Continue to pour the water back and forth in a very thin stream, holding the glasses farther and farther apart, up to about twelve inches apart. This causes the water to absorb vital energy from the air. The water breaks into small droplets which have a greater surface area permitting the water to absorb more oxygen, which is beneficial to your health and tastes better. Energy from the flowing water converts to energy that will activate and cleanse the digestive system. If possible, do this outside under the rays of the morning sun to enrich the water with even more energy.
Pour the lemon water back and forth three or four times and then drink it. Drink the mixture fairly quickly by taking big sips, but not gulps. With experience, you will be able to finish the first glass in 30 to 60 seconds, but at first just drink as fast as it is comfortable for you. Then, making sure that your breathing is settled, drink the second glass in the same amount of time. Be sure not to drink so fast that you swallow air.
The pieces of ice also play an important role. First of all, water from melted ice has special healing power. By mixing it with other water, the energy and information from the ice spreads throughout the mixture. Second, moderately cold water tends to activate the peristaltic action of the digestive system the same way cold pushes us to move and be active in order to create warmth. Upon drinking this water, the coldness in the stomach sends a wave of activity, which spreads through the whole gastrointestinal tract, including the large intestine. It activates the colon’s peristaltic action, which is most effective at that time of day.
Keep in mind that whatever is beneficial at one time of day may not be beneficial at a different time of day. For example, deliberately triggering the elimination process later in the day may interfere with digestion. Specifically, cold water drunk after a meal tends to hamper digestion since the digestive process needs to reach 102 degrees Fahrenheit to be optimally efficient. This wastes energy since the body must now heat the food back to 102 degrees Fahrenheit. Until this happens, digestion will be “frozen.” Strong internal coldness is not helpful to the other internal organs.
The lemon juice also has a very beneficial action in that it alkalinizes and disinfects the digestive system, and is a natural laxative.
Immediately after you finish drinking this lemon-water mixture, begin to do the first part of the Cleansing Exercises. Remember, the main reason for doing these exercises is to create the urge to have a bowel movement.
Following are descriptions of seven exercises to be done before going to the restroom. It should take only 10-15 minutes to complete them. It is not necessary to do all of them. You might feel the urge to go to the bathroom after five to twelve minutes. As soon as you feel “the urge to go,” go to the restroom. After eliminating, you might return to these first exercises, completing perhaps fewer repetitions if necessary, because they bring benefit to other areas as well as for colon emptying.
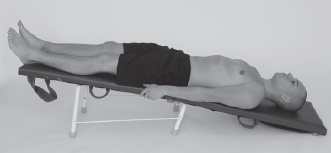
Lie on your back on the slanted board with your head down. If for any reason you feel you should not have your head down in this way, then do not do this exercise. If you have high blood pressure and have never done this before, lightly massage your face and head in order to prevent having stagnated blood in the head.

During the first week, as your system gets used to this head-down position, it may be best to limit this exercise to one minute at a time. Later you may tolerate the position longer, as long as 4-5 minutes. During this time it is beneficial to massage your abdomen in a clockwise direction. (Massage from the beginning of the large intestine up along the ascending colon, along the transverse colon, and down the descending colon, in order to physically assist the colon.)
The first exercise consists of lying in this head-down position, slowly raising and lowering your legs, then relaxing and breathing with your abdomen. Repeat. If you are able to do so, occasionally raise your legs up into the air until the toes are just past your head. Focus your mental attention on abdominal breathing rather than chest breathing.
Very often the urge to empty the colon comes right after this exercise.

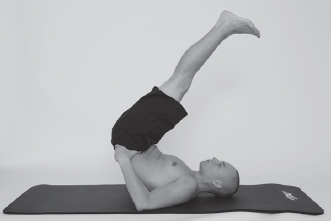
If you are physically strong, you may try to do the yoga exercise called viparita-karani mudra. This involves elevating the upper and lower body at the same time while supporting the trunk with the hands.
After this exercise it is recommended that you lie down on your back on a flat, horizontal floor and relax for 30-60 seconds. The goal of this horizontal relaxation is to spread the blood equally through the body and thereby normalize your blood pressure. Caution: Quickly standing up after being in a head-down position is harmful to the heart even though a healthy, strong person may not even notice it.
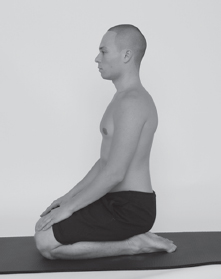
1. Kneel so that only your knees and toes touch the floor. (A thin cushion on the floor will protect your knees.) Place your palms on your upper thighs and inhale deeply and slowly. Lower your body until you are sitting on your heels. Your knees should be a little separated, your body should be upright, and the palms of your hand should be on your knees.
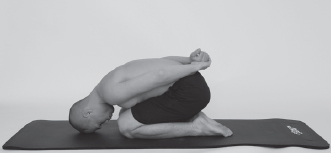
2. While in this position slowly inhale until your lungs are comfortably full. At this point put your hands in the small of your back. (A man should let his left hand grab his right wrist; a woman should let her right hand grab her left wrist.) Lean over forward, exhaling slowly, arching your back, and touching your abdomen to the top of your thighs. Bend over as far as you can; the ideal is to gently touch your head to the floor.
3. Hold your breath in this position for 1-2 seconds, or whatever is comfortable.
4. Then rise up slowly while inhaling gently to fill your lungs comfortably. To rise slowly, elevate your head first, then gradually your back, vertebrae by vertebrae. Simultaneously bring your hands back from behind you to place them palms-down on your knees.
5. By the end of the inhalation bring your body back to its original position and relax for the duration of one normal breath.
Repeat this exercise 3-5 times.
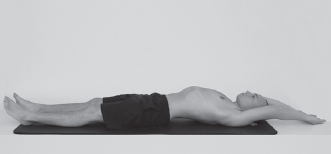
1. Lie on your back on the floor with your legs together and flat on the floor. Put your hands beside your body. Inhale gently but firmly.
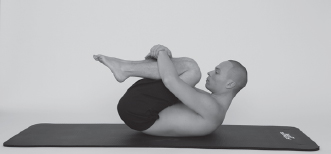
2. As you exhale, bend your knees and bring them toward your head. Embrace them with your arms. (If you are able, try to touch your forehead with your knees.)
3. In this position, inhale through abdominal breathing.
4. Hold your breath for 1-2 seconds.
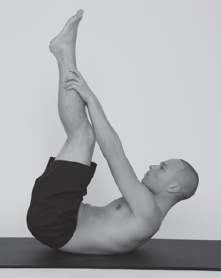
5. As you exhale, straighten your legs and hands toward a 90° angle to the floor, with the upper part of the body still elevated.
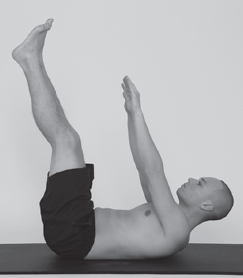
6. Hold this position for 1-3 seconds. Breathe freely.
7. Lower your legs and arms slightly to a 60° angle with the floor. Hold this position 1-3 seconds.
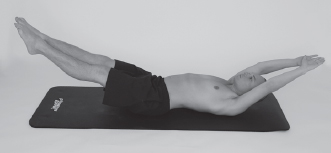
8. Lower your legs and arms slightly to a 30° with the floor. Hold this position 1-3 seconds.
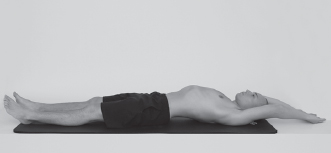
9. Now return to the starting position and relax.
Repeat this exercise 3-5 times. If you have any back problems, be careful performing position #7 and #8.
1. Lie on the floor face down. It will be more comfortable if you lie on a beach blanket or something similar. Breathe freely.
2. Bend your legs at the knees so that your feet come off of the ground and your heels begin to move toward your back.
3. With your hands, reach back and grab your ankles.
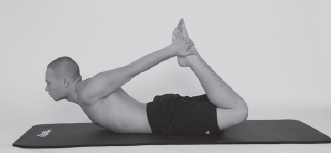
4. Lift your head back and back while looking ahead. This will elevate your chest slightly.
5. Arch your back by raising your thighs off of the floor and simultaneously raising your torso off of the floor. This should be done slowly and gently.
6. Hold this position for 1-3 seconds.
7. Now begin to rock gently forward and backward like a rocking chair. Then rock gently side-to-side. Breathe freely.
8. Gently stop rocking and slowly release your ankles. Carefully lay your arms and legs down on the floor, and return to the starting position. Relax and breathe freely.
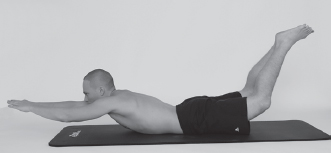
9. In the beginning, if you are not flexible enough to do this exercise, then you can do the variation shown in the picture below.
Repeat this exercise 2-3 times.
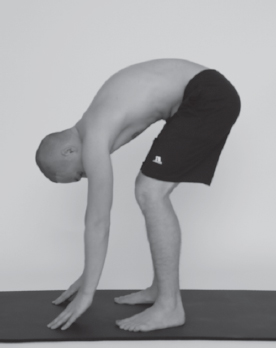
1. Stand upright with your body erect, with your feet spread about shoulder width apart and pointed forward.
2. While breathing freely, slowly bend your knees until your thighs and lower legs create an angle of approximately 120°. Try to keep your legs parallel not letting your knees spread apart while bending them.
3. Slowly bend your body at the waist until your abdomen rests on the tops of your thighs.
4. Let your arms hang down. If possible put your palms on the floor, fingers pointed forward.
5. Try to create pressure between your abdomen and your hips.
6. Move your center of gravity from your feet to your hands and back. Be careful not to lose your balance.
7. Repeat several times.
8. Exhale and then with a slow inhalation stand straight in your initial position.
1. Stand upright with your body erect, and with your feet spread about shoulder width apart and pointed forward
2. With a slow, deep inhalation through the nose, raise your hands above your head. Hold your breath for 1-2 seconds. Make sure you are stretching your torso and arms upward as if you were trying to reach the sky.
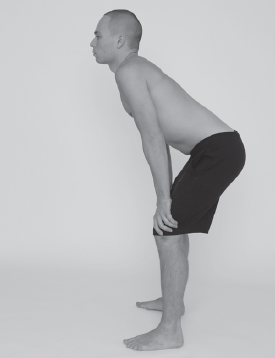
3. While slowly exhaling through your mouth:
4. Bend your body forward at the waist a little, keeping your back straight;
5. Bring your arms downward as you bend your body;
6. Place the palms of your hands on your knees, keeping your arms straight;
7. Bend your knees a little as well;
8. Bring your chin down tightly to your chest.
4. Hold your breath for 1-2 seconds and relax your abdominal muscles.
a. Gravity will tend to pull the abdominal muscles and the organs in your abdomen downward causing them to “drop down.”
b. This movement also pulls the diaphragm down, and automatically and subconsciously you will do a short, silent inhalation through your nose.
5. Right after that, contract your abdominal muscles and push air out through your nose to exhale in short, sharp breaths. (It sounds like you are blowing your nose.)
6. While in this position do a series (10-50) of these short, sharp breaths with full attention to your abdominal muscles. The breaths should be caused by quickly and strongly “bringing in” your abdomen. Relax a couple of seconds and repeat. In the future, you will be able to increase the number of series of this breathing exercise.
7. After the last exhalation, do a slow, deep inhalation. At the same time, bring your body to the straight position with your arms raised above your head.
8. With short, forced exhalations through your mouth, bring your arms down. Lips must be almost tight and make resistance to the outgoing air. It looks and sounds as if you want to blow out a candle. Exhale until your lungs are empty.
9. Rest 15-30 seconds and repeat this cycle three times.
This exercise is performed similarly to Exercises #6 above, and differs only in the breathing. In the second part, instead of breathing, you do movements while holding the breath.
1. Stand upright with your body erect, and with your feet spread about shoulder width apart and pointed forward.
2. With a slow, deep inhalation through the nose, raise your hands above your head. Hold your breath for 1-2 seconds. Make sure you are stretching your torso and arms upward as if you were trying to reach the sky.
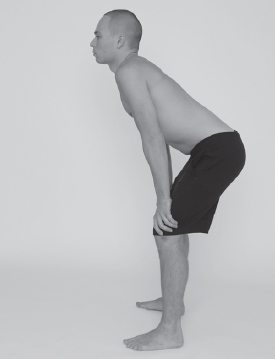
3. While slowly exhaling through your mouth:
a. Bend your body forward at the waist a little, keeping your back straight;
b. Bring your arms downward as you bend your body;
c. Place the palms of your hands on your knees, keeping your arms straight;
d. Bend your knees a little as well;
e. Bring your chin down tightly to your chest.
4. Exhale fully, as completely as you can;
5. Hold your breath as long as you can safely do so. Do not risk passing out.
6. While holding your breath, contract your abdominal muscles, (1 second).
7. Relax abdominal muscles (1 second).
8. Repeat this contraction and relaxation of your abdominal muscles while holding your breath.
9. Then, when you can barely hold your breath any longer:
a. Bend your body over and down toward the floor;
b. Stretch your arms downward as if trying to touch the floor;
c. At the same time, exhale the rest of the air from your lungs so that stagnated, old, and residual air is forced from your lungs.
10. After the last exhalation, do a deep, slow inhalation while bringing your body to the upright position with your arms raised above your head.
11. With short, forced exhalation through the mouth, bring your arms down. Lips must be almost tight and make resistance to the outgoing air. It looks and sounds as if you want to blow out a candle. Exhale until your lungs are empty.
Depending on differences in individuals, you may feel the urge to empty your colon immediately after doing the exercises, 5-10 minutes later or even 1-2 hours later. Also you will not always need to do all of the exercises to get good results. Quite often you will feel the urge to go to the bathroom on the second, or even the first, exercise. Even if, once in a while, your eating habits are less than the best (not having enough bulk, fresh fruits and vegetables, whole grains, for instance), you will still feel the signal of a strong urge to empty your colon during these exercises.
When you get that “call of nature,” it is important to go to the restroom immediately, where you will do the second set of Cleansing Exercises. The exercises described in Part II below, are designed to empty your colon more easily and completely.
The influence of water and the exercises. If you eat your supper at least four hours before going to bed, your food will leave your stomach and go to the small intestines before you retire for the night. If you must eat your evening meal closer to bedtime than that, you should make sure that your food is both softer and easier to digest in order for your food to get this far along.
If you do this, your small intestine and the beginning of your large intestine will absorb nutrients during the night. By the time you wake up in the morning, the stomach and the small intestine will be essentially empty.
If you drink cold water in the morning, it will stimulate the peristaltic action of the colon, causing it to empty itself more readily. This is because the coldness of the water prevents the digestive system from absorbing the water as quickly as it would warmer water. The exercises take advantage of this simple fact by helping to move the cold water through the stomach and small intestine down into the large intestine. On its way, the water meets the waste in the large intestine. Here water saturates the waste, softening it and increasing its volume. The coldness of the water, and the energy of falling water, activate the colon. The laxative nature of lemon juice in the water, and the body’s natural inclination to empty the colon in the morning, combined with the Cleansing Exercises, all help the elimination process to function more smoothly. These factors come together to create a thorough cleansing reaction in the large intestine, which can be felt as a strong, natural urge to empty.
When you feel the urge, go promptly to the restroom and empty the colon immediately. If you need further assistance (beyond these first exercises), there is another complete set of exercises designed for the restroom. These are described in Part II.
Before describing the exercises in Part II, it is appropriate to explain some conditions this book seeks to prevent. These conditions can happen to any beginner, especially if his or her colon is weakened by constipation or bad diet.
The large intestine is divided into three parts: ascending colon, transverse colon, and descending colon. The most polluted part is usually the ascending colon. Also, the “corners” or bends in the colon become traps for sticky waste.
In the rectal area (right before the anus), a large amount of reabsorption of water can take place. If incoming foods have little ability to hold moisture, and if waste stays in the colon for more than 12 hours, this waste dehydrates excessively and converts to colon stones. This is especially true if you drink less much water than you need.
Colon stones occur when fecal matter forms into spherical or football-shaped balls that are more firm than normal waste. These stones are usually marble-sized or smaller, but can occur up to golf-ball size. They tend to compact into very hard waste packages or stools composed of many stones. These can be easily seen in the stools. These hardened bowel movements, sometimes called “piles,” effectively block the stimulation of the colon to empty even when full.
Colon stones have two very bad characteristics. First, this waste is drier than normal, making it harder to expel. It is stickier and does not slide out as easily. Second, as the waste stays in the colon for extended periods of time, more waste is added, increasing both length and diameter of the waste package. The combination of these two characteristics can lead to hemorrhoids and anal fissures.
Hemorrhoids are caused when this oversized, drier waste pulls sensitive anal tissues out of place so that they are exposed (visibly) in the rectum. Hemorrhoids itch, hurt, and/or burn, making sitting down a misery. This same oversized, hardened waste package can become so large in diameter that the expulsion of the waste splits the rectum, causing bleeding. In this case, blood is seen on the stool or in the toilet water. This condition is painful and can also lead to infection in the open wound.
Diet and lifestyle are major contributors to colon stones. Until you can correct these causes, there are specific things you can do to help pass these hardened stools. After completing the first set of exercises, insert a small amount of water (100-200 grams) directly into your rectum by using the following method:
1. Use an enema syringe with a volume of 100-200 grams.
2. If you like, add one tablespoon of cold pressed, virgin vegetable oil to the clean water. Both the water and the oil must be at room temperature.
3. Make sure there is no air in the enema syringe and that the syringe is full.
4. Lubricate the nozzle of the enema syringe with petroleum jelly.
5. Slowly and gently insert the nozzle into your rectum. It is recommended that you do this while standing.
6. Slowly inject the water and oil into the rectum. Hold this water for a minute or two if possible to let the water soften the outer edge of the hardened waste.
7. Sit on the commode and try to expel the water and the stool. If you were not successful, you will need to repeat this procedure again. If everything is close at hand and ready, this procedure will not take more than 1 or 2 minutes. As soon as the “waste plug” is removed, your colon will begin to respond to the exercises.
For a better understanding and a demonstration of exercises 6 and 7 you can order the DVD Colon Rejuvenation, which helps you see more details, do the exercises correctly, and gain more benefits.