
The large intestine is basically a long, tubular muscle with the ability to squeeze itself progressively along its length, moving the waste as it squeezes.
Over time, the inside of the colon becomes coated with old, hardened waste, which pushes out the colon walls and resists its muscular contractions. These conditions cause the muscles of the colon to stretch and atrophy.
When a person becomes constipated from old waste accumulated in the colon, he or she may try to overcome this problem by straining. This straining causes improper pressure on the internal organs and may lead to other problems, such as hemorrhoids and anal fissures.
Some people try to solve the problem by taking laxatives. Laxatives irritate the colon walls toward ulcers or more serious problems, and they can create a dependency.
Therefore, in order to improve colon function, the first goal is to remove the source of the difficulty.
To help eliminate as completely as possible, it is useful to do the second set of Cleansing Exercises in the restroom. These exercises will assist and strengthen the weakened muscles of the colon.
For most people it is best to perform the exercises as written. However, as you gain familiarity with the different exercises, you will discover which exercises produce the best results in your situation. As you learn the operating principles behind them, you will create variations that are tailored to your body to obtain maximum results for you.
Which exercise is best varies from person to person, and may change for each person from day to day as a result of varying food and other personal conditions. You may notice that material moving through the colon may move with greater difficulty in one place than in another. This will be felt as pressure, discomfort or even as a small pain. (You can feel this best in a clean, or relatively clean, colon.)
In order to maximize the effectiveness of these exercises, it is helpful to discover where these difficult areas of the colon are for you. The location of such difficult areas will determine which exercises are most appropriate. If, after a few minutes, a particular exercise does not produce the desired results it is appropriate to go to a different exercise. Remember, never use direct pressure in the area of the anus as this can worsen, or even cause, hemorrhoids.
After emptying, the colon muscles relax and rest for a few minutes. In order to help them rest and relax, one of the exercises from Part II, specifically the exercises that include arching your back, will be useful.
In order to give your colon extra strength for extra cleansing, it is recommended that you do the following exercises. I have practiced these exercises for years and create new variations all the time. You will find some exercises more productive than others, and will probably use your experiences to develop your own variations. As you practice this second set of exercises you will understand the principles in operation and match these principles to your own situation.
All but the last exercise of the “Throne Room Exercises” involve sitting on the toilet and bending over at the waist. The purpose for this is to put pressure on the abdomen using the arms or thighs in order to stimulate the colon. Generally, pressure is put on the right side first to stimulate movement in the ascending colon. Then pressure is put on the left side to stimulate movement in the descending colon. This follows the natural flow of waste through the large intestine. There are variations of some exercises that call for pressure to be put on the entire colon at one time.
Now, while sitting on the commode in the restroom, begin the exercises of Part II, which are designed to help you eliminate a large amount of feces without causing tension in the rectal area. After each exercise you should rest before going to the next exercise. As a rule, Cleansing Exercises provoke two to four and more ejections from the colon. Always rest after each ejection.
If for some reason you feel that one of these “royal” exercises is not giving you satisfactory results, you will likely need to change your body position. This can be accomplished either by arching your back toward your legs, or by twisting your back to one side or the other.
Try these exercises and see which ones produce the best results for you.

1. Sit on the commode with your body upright.
2. Bend your right arm at the elbow. Put your forearm on your right thigh and place your upper arm against your rib cage.
3. Bend your body to the right.
4. Bring your left arm up straight; stretch the left side of your body.
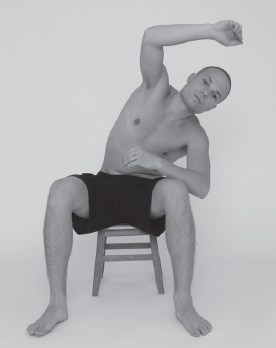
5. At the same time create resistance with your right arm by pressing on your right thigh. (Very often it is at this moment that the emptying of the large intestine begins.)
6. Push with your right arm to bring yourself upright again.
7. Now do the same thing on the other side.
8. Put your left arm, bent at the elbow, on your left thigh.
9. Bend your body to the left.
10. Bring your right arm up straight; stretch the right side of your body.
11. At the same time create resistance with your left arm by pressing on your left thigh. (Generally, this last step helps to finish the first ejection from the colon.)
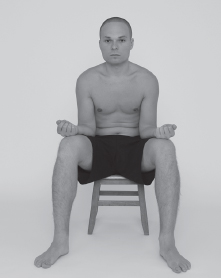
1. Sit on the commode with your body upright.
2. Spread your knees widely but comfortably.
3. Bend your right arm at the elbow and place the elbow into your body at the waist. Keep your right forearm parallel to and touching your right thigh. Your upper arm should be against your rib cage. With your right open, palm up, lean into your right arm and right thigh in order to put pressure on your ascending colon.
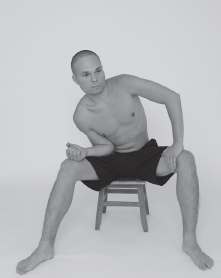
4. Simultaneously, place your left hand on the inside of your left thigh next to your knee. Your left hand should have its palm against your leg and the fingers on your left hand should be pointing downward. Your left arm should be straight. Push against your left leg.
5. As you are doing this with your arms and legs, arch your back forward in order to put pressure on your ascending colon.
6. Hold this position for 5-10 seconds.
7. Bend your left arm at the elbow and place the elbow into your body at the waist. Keep your left forearm parallel to and touching your right thigh. Your upper arm should be against your rib cage. With your left open, palm up, lean into your left arm and left thigh in order to put pressure on your descending colon.
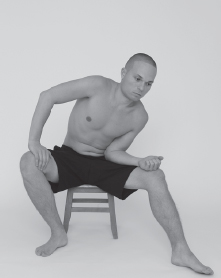
8. Simultaneously, place your right hand on the inside of your right thigh next to your knee. Your right hand should have its palm against your leg and the fingers on your right hand should be pointing downward. Your right arm should be straight.
9. As you are doing this with your arms and legs, arch your back toward your legs in order to put pressure on your descending colon.
10. Hold this position for 5-10 seconds.
11. Go back and forth from one side to the other as needed.
1. Sit on the commode with your body upright.
2. Spread your knees widely but comfortably.
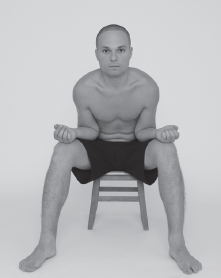
3. Bend both arms at the elbow and place your elbows into your body at the waist. (Some will be able to place their elbows just inside the pelvic bones.) Keep your forearms parallel to and touching your thighs. Your upper arms should be against your rib cage. With your hands open, palms up, lean into your arms and thigh in order to put pressure on your entire colon.
4. As you are doing this with your arms and legs, arch your back toward your legs in order to put pressure on your ascending colon.
5. Hold this position for 5-10 seconds.
1. Sit on the commode with your body upright.
2. Arch your lower back toward your legs.
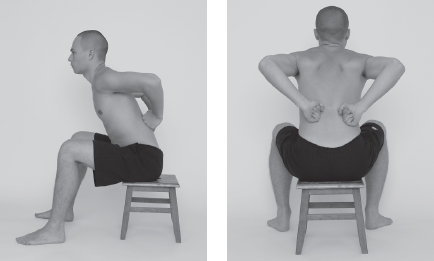
3. Place both of your fists against your kidneys (lower back) so the left fist is placed against the left kidney and the right fist is placed against the right kidney.
4. Equally, and at the same time, press against both kidneys with your fists while arching your back toward your legs
5. Gently release the pressure equally and at the same time.
6. Repeat several times.
1. Sit on the commode with your body upright.
2. Arch your lower back toward your legs.
3. Put your arms behind your back.
4. Bend your arms at the elbows.
5. Connect your right hand to your left elbow and your left hand to your right elbow, so your forearms are snuggled tightly to each other behind your back. (Exercise #5 is similar, see picture above.)
6. Press on your lower back with your forearms.
7. Relax your arms gently to release the pressure.
8. Repeat a couple of times.
1. Sit on the commode with your body upright, legs spread apart.
2. Bend your right arm at the elbow in front of you.
3. Make a fist with your right hand using only four fingers and leaving the thumb extended.
4. Put your right fist on the right lower part of the abdomen with the right thumb pointing outward.
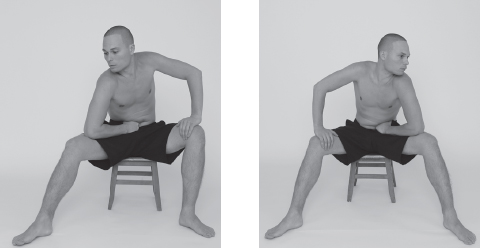
5. Turn your elbow toward whatever is in front of you so that your abdomen and forearm form a 90° angle (approximately). Make sure the right elbow is pointed approximately the same direction as your right knee (away from your body).
6. Press with your right fist into the right lower part of your abdomen.
7. Bend your body over and a little to the right.
8. Try to put your right forearm on your right thigh.
9. Put your left palm on the inner part of your left thigh and press.
10. Try to resist the incoming pressure with your left thigh.
11. Do slow, deep abdominal breathing, which will increase the pressure on the lower right abdomen.
12. Stay in this position as long as you can, comfortably, or until you get results, but not longer than one minute.
13. Change to the other side.
1. Sit on the commode with your body upright, legs spread apart.
2. Bend both arms at the elbow in front of you.
3. Make a fist with each hand using only the fingers and leaving the thumbs extended.
4. Put your fists on the lower part of your abdomen with the thumbs pointing outward.
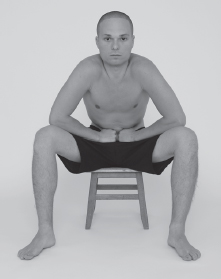
5. Turn your elbows toward whatever is in front of you so that your abdomen and forearms form a 90° angle (approximately). Make sure the elbows are pointed approximately the same direction as your knees (away from the body).
6. Press with your fists into the lower part of your abdomen.
7. Bend your body forward to put pressure on the entire colon.
8. Try to put your forearms on your thighs.
9. Do slow, deep abdominal breathing, which will increase the pressure on your lower abdomen.
10. Stay in this position as long as you can, comfortably, or until you get results, but not longer than one minute without resting
Caution: Do this exercise only if you do not have a history of back problems. If you do have any kind of back problems, do not do this exercise. When performed it should be done slowly and carefully, always releasing gently.
1. Sit on the commode with your body upright.
2. Spread your knees.
3. While keeping your left arm straight, place it between your legs, hanging down.
4. Place your left arm inside of the crook of your left knee and grab your left calf with your left hand.
5. Press against the inner part of your left thigh with the back of your left arm.
6. Press back with your left thigh against your left arm to increase your ability to twist.
7. Put your right arm behind your back.
8. Bend your right arm at the elbow.
9. With your bent right arm behind your back, carefully try to reach your left hip with the fingers of your right hand.
10. At the same time, slowly and carefully turn the body (right shoulder and head clockwise) as far around as possible. Some people who have more flexibility will possibly be able to reach far enough to grab the inner surface of the left thigh with the right hand.
11. Stay in this position a couple of seconds.
12. While in this position, do slow, deep abdominal breathing.
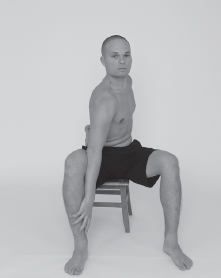
13. Stay in this position as long as it is comfortable. Do not exceed one minute.
14. Very slowly unwind from this position, and rest a few seconds.
15. Perform the same exercise on the other side.
1. Sit on the commode with your body upright.
2. Spread your knees.
3. While keeping your right arm straight, place it between your legs, hanging down.
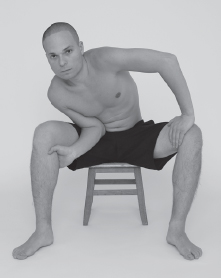
4. Insert the palm of the right hand (from the inside) up under your right knee, gripping the upper calf with the thumb on the inside and the four fingers on the outside of the right calf.
5. Bend your right arm at the elbow and lean your body into your elbow.
6. Press into your abdomen with your right arm.
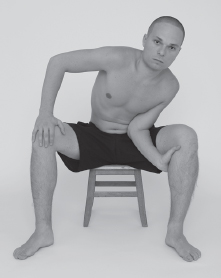
7. Put your left palm on the left knee, fingers on the inner part of the knee.
8. With your left palm press on the inner part of your left knee.
9. Resist with your left leg.
10. Stay in this position a couple of seconds.
11. Put pressure on the right fore arm, releasing the pressure on the left leg.
12. Then put pressure on the left leg, releasing the pressure on the right fore arm.
13. Change to the opposite position.
14. Repeat this exercise a couple of times.
(This is the same as the previous exercise except it uses both hands simultaneously.)
1. Sit on the commode with your body upright.
2. Spread your knees.
3. While keeping your arms straight, place them between your legs, hanging down.
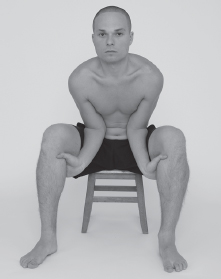
4. Insert the palms of your hands (from the inside) up under your knees, gripping the upper calves with the thumb on the inside and the four fingers on the outside of your calves.
5. Bend your arms at the elbows, which automatically will bend your body forward.
6. Press into your abdomen with your arms.
7. Stay in this position a couple of seconds.
8. Release gently and relax.
9. Repeat this exercise a couple of times.
P. S. By pressing on your right forearm, you press on the right part of your abdomen, where the ascending colon is located. By pressing on your left forearm, you press on the left part of your abdomen, where the descending colon is located.
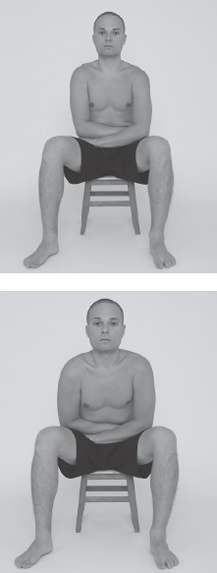
1. Sit up straight on the commode.
2. Spread your knees.
3. Arch your lower back toward your legs.
4. Put your left palm on top of your right upper thigh toward the hip.
5. Put your right palm on top of your left upper thigh toward the hip.
• Make sure the fingers on each hand are tightly together.
• Make sure the forearms are tight to the abdomen.
6. Bend at the waist and push your forearms into your abdomen. This will put pressure on the colon.
Exercises 12 through 16 are neck exercises based on Japanese professor Nishi’s belief that one of the reasons for constipation can be a dilated valve between the stomach and the small intestines. He believes that this is a result of weakening of the fifth vertebra (the neck).
As a result of this valve problem, acid from the stomach goes to the small and large intestines and neutralizes the bile. This leads to a weakening of the function of the colon, and therefore to constipation. (Constipation produces CO2. The accumulation of CO2 leads to strong body poison and whole body toxicity.)
In order to bring your vertebrae back to normal, you will probably need to see a chiropractic doctor. However, in order to restore your neck muscles, and then maintain them in good condition you might need to strengthen the neck muscles and increase the mobility of the neck in all directions.
This can be achieved with simple exercises for the neck. If you have any kind of neck injury, consult with your personal health practitioner to be sure that you will not strain or otherwise negatively impact your neck.
1. Sit on the commode with your back straight.
2. Spread your knees.
3. Put the palms of your hands on your knees.
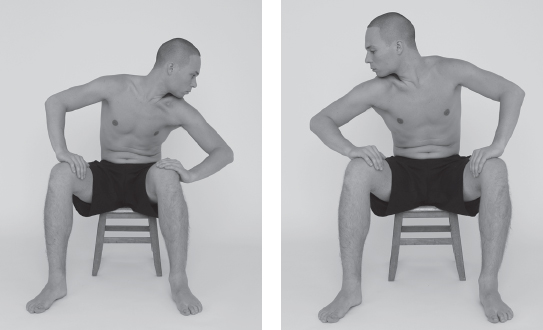
4. Turn your head gently to the left. Try to reach your left shoulder with your chin. (The first few times you do this, it is acceptable to elevate your left shoulder somewhat.)
5. Now, turn your head gently to the right. Try to reach your right shoulder with your chin. (The first few times you do this, it is acceptable to elevate your right shoulder somewhat.)
6. Repeat this sequence 5-10 times on each side.
1. Sit on the commode with your back straight.
2. Spread your knees.
3. Put the palms of your hands on your knees.
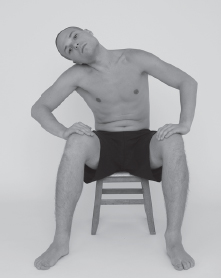
4. Bend your head to the left, trying to reach your left shoulder with your left ear. If you cannot do it the first couple of times, it is acceptable to elevate your shoulder somewhat.
5. Bend your head to the right, trying to reach your right shoulder with your right ear.
6. Repeat 5-10 times on each side.
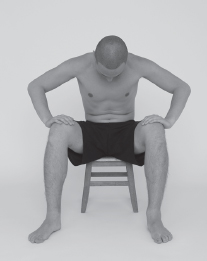
1. Sit on the commode with your back straight.
2. Spread your knees.
3. Put the palms of your hands on your knees.
4. Bend your head forward, trying to touch your chin to your chest.
5. Lift your head up and look at the ceiling, stretching your neck muscles.
• Do not bend your head backward.
6. Repeat 5-10 times.
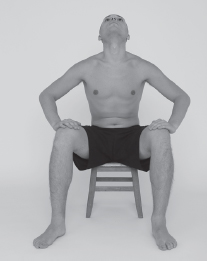
1. Stand, or sit with your back straight, looking straight ahead.
2. Without moving your neck or shoulders move your head straight forward by stretching your chin out in front of you. Keep your head level, parallel to the floor plane.
3. Move your head straight backward to the initial position. (This exercise is similar to the movement of a goose’s head.)
4. Repeat 10-15 times.
1. Sit up straight on the commode.
2. Bend your right arm at the elbow.
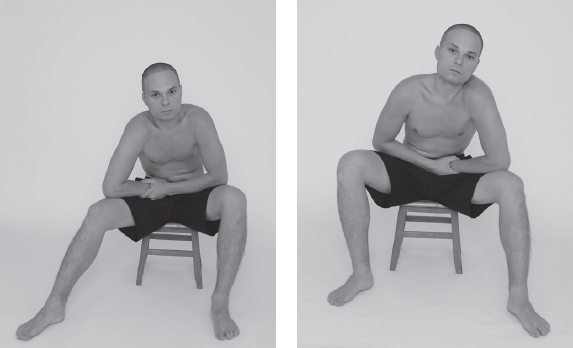
3. Make a fist with your right hand.
4. Press your right fist on the right lower part of your abdomen, with your right elbow directly above your right knee.
5. Insert your left palm under your right wrist.
6. Take hold of your right wrist with your left hand.
7. Press your left forearm to the left part of your abdomen.
8. Bend your body forward and a little to the right.
9. Bring the back of your left hand and your right forearm to meet your right thigh.
10. By bending forward, continue to press with your right fist on the right lower part of your abdomen.
11. With your left arm try to keep and even pull your right arm and fist more tightly to your abdomen.
12. Stay in this position for some time.
13. Repeat this procedure on the other side using your left fist.
1. Sit on the commode with your back straight.
2. Spread your knees about shoulder width apart.
3. Arch your lower back so that your abdomen touches your thighs.
4. Let your arms hang down straight beside your legs with your arms on the outside of your legs.
5. Keep your arms against the outside of your legs.
6. Put your hands on top of your feet and grab the inside of your arches with your fingers. (If you are unable to reach that far grab as far down as you can on your legs.)
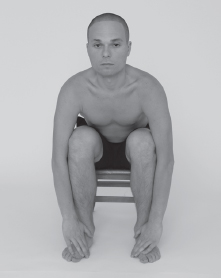
7. Tense your fingers. Tighten your arms to your legs. Tighten your abdomen to your thighs.
8. Raise your chest and your head as much as you can.
9. Inhale
10. Stay in this position for as long as is comfortable.
11. Relax, rest, and repeat.
1. Sit on the commode with your back straight.
2. Spread your knees about shoulder width apart.
3. Bend your body forward at the waist, making sure that the right thigh is in front of the ascending colon and the left thigh is in front of the descending colon.
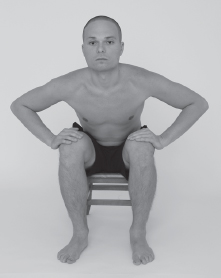
4. Curve your lower back area so your abdomen touches your thighs.
5. Bend your arms at the elbows.
6. Place your palms on the outside of your knees
7. Use your arms to try to bring your knees closer together.
8. At the same time, use your legs to resist bringing your knees together.
1. Sit on the commode with your back straight.
2. Spread your knees about shoulder width apart.
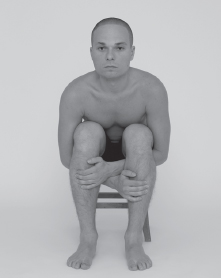
3. Arch your lower back so your abdomen touches your thighs.
4. Bend your arms at the elbows.
5. Put your forearms beneath your knees.
6. Let your arms cross themselves there.
7. Grasp the right ankle with the fingers of the left hand and the left ankle with the fingers of the right hand.
8. Tense your fingers. Tighten your arms to your legs. Tighten your abdomen to your thighs.
9. Extend your chest and your head as much as you can.
1. When in one of the final positions mentioned above, with your abdomen against your thighs and your arms in one of the variations mentioned above, twist your body, keeping the right part of your abdomen still against the right thigh while lifting a little the left part of your abdomen and elevating your left shoulder. This position increases pressure on the right ascending part of your colon.
2. Do this on each side (right and left) and switch out every couple seconds.
You may be able to find a special foot rest that will be very helpful in some of the exercises described above. This foot rest is designed to stay under the commode and bring you closer to the squatting position, the natural position for emptying the colon. Variations of the above exercises can be done in combination with this special footrest under your commode. In some cases, this combination gives good results. The use of this special footrest can increase the benefits of the second set of these Cleansing Exercises.
Pictured here without explanation are some additional exercises to be done with the foot rest. More explanation about these exercises will be included in the video.
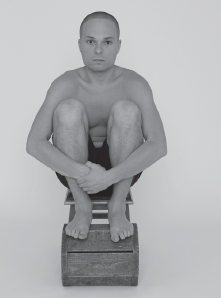
For information on where to get a sepcially designed footrest, or the video, call Koyfman Whole Body Cleansing.
To conclude this description of Cleansing Exercises, I want to bring to your attention one more important feature. Cleansing Exercises not only help you to empty your colon completely everyday. They have a huge health influence on your whole body because cleansing affects the operation of the joints, spine, lungs, internal organs, lymphatic system, glands, etc., activating the blood supply and circulation, lymphatic drainage, and the circulation of energy in the channels.
You are made stronger not only in your colon muscles, but in your entire body as a whole.
All these exercises can be done with a minimum amount of time spent. It is better to be doing one or more of these exercises than just sitting there pondering the wallpaper across from you.
In order to help the colon to achieve repeated evacuations, the following techniques may be used:
1. Every exercise from Part II combined with deep abdominal breathing in the final (static) position.
2. Breathing Exercise, Part I, #6, done in the sitting position.
3. Put your hands with spread fingers on your abdomen so that the fingers of one hand are in front of the fingers of the other hand. Press your fingers one by one, creating a wave of pressing and releasing movements on your abdomen. At the same time, try to create some resistance, by bulging your abdomen against your fingers. Breathe freely.
4. Massage your hands in specific places such as the “web” of the hand. This is the fleshy part between the thumb and first finger. Try to massage this area with a circular motion, circling first in one direction and then in the other
5. The Lion’s Yawn
a. Put the palms of your hands on your knees.
b. Inhale deeply through your nose.
c. Slowly exhale through your mouth. As you exhale, open your mouth as widely as you can, sticking your tongue out as far as you can. This should tightly strain the entire tongue, which is of course a muscle. (This stretch looks like a big yawn).
d. Hold your breath in this position for a couple of seconds.
e. Abdominal muscles and arm muscles must be tight.
f. Relax and inhale slowly through the nose.
g. Repeat two to four times
Note: The tongue and the mouth are the beginning of the digestive system. Tension in the tongue, the first link of the system, sends a message through the whole chain.
6. Stand up straight and use your hands to feel your abdomen for tense areas. When you find one, press it with your fingers at this specific area with moderate strength. Keep this pressure for little while. If you need to apply a little extra pressure, you can do abdominal breathing at the same time.
The goal of these Cleansing Exercises is more than to help your colon empty itself. There are other, related benefits as well. These include a feeling of emptiness in the colon that translates into a feeling of lightness in the rest of the body, a sensation of physical comfort that is reflected in emotional well being, and an increase in physical energy due to feeling clean inside.
To make sure that all waste is removed, you need to gently feel your abdomen with your fingers. (Fingers should be perpendicular to the abdomen.) If your abdomen feels relaxed and calm, then your colon is as empty of waste as it can be at the time. It also means you are finished with the morning exercises.
Sometimes colon gases and small amounts of waste remain in the lower part of the rectum, right in front of the exit (anus). This can create discomfort for the rectal walls and anus. The colon cannot create enough pressure to remove this material because of its very small amount.
There is a technique to help your colon to get rid of this remainder and the associated discomfort. Using a small enema syringe introduce 100-200 mg. of clean, purified water into the rectum. Release immediately. This should be done in the standing position. Do not forget to lubricate the tip before introduction.
If the first introduction of the water does not produce the desired results, you may repeat it once or twice. This flushing of the rectal area with a very small amount of water can not be compared even with an enema. (It is more like rinsing your mouth with water to remove small particles of food after eating.) This simple technique will help maintain your health by helping to prevent hemorrhoids, inflammation of the prostate, etc.
This procedure ends the morning program of cleansing of the large intestine. By learning how to do it correctly and quickly, you will forget what constipation is. You won’t want to lose the benefits that this will give you.