CHAPTER 8
Techniques
 Whenever a technique or an explanation relates to only one chapter, it will normally appear in that chapter. However, a number of techniques have application in more than one chapter. Such techniques are explained here. It is a good idea to become familiar with the contents of this chapter so you can refer to whatever may be helpful.
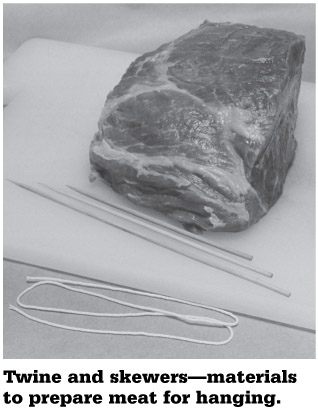
Hanging with a Skewer and Twine Loop
If you wish to hang a hunk of meat for drying or smoking, one of the best methods is to use a skewer and a loop of butcher’s twine. It is fast and easy, and it disfigures the meat much less than hooks. Furthermore, if the meat is thin, the skewer may prevent horizontal curling.
- Select a bamboo or stainless-steel skewer at least 1 inch (2.5 cm) longer than the width of the meat. (Asian grocery stores usually stock bamboo skewers of assorted lengths.)
- Cut a piece of butcher’s twine about four times the width of the meat.
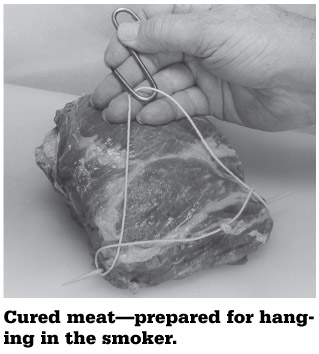
- Push the skewer through the meat near one end of the hunk.
- Tie the two ends of the twine together, and then pass the twine over the skewer ends and under the loop, as illustrated in the photo. The meat can now be hung directly on a support rod, but the use of an S hook on which to hang the twine is more convenient.
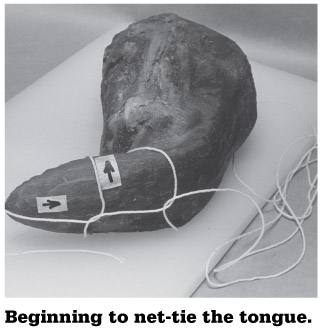
Net-Tying
Net-tying is a good way to hang meat in the smoker, and it makes a very attractive finished product. For some reason, a net-tied product looks like “the real thing.” It is particularly attractive on beef tongue, hunks of ham, or large sausages. It does have one disadvantage: It takes more time to net-tie than it does to lay the product on a smoking rack or to hang it with a skewer and a loop of twine. However, net-tying will become faster and easier as you gain experience.
The irregular shape of a beef tongue makes it one of the more difficult items to tie, so the beef tongue will be used to illustrate the procedure. You can practice this technique without using meat. Instead of meat, use a block of wood or any other object.
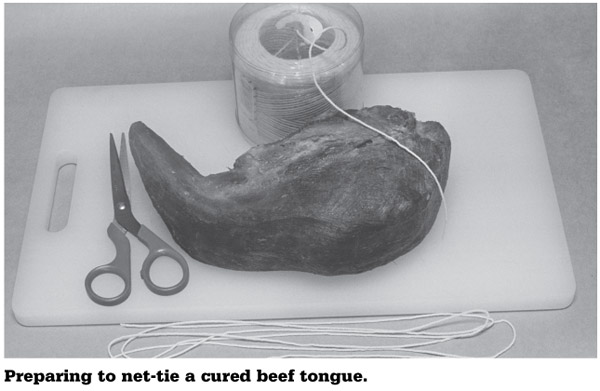
- Cut a piece of butcher’s twine about eight times the length of the tongue.
- Hold the twine over the tip of the tongue, leaving about 6 inches (15 cm) of twine to spare. Bring the long end of the twine about 2 inches (5 cm) from the tip of the tongue (on the top), and put your left thumb on top of the twine (if you are right-handed). If you press the twine with your thumb, you can bend the twine 90 degrees and wrap it completely around the front part of the tongue.
- Feed the long end of the twine under the bend (at the point where you were pressing with your thumb).
- Again, bring the twine along the top until it is about 4 or 5 inches (10 to 12 cm) from the tip the tongue. Do just as above: Press down with the thumb, wrap around, and feed the long end under the bend in the twine. Do the same thing two more times.
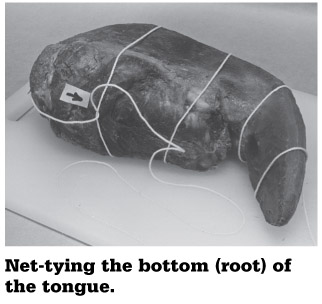
- On the bottom (root) of the tongue, feed the long end of the twine over and under each place that the twine has been wrapped around the tongue.
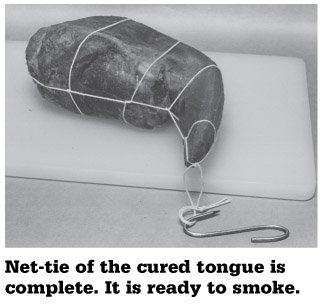
- Make a knot at the tip of the tongue. Then tie the two loose ends together about 2 or 3 inches (5 to 8 cm) from the tip of the tongue. If desired, make a loop, and insert a hook in that loop.
- To prevent slippage, use eight short pieces of twine to tie a knot at each of the eight points where the twine intersects. (The knots are not shown in the photograph.)
Expelling Air from Plastic Bags
After putting raw material or product in a plastic bag, it is advisable to expel most of the air before sealing. This is especially true in the following situations:
- The product or raw material will be frozen.
- The finished product will be cooked using the hot water cooking method described later in this chapter.
- The raw material will be thawed using the cold water thawing method.
A simple technique will expel almost all of the air. First, fill a deep pan with cold water. Put the material in a plastic bag, and then immerse the bag in the water while keeping the open end of the bag above the waterline. Push the bag down until the water pressure has forced the air out; twist the bag closed, and seal it.
Thawing
Instead of using fresh material, frozen meat, frozen fowl, and frozen fish are often thawed, cured, and smoked. Smoked products made of thawed raw material are usually indistinguishable from those made of fresh material. However, it is best if the raw material has been properly frozen, properly thawed, and used as soon as possible.
Microwave thawing is widely used for general household and commercial food preparation, especially for foods that are to be cooked soon. However, it is not suitable for most of the processing described in this book:
- A microwave oven causes uneven thawing.
- Some parts of the material are warmed excessively, especially the edges.
- The material is sometimes partially cooked.
Removing raw material from the freezer and thawing it at room temperature is another bad way to thaw; the surface and the thin parts of the material will thaw quickly, and they will remain at a relatively warm temperature while the thicker parts continue thawing. Bacteria could begin to multiply on the warmer parts of the raw material. The conditions might not be bad enough to cause food poisoning, but the quality of the finished product will suffer. It is best to use one of the recommended thawing methods that are explained below.
REFRIGERATOR THAWING
If the raw material is to be thawed in a refrigerator, the refrigerator should be set to between 36º and 40º F (2.2º and 4.4º C). Thawing in a refrigerator is a very good method for most kinds of food. There is one disadvantage, however: Refrigerator thawing may require considerable time. Four days, or more, might be required to thaw a turkey, for example.
COLD WATER THAWING
If cold water thawing is employed, the pieces of raw material must be sealed in plastic bags to prevent absorption of water (this is important). It is best to put only one piece of raw material in each bag. Remove as much air as possible. Place the bagged material in a deep container, and fill the container with cold tap water. The material should be pressed below the surface of the water. Set the container in a sink, and allow a thin stream of cold tap water to run into the container—or change the water in the container from time to time.
A large joint of meat (a primal cut of top sirloin, for example) might require only a number of hours to thaw in cold water, but the same joint of meat might require several days to thaw in the refrigerator. This will be true even if the temperature of the water in the container is the same as the temperature of the air in the refrigerator. Why does cold water thaw more effectively? The heat conductivity of water is much greater than that of the air in the refrigerator. Consequently, thawing is much faster in water—even if the thawing temperatures are the same.
Cold water thawing can be used in combination with refrigerator thawing. Even if you began the thawing in the refrigerator, you can finish it quickly in cold water. This is especially useful when you have underestimated the refrigerator thawing time, and you need to begin your processing schedule.
Finally, some people (like me) believe that fish should always be thawed quickly in cold water. Deterioration of the flesh begins to occur when fish starts thawing. Consequently, quick thawing in cold water will result in fresher fish.
Surface drying
Traditional smoking requires that the surface of the product be reasonably dry before smoking begins. If the surface is not dry, smoke will dissolve in the surface moisture, and this will cause an uneven coloration and an unpleasant taste.
Food smoking books often suggest that the product be hung, unwrapped, in a refrigerator overnight. I do not suggest this method of drying in this book because it is troublesome and because most people, including myself, usually do not have enough refrigerator space to accommodate all of the product.
The technique for surface drying that I have developed requires the use of paper towels and newspaper. The product is not hung; it is stacked on the refrigerator shelf after being wrapped with paper towels and newspaper. If this technique is used, very little refrigerator space is required.
The next morning, the paper is removed and discarded. Almost all of the surface moisture will have been absorbed by the paper. After subjecting the product to about 140° F (60 ° C) for about an hour or so, the surface will be dry and smoking may begin.
Hot Water Cooking
Sausages are commonly cooked in hot water. I use a method of hot water cooking for cooking various kinds of smoked meats, including medium- and large-diameter sausage. The technique is a useful alternative to cooking the product in a steamer, a hot smoker, a water smoker, or a kitchen oven. The method of hot water cooking described below is suitable for red meat and for fowl that is being processed in pieces. It is not a good method for cooking fish.
Hot water cooking has many advantages:
- Hot water cooking between 170º and 200º F (76.7º and 93.3º C) does not dry the product nearly as much as cooking it in an oven or in a hot smoker without a water pan.
- If the product is cooked in hot water, shrinkage is less than cooking it in a kitchen oven or cooking it in a hot smoker without a water pan.
- Cooking in hot water is much faster than cooking in a smoker (with or without a water pan) because the heat conductivity of water is much better than that of air.
- It is very easy to avoid overcooking if hot water cooking is used. The hot water temperature can be kept just high enough for cooking to take place; as soon as the product has become fully cooked, it can be removed from the hot water. (Because a meat thermometer is used, it is easy to determine when the product is fully cooked.)
The method described below requires the product to be placed in plastic bags before cooking in hot water. Use of plastic bags will prevent dissolving of the seasoning and smoke flavor into the cooking water. Your kitchen will smell wonderful if plastic bags are not used, but the product will taste flat because much of the flavor and aroma will be dissolved in the hot water used for cooking. For sausages, the natural or synthetic casing gives some protection from the water. Nevertheless, it is recommended that sausages, too, be put into plastic bags prior to cooking in hot water.
Rather than using common plastic food bags, vacuum-packing plastic may be used. This plastic is strong, and the air is almost completely removed. However, vacuum-packing is more expensive.
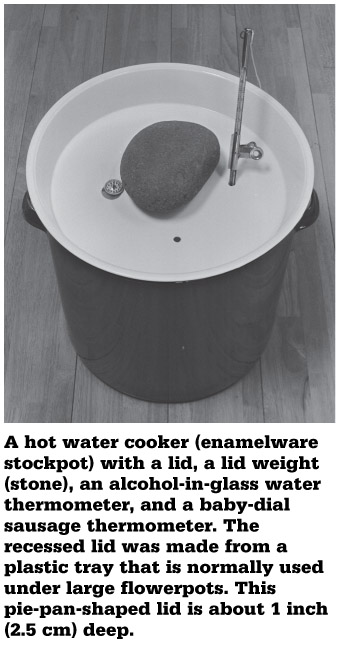
HOT WATER COOKER
The basic elements of a hot water cooker are:
- A large pan, pot, or kettle made of any kind of metal normally used for pots and pans (including cast iron or aluminum). A large stockpot is ideal.
- A recessed lid that is shaped like a pie pan. The rim of this lid rests on the top edge of the cooker pot. The recessed area of this lid has holes bored in it, and this recessed area will sink slightly below the water surface when the pot is nearly full of hot water. The primary purpose of the lid is to press the meat down, below the surface of the hot water. The thermometer for the hot water is inserted into one of the small holes in the recessed lid, and a baby-dial meat thermometer protrudes from the large hole in the lid. This recessed lid can be made of any material that can withstand the temperature of very hot water.
- A clean stone, brick, or other heavy object to place in the center of the recessed lid. The heavy stone functions to keep the lid from being pushed upward by the buoyancy of the meat or sausage.
- A liquid-in-glass or dial thermometer that will read at least as high as 212º F (100º C). This thermometer is used to measure the temperature of the hot water.
- A baby-dial sausage thermometer (shown in the photograph). As mentioned above, this thermometer protrudes from the large hole in the lid. The diameter of this large hole should be slightly greater than the diameter of the dial on the baby-dial thermometer. Secure the thermometer to the pot handle with twine.
HOW TO COOK WITH HOT WATER
If a recipe in this book suggests that the product be cooked in hot water, the basic instructions for doing so will be indicated. Nevertheless, the more detailed explanation given below may be helpful in the beginning.
- Fill the cooking pot about half to three-quarters of the way with water. Put the water-temperature thermometer in the pot, and begin to heat the water to the suggested cooking temperature.
- While the water is heating, inspect each piece of smoked meat for sharp corners or projections that could punch a hole in the plastic bag (the plastic bag that will be used to encase the meat). Scissors can be used to snip off any sharp projection (a sharp, dried fiber of meat, for example).
- Select the thickest piece of meat, and insert a sausage thermometer into the center of the thickest part. Be sure the tip of the thermometer does not touch bone, and be sure it is not embedded in fat. (If either one of these conditions exists, the thermometer reading may not be accurate.)
- Wrap this thickest piece of meat with plastic food wrap. Twist the plastic wrap around the sausage thermometer stem at the point where it projects from the meat. Wrap all the other pieces with plastic food wrap. (The main reason for wrapping with plastic food wrap is to give additional protection against the plastic bag being punctured by a sharp point on the smoked meat. A second purpose is to reduce the dissolving of the flavor, even if the plastic bag leaks despite the precautions taken.)
- Put the remaining pieces of meat in individual plastic bags, expel the air, and twist the neck closed. Seal the neck with a short piece of butcher’s twine or a wire bread-bag tie. If butcher’s twine is used, it is convenient to use something like a piece of cellophane tape or a clothespin to keep the bag twisted shut while it is being tied. A bagging tape machine could be used instead of using cellophane tape (see the bagging tape machine photo in chapter 4). The thickest piece of meat (the piece with the thermometer embedded in it) is sealed in a similar way. Of course, the neck of the plastic bag should be twisted around the stem of the thermometer.
- When the hot water is approximately the correct cooking temperature, put all the meat in the pot except the piece with the thermometer. (If the water is a few degrees above the correct cooking temperature, there is no need to be concerned about it; the meat is cooler than the water, and it will bring the temperature down.)
- Place the recessed lid on the pot, and add hot tap water to bring the water level to the bottom of the recessed lid. On the other hand, if there is excess water, it needs to be removed to prevent the pot from overflowing.
- Tie another piece of twine on the thermometer protruding from the thickest piece of meat (tie this twine at about the same place that you previously sealed the bag). This twine should be long enough to tie to the handle of the pot.
- Remove the lid, and pass the dial of the sausage thermometer through the bottom of the large hole in the lid. Feed the twine through the same hole. Put this piece of meat in the hot water while replacing the lid. Tie the twine to the pot handle.
- Insert the hot water thermometer through a small hole in the lid. If necessary, use twine to tie it to a handle on the pot. Weight the lid with a large stone so that the meat will be pushed below the surface of the water. It is desirable for some water to come up through the holes in the lid. Adjust the water level again, if necessary.
- Bring the temperature of the water to the specified cooking temperature, and try to maintain that temperature. Important: Before reading the hot water thermometer, it is best to move it back and forth a few times to make sure that it is not resting against a relatively cool piece of meat.
- Cook the meat until the specified internal temperature is reached. Depending on the thickness of the meat and other factors, this may require an hour or more. If you want the finest quality possible, avoid the temptation to speed up the cooking by raising the temperature of the hot water.
- After the product has been cooked, put all the pieces in a colander, open the bags, and drain. There will be some juice in the bags because a little juice is squeezed out when the meat shrinks during cooking. (Sausages should be cooled quickly in cold water before the plastic bags are opened.) Cool at room temperature for two hours. Refrigerate overnight, uncovered (to facilitate drying of the surface). The pieces should be sealed in plastic bags the following morning.
Caution: Be particularly careful when cooking at a rather high temperature: 190º F (87.8º C), for example. If the temperature of the water should accidentally reach the boiling point, the bags will balloon, and some may burst. In addition, the meat will shrink more than it normally does. Worst of all, the ballooning bags will cause the hot water to overflow the pot, and you will have a very watery mess to clean up. I made this mistake once, but I do not think I will make it again.
Cooking with a Steamer
Cooking with a steamer produces results almost as good as the hot water cooking method described above. Furthermore, steamer cooking is simple, fast, and effective. The use of a special technique described below results in a succulent product that is bathed in its own juices.
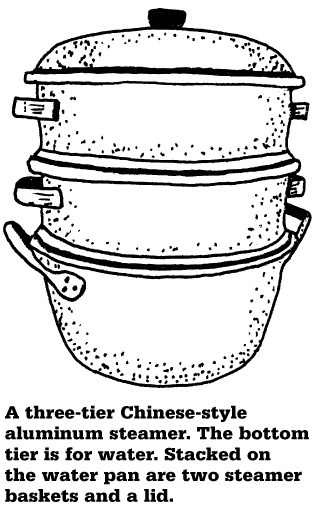
A steamer with a minimum internal diameter of 11 inches (28 cm) is recommended. Any kind of steamer can be used, but I like to use a large aluminum Chinese steamer. Chinese steamers usually have three tiers. Water boils in the pan in the lowest tier. Each of the steamer baskets has numerous holes punched in the bottom. Steam from the boiling water passes up, through these holes, and escapes from the top of the steamer.
After pieces of red meat, sausage, or fowl are cured and cold smoked, wrap each piece very well with plastic food wrap. (This will cause the product to be bathed in the juices that are squeezed out when the meat cooks and shrinks.) Insert the cable probe of an electronic meat thermometer in the thickest piece. The probe may be stuck through the plastic wrap. Place all of the meat in the steamer baskets.
Bring the water to a boil, and steam the meat until the internal target temperature is reached. If the thermometer’s audible alarm is switched to the ON position, you need not monitor the cooking process—watch TV, if you like, and wait for the alarm to sound.
Sharpening Knives
Various kinds of electrical and mechanical knife sharpening gadgets are on the market. Most of them promise a razor-sharp edge with little or no effort. However, none of them will put a better edge on your knife than an old-fashioned sharpening stone. Furthermore, many of these gadgets will destroy or damage knives very quickly. Admittedly, sharpening knives by hand is not at the top of my list of interesting things to do, but it is the best way to get a truly sharp knife.
When sharpening a knife, it is best to use a lot of water on the stone to wash away the metal dust and abrasive particles. I sharpen my knives in the kitchen sink with the whetstone placed on top of an inverted plastic dishpan. A fine stream of water constantly flows on the stone. The samurai warriors of feudal Japan used water on the whetstone when sharpening their swords. In modern Japan, this technique is still used when the Japanese sharpen their culinary knives.
Some people use mineral oil on the stone, but this is very messy, and it is certainly no better than water. If oil has ever been used on the stone, it is best to buy a new stone, and use nothing but water on it.
Use the whetstone described in chapter 4, page 86. First, use the coarse side of the stone. Hold the knife blade at an angle of about 20 degrees to the stone. The blade may be pushed, pulled, or sharpened in a circular motion; it makes no difference—the motion used to sharpen the knife is not important. Do what is comfortable for you. It is important, however, to maintain an angle of about 20 degrees on both sides of the blade.
Stroke the right side of the blade for about 15 seconds, then turn it over and stroke the left side for about 15 seconds. The sharpening should begin at the tip of the blade and proceed slowly to the hilt, or vice versa.
Continue sharpening on the coarse side of the stone until the knife feels very sharp. If the knife was quite dull, this may require five minutes or more. Stainless-steel knives are made of hard steel, so more time is required to sharpen them than to sharpen carbon-steel knives. Long knives require more time to sharpen than short knives.
When the knife feels sharp, turn the stone over so that the fine side is up. Continue sharpening at the same angle but with lighter pressure. This will remove the burrs and the edge curl, and it will put a fine edge on the knife.
Between sharpening sessions, a butcher’s steel should be employed to remove the edge curl and burrs that develop when a knife is used.