In the 1970s, I worked for Hammond Organ Company, a manufacturer of electronic organs in Chicago. One of my duties was to look after some of the foreign guests who visited the company from time to time, and this included taking them out for lunch or dinner. One establishment that we frequented was a cozy German restaurant that served delicious and authentic cuisine. A permanent feature on the menu was curedand-smoked pork loin (kassler rippchen). A slice at least 1 inch (2.5 cm) thick was served with a mountain of sauerkraut.
That smoked pork loin was truly unforgettable. I never dreamed I would be able to make it myself. However, a few years later when I became interested in smoking foods, I recalled the smoked pork loin, and I decided that making it would be one of my goals—and I did it! It comes out of my smoker three or four times a year, and my family and friends never seem to tire of it. The only disappointing thing about smoked pork loin is that it is just too easy to produce. Something so good should require more work!
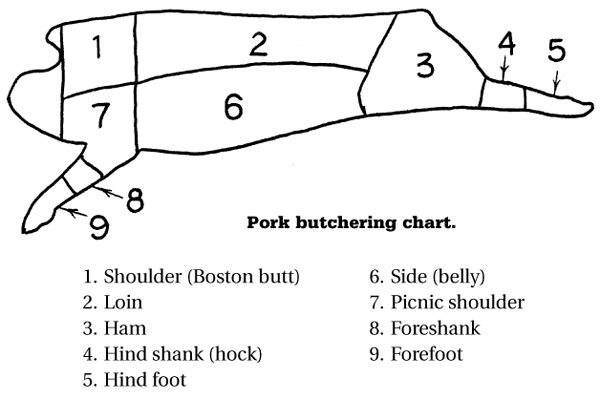
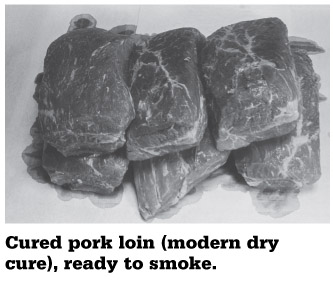
All of us are familiar with the pork chop. The pork chop is cut from the long muscle (the loin) that lies on both sides of the pig near the backbone and between the foreleg and the hind leg. The best pork chops are cut from the center section of the loin. The front part of the loin (toward the shoulders of the pig) has fat marbled in the red meat, and it is most often used for pork roasts or country-style ribs. The most attractive smoked pork loin will be made from the same section of the loin that is used for high-quality pork chops—the center. Nevertheless, don’t hesitate to use the front or back of the loin if economy is more important than appearance. Pork from the cheaper front part of the loin is pictured in the Cured Pork Loin (Modern Dry Cure) photograph.
Bone-in loin may be cured and smoked if you want authentic kassler rippchen, but you may prefer boned material since it is easier to cure and easier to slice after the smoking and cooking have been completed. Boned pork loin is very easy to buy nowadays.
It seems logical to me that more cure mix should be applied to a pound of boned meat than to a pound of bone-in meat. To my way of thinking, the bone-in meat would require less curing mix because the bone does not need to be cured. But, alas, it seems that my logic is flawed. The same amount of cure applied to either a pound of boned meat or a pound of bone-in meat seems to produce the same taste. (It may be that the bones are absorbing about the same amount of cure as the meat.) Consequently, if you use bone-in meat, I recommend that you weigh the meat and apply the cure accordingly, disregarding the fact that the meat contains bones.
A pork loin usually requires very little trimming. Cut off loose flesh, if any exists, and remove blood clots. If you like, you may shave off excess fat on the top part of the loin.
A whole, uncut pork loin can be processed if it will fit in your curing containers, refrigerator, and smoker. However, if you intend to give pieces of the smoked loin as gifts, the finished product will be more attractive if the loin is cut into hunks about 4 to 6 inches (10 to 15 cm) long. In addition, the loin is easier to weigh, handle, cure, smoke, and freeze if it is cut into pieces of a more manageable size. The following instructions assume that the loin has been cut into hunks.
Wash each piece of the loin in cold water, and drain in a colander. Blot them with a paper towel. Pierce well (especially any surface that is covered with fat). While the curing mix and curing equipment are being readied, refrigerate the meat.
The total curing time required depends on the thickness of the thickest part of the loin. Measure the thickest part, and allow seven days of curing time for every inch (2.5 cm) of thickness. Consequently, about two weeks of curing time is required if the thickest part of the loin is 2 inches (5 cm) thick.
1 Tbsp. (15 ml) salt
1 Tbsp. (15 ml) brown sugar—packed in the spoon
¾ tsp. (3.75 ml) onion powder
½ tsp. (2.5 ml) Prague Powder #1 (curing powder)
½ tsp. (2.5 ml) garlic powder
½ tsp. (2.5 ml) white pepper
¼ tsp. (1.25 ml) allspiceTotal: 8½ tsp. (42.5 ml).
CURE MIX MEASURING CHART
8½ tsp. (42.5 ml) per 2¼ lbs. (1 kg) of pork loin
4¼ tsp. (21.25 ml) per 1 lb. (500 g) of pork loin
2 tsp. (10 ml) per ½ lb. (250 g) of pork loin
1 tsp. (5 ml) per ¼ lb. (125 g) of pork loin
¾ cup (180 ml) salt
¾ cup (180 ml) brown sugar—packed in the cup
3 Tbsp. (45 ml) onion powder
2 Tbsp. (30 ml) Prague Powder #1
2 Tbsp. (30 ml) garlic powder
2 Tbsp. (30 ml) white pepper
1 Tbsp. (15 ml) allspice
The pork is not fully cooked when it comes out of the smoker. Of course, it may be cooked by any conventional method used to cook meat. It can be sliced and fried, oven roasted, or cut up and added to boiled foods for seasoning. A water smoker can be used for the cooking, or the special hot water cooking method can be employed. Another good option would be steam cooking. Instructions for hot water cooking and steam cooking are in chapter 8.
The pork loin is fully cooked when the internal temperature is 160º F (71º C). The special hot water cooking conditions that are best for pork loin are as follows:
After cooking, this cured and smoked pork loin can be used as you would use fully cooked, cured ham. In fact, any lean pork from any part of the pig can be processed and used in the same way.
The meat from the rear leg of a hog is called ham. If this meat is not processed, it is called fresh ham. Cooked fresh ham will be the same color as a fried pork chop, and the taste will be the same. Normally, however, when we use the word ham, we mean the pink cured ham with the slightly salty taste.
Honey-cured ham is famous, delicious, and easy to make. There is one minor restricting factor, however: You cannot process a whole ham with the curing techniques presented in this book. If you were to try to cure a whole leg without injecting the flesh with strong brine, the meat would probably spoil due to a problem called bone marrow sour. Nevertheless, you can produce ham that will be very much like the ham you buy at the supermarket, but it will have three significant differences: This will not be a whole ham; it will have a smokier aroma; and it will taste better. If you do not need to have a whole ham in the round, this product is worth a try.
If economy is important, you can buy irregularly shaped hunks of pork that are often packed in large plastic tubes—most of this meat is cut from the rear leg or the loin. It is suitable as the raw material, and it may be cheaper than a whole rear leg. Wholesale grocery stores are much more likely to stock these large bags of pork hunks than a common supermarket.
If you want to use the conventional fresh ham as the raw material, you will probably have to place an order with your butcher. Almost any butcher will be happy to order a whole fresh ham for you. To prepare the ham, the first step is to remove the bone. Next, remove the skin and the excess fat. Butterfly the meat or cut it into slabs; the goal is to cut the meat so that the thickest piece is not more than 3 inches (7.5 mm) thick. Save and freeze the scraps and trimmings to make sausage sometime in the future.
Note: If you do not have butchering experience, ask the butcher to remove the bone for you. Many butchers will do this free of charge. They might be willing to remove the skin, too. It is best if you do the rest of the trimming and cutting yourself so that you can be assured of getting the thicknesses that you want.
Use a fork with sharp tines or a meat piercing tool to pierce the meat thoroughly. Next, measure the thickest piece of meat. One week of curing time will be required for each inch (2.5 cm) of thickness, so three weeks will be required if the thickest piece is 3 inches (7.5 cm) thick.
1 Tbsp. (15 ml) salt
1 tsp. (5 ml) onion powder
½ tsp. (2.5 ml) Prague Powder #1
½ tsp. (2.5 ml) white pepper powder
⅛ tsp. (0.625 ml) clove powder (optional)
3 Tbsp. (45 ml) honey (add to the dry ingredients at the time of application)Total: 5⅛ tsp. (25.625 ml)—excluding honey. (The “⅛ tsp.” and “0.625 ml” are insignificant and may be eliminated.)
CURE MIX MEASURING CHART
5 tsp. (25 ml) per 2¼ lbs. (1 kg) of pork + 3 Tbsp. (45 ml) honey
2½ tsp. (12.5 ml) per 1 lb. (500 g) of pork + 4½ tsp. (22.5 ml) honey
1¼ tsp. (6.25 ml) per ½ lb. (250 g) of pork + 2¼ tsp. (11.25 ml) honey
½ tsp. (2.5 ml) per ¼ lb. (125 g) of pork + 1 tsp. (5 ml) honey
¾ cup (180 ml) salt
¼ cup (120 ml) onion powder
2 Tbsp. (30 ml) Prague Powder #1
2 Tbsp. (30 ml) white pepper
1½ tsp. (7.5 ml) clove powder (optional)
3 Tbsp. (45 ml) honey per 2¼ lbs. (1 kg) of fresh ham (add to the cure at the time of application)
The curing, smoking, and cooking of this honey-cured ham are exactly the same as for the previous product, smoked pork loin. Enjoy!
Bacon was normally hard cured in the old days, and then smoked and dried for a lengthy period so that it could be kept without refrigeration for months—or even as long as a year. Urbanization and improved refrigeration put the job of making bacon into the hands of commercial meat processors.
These meat processors have developed mechanized curing methods for meats that home smokers cannot duplicate. For example, commercial meat processors can cure a slab of pork belly in just a few hours. A machine with hundreds of hypodermic-like needles injects the liquid cure in the pork belly in about the same amount of time that it would take you to dial a telephone number. The slab of belly is ready to smoke after it sets overnight.
Even though some of the commercially produced bacon is rather good, you can make much better bacon than that sold at a common grocery store. The bacon resulting from the process described below will probably be among the best you have eaten. With a little adjustment of the seasoning to match your taste, you can produce the best bacon you have ever eaten. You can control all the seasonings, the smokiness, and the salt content. Moreover, with a little care you will be able to produce the same exquisite product every time. It requires a little work, but not much—and most of that work is fun because it is creative.
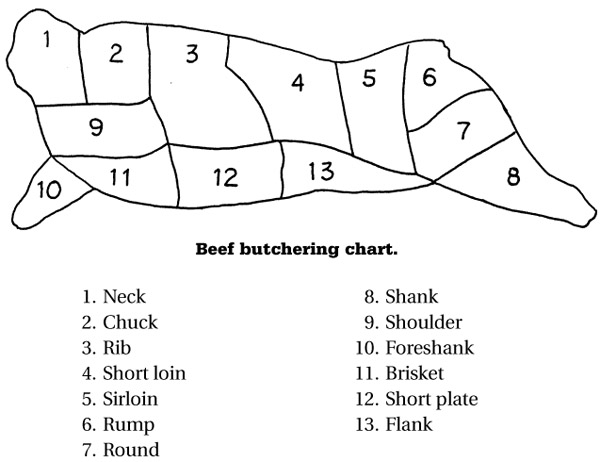
When a pig is butchered, the belly meat that extends from the chest to the hind leg is cut down the middle into two belly slabs. The belly meat that comes from the area of the chest is called brisket, and the meat that is nearest the hind leg is called flank. The brisket end of the belly is thicker than the flank, and it is preferred for making bacon. Bacon made from the flank will taste the same, but it will not be as attractive. If you are able to select between the two halves, you may find that the flank half is cheaper. Frozen belly works just as well as fresh belly.
It is recommended that the skin be removed from the belly before processing it into bacon. Both the cure and smoke flavor will penetrate the belly more easily if the skin is removed. However, the skin need not be discarded; it can be cured and smoked with the bacon. Cured and smoked pork skin makes excellent flavoring when boiling dried beans or making soup. If the skin will be processed with the pork belly, be sure to include the weight of the skin when you calculate the amount of cure mix.
The total required curing time depends on the thickness of the thickest rectangle. Measure the thickest rectangle; allow seven days of curing time for every inch (2.5 cm) of thickness. If the thickest rectangle measures 1½ inches (4 cm), for example, the curing time will be a week and a half.
1 Tbsp. (15 ml) salt
½ tsp. (2.5 ml) onion powder
½ tsp. (2.5 ml) Prague Powder #1
½ tsp. (2.5 ml) garlic powder
½ tsp. (2.5 ml) white pepper
2 Tbsp. (30 ml) maple syrup (add to the ingredients above at the time of use)Note: If about 1 teaspoon of imitation maple flavor is added to the maple syrup, the bacon will have a stronger maple aroma.
Total: 5 tsp. (25 ml)—excluding maple syrup and the optional maple flavor.
CURE MIX MEASURING CHART
5 tsp. (25 ml) per 2¼ lbs. (1 kg) of belly + 2 Tbsp. (30 ml) of syrup
2½ tsp. (12.5 ml) per 1 lb. (500 g) of belly + 1 Tbsp. (15 ml) of syrup
1¼ tsp. (6.25 ml) per ½ lb. (250 g) of belly + 1½ tsp. (7.5 ml) of syrup
½ tsp. (2.5 ml) per ¼ lb. (125 g) of belly + ¾ tsp. (3.75 ml) of syrup
¾ cup (180 ml) salt
2 Tbsp. (30 ml) onion powder
2 Tbsp. (30 ml) Prague Powder #1
2 Tbsp. (30 ml) garlic powder
2 Tbsp. (30 ml) white pepper
2 Tbsp. (30 ml) maple syrup per 2¼ lbs. (1 kg) of belly (add to the cure at the time of use)
Note: This bacon is not a fully cooked product. Smoking at about 145º F (63º C) for two or three hours might not protect against trichinosis. All bacon should be fully cooked before it is consumed.
Hint: If you intend to fry or broil the bacon, it is a good idea to make about five scores across the top of the bacon rectangles before you slice it. Each score should be approximately 1⁄16 inch (1 mm) deep, and it should be perpendicular to the direction of slicing. These scores will help to prevent the bacon from curling when it is being cooked. Also, keep in mind that maple-syrup-cured bacon is a type of sugar-cured bacon, so it should be fried slowly at a low temperature and turned frequently. Frying sugar-cured bacon at a high temperature will cause it to caramelize and char.
By making changes in the seasoning ingredients, the sweetener, or even the raw material, many other bacon varieties can be made.
Canadian bacon is popular in the United States, but it is expensive. You can make it yourself cheaply. In Canada, there is a similar product called peameal bacon, or peameal back bacon.
Peameal bacon is made from the eye of the loin, as is our Canadian bacon. (The eye of the loin is the well-trimmed core of a boneless pork loin.) However, the peameal bacon is rolled in yellow cornmeal, and it is never smoked. Our Canadian bacon is usually smoked, and it is never rolled in yellow cornmeal.
Why is the Canadian product called peameal bacon? Well, in the old days, it was rolled in a meal made from dried yellow peas; it was thought that the peameal would help to preserve the bacon. Yellow cornmeal was cheaper, and it seemed to work as well, so they changed the coating to cornmeal. Apparently, the name cornmeal bacon never caught on.
To make Canadian bacon as it is made in the United States, process the eye of the loin exactly as the maple-syrup-cured bacon is processed. However, instead of 3 tablespoons of maple syrup as the sweetener, use 1 tablespoon (15 ml) of common white sugar.
Commercially produced Canadian bacon is round because it is processed in a sleeve. This homemade product will have an oval shape.
When the eye of the loin is trimmed in preparation for curing, it is a traditional practice to leave about ⅛ inch (3 mm) of fat on the top.
Irish bacon is similar to Canadian bacon. The main difference is that Irish bacon is made from exactly the same part of the loin used to make boneless pork chops. Consequently, after Irish bacon is cured, smoked, and thinly sliced, it will have the same teardrop shape and the same percent of fat as a pork chop, but it will be boneless.
To make this bacon, process a boned pork loin in the same way that maple-syrup-cured bacon is processed. However, it would be more traditional to use about 1 tablespoon (15 ml) of brown or white sugar instead of syrup.
One custom smoke shop in New York cures Irish bacon with a wee bit o’ Irish whiskey. Hmmm—if Irish bacon tastes better with a little Irish whiskey in the cure, I wonder what a little Canadian whiskey would do for Canadian bacon?
Cure the pork belly by using the maple syrup cure, or use whatever seasonings and sweetener you like. However, before you put it in the smoker, press black pepper on the surface of the bacon slab or the bacon rectangles. Use very coarsely ground black pepper or cracked peppercorns.
You may want to use the following technique to make the pepper stick better: Before applying the pepper, paint the surface of the bacon very lightly with a mixture of 1 part honey, diluted with 3 parts of water. Let the surface dry until it becomes sticky, and then apply the pepper. The same thing can be accomplished with undiluted maple syrup or corn syrup.
Bacon that is made from the cheek of the pig is called jowl bacon. Use the maple syrup cure or any other bacon cure that you like. Jowl bacon looks similar to belly bacon, but the slices are shorter. It is a little tougher, but the taste is the same as belly bacon. The Italians make jowl bacon; they call it guanciale.
Try adding your favorite spices to the curing mix. For example, I have found that the addition of allspice makes an interesting flavor variation. A few people enjoy smoked pork that has been seasoned with cinnamon. I do not. Furthermore, sage is an excellent spice for fresh country sausage and many smoked poultry products; however, for me, it has an unpleasant taste in smoked pork products.
The curing process for Cajun country-style ribs that appears later in this chapter can be used to produce Cajun bacon—a well-seasoned bacon that is famous in Louisiana. Use the same Cajun-style curing process, but smoke the belly according to the instructions for maple-syrupcured bacon.
The fat on the back of a pig is called fatback. It is hard fat, which means that it does not melt as easily as regular pork fat. Rural people sometimes process fatback in the same way as belly bacon. Of course, they call it fatback bacon. Obviously, this bacon is very high in cholesterol.
Recently, I saw a product called country bacon in the butcher shop of a large grocery store. It was made from lean pork that had been cut to the same thickness as bacon slabs; then these slabs were processed as bacon. Of course, it was sliced like bacon.
If you like bacon but are concerned about the fat, you may wish to use lean slabs and make country bacon. To the extent possible, it is best to cut the slabs of lean meat with the grain. If the slabs are cut with the grain and the finished product is thinly sliced across the grain, the bacon will be tender.
Gypsy bacon is a Hungarian specialty. It is a method of cooking bacon rather than a method of curing and smoking it. The first step is to process the pork belly into bacon. Next, roast unsliced bacon hunks in a common oven at 350º F (175º C) until the internal temperature reaches 160º F (71º C). Sprinkle the roasted bacon liberally with paprika, preferably the flavorful Hungarian paprika. Slice the bacon thinly, and serve it on rye bread.
For a campfire treat, you may skewer a very thick slice of bacon in the same way a frankfurter is skewered. Cook it over the campfire, sprinkle it liberally with paprika, and serve on rye.
Beef bacon is not as popular as it used to be. However, if you like it, you can make it. Simply use the parts of the beef brisket that resemble the red and white layering of pork belly.
If you want to be kind to your heart, use all lean meat. However, just as for the previously described country bacon, it would be best to cut the slabs of lean meat with the grain before curing, and then slice it thinly across the grain after it is smoked.
Cured and smoked ham hocks are commonly used in southern-style cooking, and they are commonly used as a flavoring for cooking dried beans and peas. Pinto beans, navy beans, lima beans, black-eyed peas, split peas, and lentils, for example, taste very good when cooked with smoked ham hocks.
Cured and smoked ham hocks are sold at grocery stores, but you can easily make your own. All you have to do is process the fresh ham hocks in the same way as smoked pork loin is processed. When measuring the cure, disregard the fact that the hocks contain a lot of bone; weigh the hocks and apply the suggested amount of cure accordingly.
The raw material (fresh, uncured ham hocks) can be found in many grocery stores, especially in ethnic grocery stores. If you do not see them on display, ask the butcher if he or she can obtain them. Local meat-packers that retail to the public can provide them. If they do not retail to the public, they will be able to tell you where to find fresh ham hocks.
Almost everyone has eaten cha shu—a flavorful Chinese-style barbecued pork that originated in the Hong Kong area of China. This delicacy is usually red on the outside. As an appetizer, it is thinly sliced and served with a small dish of hot mustard and toasted sesame seeds. A small amount of hot Chinese mustard is smeared on the pork, which is then dipped in sesame seeds. Cha shu is also used in fried rice, or in other dishes, as a seasoning ingredient.
The pork is marinated for a rather long time. It is traditionally barbecued, but it is even better when it is water smoked. If you like pork, this product will probably become one of your favorites. My friends appreciate the taste imparted by the ingredients listed below, but the recipe is not carved in stone—change it as you see fit. The pork can be either lean or fatty.
Cha shu is traditionally used as an appetizer, but it can also be served as a main course. As a main course, you may wish to use boneless pork chops or pork steak as the raw material. It can also be used for gourmet sandwiches.
In China, the Chinese use red-orange powdered food color in the marinade. However, the red liquid food color available anywhere in the United States works perfectly. I know of one professional Chinese cook here in Oregon who uses the American liquid food color, and I suspect that many other Chinese cooks do the same.
Below, you will see that clear honey is required. If your honey has crystallized, it may be clarified quickly in a microwave.
⅓ cup (80 ml) honey (clear)
¼ cup (60 ml) sugar
¼ cup (60 ml) sherry, or shao hsing wine
3 Tbsp. (45 ml) soy sauce
1 Tbsp. (15 ml) grated fresh ginger, or 1 tsp. ginger powder
1½ tsp. (7.5 ml) salt
½ tsp. (2.5 ml) red food color (liquid or powder)
¼ tsp. (1.25 ml) finely ground white pepper
2 cloves garlic, minced, or ¼ tsp. (1.25 ml) garlic powder
Prepare the amount of marinade appropriate for the weight of pork to be seasoned. Cut the pork into long rectangles about 1½ inches (4 cm) thick and 2 to 3 inches (5 to 7 cm) wide—the length is not important. It is best to pierce the pork to encourage deep penetration of the marinade. Begin to marinate the pork; keep it refrigerated. Shake the container several times a day. Marinate until the morning of Day 3.
This product is made from the very meaty and very economical cut of pork called country-style ribs. Actually, these are not ribs at all. These rib-shaped cuts usually come from the end of the loin that is located just above the shoulder blade. Consequently, they are sometimes called shoulder blade ribs. Boston butt is also cut into country-style ribs.
Cajun bacon is well known in the Cajun area of the Deep South, and that bacon inspired this product. Seasonings used in Cajun cooking were selected to flavor the pork. If you like highly seasoned foods, I believe that you will like this product. The Prague Powder #1 is optional. If it is used, the pork will be the same pink color as cured ham.
2 tsp. (10 ml) salt
2½ tsp. (12.5 ml) brown sugar—packed in the spoon
1 Tbsp. (15 ml) paprika
1½ tsp. (7.5 ml) onion powder
1 tsp. (5 ml) garlic powder
1 tsp. (5 ml) black pepper
1 tsp. (5 ml) cayenne
¾ tsp. (3.75 ml) ground oregano
½ tsp. (2.5 ml) ground thyme
½ tsp. (2.5 ml) Prague Powder #1 (optional)
¼ tsp. (1.25 ml) coriander powderTotal: 14 tsp. (70 ml) = 4 Tbsp. + 2 tsp.
CURE MIX MEASURING CHART
4 Tbsp. + 2 tsp. (70 ml) per 2¼ lbs. (1 kg) country-style ribs
2 Tbsp. + 1 tsp. (35 ml) per 1 lb. (500 g) country-style ribs
3½ tsp. (17.5 ml) per ½ lb. (250 g) country-style ribs
1¾ tsp. (8.75 ml) per ¼ lb. (125 g) country-style ribs
½ cup (120 ml) salt
½ cup + 2 Tbsp. (150 ml) brown sugar—packed in the cup
¾ cup (180 ml) paprika
¼ cup + 2 Tbsp. (90 ml) onion powder
¼ cup (60 ml) garlic powder
¼ cup (60 ml) black pepper
¼ cup (60 ml) cayenne
3 Tbsp. (45 ml) ground oregano
2 Tbsp. (30 ml) ground thyme
2 Tbsp. (30 ml) Prague Powder #1 (optional)
1 Tbsp. (15 ml) coriander powder
The country-style ribs are cured, smoked, and cooked in the same way as the previously described smoked pork loin. Water smoking or steaming are good methods for cooking the pork.
In a hilly area near my former home in Japan, a friend grows Oriental pears for a living. Several years ago, when I was still living there, he trapped four wild boar sucklings that were playing in one of his orchards. He raised them as you would raise domesticated piglets. Sweet potatoes were their main food. He slaughtered them when they got just the right size to eat, and he asked me to smoke the loins, hams, and shoulders of one of them. I did so, with pleasure.
Since the wild boar is related to our domesticated swine, I decided to cure and smoke the meat in the same way that I smoke pork loin. I skinned and boned all the meat, and then cut the thicker pieces into slabs so that they would cure in 14 days. Before smoking the meat, I net-tied all of the cured hunks individually to make them as attractive as possible. The result was exceptional, and my friend was delighted. In fact, he was so pleased with the result that he asked me to smoke one more wild boar.
The taste was much like cured and well-smoked pork, but with a hint of something wild. The color of the finished product was a deep rose, rather than pink.
Considering this experience, I suggest that wild boar be processed in the same way as common pork. Use your favorite curing and smoking process for pork. If you do have the privilege of processing wild boar, you will notice that the animal has much less fat than a porker. In some places, there is almost no fat between the skin and the red muscle tissue. According to what I have read, a wild boar under one year old is the tastiest.
In times gone by, wild game was the only meat available. When a kill was made, people would gorge themselves on the fresh meat and hope that they could make another kill before they starved to death. Under such circumstances, they would wish that they could preserve meat when there was more than they could eat. It was not long until they discovered that they could postpone decay by jerking the meat (drying it in the sun). By putting a lot of salt on the meat before it was jerked, the meat could be preserved for a long time. Thinly slicing the meat and drying it with fire helped to make the process more effective and more predictable.
Jerky made in this way was very hard and very salty. It was often eaten after boiling it together with other foods. The boiling of the jerky extracted much of the salt, made the meat moist, and seasoned the other food in the pot.
We now have other methods of preserving meat, and we do not depend on jerked meat to live. Nowadays, we make jerky because we want a good-tasting snack. Commercial processors of jerky use preservatives, so they are able to reduce the salt and still make a product that has a long shelf life. When we make jerky at home, I believe our primary goals are to make a product that tastes better and costs less than that we can buy. For some people, a third goal is to make a product that is not loaded with preservatives. We can do all of these things—but we must be willing to accept a shorter shelf life.
The two jerky products described below will taste better than commercial jerky, and they will certainly cost less. In fact, if all of the jerky you have eaten has been commercially prepared, this will probably be the best jerky you have ever eaten. If the salt content or seasoning is not exactly right, you can change it. However, because the salt content is comparatively low, and because there are no preservatives other than a modest amount of salt and sweetener, the shelf life at room temperature is not more than about two weeks. This is a small sacrifice, because the shelf life can be extended far beyond the two weeks by refrigerating or freezing the jerky.
Directions for making California jerky and Wild West jerky are given below. The basic processing directions for making either product are the same. Only the seasoning is different. Beef is specified, but any meat can be used. Pork, or any meat that may contain trichinae, should be heated until the internal temperature is at least 160º F (71º C).
Lean meat, such as beef bottom round or top round, is preferable because fatty meat processed into jerky turns rancid quickly. Keep in mind that there will be a 40 to 50 percent weight loss when making jerky. Ten pounds (4.5 kg) of raw meat will become 5 to 6 pounds (2.25 to 2.75 kg) of jerky.
The following jerky seasoning formulas are not true marinades, and they are not true brines, either. They are somewhere in between. Nevertheless, these cures work very well for jerky, and they can be used as models to make countless other jerky seasoning formulas.
A small amount of Prague Powder #1 is used in both of the seasoning mixtures. Because this curing powder is used, the finished product will have an eye-pleasing reddish color. If you choose not to use the Prague Powder, the finished product will be the same brown color that is characteristic of cooked beef.
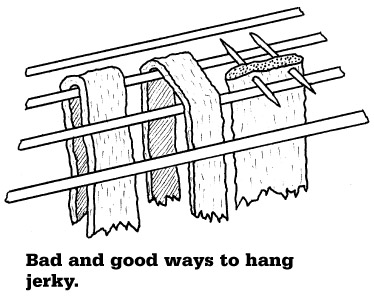
The strip of meat that is hanging on the left in the drawing demonstrates a bad way to hang jerky. There will be poor air circulation because the slice of meat is almost touching itself. Drying will be uneven.
Better ways to hang jerky are indicated by the jerky strips hanging in the middle and on the right: It could be hung with toothpicks, or it could be hung over two bars.
Place the drained jerky on racks in the oven. A drip tray must be placed under the jerky. Heat the oven to 150º F (65º C). If the temperature can’t be set that low, then set the oven to the lowest setting. Dry for about three hours, and then raise the temperature to 175º F (80º C). For fowl, however, the temperature should be raised to 185º F (85º C). Continue drying for another two to four hours. Let the jerky cool to room temperature, and then freeze or refrigerate it.
Processing instructions appear above.
1 Tbsp. (15 ml) salt
2 Tbsp. (30 ml) brown sugar—packed in the spoon
2 tsp. (10 ml) ginger powder
2 tsp. (10 ml) garlic powder
2 tsp. (10 ml) black pepper
½ tsp. (2.5 ml) Prague Powder #1 (optional)
½ tsp. (2.5 ml) MSG (optional)
½ tsp. (2.5 ml) hickory smoke flavor (optional)
¾ cup (180 ml) orange juice
3 Tbsp. (45 ml) soy sauce
2 cups (480 ml) cold water
Processing instructions appear above.
1 Tbsp. (15 ml) salt
1 Tbsp. (15 ml) honey
2 tsp. (10 ml) black pepper
1 tsp. (5 ml) garlic powder
½ tsp. (2.5 ml) Prague Powder #1 (optional)
½ tsp. (2.5 ml) MSG (optional)
½ tsp. (2.5 ml) hickory smoke flavor (optional)
½ tsp. (2.5 ml) cayenne
½ tsp. (2.5 ml) coriander
½ tsp. (2.5 ml) chili powder
3 Tbsp. (45 ml) soy sauce
2 tsp. (10 ml) Worcestershire sauce
¾ cup (180 ml) apple juice
2 cups (480 ml) cold water
Old-fashioned smoked tongue is hard cured in the same way as corned beef. Because of the high salt content, it must be placed in a large kettle, covered with water, and simmered for about an hour per pound (450 g). This long period of simmering extracts the excess salt.
The excellent refrigeration available nowadays allows you to use a mild cure that does not require simmering to extract excess salt. The modern dry cure method infuses just the right amount of salt to match your taste.
If you have ever tasted old-fashioned smoked tongue, you will most certainly say that the smoked tongue produced by the following process tastes much better. This is because the smoke flavor, the meat flavor, and the seasonings are not dissolved out of the tongue by a long period of simmering in water.
This mildly cured, smoked tongue is quite easy to make, but the whole process will require about two weeks of curing and about six hours of smoking.
Normally, meat is cured and smoked before it is cooked. This smoked tongue is unusual because it is cooked before it is smoked. (You cure first, then cook, and then smoke.) This is done because the skin should be removed before smoking, and it is most easily removed from the tongue after cooking has taken place.
Of course, if the skin is removed from the raw tongue in the beginning, the more common order (cure, then smoke, and then cook) could be employed. A raw tongue can be skinned if it is first frozen solid. A razor-sharp knife must be used, and work must begin at the tip of the tongue while the tip is still frozen and stiff. I have skinned a frozen tongue many times, but it is extremely dangerous and not recommended. However, if you do try it, make sure that there is never anything in front of the cutting edge of the knife other than the tongue itself. The knife will slip and leap forward many times. Also, be sure to count your fingers before and after this procedure. Japanese butchers frequently use this method to skin tongues, but I don’t think a reasonably sane American butcher would consider it. Safety matters aside, skinning a raw tongue is a labor-intensive and time-consuming operation.
Any size of beef tongue can be used, but tongue lovers claim that tongues weighing less than 3 pounds (1,400 g) are best. Another consideration is that small tongues cure faster than large ones. Frozen tongues work just as well as fresh.
If there is a meatpacker or distributor in your area, you might be able to buy frozen Grade 2 beef tongues. The price will be about half the price of fresh tongues sold at a common supermarket. Grade 2 tongues are cheaper because they have a hook mark or a knife slash that distracts from the appearance.
Scrub the tongue very well with a vegetable brush under lukewarm water. Drain, and refrigerate it while preparing the cure.
The total curing time depends on the thickness of the tongue. Measure across the top of the tongue at the thickest point (from the right side to the left, where the big taste buds are located). Allow seven days of curing time for every inch (2.5 cm) of thickness.
1 Tbsp. (15 ml) salt
1 tsp. (5 ml) granulated sugar
¾ tsp. (3.75 ml) onion powder
½ tsp. (2.5 ml) oregano
½ tsp. (2.5 ml) Prague Powder #1
½ tsp. (2.5 ml) black pepper
½ tsp. (2.5 ml) garlic powder
¼ tsp. (1.25 ml) red pepper, or cayenne
1 shredded bay leaf (do not mix with the ingredients listed above)Total: 7 tsp. (35 ml)—excluding the bay leaf.
CURE MIX MEASURING CHART
7 tsp. (35 ml) per 2¼ lbs. (1 kg) of tongue + one bay leaf
3½ tsp. (17.5 ml) per 1 lb. (500 g) of tongue + ½ bay leaf
1¾ tsp. (8.75 ml) per ½ lb. (250 g) of tongue + ¼ bay leaf
¾ tsp. (3.75 ml) per ¼ lb. (125 g) of tongue
¾ cup (180 ml) salt
4 Tbsp. (60 ml) sugar
3 Tbsp. (45 ml) onion powder
2 Tbsp. (30 ml) oregano
2 Tbsp. (30 ml) Prague Powder #1
2 Tbsp. (30 ml) black pepper
2 Tbsp. (30 ml) garlic powder
1 Tbsp. (15 ml) red pepper
1 shredded bay leaf per 2¼ lbs. (1 kg) of tongue (do not mix with the ingredients listed above)
Smoked tongue is gourmet fare, and it is very tasty when it is served either hot or cold. Slice it thinly, and serve it as an appetizer. Try it for sandwiches. Try it on crackers, or mince it and add it to scrambled eggs or salad. Mustard and horseradish are traditional dressings for tongue, but I find them too harsh for the subtle flavors of this product.
The Slavic Jews created pastrami. It is related to pork pastrama, a highly seasoned, smoked pork that is famous in Romania. This similarly seasoned beef pastrami became very popular in the Jewish delicatessens throughout Europe. Eventually, it found its way to the United States with the Jewish immigrants. Today, it is available in numerous countries of the world, and its origins are almost forgotten.
The international popularization of pastrami led to significant variations in seasoning and processing, but the following points are generally true for the various products known as pastrami:
Pastrami is made of beef that has been cured and highly seasoned with salt, sugar, garlic, black pepper, and a nitrate or nitrite color fixer. Depending on the processor, numerous other seasonings are used: Allspice, onions, ginger, red pepper, cloves, coriander seeds, oregano, paprika, and pickling spices are some of the more common additions. The black pepper is coarsely ground and pressed onto the surface of the meat before smoking.
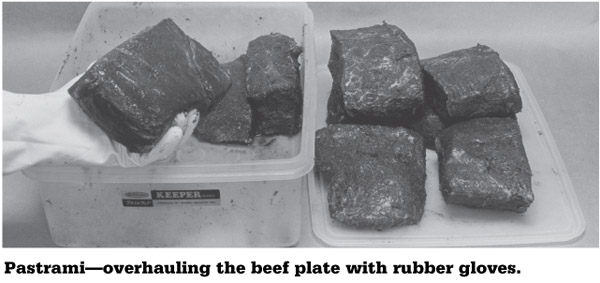
Inexpensive cuts of meat are usually used to make pastrami. Almost any cut of beef can be used, but the most common cuts are brisket, plate, and shoulder. To be authentic, pastrami must be smoked.
Pastrami is thoroughly cooked. Depending on the processor, it is steamed, hot smoked, boiled, oven roasted, or possibly even grilled. (A modified form of hot water cooking is one of the methods suggested below, but other methods may be employed. If it is hot smoked, water smoking should be used to prevent severe drying. Oven roasting, too, can cause excessive drying unless precautions are taken.)
The following procedure for making pastrami will give you a consistently tasty product. A fellow teacher and friend in Japan—a Jewish woman from New York—regularly bought this pastrami from me whenever I made a batch. I consider her approval of this product to be a great compliment. I hope you will like it. Make changes in the seasonings if you need to tune the product to your taste buds.
The primal cut (a large hunk) of top sirloin is my favorite for making pastrami. A good grade of beef plate is my second choice. (Plate is the part of the beef belly that lies between the brisket and the flank.) Exceedingly fat meat, or exceedingly lean meat (beef round, for example), should be avoided.
Measure the thickest hunk, and allow six days of curing time for every inch (2.5 cm) of thickness.
1 Tbsp. (15 ml) salt
1 tsp. (5 ml) garlic powder
1 tsp. (5 ml) onion powder
1 tsp. (5 ml) granulated sugar
½ tsp. (2.5 ml) Prague Powder #1
½ tsp. (2.5 ml) red pepper
½ tsp. (2.5 ml) white pepper
½ tsp. (2.5 ml) oregano
½ tsp. (2.5 ml) paprika
¼ tsp. (1.25 ml) allspice
¼ tsp. (1.25 ml) ginger powderTotal: 9 tsp. (45 ml) = 3 Tbsp.
CURE MIX MEASURING CHART
3 Tbsp. (45 ml) per 2¼ lbs. (1 kg) of beef
4½ tsp. (22.5 ml) per 1 lb. (500 g) of beef
2¼ tsp. (11.25 ml) per ½ lb. (250 g) of beef
1 tsp. (5 ml) per ¼ lb. (125 g) of beef
¾ cup (180 ml) salt
¼ cup (60 ml) garlic powder
¼ cup (60 ml) onion powder
¼ cup (60 ml) granulated sugar
2 Tbsp. (30 ml) Prague Powder #1
2 Tbsp. (30 ml) red pepper
2 Tbsp. (30 ml) white pepper
2 Tbsp. (30 ml) oregano
2 Tbsp. (30 ml) paprika
1 Tbsp. (15 ml) allspice
1 Tbsp. (15 ml) ginger powder
Note: The following steps are for hot water cooking. Instructions unique to pastrami are given below, but it might be helpful to review the general instructions for hot water cooking in chapter 8.
Use the traditional cold smoking (as explained in Option 1) to smoke the pastrami. However, instead of cooking with the hot water method, roast the pastrami in an oven, or steam it. In either case, the pastrami is done when the internal temperature is 170º F (77º C). An aluminum-foil tent should be used if the pastrami is cooked in an oven. If it is steamed, wrap each piece of pastrami in plastic food wrap before steaming, and use an electronic meat thermometer with a cable probe to monitor the internal temperature.
Water smoking is an easy way to smoke and cook the cured pastrami. The disadvantages are that the external coloration will not be as good, and the product will not have as much smoky flavor as that imparted by traditional cold smoking.
The first step to water smoke the cured pastrami is to preheat the water smoker to about 240º F (115º C). Next, water smoke the meat until the internal temperature is 170º F (77º C). The thinner pieces will cook faster, and they should be removed from the smoker as soon as they are cooked.
Venison, elk, moose, and other meats from big-game animals are commonly made into jerky. These meats also make excellent pastrami; try processing in the same way as beef pastrami. The numerous spices present in the jerky marinades and in the pastrami cure will subdue the wild taste. Yet another popular way to use wild game is to process it into sausage; see chapter 12.
Wild game is drier than meat from domesticated animals, so meat from wild animals will benefit from the application of cooking oil. When making any product other than jerky or sausage, it is a good idea to oil the wild game frequently during smoking and cooking. Also, cooking these meats with moist heat is better than cooking them with dry heat.
Scandinavian peoples began settling Iceland over 1,000 years ago, and they brought numerous sheep with them. Descendants of those sheep still roam the island, and they are a principal source of food. Smoked leg of lamb is part of the Icelandic culture: About 90 percent of the households serve smoked leg of lamb on Christmas Day.
I would like to say that the following product is authentic Icelandic smoked leg of lamb—but it is not. There are three reasons for this. First, the traditional product is hard cured, so it is very salty—it must be freshened (desalted) before it is eaten. Second, Icelanders do not use plain hot water to freshen the smoked leg of lamb; they simmer it in very stinky water that was used to boil skate (a fish-like creature related to the ray). The third reason is that the Icelanders use dried sheep dung as the smoking fuel, and I could not obtain any dried dung to test the process—but I must admit that I did not look very hard for it. The product described here will be mildly cured, and it will be smoked with hard wood—not hard dung.
Many Americans avoid lamb because it can have a gamy taste if it is not prepared properly. If leg of lamb is processed as indicated below, I believe that you will detect no gamy taste, whatsoever.
Lamb is becoming more popular in the United States, and good-quality lamb is now available throughout the year. For this product, boned and butterflied leg of lamb is required. Buy a small leg of lamb, and ask the butcher to butterfly it for you. Get the sirloin half of the leg (the upper half), not the shank half (the lower half). When it is butterflied, the meat will lie flat, and the thickness will usually vary between 1 and 2½ inches (2.5 to 6.3 cm).
Boned leg of lamb is easy to buy. If you need to butterfly it yourself, it is not hard to do. Put the boned leg on the counter with the skin side down. The meat will be thin in the middle where the bone was removed, but it will be thick to the left and right. Hold the knife horizontally, parallel with the top of the counter. Cut the middle of one of the thick parts almost to the outside edge, and open the meat, as you would open a book. Do the same with the thick part on the other side.
The leg of lamb is now butterflied—you now have one large slab of lamb. To make it easier to process, it is best to cut it into two or four smaller slabs.
Most of the fat should be removed. If the skin side of the meat has parchment-like membrane on it, it should be removed. This membrane is called fell, and it will make the meat taste gamy. Normally, the fell is removed by the meat processor before it is shipped to the retailer.
The total curing time depends on the thickness of the thickest part of the butterfly. Allow seven days of curing time for every inch (2.5 cm) of thickness.
1 Tbsp. (15 ml) salt
1 Tbsp. (15 ml) sugar
1½ tsp. (7.5 ml) garlic powder
1 tsp. (5 ml) onion powder
½ tsp. (2.5 ml) Prague Powder #1
½ tsp. (2.5 ml) oregano powder
½ tsp. (2.5 ml) black pepper
¼ tsp. (1.25 ml) thyme powder
¼ tsp. (1.25 ml) rosemary powderTotal: 10½ tsp. (52.5 ml).
CURE MIX MEASURING CHART
10½ tsp. (52.5 ml) per 2¼ lbs. (1 kg) lamb
5¼ tsp. (26.5 ml) per 1 lb. (500 g) lamb
2½ tsp. (12.5 ml) per ½ lb. (250 g) lamb
1¼ tsp. (6.25 ml) per ¼ lb. (125 g) lamb
¾ cup (180 ml) salt
¾ cup (180 ml) sugar
6 Tbsp. (150 ml) garlic powder
¼ cup (120 ml) onion powder
2 Tbsp. (30 ml) Prague Powder #1
2 Tbsp. (30 ml) oregano powder
2 Tbsp. (30 ml) black pepper
1 Tbsp. (15 ml) thyme powder
1 Tbsp. (15 ml) rosemary powder
The lamb is not fully cooked when comes out of the smoker. It needs to be cooked by any conventional method used to cook meat. Roasting in an oven, steaming, water smoking, or hot water cooking can be employed. Below are the basic instructions for cooking with a hot water cooker.