It is generally agreed that oily fish are best for smoking. Salmon tends to be oily. However, there are variations in the oil content depending on the species of salmon. On the average, the chinook (king) salmon and the Atlantic salmon have the highest oil content. Sockeye ranks next, followed by the coho (silver) salmon, the pink salmon, and the chum (also called keta, dog, or silverbright) salmon. Because the chum salmon has the lowest oil content of all of the species, it is the least popular for smoking. Nevertheless, it will make a better product than many other kinds of fish.
The Atlantic salmon is actually a large saltwater trout. Freshwater trout, or steelhead (a species of rainbow trout that migrates to the sea), can be substituted for salmon. Actually, ichthyologists classify both salmon and trout as members of the same salmonid family.
Nowadays, farmed Atlantic salmon, chinook, and steelhead are common. These farmed fish are excellent for smoking, but the flesh of farmed fish is not as firm as the flesh of those caught wild.
Many other kinds of fish are excellent for smoking. Sturgeon and tuna, for example, are favorites of many fish smokers.
Small fish should not be overlooked. There are species of small fish besides trout that are very good when smoked: smelt, sardines, catfish, herring, and horse mackerel, for example. Don’t let a scarcity of salmon, trout, tuna, or sturgeon stop you. Try any kind of fish available. If it tastes good, who cares?
The required smoking time increases with the thickness of the fillet. This is another point worth considering when selecting a fish to smoke. If the fillet is thick, it might not be possible to complete the smoking process in one day—this is important to many people. Fillets that have a thickness of ½ to ¾ inch (1.3 to 2 cm) are easy to smoke in a day if you get up early.
Use very fresh fish, or quick-frozen fresh fish. Using stale fish will produce an inferior product, and the fish might spoil during processing. Considerable effort is required to process smoked fish; using fish that is less than fresh will invite failure.
A freshly caught fish will retain its freshness longer if it is properly and promptly dressed and chilled.
Judging the freshness of a whole, unfrozen fish is not difficult. The signs of freshness—or spoilage—are easy to detect, so you can readily determine the freshness of a fish even if you have no knowledge about when it was caught or the care it has received.
Look at the general appearance of the fish first. The skin should be moist and glossy. The eyes should be life-like; they should be bright and bulging. A fish with dull, sunken eyes is less than fresh. The vent (anal opening) will usually be pink. A yellowish, brownish, or grayish vent usually means that deterioration of the internal organs is well advanced.
Next, press the flesh of the fish with your index finger. If it feels firm, and it springs back rather quickly without leaving a dent, the fish is fresh. This means that enzymes that cause spoilage have not yet caused the flesh to become mushy. If the fish has had its head removed, and if it has been eviscerated and tightly wrapped in plastic, this finger-pressure test may be the only test possible.
Finally, put your nose to work. It is natural for fish to smell a little fishy, but the odor should not be offensive in any way. A saltwater fish should smell a little like the ocean, and a freshwater fish will probably smell a little like the river or lake from which it came. An unpleasant odor around the gills or belly is a sure sign of spoilage. If a bad odor is present and you lift the gill covers, you will probably observe that the bright red gills have become light pink or gray, and the mucus on the gills is yellowish rather than clear.
If a fish passes all of these tests, you may be assured that it is fresh. It is of little importance whether it was caught two hours ago or two days ago.
Commercial fish-processing plants freeze fish very quickly in efficient, extremely low-temperature freezers. This process greatly helps to preserve fresh flavor.
Freshly caught fish are certainly the most desirable. Nevertheless, the commercially processed, flash-frozen fish are flavorful and high quality, and they are usually sold at a reasonable price. The widespread availability of such fish allows someone living in the middle of the United States to purchase and process seafood; someone living in Nebraska, for example, can enjoy home-smoked salmon or ocean shellfish.
A few pointers might be helpful in selecting and using high-quality frozen finfish and other seafood products:
To thaw, put the sealed package in a deep pan that is full of cold tap water, and weight the package so that it will stay below the surface. Better yet, if there are pieces that were individually flash-frozen, put each piece in its own sealed plastic bag, and thaw in the same way. Thawing in plastic bags that are immersed in water is much more efficient than thawing in the refrigerator. The thermal conductivity of water is much greater than that of air in the refrigerator, so thawing is much faster. Because it is thawed faster, the fish will be a little fresher if the water-thawing method is used. Never thaw fish at room temperature. It may not spoil, but the quality will suffer.
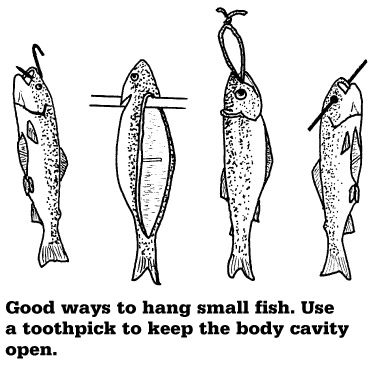
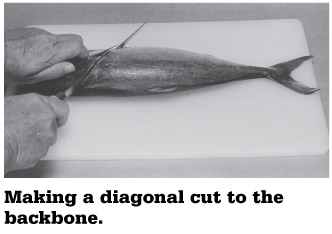
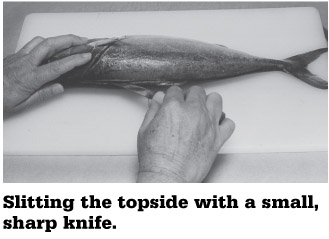
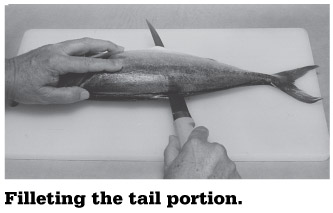
Small fish are usually smoked in the round, but larger fish are processed faster and better if they are split open. The curing, drying, and smoking will be much more efficient and predictable if large fish are split. Filleting is the usual way to split fish.
Usually, the large fish fillets that are sold at common retail outlets have been expertly cut in a fish-processing facility by professionals before they reach the store. If it is a large, fresh fish that is being sold in the round at a seafood market, the fishmonger will be happy to fillet it for you—and he or she will do an excellent job. However, in a common supermarket there are great differences in the fish-filleting skills of the employees. If I buy a whole fish in such a store, I take it home in the round and fillet it myself. The risk of getting a poorly filleted fish at a common supermarket is too great to do otherwise.
Hint: If you have your fish filleted by a retailer, tell the clerk or fishmonger that you want the bones, too. Even if the fish was skillfully filleted, there will be a lot of meat remaining on the bones. Sprinkle the bones with salt and pepper, and then steam them for 10 to 15 minutes. The steamed meat remaining on the bones will make a delicious meal or an excellent salad topping.
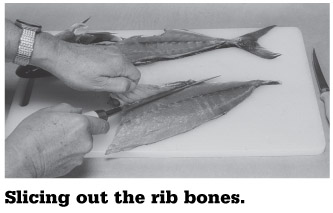
Many people would have you believe that there is only one correct way to fillet a fish: their way. The truth is that there is no correct way to fillet a fish. The way a fish is filleted depends on the expert doing it, the species and size of the fish, and even the filleting customs in various countries. Furthermore, there is no worldwide agreement on the best kind of knife for filleting.
Recently, I bought a Japanese book on the subject of culinary knife techniques. In that book, there are drawings on how to dress and fillet about 20 kinds of fish, and each explanation differs according to the species! The specified filleting knife was the thick, bevel-sharpened Japanese filleting knife illustrated in chapter 4, page 83.
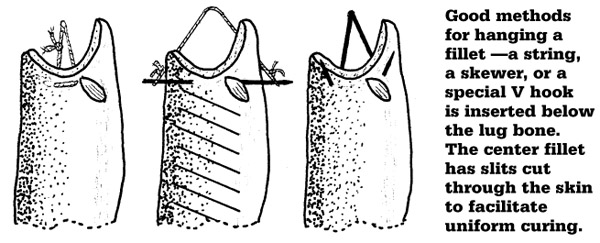
Since most of us are not making a living by dressing fish, all we need to learn is how to cut reasonably attractive fillets in an efficient manner. This is an acquired skill, but the average person can acquire it readily. If you have never filleted fish, follow the instructions below—more or less—and, in a short time, you will be cutting professional-looking fillets. I suggest, by the way, that you use a U.S. style of filleting knife or a boning knife. Using the strange-looking Japanese filleting knife will most certainly bring on ridicule and howls of laughter from those Good methods for hanging a fillet —a string, a skewer, or a special V hook is inserted below the lug bone. The center fillet has slits cut through the skin to facilitate uniform curing. observing you (unless those people happen to be Japanese). Another consideration is that the instructions given below are not appropriate for a knife with a wide, thick blade.

The word salmon is used in the processing instructions that follow, but the same process may be used for many other kinds of medium to large fish. Salmon processed by this method is called smoked salmon on the west coast of Canada and in most regions of the United States. In Europe, however, the term smoked salmon refers to the raw, cold-smoked type that is famous in places such as Scotland and Ireland. The primary distinction between kippered and barbecued salmon is that the kippered kind is cooked with lower and more carefully controlled heat. Furthermore, kippered salmon is cured rather than simply seasoned.
Thin fillets can be processed faster than thick fillets, but don’t hesitate to use thick fillets if that is all that is available. If the whole fillets are too long to be processed easily, they can be cut into pieces of a more manageable size. In any case, the skin should never be removed from the fish when it is being processed. Removal of the skin will make the fish much more difficult to handle, and the appearance will suffer. Use very fresh fish or fish that has been fast-frozen.
The flesh of white-meat fish or other fish with low oil content—such as chum salmon—should be oiled. The appropriate time to oil such fish is indicated in Day 3.
Prepare the fillets, rinse them quickly, and blot dry. Refrigerate the fish while you prepare the cure.
You might notice that the cure, below, is almost the same as that used for bacon. The main difference is that the color-fixing agent, Prague Powder #1, has been omitted because it is not required for kippered fish. I experimented with various seasonings in the cure, including the much-touted dill weed, for example. However, to my taste, the following simple curing formula is the best; it enhances the salmon flavor—it does not mask it.
1 Tbsp. (15 ml) salt
1 Tbsp. (15 ml) brown sugar—packed in the spoon
½ tsp. (2.5 ml) white pepper
½ tsp. (2.5 ml) garlic powder
½ tsp. (2.5 ml) onion powderTotal: 7½ tsp. (37.5 ml).
CURE MIX MEASURING CHART
7½ tsp. (37.5 ml) per 2¼ lbs. (1 kg) of salmon
3¾ tsp.(18.75 ml) per 1 lb. (500 g) of salmon
2 tsp. (10 ml) per ½ lb. (250 g) of salmon
1 tsp. (5 ml) per ¼ lb. (125 g) of salmon
¾ cup (180 ml) salt
¾ cup (180 ml) brown sugar—packed in the cup
2 Tbsp. (30 ml) white pepper
2 Tbsp. (30 ml) garlic powder
2 Tbsp. (30 ml) onion powder
If the fish fillet is more than ¾ inch (2 cm) thick, it is best to make parallel slits in the skin, about 1½ inches (3 to 4 cm) apart, on the front half of the fish where the fillet is thickest (see drawing on page 216). A very sharp knife will do, but a razor blade or a box cutter is best. Make the slits just deep enough to cut slightly below the skin.
If slits were made in the skin, rub some cure into them. Apply the rest of the cure to the fleshy side of the fish—apply the cure a little more heavily wherever the fillet is thick. Refrigerate for 24 hours. Overhaul two or three times during this period (rub the surface of the salmon gently to redistribute the cure).
Rinse off the cure quickly in cool water, and wrap each piece in a paper towel, then in newspaper. (When rinsing off the cure, try to keep the rinsing time to a minimum to prevent the flesh from becoming waterlogged.) Refrigerate overnight.
The process described in the previous section uses the modern dry cure method. That method is almost foolproof, and I highly recommend it if you are going to smoke a few fillets or pieces. However, if you intend to smoke many fillets or pieces of fish, or if you are going to smoke many small fish, the brine cure method might be easier—but the result would be less predictable. This is because the length of time that the fish is left in the brine is difficult to judge unless you are experienced in brine curing.
The strength of the brine is the first thing to consider. The thickness of the flesh is another important consideration when estimating the brining time. Whether the fish is filleted or whether you are dealing with small fish in the round is another factor. Oily fish absorb salt more slowly than fish with little oil in the flesh. Finally, your personal taste is important; some people want more salt than others do.
Below is a basic brine formula together with a chart that will help to estimate the amount of time a fillet of a certain thickness should be left in the brine. Below that chart is another chart which suggests brining times for small, whole fish in the round (cleaned, but with the heads still attached). With these charts and a little luck, the product might come out exactly right the first time. It is more likely, however, that the product will be acceptable, but a little more or a little less salt flavor would be better. Make records of exactly what you did and the results. Record in detail all of the following: the strength of the brine, the species of fish, the thickness of the fillet or the size of the whole fish, the time left in the brine, and any other variable that could affect the absorption of salt.
4 quarts water + 1½ cups brown sugar + 3½ cups salt (35 oz.) or
4 liters water + 370 ml brown sugar + 930 ml salt (1,090 g)
1 Tbsp. (15 ml) onion powder
1 Tbsp. (15 ml) garlic powder
1 Tbsp. (15 ml) white pepper
Measure the three seasonings into a small saucepan, and add enough water to make a thin paste. Boil the mixture for a few seconds, and then chill it in the refrigerator. Add to the brine, and chill the brine.
SUGGESTED BRINE CURING TIMES FOR FISH FILLETS
Put all of the fish in at one time, then begin taking out the thinner ones when the appropriate time has elapsed.
Thickness Time ⅜ inch (10 mm) 7 minutes ½ inch (13 mm) 15 minutes ¾ inch (19 mm) 35 minutes 1 inch (25 mm) 45 minutes 1¼ inches (32 mm) 1 hour SUGGESTED BRINE CURING TIMES FOR SMALL, WHOLE FISH
With the skin not slit (heads attached) 45 minutes With the skin slit every ¾ inch (19 mm) (heads attached) 30 minutes
After the brining is finished, drain the fillets or the small whole fish. Do not rinse. Next, follow the smoking instructions beginning with Day 3 in the previous section. Those instructions are for fillets, but the smoking process is essentially the same for small fish in the round.
For many people in the Western world, the only true smoked salmon is the type most commonly known as Scotch smoked salmon (similar styles of smoked salmon are produced in Ireland and in the Scandinavian countries). Without a doubt, it is gourmet fare, and it is an acquired taste. People who like it will come back for more; those who are repelled by the thought of eating raw fish will not touch it.
Scotch smoked salmon is, indeed, an uncooked product—but it does not taste as raw as you might imagine. It almost melts in your mouth, and it does not have a rubbery texture that is associated with some kinds of raw fish. Nothing can be done about the fact that it is raw—Scotch smoked salmon is raw by definition. True Scotch smoked salmon is also a very salty product. However, if the basic process is used, but the salt content is reduced, I think it is fair to call it Scotch-style smoked salmon. Such a product is presented here: Scotch-style smoked salmon with reduced salt.
The process described below contains the basic steps used by many professionals to make rum-and-sugar-cured Scotch smoked salmon. The only significant difference is that the salt and sugar have been reduced to make a more palatable product.
Even if you do not want to eat this product, you should try to make it for someone who does like it. Making superb European-style smoked salmon is a milepost on the road to becoming an expert smoker. Be sure to make this product when the outside temperature is cold.
This is a cold smoked product, and the processing temperature is tightly controlled. A smoker capable of maintaining 85º F (30º C)—plus or minus 5º F (3º C)—is required. Normally, this means a homemade smoker with an external smoke generator. Depending on the ambient temperature and other factors, a supplementary heat source inside the smoke chamber may be required.
Oily salmon will produce the best-tasting product. The Atlantic salmon, chinook (king salmon), and sockeye are the best kinds to use, but the coho (silver salmon) will also work well. Personally, small sockeye salmon are my favorites for smoking; the sockeye has a high oil content, and I like the bright red color of the flesh. If the salmon are small, they are easy to smoke in one day.
Traditionally, only Atlantic salmon were used to make Scotch smoked salmon. However, before farmed Atlantic salmon became plentiful, other species were used as a substitute when the wild Atlantic salmon were in short supply.
This is a raw product, so commercially frozen fish are safer to use if you are concerned about parasites—salmon occasionally harbors parasites that are harmful to humans. Commercial freezing of fish is done at temperatures low enough to kill all parasites—if there are any present. (See chapter 6, page 106.)
By now, the salt will have penetrated the flesh. Rinse each piece very briefly to remove excess salt on the surface. Wrap again in paper towels and about three layers of newspaper. Return the fish to the refrigerator. (The process of salt equalization will begin.)
Remove the wrapping, and gently rub all surfaces of the fish with a liberal amount of cooking oil or salad oil. Olive oil or peanut oil is commonly used, but any cooking oil you have on hand will do very nicely. Again, refrigerate, but without covering or wrapping.
Wet a cloth with water, and gently wipe all surfaces of the salmon to remove excess sugar. Blot well with a paper towel or cloth. Again, rub cooking oil on the surfaces. Refrigerate with no cover.
Get up early so you can get full enjoyment from your day of smoking— and so you will have enough time to get the doggone fish finished!
Continue smoking until the fish takes on an attractive reddish brown hue and the flesh feels firm. This will require at least seven to ten hours for a fillet that was from ½ to ¾ inch (1.3 to 2 cm) thick in the beginning. Thicker fillets will require proportionately more time.
Another good indication of doneness is a weight loss of about 17 to 19 percent compared with the green weight (the original weight). If you intend to use this guide to determine doneness, you must record the green weight of a typical fillet just before the salting process is begun. This was suggested in the instructions for Day 1, so you may have already marked this fillet with a toothpick and recorded the weight. If this fillet is quite like all the other fillets, you may assume that the smoking is finished for all the fish when this typical piece has lost 17 to 19 percent of its weight. Pieces that vary significantly in thickness from the “typical” piece will have to be judged individually.
Sometimes, for an unforeseen reason, you might not be able to finish the smoking in one day. Maybe the fish is quite thick, or maybe you got up too late. Not to worry! Refrigerate the fish, and continue process ing it the next day, or at least the day after that. If you can’t smoke again until three or more days have passed, you had better freeze the fish right away. The quality may suffer slightly, but it will still be delicious.
When the smoking is finished, put the salmon in the refrigerator immediately, uncovered, overnight. The next morning, wrap it in plastic food wrap, or put it in plastic bags. Wrapping or bagging the fish when it is warm will cause moisture condensation on the inside of the packaging material, and this will, in turn, cause a faster rate of spoilage. Chilling the fish in the refrigerator for a day or so also helps to make the fish more firm and easier to slice.
Decide how much will be consumed in the next two or three days. Freeze the rest immediately. If you wait two days before you freeze it, the shelf life will be two days shorter when you thaw it.
Use a sharp knife to remove the skin from the portion of the fish you wish to slice. Then, starting at the front end of the fillet, turn the knife to about a 45º angle, and cut slices across the fish about ⅛ inch (3 mm) thick—or less. Arrange these slices attractively on small, individual serving plates. (White plates with a blue or green pattern make a very attractive color contrast.) Toppings that have been prepared in advance are sprinkled on the slices of salmon by each person according to his or her taste:
fresh lemon wedges (for lemon juice)
hard-boiled egg, grated
thin slices of a mild onion
minced green onion, or chives
freshly ground black pepper
capers
Bite-sized pieces of some variety of whole-grain bread are usually provided to clear the palate. Some epicures prefer to spread unsalted butter, or cream cheese, on whole wheat, rye, or pumpernickel bread, and top this with peppered salmon. This is similar to the Danish-style open-faced sandwich, and it is the traditional way to eat smoked salmon in Great Britain. My wife likes to eat it with just a few drops of lemon juice. I like to eat it with capers and a little freshly ground black pepper, preferably washed down with German white wine.
Smelt are native to both the northern Pacific and northern Atlantic oceans. There are several species, but rainbow smelt is the common variety in Atlantic waters. Atlantic rainbow smelt were transplanted to Lake Michigan in 1912, and they gradually spread to the other Great Lakes. The eulachon and whitebait are the common species in the Pacific waters. The eulachon is also called candlefish because Pacific Northwest Indians would dry these fish, stick a wick in the oily flesh, and use them as candles. If smelt are not available in your area, fresh sardines or any other species of small, oily fish may be substituted.
The word smelt is the usual name given to these fishes in both British and American English. However, both the Americans and the British sometimes call them sparling.
Smelt are widely used as a food fish in the Northern Hemisphere, and they are often smoked. The average length is 4 to 7 inches (10 to 17 cm). They normally have a dark, greenish back that gradually changes to mottled sides and then to a bright silver belly. The flesh is fine grain, oily, and mild flavored.
Smelt spawn like salmon. They leave the ocean or the Great Lakes, enter rivers, and search out suitable gravel beds on which to lay and fertilize their eggs. When they are making their run up the rivers to spawn, people will line the banks of the river with long-handled dip nets. This is exactly the way that I obtain my smelt every spring.
Smelt may be cleaned with a small knife, but small, pointed scissors are better.
Most people brine smelt before smoking them. However, the curing method described below will result in a more consistent flavoring from batch to batch, and the quantity of seasoning ingredients will be much less than is required for a brine cure. The only negative point is that more curing time is required than for a brine cure.
The technique described below is actually the same technique— modern dry cure—that was previously described for curing bacon, pastrami, and other products. However, because of the use of a liberal amount of wine as a seasoning ingredient, the appearance is that of a marinade rather than a dry cure.
Please keep in mind that this technique can be used for any kind of fish—just change the ingredients to suit your taste. If the species of fish you cure does not contain very much natural oil in the flesh, be sure to use about ½ cup of salad oil in the cure mixture.
2 tsp. (10 ml) salt
1 Tbsp. (15 ml) brown sugar—packed in the spoon
1 Tbsp. (15 ml) soy sauce
¼ cup (60 ml) white wine
2 tsp. (10 ml) chili powder
1 tsp. (5 ml) paprika
1 tsp. (5 ml) onion powder
1 tsp. (5 ml) finely ground black pepper
½ tsp. (2.5 ml) red pepper, or cayenne
If you are using a small, portable electric smoker, smoke the fish until they become golden brown, there is noticeable moisture loss, and the flesh flakes when it is teased with a fork. Smoking in a portable electric smoker will probably require five to seven hours.
If you are using a cold smoker with auxiliary heat available:
A few years ago, I was browsing through an Italian cookbook. I wanted to find an interesting marinade for meat or fish, and I found one. I tried it, modified it slightly, and the result became a favorite of my family and friends.
According to that cookbook, street vendors in Italian coastal towns use this marinade for shrimp. They cook the marinated shrimp before your eyes and serve them to you piping hot. Not only is the marinade excellent for shrimp, but it works very well on white-meat fish and scallops as well. You will note that the marinade contains olive oil, which complements seafood that is lacking in oil. The unforgettable feature of this product will be the superb aroma while it is being water smoked. You might find that the aroma is good enough not only to make you drool, but also good enough to make your eyes cross if you are anywhere near the smoker.
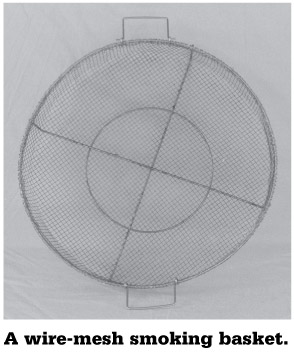
To smoke the shrimp, you will need a wire-mesh smoking rack or a flat-bottomed smoking basket. Of course, the mesh needs to be fine enough to prevent the shrimp from falling through the holes. The mesh should be made of stainless-steel wire, or steel wire plated with a suitable metal such as nickel.
Shrimp cook very fast, so the taste will not be very smoky. If you want to enhance the smoke flavor, you may add ½ to 1 teaspoon (2.5 to 5 ml) of liquid smoke to the marinade.
Raw shrimp must be used. Medium- to large-sized shrimp work best. The expensive colossal size will offer no advantage. Peel the shrimp, leaving the tail fins attached. Devein the shrimp if you wish—I don’t. Rinse with cold water and drain. Place the shrimp on a paper towel; blot them to remove excess water. Refrigerate while you prepare the marinade.
½ cup (120 ml) olive oil
¼ cup (60 ml) lemon juice
2 Tbsp. (30 ml) minced onion
2 Tbsp. (30 ml) tomato catsup
1 Tbsp. (15 ml) oregano powder
1½ tsp. (7.5 ml) salt
1 tsp. (5 ml) minced or grated garlic
½ tsp. (2.5 ml) finely ground white pepper
4 drops hot sauce
This marinade formula is excellent for any of the species of rockfish, or for any of the various species of fish commonly known as red snapper. The oil in the marinade combined with the humid water smoking will counteract the excessive dryness that would result if the white-meat fish were kippered like salmon.
If you desire a smokier flavor, dry the surface of the fish, and cold smoke it for about two hours before water smoking it.
Clean, scale, and fillet the fish—do not remove the skin. Rinse the fillets, and drain them in a colander. Wrap each fillet in a paper towel, and then in newspaper. Refrigerate the fish for an hour or so to allow the excess water to be absorbed.
½ cup (120 ml) olive oil, or salad oil
¼ cup (60 ml) orange juice
¼ cup (60 ml) minced onion
4 cloves garlic, minced
2 tsp. (10 ml) salt
1 tsp. (5 ml) paprika
1 tsp. (5 ml) rubbed dried basil
½ tsp. (2.5 ml) marjoram
½ tsp. (2.5 ml) thyme
½ tsp. (2.5 ml) cayenne
Catfish farming is one of the great success stories of aquaculture. Prior to the late 1960s, the only way to get catfish was to catch them in the wild. Farmed catfish were not seen in the grocery store. Now they are offered year-round in all the major supermarkets.
The species of catfish called channel catfish is farmed. The channel cat is generally considered the best tasting of all the species. Every year, tons of channel catfish are marketed in retail stores and served in restaurants, particularly in the South.
Excellent quality control is the main reason for the success of catfish farming. For example, catfish are bottom feeders by nature, but farmed catfish are fed exclusively on high-protein food that floats atop the water; the diet of the fish is thereby carefully controlled. These floating food pellets are made of a nutritious blend of soybeans, corn, rice, wheat, vitamins, and minerals. Fish from each pond are taste-tested before harvest. The packers process the fish in state-of-the-art plants, using the finest equipment and flash-freezers.
The oil content of catfish is about the same as that of coho (silver) salmon. This high oil content makes them ideal for kippering. Considering this, it is unbelievable that there is no well-established custom of smoking catfish. It is delicious.
Catfish can be cured in the same way as kippered salmon, but there is a special cure suggested below; this cure uses seasonings that go particularly well with catfish.
Catfish are always skinned before cooking or processing, and they will likely be skinned and filleted when you buy them at the supermarket. Because there is no skin to protect the flesh and hold it together, a special smoking technique is required.
Rinse and drain the skinned catfish fillets. Wrap each piece in a paper towel and newspaper. Refrigerate the fish while you prepare the curing mix.
2 tsp. (10 ml) salt
1 Tbsp. (15 ml) sugar
½ tsp. (2.5 ml) white pepper
½ tsp. (2.5 ml) onion powder
¼ tsp. (1.25 ml) garlic powder
¼ tsp. (1.25 ml) cayenne
¼ tsp. (1.25 ml) rosemary powder
¼ tsp. (1.25 ml) basil powderTotal: 7 tsp.
CURE MIX MEASURING CHART
7 tsp. (35 ml) per 2¼ lbs. (1 kg) of catfish
3½ tsp. (17.5 ml) per 1 lb. (500 g) of catfish
1¾ tsp. (8.75 ml) per ½ lb. (250 g) of catfish
1 tsp. (5 ml) per ¼ lb. (100 g) of catfish
½ cup (120 ml) salt
¾ cup (180 ml) sugar
2 Tbsp. (30 ml) white pepper
2 Tbsp. (30 ml) onion powder
1 Tbsp. (15 ml) garlic powder
1 Tbsp. (15 ml) cayenne
1 Tbsp. (15 ml) rosemary powder
1 Tbsp. (15 ml) basil powder
Sprinkle the cure on both sides of the fillets, and rub the flesh to distribute the cure evenly. Stack the fish in a curing container, and refrigerate it for 24 hours. Overhaul the fillets several times during this period.
Rinse the cure off each fillet quickly in cool water. Lay the fillets in a food container with paper towels and newspaper between each layer. Cover, and refrigerate overnight.
When Marco Polo was exploring China in 1280, he mentioned seeing scallops being sold in the marketplace in Hangchow, China. In the past century, equipment was developed to harvest deepwater scallops economically and in large quantities. This fact resulted in scallops reaching the popularity that they enjoy today.
The scallop, like the oyster, is a bivalve mollusk. However, unlike the oyster that attaches itself to a bed, the scallop moves about by “swimming.” The shells snapping together accomplish the swimming action; the water that is forced out of the shells propels the scallop. To accomplish this forceful shell closing, an oversized muscle called the “eye” has evolved. This sweet-flavored muscle is the only part of the scallop that is eaten by Americans, but Europeans and Asians eat the entire shucked scallop.

Many varieties of bivalve mollusks are commonly known as scallops. In the supermarkets, the most common are the very small and tender scallops that are called bay scallops, and the larger and less tender sea scallops or ocean scallops. Scallops cannot be sold live because they must be able to move around in an ocean environment to survive.
The color of fresh scallops may range from a pink hue to light beige. Scallops should not be stored in water; if the scallops are pure white, it may be due to that fact that they were plumped in water. They should smell clean and fresh and have a gloss. Refrigerate immediately, and use within one day, if possible. Flash-frozen scallops are a good alternative to fresh scallops.
Because of their low oil content, scallops are best processed by using a marinade containing oil and by smoking in a water smoker.
Either bay scallops or sea scallops may be used for the following product. However, if sea scallops are used, they will be more tasty and easier to cook if they are cut into quarters before marinating.
Rinse, drain, and blot the scallops. Refrigerate while preparing the marinade.
⅓ cup (80 ml) peanut oil, olive oil, or salad oil
2 Tbsp. (30 ml) soy sauce
1 Tbsp. (15 ml) sesame oil
2 tsp. (10 ml) hoisin sauce (see appendix 1)
1½ tsp. (7.5 ml) salt
½ tsp. (2.5 ml) onion powder
¼ tsp. (1.25 ml) ginger powder
⅛ tsp. (0.625 ml) garlic powder
Combine all of the marinade ingredients in a plastic or glass container. Mix well, add the scallops, and marinate. Stir them from time to time. Store the scallops in the refrigerator overnight.
Drain the scallops, but do not rinse. Discard the marinade. Smoke in a water smoker at 200º F (93º C). Because the scallops are small, they must be smoked in a wire-mesh smoking basket or on a wire-mesh screen that has been plated with a nontoxic and acid-resistant metal. Test for doneness after about 45 minutes. They are done when the raw, translucent appearance turns opaque. If the scallops are overcooked, they will become tough and rubbery. Of course, the bay scallops will cook faster than the large, whole sea scallops.
Connoisseurs of caviar are essentially unanimous in saying that sturgeon caviar, especially beluga sturgeon caviar, is the finest. Many of the same connoisseurs say that salmon caviar is the best substitute for sturgeon caviar.
Americans are usually not excited by the thought of eating raw salmon eggs. They may know that salmon eggs are used as bait to catch trout and steelhead, but they may not be aware that salmon eggs are eminently edible, and are considered a delicacy in countries such as Japan and Russia. For these reasons, most salmon roe obtained by sportfishing in North America is thrown in the garbage, fed to seagulls or cats, or used as fish bait. What a shame! Most people who muster the courage to try red caviar find that they like it. When you eat the eggs, they burst open in your mouth and shower your taste buds with the delicious flavor. They are superb on crackers. Try mixing them with scrambled eggs, or try them as a garnish for deviled eggs.
Salmon caviar is not a smoked product, but I believe that many readers of this book would like to know how to prepare it.
Red caviar is very easy to make if the instructions given below are followed. The technique of using warm water to remove the eggs from the sac works like magic! My wife discovered this technique in a fish cookery book written in Japanese. All the instructions written in English that I have seen have said that the best way to remove the eggs is to rub the slit sac on a wire-mesh screen having about 3/8-inch (10 mm) holes. The wire-screen technique is very laborious, is inefficient, and results in damage to many eggs. I do not recommend it. The Japanese warm water technique explained below is much faster and easier.
Note: Salmon eggs used to prepare caviar must be fresh.
The caviar will keep for months at normal refrigerator temperature if it is processed with this Japanese cure.
½ cup (120 ml) saké (Japanese rice wine)
½ cup (120 ml) soy sauce
ice water to cover
Mix the saké and soy sauce in a deep plastic or glass container that is large enough to hold the eggs. Put the eggs in the cure and stir well. If necessary, add enough ice water to barely cover the roe. Stir again. Refrigerate.
Whenever you wish to serve the caviar, place the desired amount in a wire strainer and rinse thoroughly in cold water. Drain the eggs for about one minute, and then put them on a paper towel with newspaper underneath for a few more minutes. Place the eggs in a dish and serve.
Eggs processed with this brine cure will keep for several months in a refrigerator kept between 34º and 36º F (2º and 3º C).
2 quarts of chilled water + 2 cups of noniodized salt or
2 liters of chilled water + 500 ml of noniodized salt
Place the eggs in the brine, and stir them occasionally for 15 to 20 minutes. When the eggs begin to look cloudy, remove them from the brine. Drain them in the refrigerator for several hours, and then place them in a container with a tight-fitting lid. If oil from broken eggs collects at the bottom of the container, turn the container upside down once a week; this will cause the eggs to be bathed in that oil.
Fish jerky may be made from almost any kind of fish, but the Indians of Canada, Alaska, and the Pacific Northwest made salmon jerky famous, so it is the most common fish jerky. The white settlers of these regions often called this Indian-made salmon jerky squaw candy.
The Native Americans prefer to use chum salmon (keta salmon) as the raw material because it has the lowest oil content. When the oil content is low, jerky will keep longer before becoming rancid. However, this factor is not critical if the jerky is kept tightly wrapped and refrigerated. In fact, if good taste rather than long shelf life is the goal, use salmon with high oil content as the raw material.
Salmon has higher water content than beef, so salmon jerky will shrink more than beef jerky. Another consideration is that salmon jerky is more fragile than beef jerky, so it has to be handled more carefully when it is being dried.
Salmon jerky is usually processed by making numerous deep cuts across the fillet; these cuts are made through the flesh and all the way to the skin. When the fillet begins to dry, a gap will open where the cut was made. The opening of numerous gaps will increase the drying area and allow the flesh to dry faster. Nevertheless, if this method is used, over 24 hours of drying time is required to make salmon jerky.
However, if the skin is removed from the fillet and the salmon flesh is sliced thinly, salmon jerky can be made in one day. The use of parchment paper and oil prevents the skinned salmon from sticking to the wire mesh, and this helps to overcome the fragility problem encountered when jerky is made from skinned salmon.
To prepare the raw material, remove the skin from the fillet, and slice the flesh. It may be sliced across the fillet or cut into hunks and then sliced from head to tail—the direction of the cuts is not critical. But no matter how it is sliced, the slices should be about ¼ inch (7 mm) thick. The fillet is easier to slice if it is partially frozen.
2½ tsp. (12.5 ml) salt
1 Tbsp. (15 ml) brown sugar—packed in the spoon
1 tsp. (5 ml) white pepper
½ tsp. (2.5 ml) garlic powder
½ tsp. (2.5 ml) onion powder
1 cup (240 ml) water
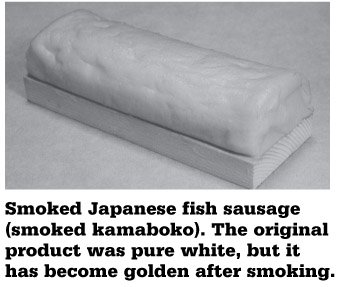
Nowadays, it is easy to buy the Japanese-style fish sausage known as kamaboko if you look for it in a large Asian food store. Smoking kamaboko is very easy, and people who like fish usually enjoy this product. However, most of the people who will read this book will have never heard of kamaboko, so an introduction to the product is in order.
First, I must explain that kamaboko is not put into casings, as is most American and European sausage. It is mounded on a little wooden board that is about 2 inches wide and 6 inches long (5 x 15 cm). The purchased product has a texture resembling firm bologna, and the little board underneath serves as a disposable cutting board. It is fully cooked and ready to eat when purchased. The most common color is white inside with pink food color on the outside surface. However, the solid white type is best for smoking because it takes on a beautiful golden hue when it is smoked.
Imitation crabmeat, like kamaboko in the previous section, is a kind of fish sausage. It, too, is fully cooked and ready to eat when purchased. Imitation crabmeat is made of ground fish having white flesh that is seasoned with juice extracted from crabs. It is then processed to resemble crabmeat. It may be smoked in the same way as kamaboko.
The variety of clams available depends, to some extent, on where you live. Small Manila clams and steamer clams are widely available in supermarkets in this part of the United States, so I usually use these clams. Steamer clams are also known as soft-shell clams, and there are several species. In the procedure below, please understand clams to mean these Manila or soft-shell clams. Nevertheless, the procedure may be adapted to any species of clam, or any species of frozen clam meats.
1 Tbsp. (15 ml) salt
1 Tbsp. (15 ml) brown sugar—packed in the spoon
1 tsp. (5 ml) white pepper
1 cup (240 ml) water
At this point, the clam meats are ready to eat, but they will taste better if they are refrigerated overnight to allow the flavor to mellow. Many people like to apply olive oil while the meats are still warm. The following paragraph describes this oiling technique. If the meats are to be oiled, they should be oiled at room temperature immediately after smoking.
To oil the clam meats, place them in a glass or plastic container with a tight-fitting lid. Add enough olive oil to coat the clams when the container is shaken, rolled, or turned upside down. About ¼ cup of olive oil is usually adequate. Continue to agitate the container every few minutes for about one hour, until the meats have absorbed most of the oil. Refrigerate.
Fresh oysters in the shell, or shucked oysters in a jar, may be used for this product. However, in either case, small oysters produce a better result than medium or large.
If you are starting with fresh oysters in the shell, the best way to proceed is to place them in a steamer and steam until the shells open. Discard any whose shells do not open. The oyster meats will now be firm, and they can be plucked from the shell easily.
If you have purchased oysters that have been shucked, they should be simmered in slowly boiling water. First, drain the oysters, place them in a wire-mesh strainer, and put them in boiling water until the gills curl. This will require four or five minutes for small oysters—more time for larger ones. The oysters will now be firm and plump.
After applying one of the heat treatments described above, remove excess water by placing the oysters on a paper towel with newspaper underneath. Refrigerate them while you prepare the seasoning. The seasoning below is adequate for one 10-ounce (280 g) jar of shucked oysters; increase the volume of the seasoning to match the weight of oyster meats you will process.
2 Tbsp. (30 ml) hot water
2 tsp. (10 ml) brown sugar—packed in the spoon
¾ tsp. (3.75 ml) salt
¼ tsp. (1.25 ml) finely ground pepper
⅛ tsp. (0.625 ml) thyme
⅛ tsp. (0.625 ml) marjoram
Octopus is commonly eaten in many countries of the world, but the United States is not one of them. However, because of the recent increase in Asian restaurants here, more Americans have had the opportunity to eat octopus—and many of them have discovered that they like it. Nevertheless, few Americans would entertain the idea of preparing octopus in their home. For the adventuresome souls among us, a tasty and unusual way to prepare octopus is presented below. In my opinion, if this product is made using the recommended baby octopus, it makes a very tasty, attractive, and unusual gift.
There are many species of octopuses (or octopi, if you prefer the Latin-based plural), and there are many different sizes. I prefer dwarf octopuses; when they are raw and stretched to full length, they measure about 6 or 7 inches. However, even at this small size, they are adults. Nevertheless, they are more often called baby octopuses. Well-stocked fish markets and large supermarkets often offer fresh baby octopuses. If you go to an Asian grocery store, you will likely find frozen baby octopuses that have been eviscerated, washed, and flash-frozen.
Larger octopuses may be used, but the larger the octopus, the tougher the skin. The skin will be tender on an octopus weighing less than about 4 pounds (1.8 kg). However, if the octopus is considerably larger than that—25 pounds (11 kg), for example—it would be best to remove the tough skin after the meat is steamed. Steaming will tenderize the flesh of any size of octopus, so size is of little concern when tenderness is being considered.
If the creatures have not been eviscerated, you will need to cut out the beak, the anus, the yellowish pouch and attached membranes, and the ink sac. If it is a large octopus, the eyes should be removed. Scissors usually work well for these operations. Take care that the ink sac is not punctured. Rinse thoroughly.
1 Tbsp. (15 ml) salt
1 Tbsp. (15 ml) brown sugar—packed in the spoon
1 tsp. (5 ml) white pepper
½ tsp. (2.5 ml) garlic powder
½ tsp. (2.5 ml) onion powder
1 cup (240 ml) water
The octopuses are now ready to eat, but it would be better to refrigerate them overnight to allow the flavor to mellow. Many people, including myself, like to apply olive oil while they are still warm. If you wish to oil the smoked octopuses, see the oiling instructions previously given for smoked clams.