No matter how advanced and well-scaled your Splunk infrastructure is, if all scheduled reports and alerts are running at the same time, the system will start experiencing performance issues. Typically, you will receive a Splunk message saying that you have reached the limit of concurrent or historical searches. There are only a certain number of searches that can be run on fixed CPU capacity for each Splunk server or collection of servers. A common problem a Splunk administrator will inevitably face is how to limit the number of searches running at the same time. One way to fix this is to throw more servers into you Splunk environment, but that is not a cost-efficient way.
It is important to properly stagger and plan scheduled searches, reports, alerts, dashboards, and so on, ensuring they are not all running at the same time. In addition to the schedule time, there are two ways to help achieve staggering in scheduled search runs:
- Time windows: The first way to ensure that searches are not running concurrently is to set a time window. You have done this in the exercises in this chapter. This is not ideal if you need to schedule searches for an exact time.
- Custom Cron schedule: This is what most advanced users use to create their schedules. Cron is a system daemon, or a computer program that runs as a background process, derived from traditional UNIX systems, and is used to execute tasks at specified times.
Let's go through an example of how to use a Custom Cron schedule. Begin with this search in the Destinations app search bar, which finds all errors in a payment:
- Enter and run the following search:
SPL> eventtype=bad_payment
- Save it as an alert by clicking on Save As | Alert.
- Name it Payment Errors.
- Change the permissions to Shared in App.
- In the Alert type, change the schedule to Run on Cron Schedule.
- Click on the Time Range button to access a slimmed-down version of the time-range picker.
- On the Relative tab, in the Earliest field, enter 15 and change the drop-down selection to Minutes Ago. Also select Beginning of minute to ensure it starts at the beginning of the 15th minute.
- For Latest, leave the default selection of Now.
- Click on Apply to return to the Save As Alert window. Not clicking on the Apply button will mean your recent entries will not be saved for use.
- In the Cron Expression field, leave the default entry, but be sure to see the next table for a clear explanation of what the Cron expression options are.
- Finally, change the Trigger Actions to Add to Triggered Alerts. Use the following screenshot as a guide:
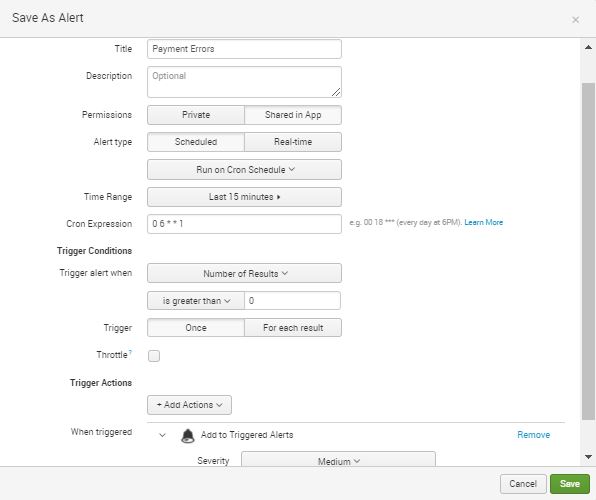
- Click on Save when done.
The Cron expression * * * * * corresponds to minute, hour, day, month, day-of-week.
Learning Cron expressions is easiest when you look at examples. The more examples, the simpler it is to understand this method of scheduling. Here are some typical examples:
| Cron expression | Schedule |
| */5 * * * * | Every 5 minutes |
| */15 * * * * | Every 15 minutes |
| 0 */6 * * * | Every 6 hours, on the hour |
| 30 */2 * * * | Every 2 hours at the 30th minute (for instance, 3:30) |
| 45 14 1,10 * * | Every 1st and 10th of the month, at 2:45 pm. |
| 0 */1 * 1-5 | Every hour, Monday to Friday |
| 2,17,32,47 * * * * | Every 2nd minute, 17th minute, 32nd minute, and 47th minute of every hour. |
Now that you know something about Cron expressions, you can fine-tune all your searches to run in precise and different schedules.