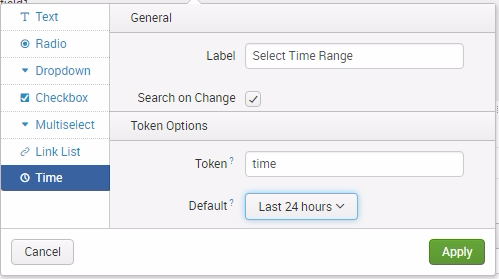
Let's change our input field into a time range field:
- On the list to the left for the first input, select Time.
- In the General section, type Select Time Range in the Label space.
- Click on the Search on Change checkbox.
- Enter time for the Token value.
- Set the Default time range to Last 24 hours.
- Click Apply when done.
- Use the following screenshot as a guide:

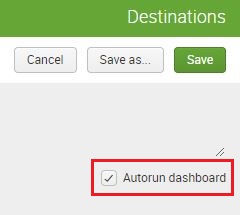
- Before you save the dashboard changes, click the Autorun dashboard checkbox, as seen in the following screenshot. Then click on Save:

You can now try to change the time range using the time input, but nothing will happen. This is because we have not yet configured the panels to react when the time input has been changed. In these next steps, we are adjusting the searches to consider the token filled by the input selection. Let us do that now:
- Go back to Edit to allow for dashboard changes
- Select the Edit Search (magnifying glass) icon
- Change Time Range to Shared Time Picker (time)
- Click on Apply:

- Click on Save to exit Dashboard Edit mode
At this point, the first dashboard panel should react to the changes made to the time range input. If the changes to the input aren't being recognized by search, refresh the browser to make sure you are using the freshest dashboard code. During testing for this book, we stumbled across this challenge.
Update the remaining three panels by performing the same steps. Ensure each panel changes based on your selected time range before moving on to the next section.