When you enable acceleration for a data model, Splunk internally pre-summarizes the data defined by the data model for a given time range. This gives a tremendous boost to the search speed for your data model when searches are executed within the given time range. There are a couple of things to remember when you enable data model acceleration:
- Once you enable acceleration for a data model, you will no longer be able to edit the data model objects. Ensure that your model and related child objects and attributes are accurate before implementing acceleration. A huge data model may take some time to complete the acceleration process, so plan accordingly. You will only be able to edit the data model again if you disable the acceleration.
- Select your summary range wisely. The summary range is the calculation time span that the acceleration will use against your data. The summary range can span 1 day, 7 days, 1 month, 3 months, 1 year, and so on. Search acceleration is based on time ranges. Only those that fall within the selected time range will be accelerated. If you need to accelerate for 5 days, then it is safe to select 7 days. However, if you run the report for 10 days, the searches beyond the selected acceleration range will execute at a normal speed, which isn't always a bad thing.
- Acceleration will take up disk space. Test sizing prior to setting the acceleration for good.
In this exercise, you will enable data model acceleration with a summary range of 7 days:
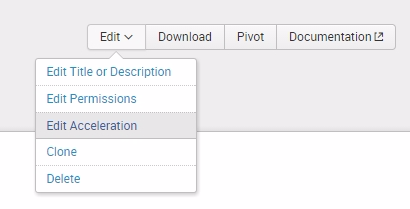
- Once again in the Edit dropdown, select Edit Acceleration:

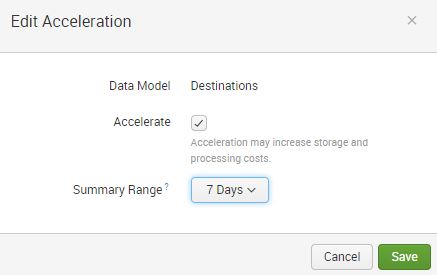
- In the Edit Acceleration prompt, check the Accelerate box and select 7 Days as your Summary Range. These options are seen in the following screenshot:

- Click on Save to kick off the acceleration process. Notice that Splunk will issue a warning that the data model is locked and can no longer be edited unless you disable acceleration:

- Let's check the status of the acceleration process. Go back to the Data Models main page by clicking on All Data Models in the upper left.
- Expand the Destinations data model by clicking on the side > next to Destinations. You should see information that is similar to the following screenshot:

- Under the Acceleration section, you will see a sizable amount of information about the state of your data model acceleration, such as the status, access count, size on disk, summary range, buckets, and the last time it got updated. It will probably take some minutes until the acceleration is complete. Keep refreshing the page until the Status says 100.00% Completed, as shown in this screenshot:

Now that the data model has been fully constructed and accelerated, it is time to use it with Pivot.