Chapter Nineteen (3)
Header Component
I
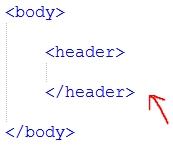
n this chapter, we are going to be working on the header component for the home page of our website. The header component contains a logo and a search box positioned at both the left and right side of our web page. Figure 19.3.1 highlights the header component.
Figure 19.3.1: The header component of our web page highlighted in red color.
The steps below will guide you on how to create the header component of our web page.
Step 1:
Add a new opening and closing <header> tags within the <body> tags of your index.html file. Figure 19.3.2 highlights the new <header> tag.
Figure 19.3.2: A <header> tag added to our index.html file.
Step 2:
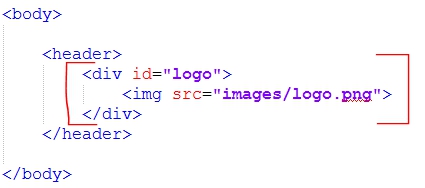
Because we have two objects (logo and search box) on the “Header” section of our web page, we are going to start by adding a logo which is already available in the “images” folder. Figure 19.3.3 highlights a new <div> tag added to contain the logo.
Figure 19.3.3: A <div> tag containing our logo is nested within the <header> tag.
From Figure 19.3.3 you will observe that we are using an <img> tag to display a logo on our web page. We are also containing the <img> tag within a <div> tag that has an “ID” attribute with the value of “logo”. We are going to use this as a selector to apply some CSS rules to the logo.
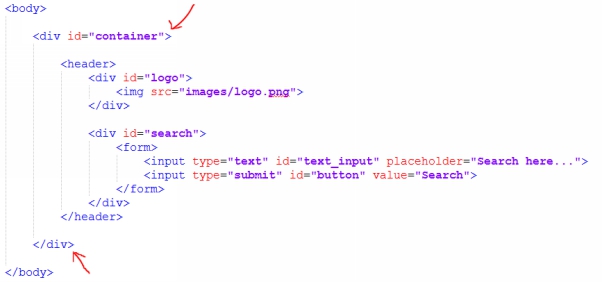
Within the “Header” component, we are also going to add a search box using some “form” elements.
Figure 19.3.4 highlights some new “form” elements added within our <header> tags.
Figure 19.3.4: A <div> tag containing our search box is nested within the <header> tag.
On Figure 19.3.4, observe that we added quite a lot of elements within the <header> tag. Let's briefly review what we have done.
What we want to achieve here is to have a logo and a search box appear at the top (header component) of our web page. We had already added both of these elements within the <header> tag. To achieve this goal, we have to contain both objects (image and search box) within their distinct containers and add an ID to each of the containers which we are going to be using to apply some CSS rules.
For our search box, we added two <input> tags, one for accepting text input, while the other is a submit button. Both <input> tags have an “ID” attribute applied to them, highlighted on Figure 19.3.4.
A new attribute was also added to the text input field called “placeholder”. Whatever you type within this placeholder is what would appear within a text input field before any text is typed within it. Figure 19.3.5 shows what our index.html currently looks like on a web browser, and it also highlights how the text written within the “placeholder” attribute of our search box appears on a web browser.
NOTE:
You will mostly use the “placeholder” attribute in cases where you are not adding a <label> tag to your input fields, just as we did with our search box.
Figure 19.3.5: index.html file opened in a web browser.
Before we complete the steps for setting up the top header component of our web page, I will like to draw your attention towards the type of layout that we are trying to design.
Boxed Layout
The project that we are working on is going to have a boxed layout. You might have observed that all the contents on our sample website on Figure 19.1 in the introductory chapter for this project are all centered in the middle of the web page. That is an example of a boxed layout.
In a nutshell, boxed layouts are layouts that do not occupy the full width of a web browser. This implies that, an alternative to boxed layout is “Full Width” layout. Full width layouts occupy a whole web browser.
To achieve a boxed layout design, we have to first center the contents of our web page. The steps below will guide you on how to center the contents of our web page.
Step 1:
Wrap all the elements within the <body> tag in a <div> tag and add an “ID” attribute with a value of “container” to the <div> tag. We are going to use this attribute value “container” to apply some CSS rules that will center the contents of our web page. This is similar to what we did in a previous chapter.
Figure 19.3.6 highlights the new changes on our index.html file. Also observe that the more tags I nest in my index.html file, the more I indent. This will help you maintain a clean and readable code.
Figure 19.3.6: All elements within the <body> tag are wrapped in a <div> tag with a class attribute that has the value of “container”.
Step 2:
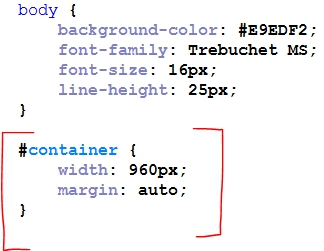
Add the new CSS rules highlighted on Figure 19.3.7 in your style.css file.
Figure 19.3.7: Some CSS rules applied to the “container” ID selector.
From Figure 19.3.7, we applied two CSS properties to the “#container” selector. One for reducing its width, and the other for centering any element that is nested within it. Figure 19.3.8 shows how our centered contents would look like on a web browser.
Figure 19.3.8: index.html file opened in a web browser.
In Figure 19.3.1, you will observe that the logo is positioned to the left, while the search bar is positioned to the right side within the header component. To achieve this layout, follow the steps below.
NOTE:
Both the logo and the search bar are not currently positioned on the same line (left and right) because they are both in a <div> tag. As noted in a previous chapter, <div> tags are block elements, which implies that, they occupy the whole horizontal width of a web browser.
Step 1:
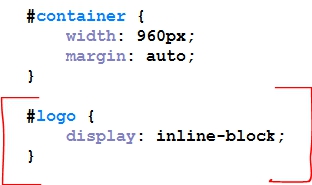
Use the “logo” selector in the <div> tag containing our logo to change its display from “block” to “inline-block” as highlighted on Figure 19.3.9.
Figure 19.3.9: CSS rule applied to the “logo” ID selector.
Looking at Figure 19.3.9, the first thing we did was to change the way the <div> tag containing our logo displays, using a CSS “display” property. The value “inline-block” causes the <div> tag to display as an “inline” element but at the same time allowing us to apply a width, height, and margin properties to it as though it were a block element. Hence, the name “inline-block”.
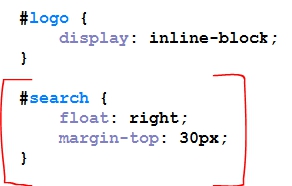
Step 2:
Float the search box to the right side of the header component. This will cause it to display on the same line “horizontally” with our logo. To properly position the search box, we will also apply a top margin property with a value of “30px” to push it towards the middle of the header component. Figure 19.3.10 highlights the CSS rules applied to our search box.
Figure 19.3.10: CSS rules applied to the “search” ID selector.
Figure 19.3.11 shows how our index.html file looks like on a web browser.
Figure 19.3.11: index.html file opened in a web browser.
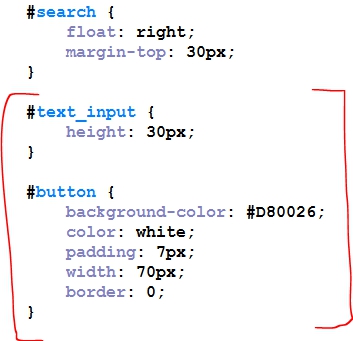
In Figure 19.3.4, two “ID” attributes with the value of “button” and “text input” were highlighted in our <input> tags. We are going to use these selectors to apply some CSS rules that will improve the way our search box displays. Figure 19.3.12 highlights some new CSS rules for the two elements within our <form> tags.
Figure 19.3.12
Figure 19.3.13 shows how our search box looks like after applying the new CSS rules.
Figure 19.3.13: index.html file opened in a web browser after applying some new CSS rules to the “text_input” and “button” ID selectors.