Chapter Nineteen (4)
Navigation Component
In this chapter, we are going to work on the navigation component of our web page. The navigation component contains the primary links (Home, About, Portfolio, Services, Contact Us) of our web page. Figure 19.4.1 highlights the navigation component.
Figure 19.4.1: The navigation component of our web page highlighted in red color.
The steps below will guide you on how to create the navigation component of our web page.
Step 1:
Add a <nav> tag immediately after the closing </header> tag we initially added.
NOTE:
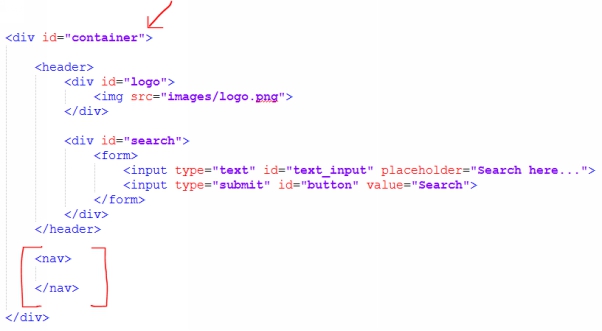
Because we are working on a boxed layout, all the new elements for our website content are going to be added within the <div> tag with an “ID” attribute that has the value of “container”. Figure 19.4.2 highlights the new <nav> tag added to our index.html file.
Figure 19.4.2: A new <nav> tag is highlighted in our index.html file.
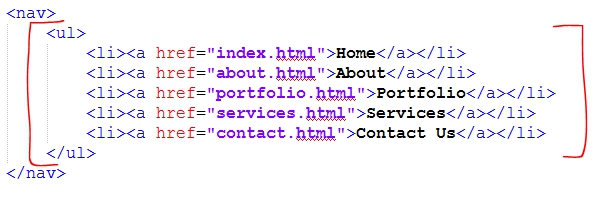
When creating links we usually make use of the <a> tag. This time however, since we have a collection of links to display on our main menu, we are going to nest our links inside a <ul> tag. We are doing this because (1) It is a widely known technique which developers know and expect. (2) Lists provide additional elements for selecting and styling our links. Figure 19.4.3 highlights some new links added within a <ul> element.
Figure 19.4.3: <li> and <a> tags are added to our index.html to contain our primary links.
NOTE:
Each <a> element is wrapped within an <li> element, just as we usually add items to a <ul> element.
Figure 19.4.4 shows how the new links we added appear in a web browser.
Figure 19.4.4: index.html file opened on a web browser after adding our primary links.
We currently have a list of links that haven't been styled yet. We want our navigation component to look like the highlighted component in Figure 19.4.1. The steps ahead will guide you through the CSS rules that we require to achieve our desired result.
Step 2:
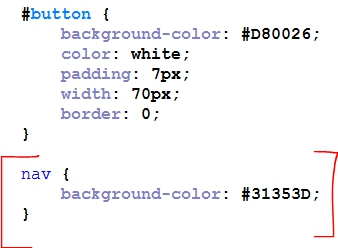
Apply a background color to the whole navigation component using the “nav” selector. Figure 19.4.5 highlights the CSS rule for changing the background color of our navigation component.
Figure 19.4.5: A background property is applied to our primary navigation.
Figure 19.4.6 shows how our navigation component currently looks like.
Figure 19.4.6: index.html file opened on a web browser after applying a background color to the primary navigation.
Step 3:
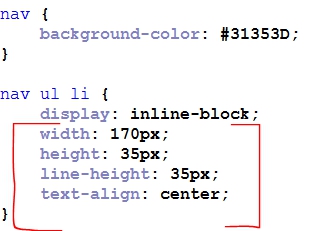
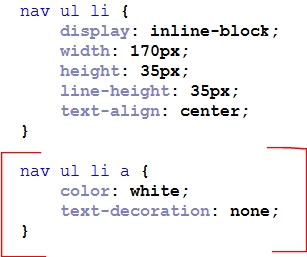
Change the display of the list items within the <nav> tag from “block” to “inline-block” as highlighted in Figure 19.4.7.
Figure 19.4.7
Figure 19.4.8 highlights the new changes in our web browser.
Figure 19.4.8: index.html file opened on a web browser after changing the display property of our <li> tags to “inline-block”.
Step 4:
To improve the presentation of our navigation component, add The highlighted CSS properties on Figure 19.4.9.
NOTE:
The new CSS properties added in Figure 19.4.9 are properties that we had used before. I will recommend that you add each property one at a time, save and refresh your browser to observe the changes each property is making to on navigation.
Figure 19.4.9: New CSS rules applied to the <li> tags within our primary navigation.
Figure 19.4.10 shows how our navigation looks like.
Figure 19.4.10: index.html file opened on a web browser after applying some new CSS rules to the <li> tags in our primary navigation.
Step 5:
Change the link colors to “white” and remove the underlines on all the links.
Figure 19.4.11 highlights the CSS rules for these new changes.
Figure 19.4.11: New CSS rules applied to the <a> tags within our primary navigation.
Figure 19.4.12 highlights the new changes in our web browser.
Figure 19.4.12: index.html file opened in a web browser after applying some new CSS rules to the <a> tag in the primary navigation.
In CSS, the “text-decoration” property accepts values such as “overline, line-through, underline, and none”. By default, <a> tags are underlined. By applying the value of “none” to a “text-decoration” property just as you saw in Figure 19.4.11, we are removing the default “underline” on our links.
Before we move on to the final step, you may have observed that it is only when we place our mouse on a link title that the cursor changes to a hand tool, even though we had already applied a width of 170px to the list items containing our links.
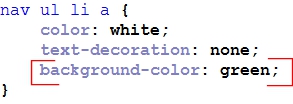
To really understand this, try adding a green background color to the anchor selector within the <nav> tag. Figure 19.4.13 highlights a background color property added to our anchor tags which we are going to remove shortly.
Figure 19.4.13: A green background color is applied to the <a> tags within our primary navigation.
Figure 19.4.14 highlights our anchor tags with a green background color.
Figure 19.4.14: index.html file opened on a web browser after applying a green background color to the <a> tags within our primary navigation.
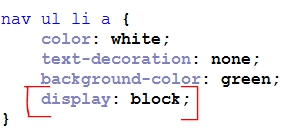
As we saw in a previous chapter, inline elements only occupy the width of their contents. What we are trying to achieve here is to get our anchor tags to occupy the entire width 170px that we applied to the list items containing them. Figure 19.4.15 highlights the CSS property that we can use to achieve this.
Figure 19.4.15: A “display” property with the value of “block” is applied to the <a> tag within our primary navigation.
Figure 19.4.16 shows our anchor tags displayed as block elements.
Figure 19.4.16: index.html file opened on a web browser after applying a new CSS rule to the <a> tags within our primary navigation.
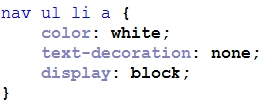
We added a green background color on our anchor tags to clarify a point. We are going to remove the “background-color” property and leave the “display” property. When you move your mouse around a link you will observe that the mouse cursor shows a hand tool, even when the cursor is not on the actual link title. I hope that this example will clarify the point I am making.
Figure 19.4.17 shows how your anchor selector should look like after removing the “background-color” property.
Figure 19.4.17: CSS rules for the <a> tags in our primary navigation after removing the green background color applied to it.
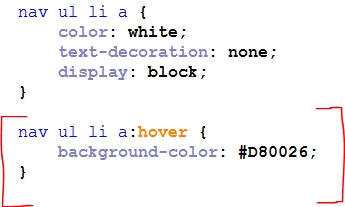
Step 6:
Add a hover effect on the anchor tags to highlight the current link a mouse is hovering over. Figure 19.4.18 highlights the new CSS rule added to our style.css file.
Figure 19.4.18: A hover effect is applied to the <a> tags in our primary navigation using the “:hover” pseudo selector.
NOTE:
We are using almost the same CSS selector on Figure 19.4.17. The only difference is that we are using a pseudo selector “:hover” to apply a background color to our anchor tags whenever users move their mouse cursor around a link. After applying the CSS rule highlighted in Figure 19.4.18, try moving your mouse around the links on your web page, and you should observe a background color appear on the highlighted link.
Summary
We have successfully completed the navigation component of our web page. In the next section, we are going to be working on the banner component.